How to Use Electra One with iConnectivity routers
Introduction
Pairing the Electra One controller with iConnectivity's MIDI routers, such as the mioXL and mioXM, greatly simplifies and enhances the flexibility of MIDI message routing in your setup.
This tutorial will guide you through the process of connecting the Electra One to the mioXL, with a particular focus on establishing a USB connection between the Electra One and the mioXL.
The information provided here also applies to the mioXM.
Benefits of using a router
While the Electra One can directly connect to two USB MIDI devices and support up to 32 MIDI devices via its MIDI DIN ports, integrating it with iConnectivity's MIDI routers offers several significant advantages:
- Flexible MIDI Routing: Easily route Electra One's MIDI messages to multiple destinations, including DAWs and hardware synthesizers.
- Custom Port Naming: Simplify complex setups by customizing port names for clarity and easy identification.
- Easy Ad Hoc Routing: Make quick and easy changes to MIDI routing a needed.
- Multiple Controllers: Seamlessly integrate multiple Electra One controllers within the MIDI network.
- Single-Cable Connection: a single USB cable for the connection between the Electra One and the router, streamlining your setup.
Gear required
- An Electra One controller
- An iConnectivity mioXL/mioXM router
- Auracle for X-Series software installed (for configuring the MIDI router)
- A computer with a DAW (e.g., Ableton Live)
- Optionally, a powered USB hub if your mioXL port does not provide enough power
Essential routes
In this tutorial, we will demonstrate how to connect Electra One to mioXL using the mio's USB host port. The MIDI routings will be established in two stages:
- Establishing the essential connection between Electra One and the computer.
- Extending the routing to include the ability to record and replay parameter automation on synthesizers connected to the mio's MIDI DIN ports.
A diagram of connections: 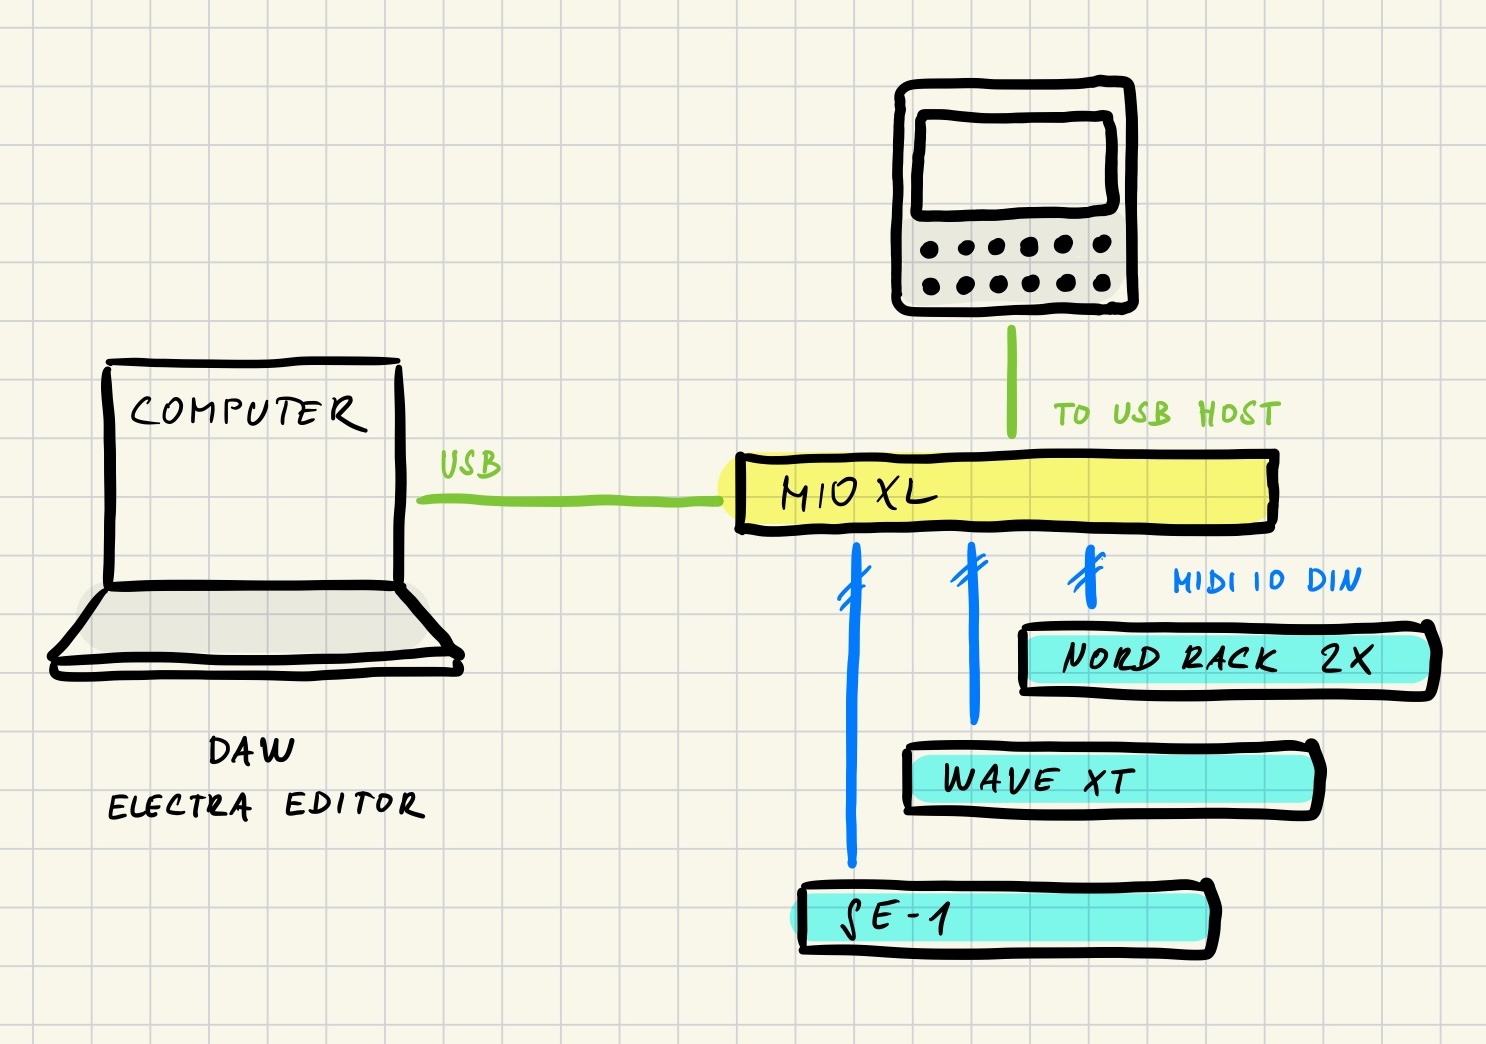
Auracle configuration screens
The configuration screens below consist of multiple MIDI devices. For the purposes of this tutorial, focus only on the MIDI devices shown in the diagram.
Connect Electra One to mioXL
Make sure your Electra One is connected to mioXL via one of the mioXLss USB host ports. Note: Not all mioXL ports provide enough current to power the Electra One controller.
If your controller keeps rebooting or seems unstable, try one of the following:
- Try a different physical port on the mioXL.
- Reduce the screen brightness on the controller.
- Connect the Electra One using a powered USB hub.
Configure USB Host ports in Auracle
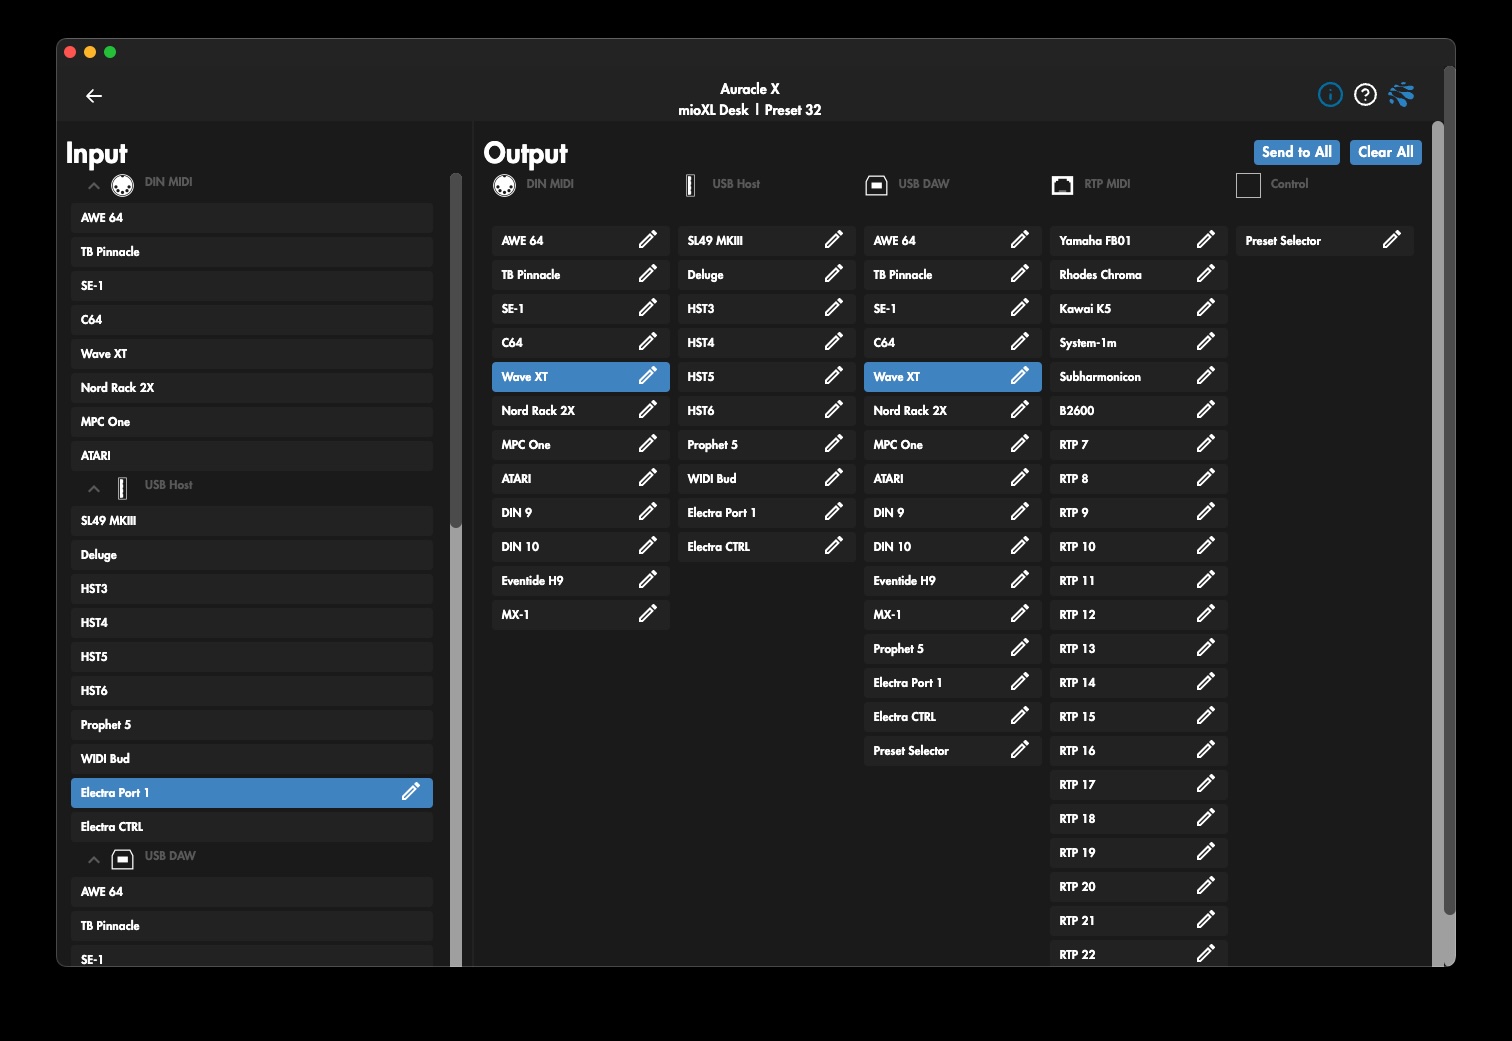
Once the controller is connected to the mioXL, open the Auracle software and navigate to the USB Host Reservation screen. There, select the HST ports you want to use, rename them as desired using the pencil icon, and use the dropdown lists to assign Electra One’s ports from the list of all available USB devices connected to the mioXL:
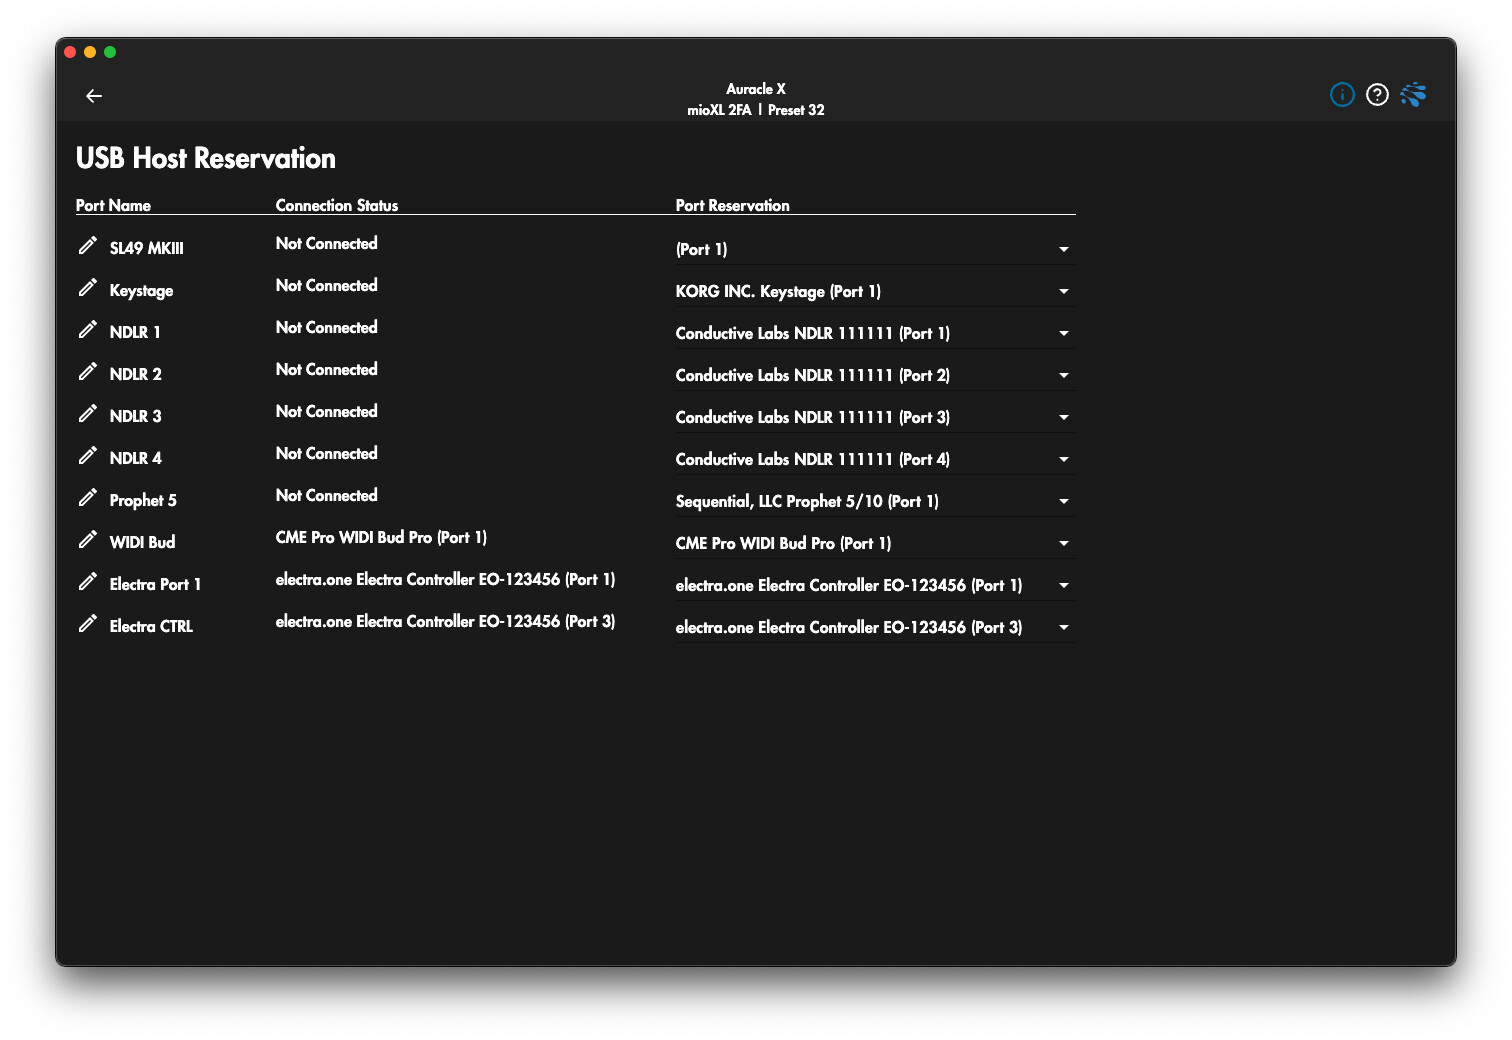
In this tutorial, we will configure Electra One’s Port 1 and CTRL port. The CTRL port is listed in the dropdown as (Port 3).
Set Up MIDI Routing in Auracle
We will first set up routing so that the Electra One web-based editor can be used via the mioXL, and so that Electra’s Port 1 can be used as both input and output on the computer.
Overview of connections to set up:
- USB Host
Electra Port 1-> USB DAWElectra Port 1 - USB Host
Electra CTRL-> USB DAWElectra CTRL - USB DAW
Electra Port 1-> USB HostElectra Port 1 - USB DAW
Electra CTRL-> USB HostElectra CTRL
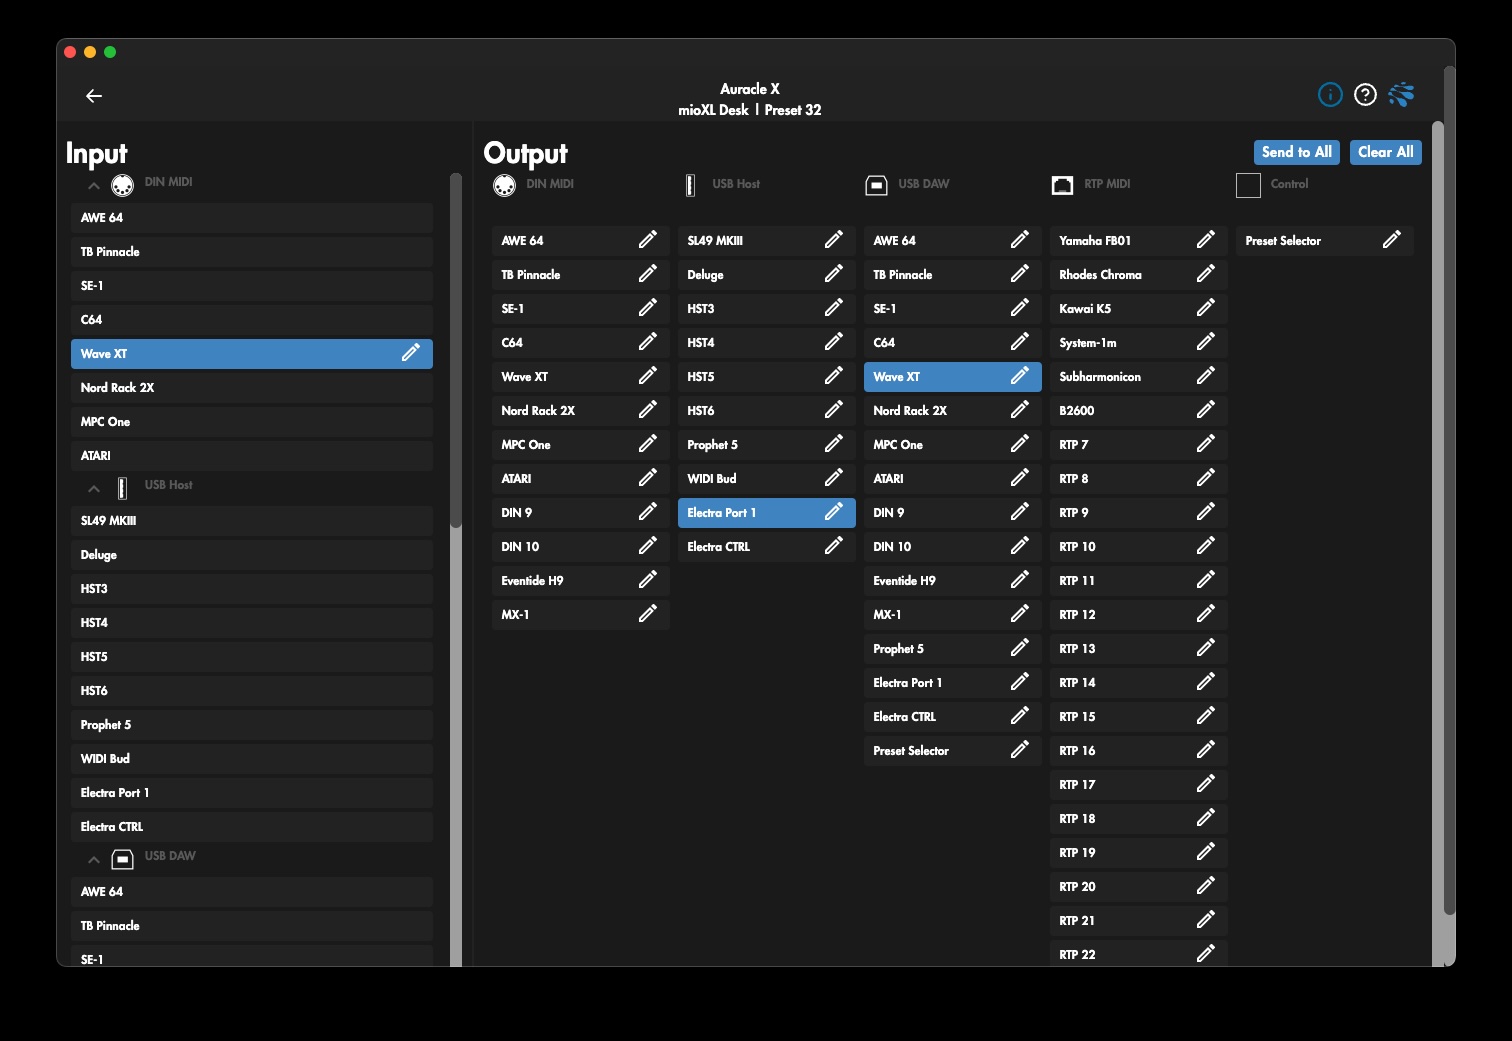
In the Auracle software, use the MIDI Routing section to configure the required routes. While configuring the routes, edit the names of the USB DAW ports that you selected for the Electra One ports.
Required routes
From Electra One Port 1 to
Electra Port 1USB DAW on the computer. This port will appear on the computer asmioXL Electra Port 1MIDI port.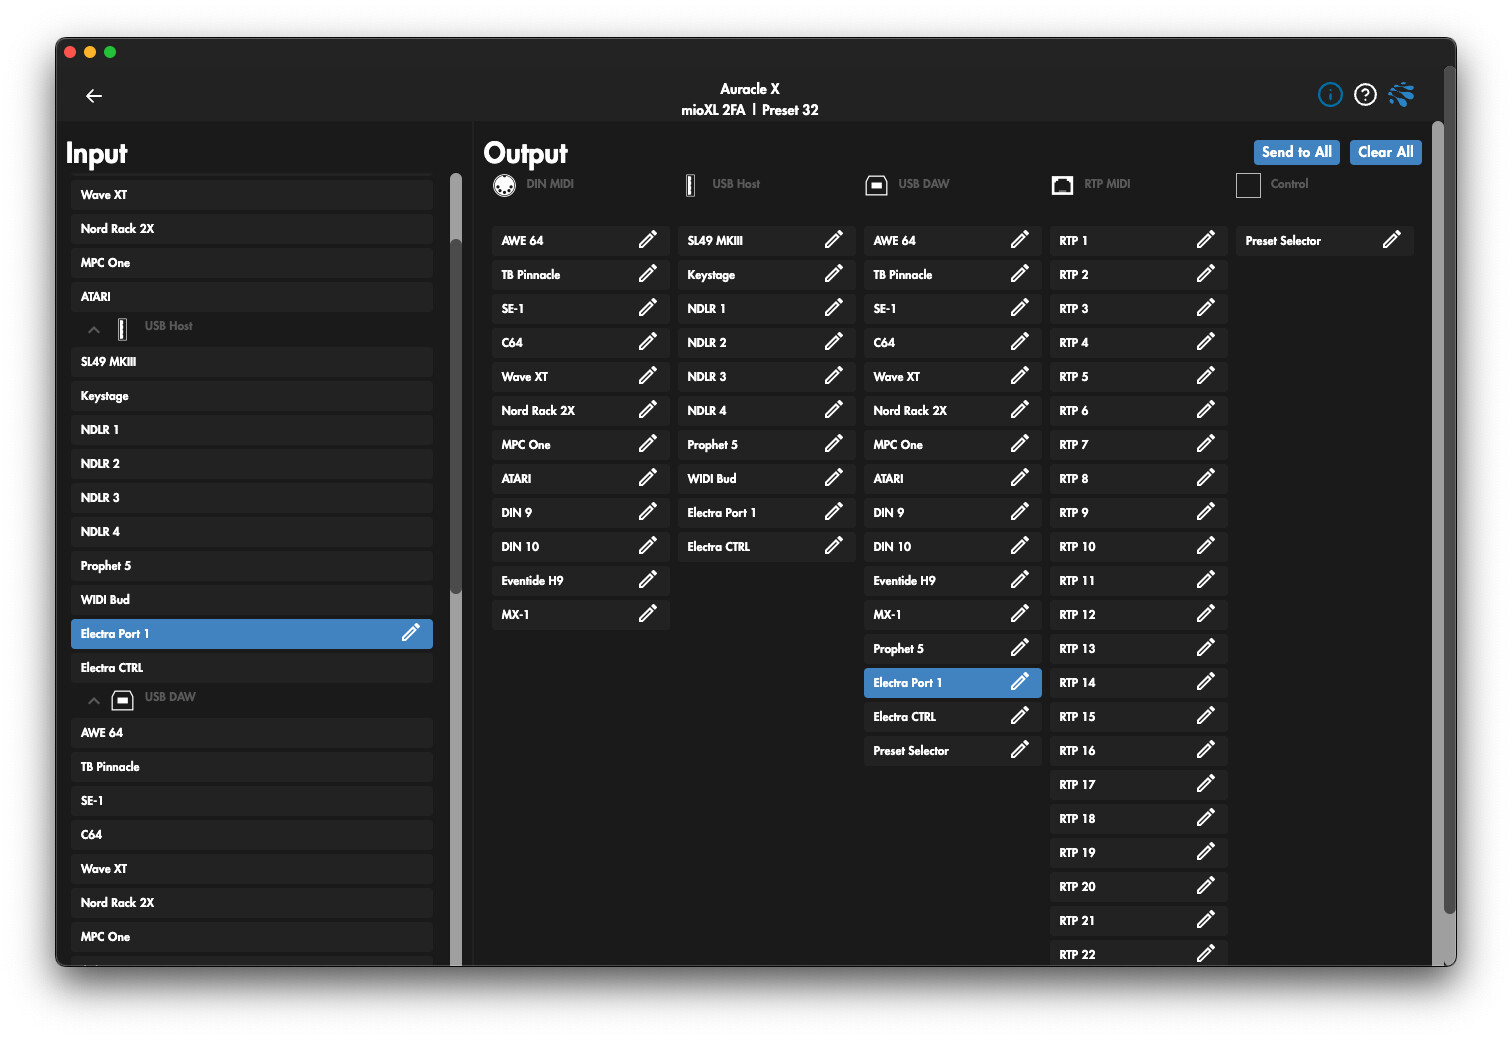
From Electra One CTRL to
Electra CTRLUSB DAW on the computer. This port is used for the Electra web editor and will appear as mioXL Electra CTRL on the computer: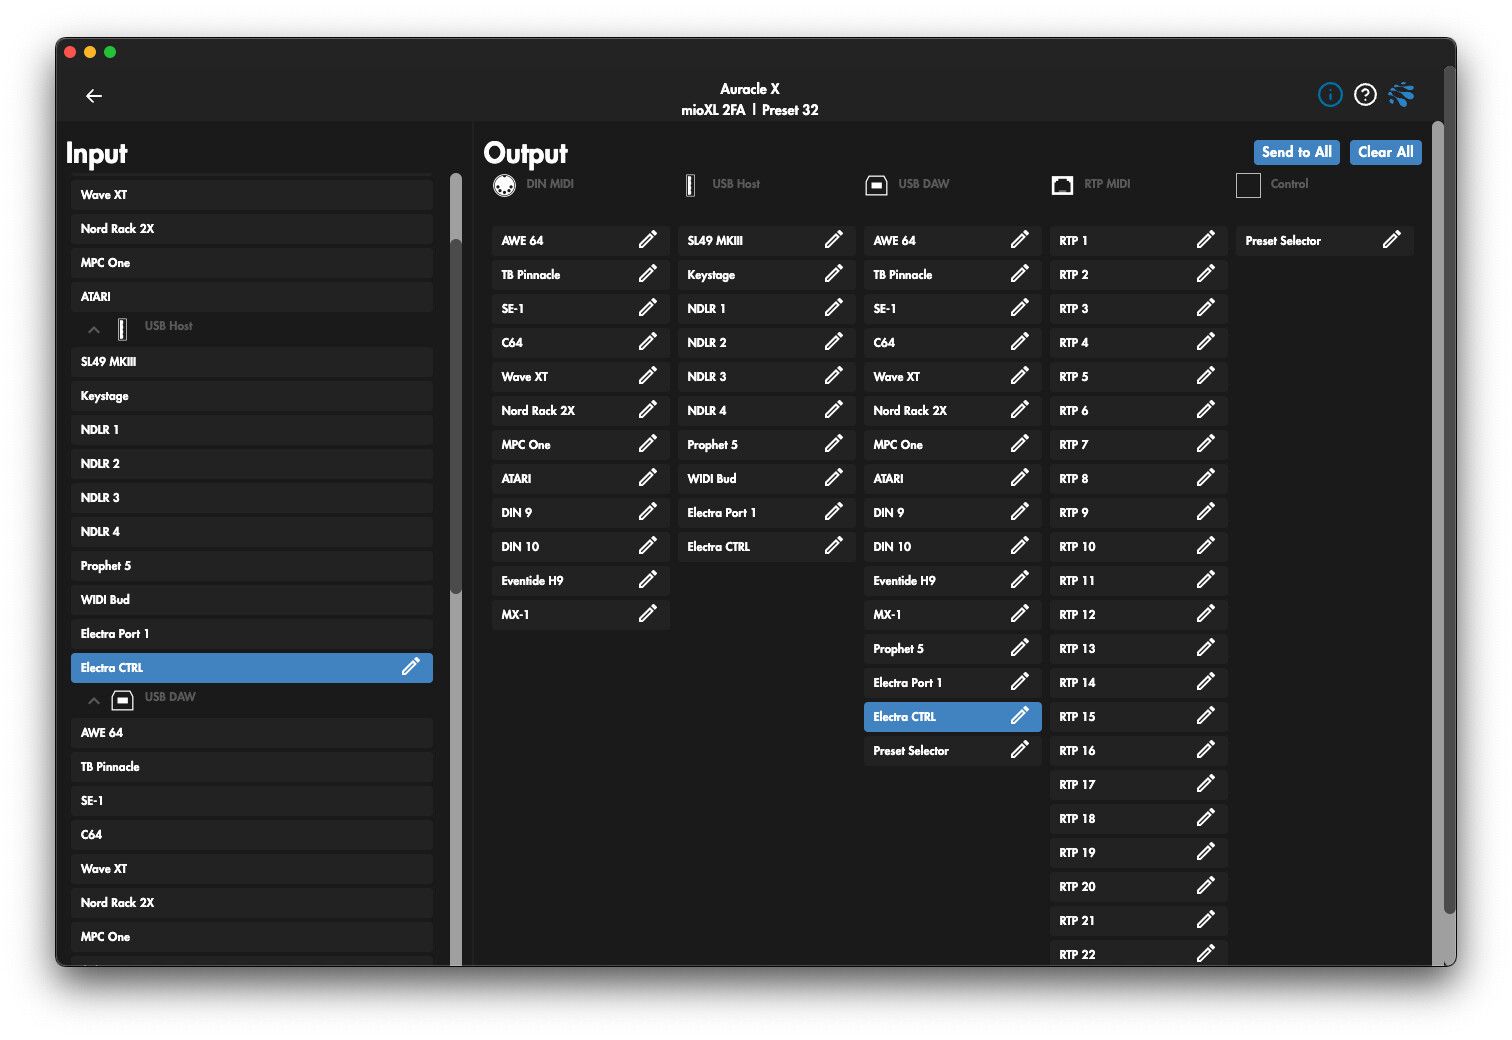
Now, add routes for the opposite direction. Route mioXL
Electra Port 1to the controller's Port 1: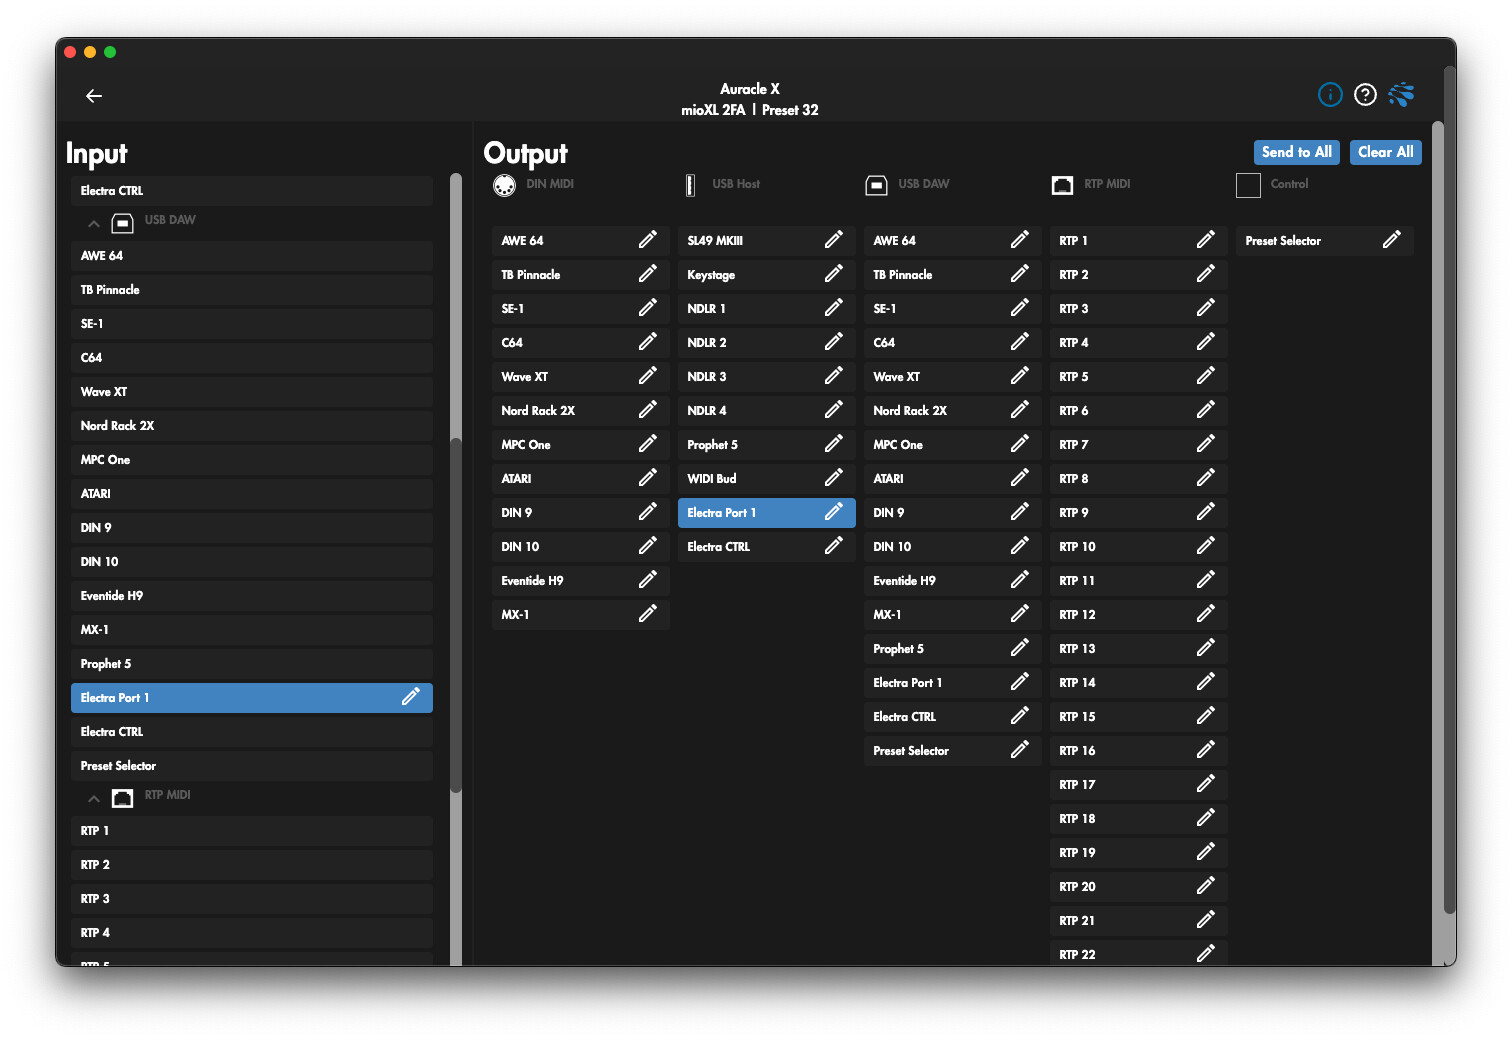
And mioXL USB DAW
Electra CTRLto the controller’s CTRL port: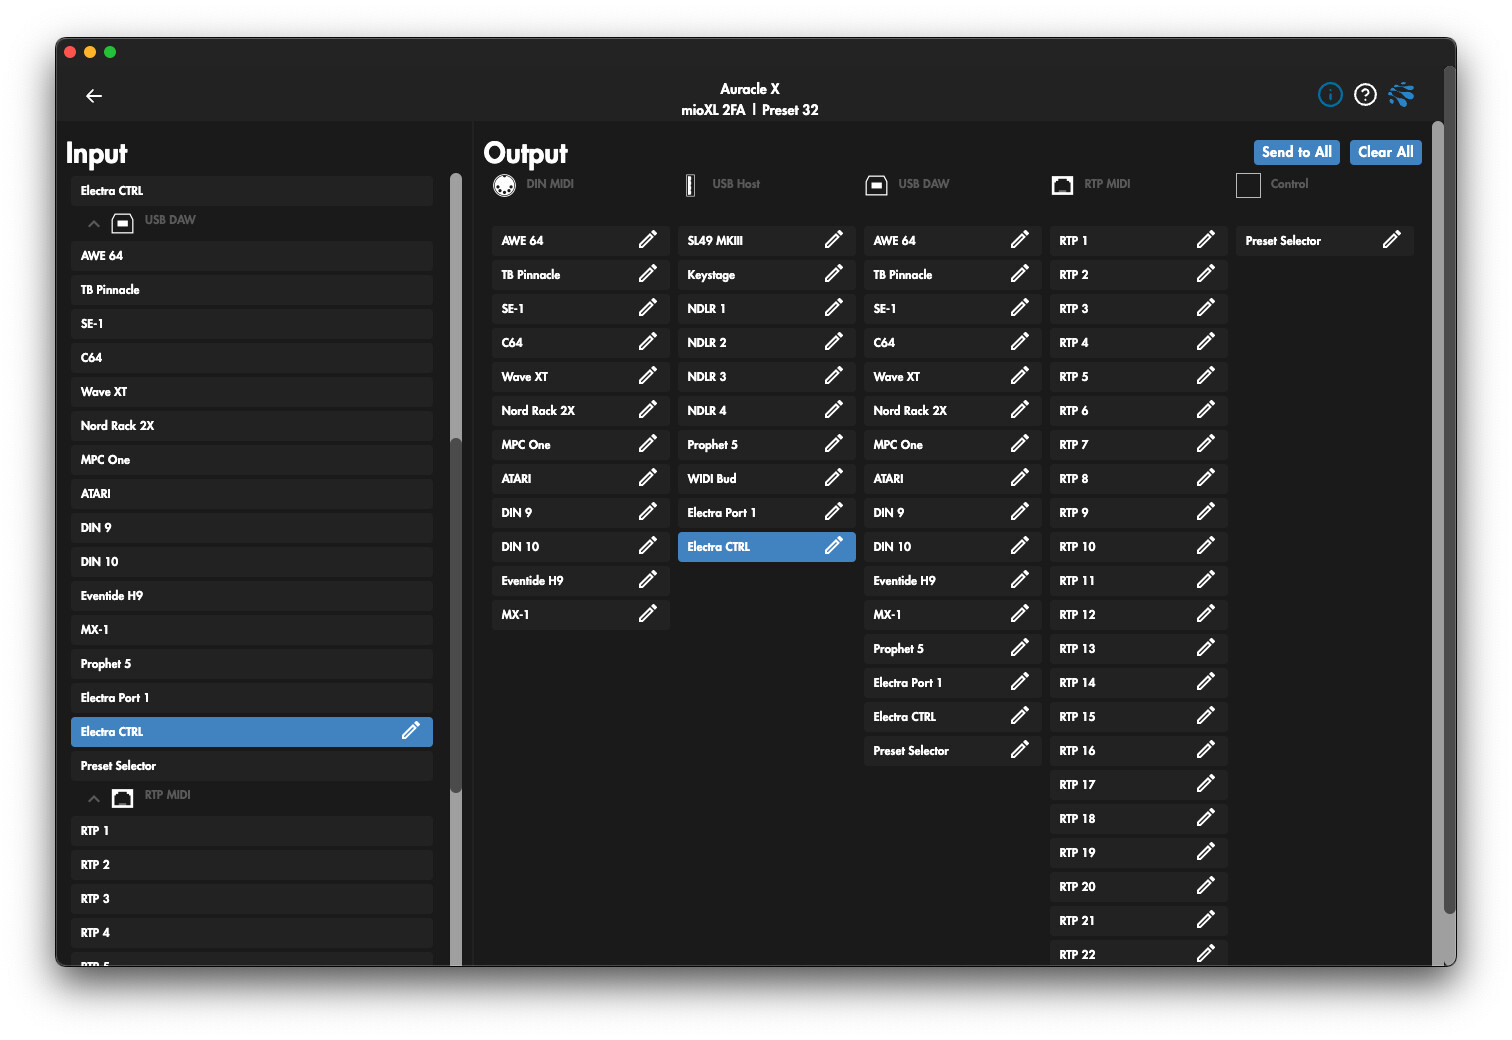
Done! The basic routing is set up. Don’t forget to save your settings to the mioXL's preset.
Refresh port names
Since you have edited the names of the USB DAW ports, you need to ensure that the new names are recognized by your system. This update does not occur automatically.
On macOS:
- Turn off your mioXL.
- Open the Audio MIDI Setup application.
- Switch to the MIDI Studio window.
- Remove the mioXL device from the list / grid.
- Turn your mioXL back on.
On Windows:
- Turn off your mioXL.
- Restart the computer.
- Turn your mioXL back on.
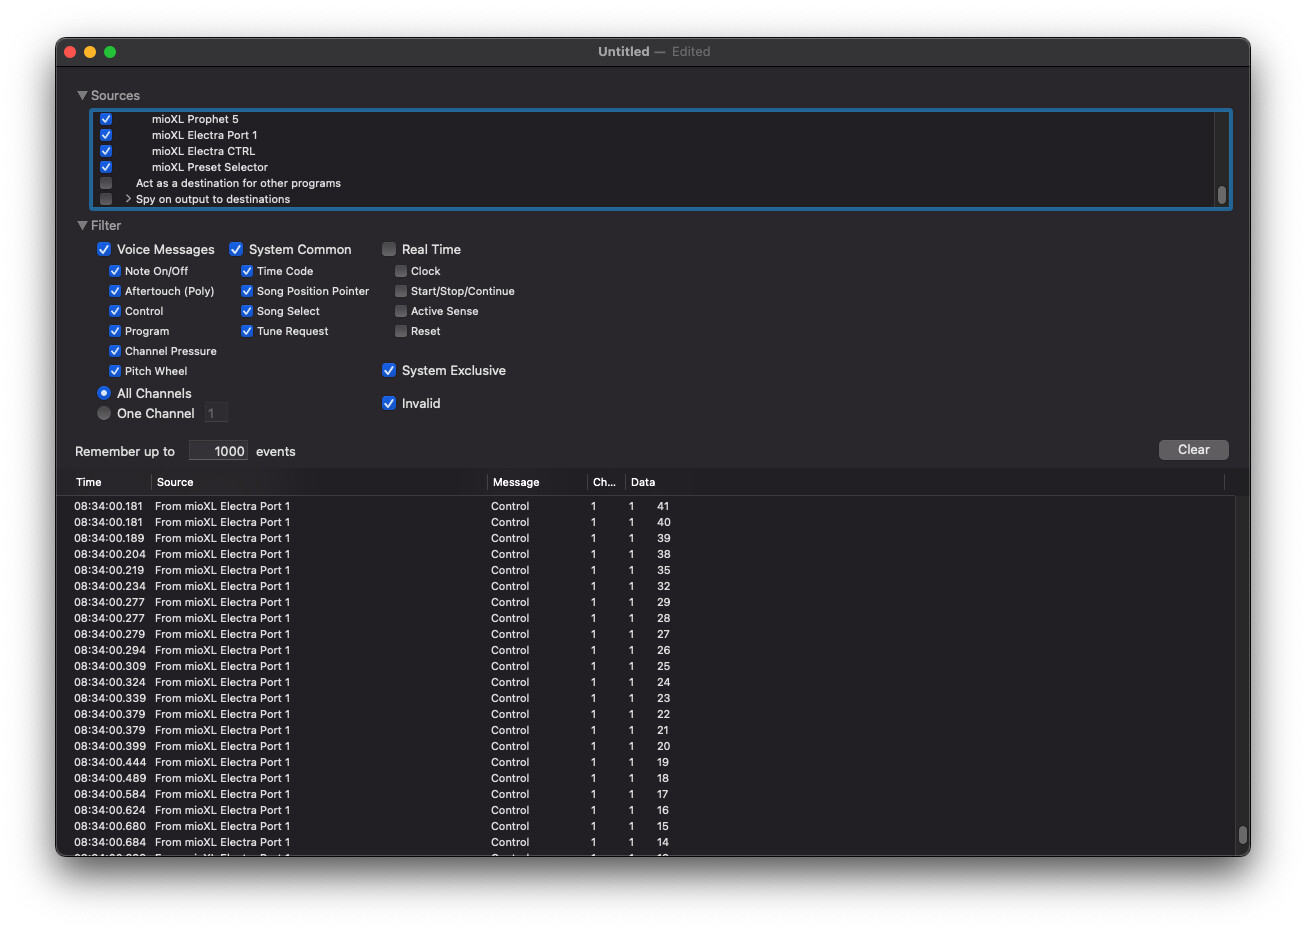
Verify connections
Use an application such as MIDI Monitor (on macOS) or MIDI-OX (on Windows) to ensure that the MIDI ports and their names are correctly set up.
If you have a preset loaded on your controller and you turn a knob with a parameter assigned, you should see the corresponding MIDI messages on the mioXL Electra Port 1 port on the computer.
Configure web app
Open the app.electra.one web application and navigate to the Controller section. There, you can set the MIDI Input and MIDI Output for communication between the web editor and the controller. Use the Electra CTRL ports for both input and output.
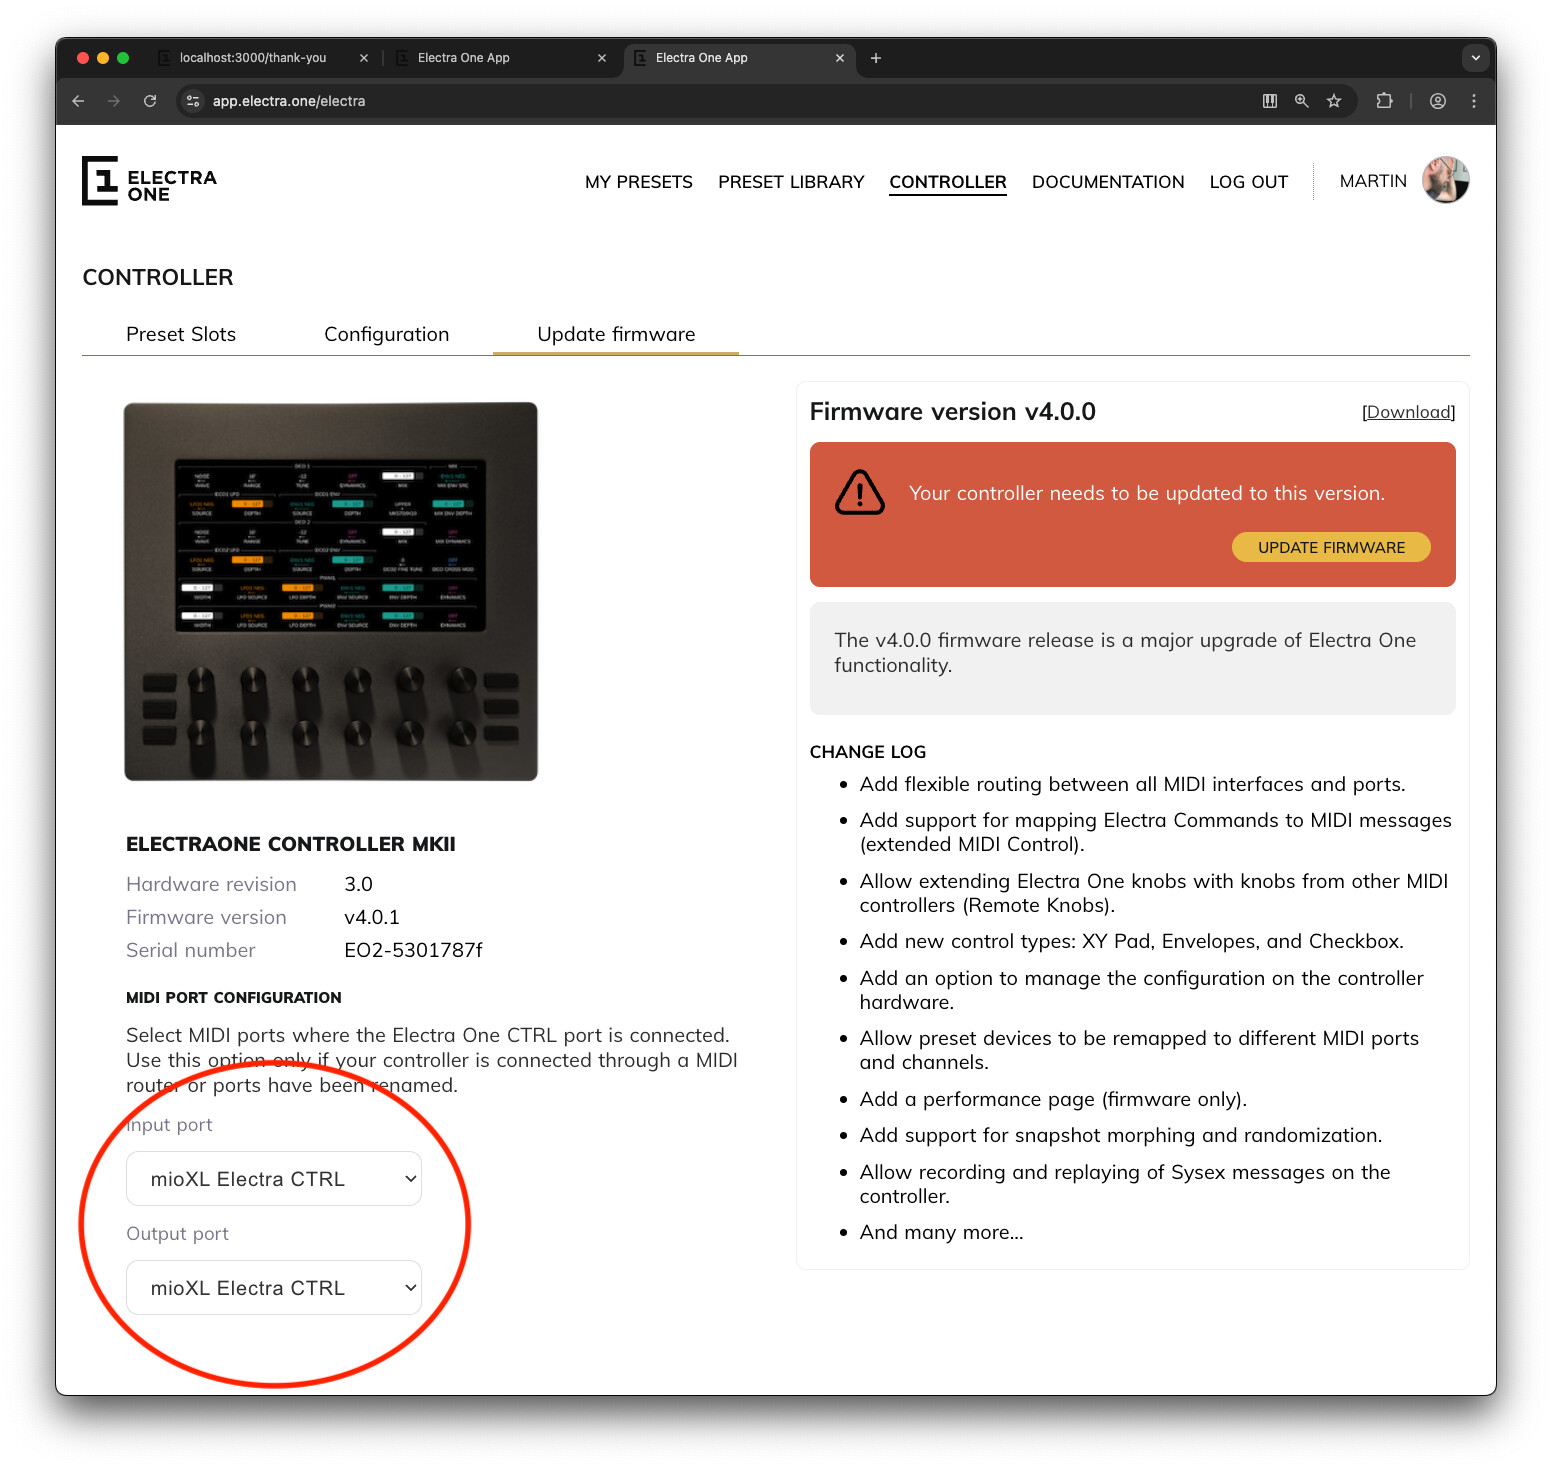
Once set, try sending a preset to the controller. If everything is set up correctly, the preset should upload successfully.
Synthesizer routing
In the second part of this tutorial, we will extend our configuration to enable the following:
- Use Electra to control a parameter on the synthesizer.
- Keep Electra in sync when the parameter is modified on the synthesizer.
- Record parameter changes from either Electra or the synthesizer into the DAW.
- Play back recorded parameter automation from the DAW to the synthesizer and have the changes reflected on Electra.
To demonstrate this, we will use the filter cutoff parameter on the Waldorf Wave XT. The same principles apply to any other device connected to the mioXL router.
Set up routing
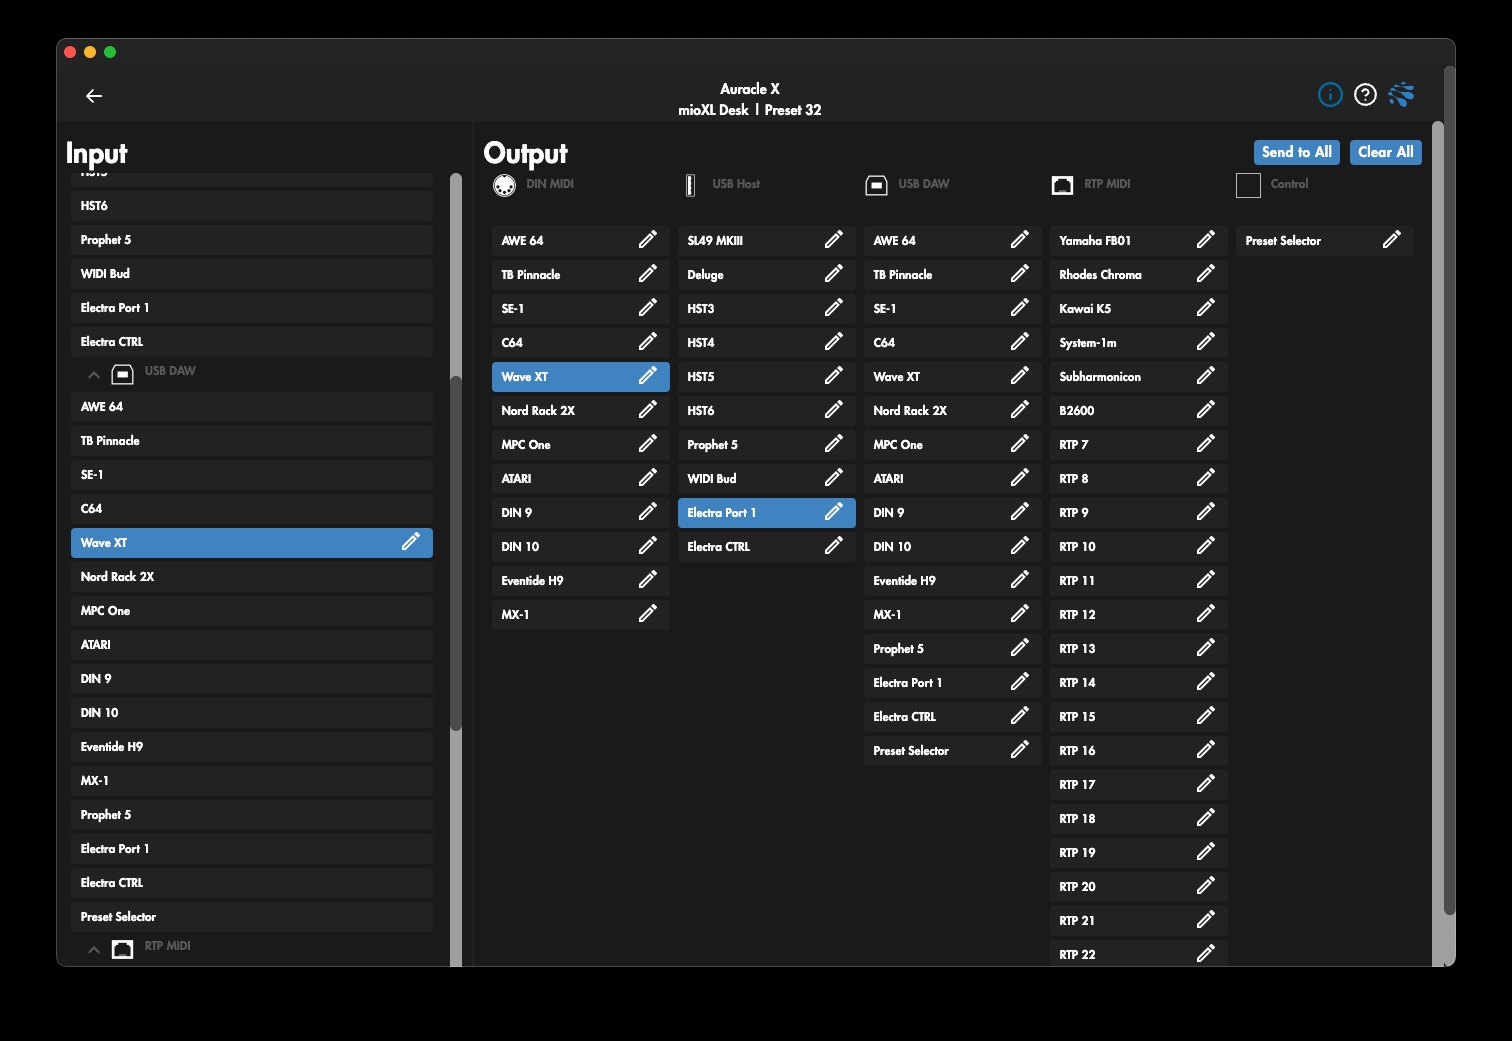
Let's describe and set up the required MIDI routes:
Messages from Electra One hardware controller
Electra Port 1on USB Host to be sent to:Wave XTon the USB DAW port on the computer: This allows Electra One to send control parameters of the Waldorf Wave XT preset to the computer for recording of the automation.Wave XTon the MIDI IO DIN port: This route provides direct control of the Waldorf Wave XT parameters with the Electra One.
Messages from Waldorf Wave XT synthesizer on
Wave XTport on the MIDI IO DIN to be sent to:Wave XTport on the USB DAW port on the computer. This will allow recoring of changes (automations) amde with the knobs on the Waldorf Wave XT.- Electra One hardware controller on
Electra Port 1on the USB Host: This keeps the parameters on the controller in sync with the changes made on Waldorf Wave XT.
Messages from
Wave XTon the USB DAW port on the computer to:Wave XTport on MIDI IO DIN port: This route sends MIDI messages (including recorded automation) from the DAW back to the hardware synthesizer for playback.- Electra One hardware controller at
Electra Port 1: This ensures that Electra One stays in sync with all parameter changes originating from the computer.
Use MIDI Monitor or MIDI-OX to test the new routes. If everything works as expected, don’t forget to save your preset.
Load the preset
With all routing set up, it’s time to create or load a preset onto the controller. For this demonstration, we will use a simple preset with one control assigned to CC #50 – Filter Cutoff on the Waldorf Wave XT.
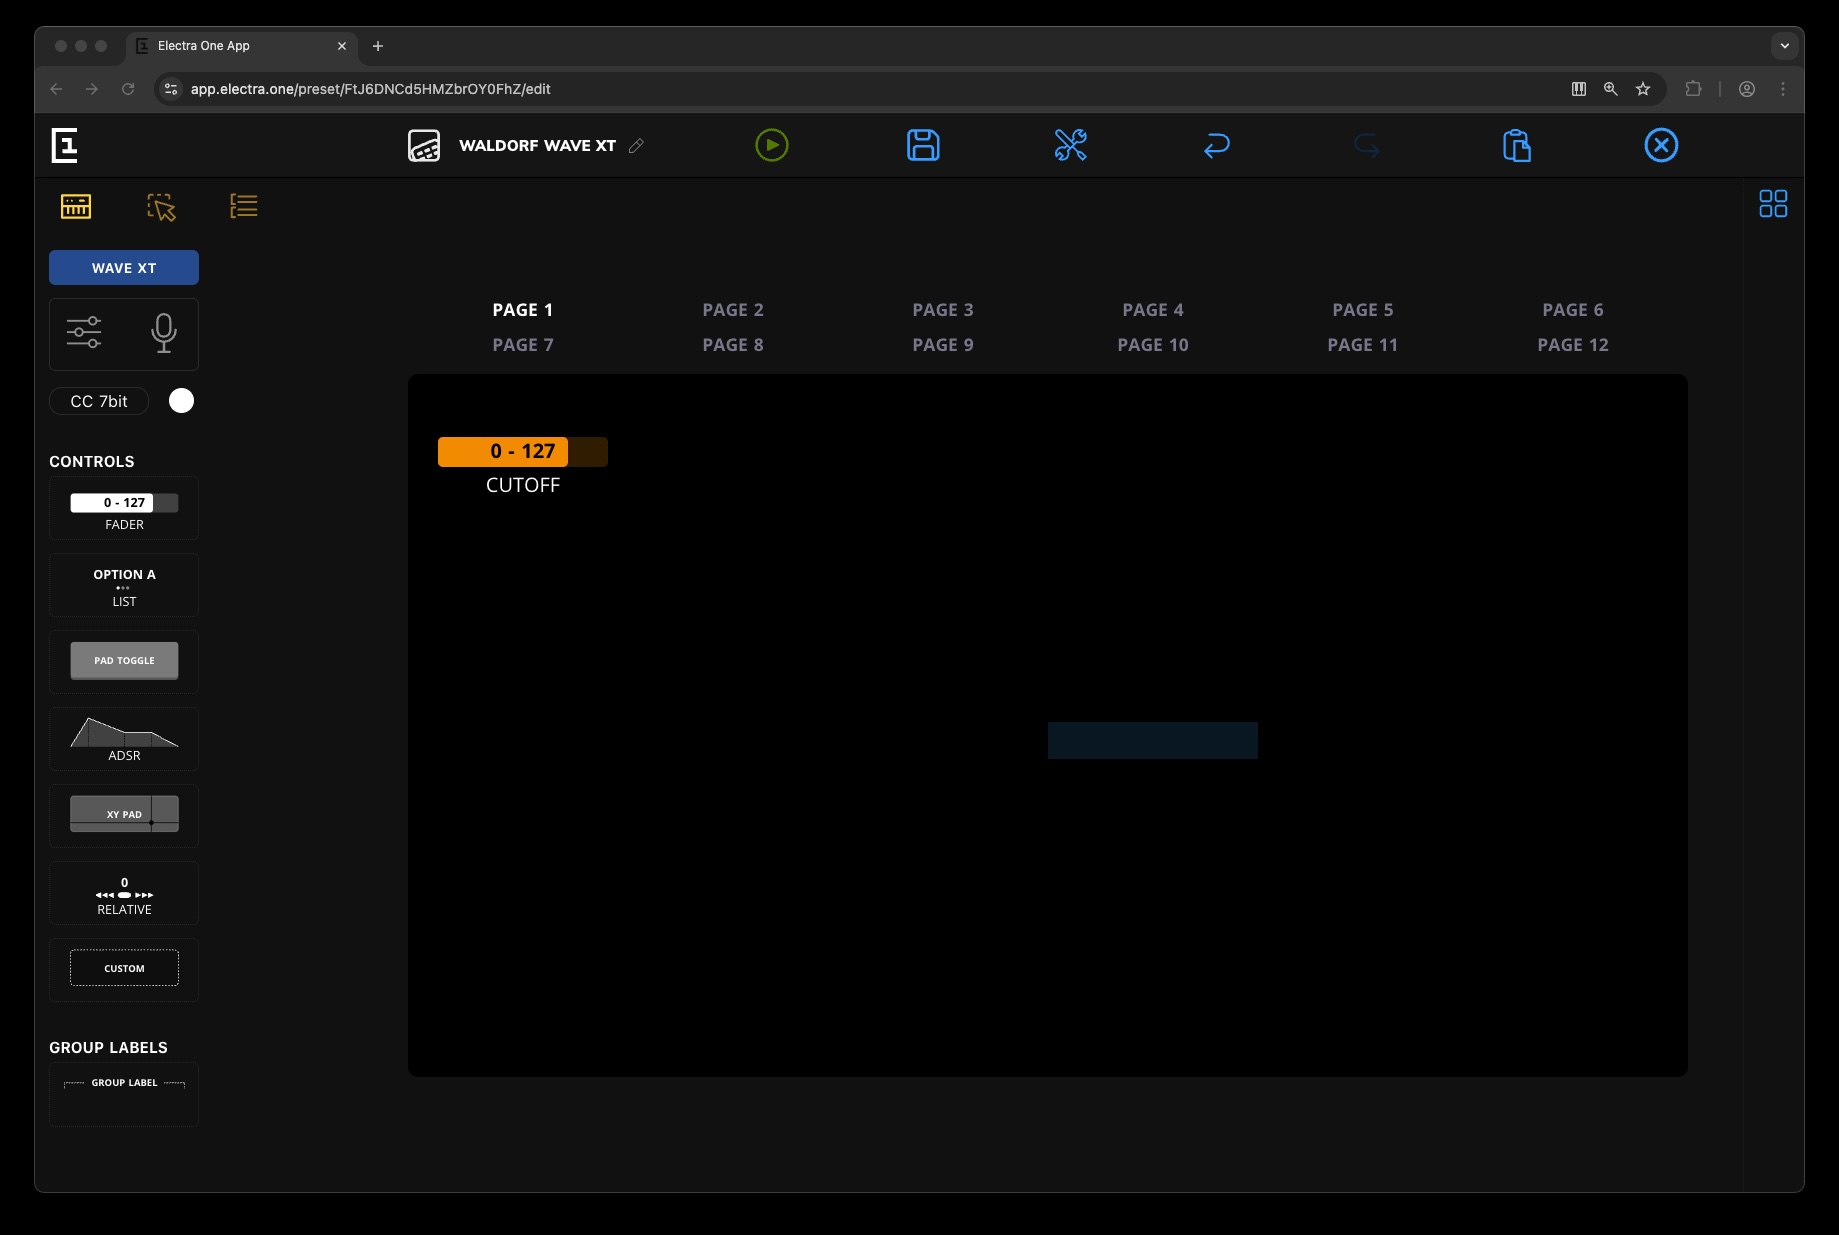
Note: It’s crucial to ensure that all MIDI channels are set up correctly. In this example, the Waldorf Wave XT is set to listen on MIDI channel 8.
Test the preset
Turn the Cutoff knob and play some notes. You should hear the filter cutoff frequency change. Next, turn the Filter Cutoff knob on the Waldorf Wave XT. Again, you should hear changes in the sound, and you should also see the corresponding control on the Electra One update.
If everything works as expected, you’re ready to integrate the DAW into the setup.
Record the automation
We will use Logic Pro to demonstrate how to record and replay automation created with an Electra One preset.
The same principles and settings apply to any other DAW - in short, you need to configure the MIDI inputs and outputs correctly for the given track.
In our example, we will record from all MIDI inputs. This ensures that we also capture notes played by a software sequencer running on the computer. Setting the input to all MIDI sources guarantees that both sequencer data and MIDI messages from the mioXL Wave XT MIDI port are recorded.
We will set the input MIDI channel to 8. For the output, we will send everything to mioXL Wave XT port on the computer, MIDI channel 8:

Below, there is the result of our recording. It includes notes from the sequencer and cutoff (CC #50) changes made using Electra One. If you also used the knobs on the Waldorf Wave XT, those changes would be recorded as well.
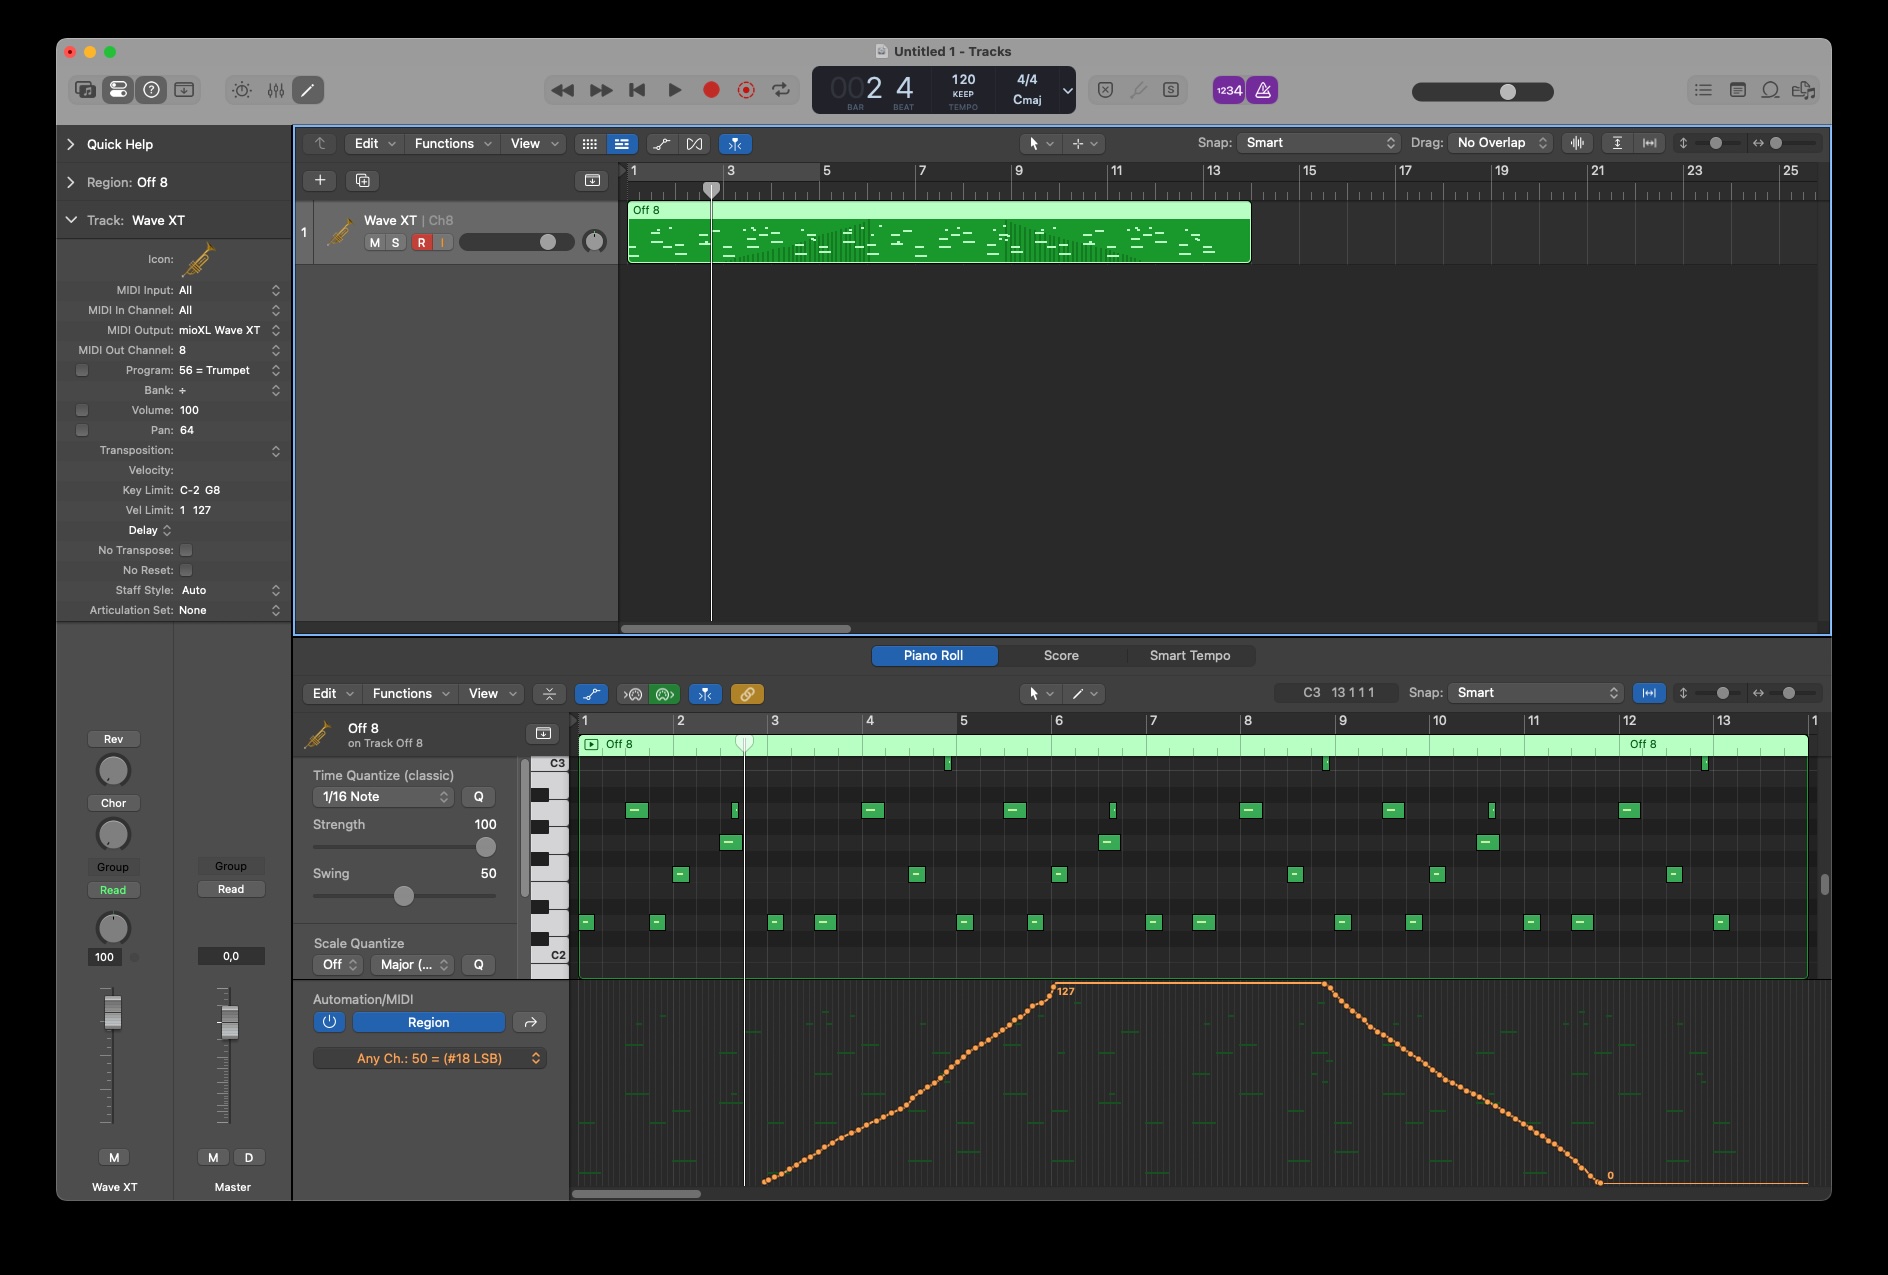
When this track is played back, all recorded data will be sent to the synthesizer, and Electra One will display all changes in real time.