The Overview
Electra One Mini is designed to provide fast, hands-on control over your MIDI gear through an interface that is both intuitive and powerful. In contrast to Electra One mk2, the Mini emphasizes a fully tactile workflow, relying on direct interaction with its knobs rather than a touchscreen.
The device features eight high-resolution, touch-sensitive rotary encoders, each equipped with a push-switch action. These knobs are used not only to adjust control values, but also to navigate presets, pages, and other parts of the user interface. In addition, Electra One Mini includes dedicated hardware buttons, some of which can be assigned by a preset, while others are reserved for controller-level and system functions.
The Electra One Mini user interface is built around a small set of clearly defined interaction elements:
- Color display – shows controls, presets, pages, menus, and configuration screens.
- Touch-sensitive knobs – eight high-resolution rotary encoders used for precise parameter control. Touching a knob selects or focuses a control, turning it adjusts the value, and pressing it activates secondary actions such as value changes, opening details and sub-pages.
- Buttons – used for navigation, accessing controller functions, and triggering preset-assigned actions. Two buttons are reserved for system-level functions, while others can be freely assigned by a preset.
Optionally, you can use external MIDI controllers to expand the number of available buttons and knobs. More information on this topic is provided in the web application User guide.
In addition to its single pair of MIDI IN and MIDI OUT ports, Electra One Mini functions as both a USB host and a USB MIDI interface with advanced MIDI routing capabilities. The USB Host port allows connection of up to two external USB MIDI devices, while the USB Device interface provides two USB MIDI ports for connection to host systems. Together, these features allow Electra One Mini to act as a compact yet powerful central hub within a MIDI-based music production setup.
Default configuration
We’ll begin with Mini in its default configuration, which makes it easier to get familiar with how the device works. Later, you’ll learn how to customize the controller to suit your needs. The default setup defines the behavior of the hardware buttons and how knob touches are handled.
Panel layout and connectors
Front panel
The front panel is the primary area where you interact with Electra One Mini.
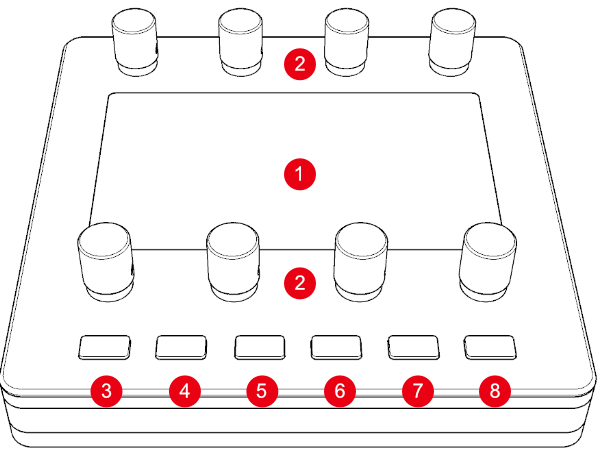
It consists of the following elements:
- Color display – the main screen used to present controls, presets, pages, menus, and system screens.
- Touch-sensitive 360-degree knobs – eight rotary encoders labeled
KNOB 1(top-left) throughKNOB 8(bottom-right). These knobs are used to adjust parameter values, select and focus controls, and navigate the user interface. [MENU]button[CONTEXT]button[BUTTON 1]button[BUTTON 2]button[BUTTON 3]button[BUTTON 4]button
The [MENU] and [CONTEXT] buttons have fixed, system-level functions that cannot be changed by the user. The remaining four buttons can have their function assigned by the preset or a current context.
In the default configuration, these assignable buttons perform the following actions:
[BUTTON 1]button – resets all preset controls to their default values.[BUTTON 2]button – assigns random values to all preset controls.[BUTTON 3]button – sends a patch request MIDI message.[BUTTON 4]button – opens the Snapshots window.
The actions assigned to these buttons can be customized in the web application, allowing you to adapt the behavior of the device to better suit your workflow.
Rear panel
The rear panel is where you connect Electra One Mini to your computer and other MIDI gear. It also includes a button for resetting the device and switching it to the update mode.
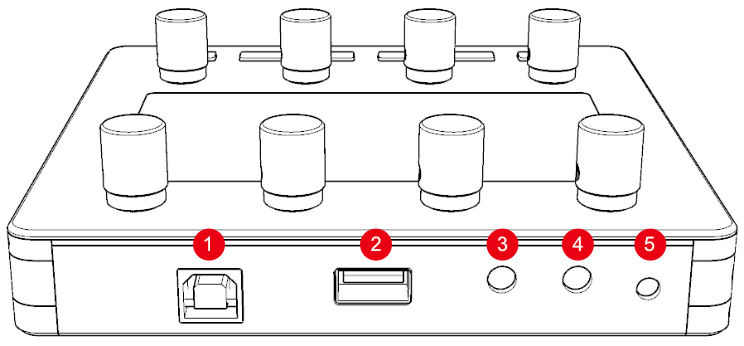
<USB DEVICE>port - connects Electra One to your computer as a USB MIDI interface<USB HOST>port – connects USB MIDI devices (e.g. synths, controllers) directly to Electra One<MIDI 1 IN>port – MIDI TRS A input (Port 1)<MIDI 1 OUT>port – MIDI TRS A output (Port 1)[RESET]button – performs a hardware reset
Ports <MIDI 1 OUT>, <MIDI 1 IN> are often referred as to <MIDI IO>
Reset button
The [RESET] button power-cycles the controller. Pressing it has the same effect as unplugging and reconnecting the USB cable.
Note: Resetting Electra will not delete any of your presets or saved settings. However, any unsaved values from the currently loaded preset will be lost.
The reset button is not needed under normal circumstances. It is used to switch the controller to the update mode or to recover from system crashes.
Display layout
The display is the central point of interaction on Electra One Mini. It presents the controls mapped to your synthesizer parameters, based on the currently loaded preset and active page.
In addition to control elements, the display also provides important system information, including:
- MIDI port activity (data in and out).
- The currently selected preset and page.
- The active controller mode (for example, Low Sensitivity, MIDI Learn).
- The current context and the actions available within it.
Controls are typically arranged in a 4 × 2 grid, providing direct access to eight primary controls. In addition, presets may define four soft pads at the bottom of the display, allowing access to up to 12 controls per page. Pads are button-like controls that are triggered by pressing the corresponding hardware button and are commonly used to send MIDI messages or trigger preset Lua functions.
More advanced presets can override or customize this layout to better suit specific workflows or device requirements.

- Status bar with MIDI port activity indicators
- Upper row of controls assigned to the top knobs
- Lower row of controls assigned to the bottom knobs
- Bottom bar with the preset name and current page name
[MENU]button to change pages, presets, windows[CONTEXT]button to change function of the assignable buttons- Assignable buttons, defined by the active preset or the current context
- Indicator of activity on
<MIDI 1 OUT>port - Indicator of activity on
<MIDI 1 IN>port - Devices connected to
<USB HOST>port and indicator of activity - Indicator of activity on
<USB DEVICE>port - Group of Controls
- Dial Control
- Mode indicators
- Preset name
- Current page name
- Optional info text defined by the preset
The Status bar
The status bar is located at the top of the display and provides real-time information about MIDI activity on all available ports, including the USB Device port, connected USB Host devices, and the MIDI I/O ports.

The layout of the status bar reflects the physical arrangement of the connectors on the rear panel of the controller, making it easy to correlate on-screen information with connected hardware. MIDI activity is indicated by flashing the corresponding port labels, allowing you to quickly identify where MIDI data is being transmitted or received.
MIDI IO ports
These indicators represent the MIDI IN and OUT TRS connectors on the rear panel (referred to as <MIDI IO>). The labels flash when MIDI data is being received or transmitted through these ports.

USB Host devices
USB Host devices displays information about MIDI USB devices connected to Electra’s USB Host port. The MIDI USB devices are identified by their “Product name”. It means that when a USB device is connected to the <USB HOST> port, its name is shown.

Up to two USB MIDI devices can be connected using a standard USB hub. When two devices are connected, the label will read "2 devices".
USB Device port
The rightmost item on the status bar shows the status and MIDI activity of the <USB DEVICE> port — that is, the communication between the controller and the computer.

The Bottom bar
The Bottom bar helps you stay oriented by showing where you are in the user interface, what you are currently working with, and which mode the controller is in.

The left side of the Bottom bar displays mode indicators, providing immediate feedback about the current operating state of the controller. The center section shows the name of the active preset and the currently selected page, helping you maintain context as you navigate. The right side of the Bottom bar can be used by preset developers to display additional, preset-defined information.
Connecting Electra
The next sections will show you how to connect Electra One Mini to your setup. While there are many possible ways to integrate the controller into a MIDI environment, the examples that follow provide a solid starting point.
In practice, adding Electra One Mini to your rig may encourage you to rethink existing MIDI connections and workflows, often resulting in a simpler and more efficient overall setup.
A basic setup
The simplest way to get started with Electra One Mini is to connect it to a single hardware synthesizer and a computer.

In this setup, the synthesizer is connected to Electra One Mini using the controller’s MIDI I/O ports (<MIDI IO>). Through this connection, Electra can send MIDI messages that control the synthesizer’s sound parameters, such as filter cutoff, envelope settings, or modulation depth.
At the same time, Electra One Mini is connected to your computer via USB. When connected, the computer recognizes Electra as a USB MIDI device and exposes two virtual MIDI ports, referred to as the <USB DEVICE> ports. These ports can be used by software applications—such as a DAW or MIDI utility—to send and receive MIDI messages.
In this configuration, Electra One Mini performs two roles simultaneously:
- It acts as a MIDI controller, sending control data to the hardware synthesizer.
- It acts as a USB MIDI interface, allowing MIDI data to flow between the computer and the synthesizer.
This means that MIDI messages from your computer can be routed through Electra to the synthesizer, and MIDI data generated by the synthesizer can be sent back to the computer, all without requiring a separate MIDI interface.
The USB connection also allows you to access the Electra One web editor, where you can create and edit presets, configure hardware controls, and manage your controller’s settings.
Electra One MIDI controller has three USB device ports, two available to you and one dedicated to the communication with the Electra One web application. On MacOS they are:
Electra Port 1Electra Port 2Electra CTRL
On Windows, you will most likely see:
Electra ControllerMIDIIN2 (Electra Controller)MIDIIN3 (Electra Controller)
By default, any MIDI message sent to USB device Port 1 OUT on the computer, will be forwarded to <MIDI 1 OUT> port. Any message received on <MIDI 1 IN> port, will be forwarded to USB device Port 1 IN on the computer. Ports 2 work in the same way. The routing of messages between the MIDI interfaces and ports can be fully customized by configuring Electra One internal MIDI router.
By default, any MIDI message sent from your computer to USB Device Electra Port 1 OUT is forwarded to Electra’s <MIDI 1 OUT> port. Similarly, any message received on <MIDI 1 IN> is forwarded to USB Device Electra Port 1 IN on the computer. Electra Port 2 behaves the same way.
The routing of MIDI messages between Electra’s ports and interfaces can be fully customized using Electra One’s internal MIDI router.
Electra CTRL is dedicated to communication between Electra and Electra Editor.
TIP
If you do not see Electra CTRL, it might be called MIDIIN2 / MIDIOUT2. Some versions of operating systems do not read the port name correctly. Please review The Connection Troubleshooting Guide.
A complex setup
To further illustrate Electra One Mini’s capabilities, let’s look at a more advanced setup involving multiple devices.

In this example, multiple hardware synthesizers are connected to Electra One Mini’s <MIDI IO> ports. Because Electra One Mini provides a single MIDI output, additional devices are connected using MIDI daisy-chaining (via MIDI THRU ports on the instruments) or by using an external MIDI Thru box.
In addition, a USB MIDI master keyboard is connected directly to Electra One Mini’s <USB HOST> port. This allows the keyboard to send MIDI messages to Electra without the need for a computer or additional interfaces.
In this configuration:
- You can control all connected synthesizers using Electra One Mini.
- MIDI messages generated by the master keyboard are automatically forwarded to the
<MIDI IO>ports, allowing the keyboard to play the connected hardware synthesizers. - The same MIDI messages are also forwarded to the
<USB DEVICE>ports, making them available to software running on a connected computer.
MIDI messages generated by turning the knobs or pressing the buttons on Electra One Mini are merged with the incoming MIDI data according to Electra’s routing settings. These messages are then sent simultaneously to both the <MIDI IO> ports and the <USB DEVICE> ports, allowing Electra to act as a central routing and control hub for the entire setup.
A MIDI router setup
Combining Electra One Mini with a dedicated MIDI router—such as those from iConnectivity, Blokas MIDIHub, or Conductive Labs MRCC — creates a powerful and highly flexible MIDI system. This type of setup is ideal when working with multiple synthesizers, controllers, and computers, and when advanced MIDI routing, filtering, or merging is required.
A basic example of a MIDI router–based setup is shown below:

In this example, Electra One Mini is connected to the MIDI router using its <MIDI IO> ports. The router then distributes MIDI data to the connected synthesizers and devices according to its internal routing configuration.
Depending on the capabilities of your MIDI router, several alternative connection options are also possible:
- You can connect the MIDI router to Electra One Mini’s
<USB HOST>port, allowing the router to appear as a USB MIDI device. - You can connect Electra One Mini’s
<USB DEVICE>port to a USB Host port on the router, enabling bidirectional MIDI communication over USB.
This flexibility allows Electra One Mini to integrate seamlessly into even the most complex MIDI environments, while the router handles distribution, merging, and filtering of MIDI data.
WARNING
If you connect Electra One to a USB Host port, make sure the host can supply 300mA of current. If it cannot, use a powered USB hub or a USB Y-cable to provide the additional power required.
Changing pages
Each Electra One Mini preset can contain up to eight pages of controls. Pages are used to organize parameters into logical groups, allowing you to work with more controls than can be shown on the display at once.
To change the active page, press the [MENU] button. This opens the page selection screen.

On this screen, page names are displayed in positions that correspond directly to the physical layout of the eight knobs. Each page is associated with one knob.
To select a page, simply press the corresponding knob. The currently active page is highlighted, making it easy to see which page is selected.
To close the page selection screen and return to normal operation, press the [BACK] button. The [BACK] button appears in the same screen position where the [MENU] button is normally shown.
In addition to page selection, the page selection screen also provides access to other parts of the controller, such as Preset selection, Snapshots, Captures, preset Functions, and System information.
Menu items overview
The page selection screen also provides access to several other areas of the controller:
Presets – lets you select which preset is currently active on the controller.
Snapshots – store and recall complete sets of control values, allowing you to quickly switch between different sound states within a preset.
Captures – record the SysEx messages from connected MIDI devices.
Functions – preset-defined actions that perform specific tasks, such as sending messages, triggering scripts, or changing controller behavior.
System – provides access to global controller settings, configuration options, and system information.
Each of these areas is described in more detail in its own section of the user guide.
Changing and Loading presets
Presets define what Electra One Mini controls and how it behaves. You can switch between presets directly on the controller, and you can load new presets using the Electra One web application.
Presets are stored on the controller in preset slots. A preset slot is a storage location where a preset can be loaded. Each slot can be either empty or occupied by a preset. Electra One Mini organizes preset slots into five banks, with eight slots in each bank.
Selecting a preset slot activates the preset stored in that location. In the documentation and on the forum, the term preset often refers not only to the preset data itself, but also to the preset as loaded in a specific slot.
Changing presets
To open the Preset Selection screen, first press the [MENU] button to open the page selection screen, then press the [PRESETS] button.
Once the Preset Selection screen is open, use the knobs to select the preset slot you want to activate. Preset selection works in the same way as page selection: each preset slot corresponds to one knob.

The currently active preset is highlighted (shown in blue). This is the preset you are working with, and the one that sends and responds to MIDI data.
When the Preset Selection window is open, the hardware buttons can be used to switch between the five preset banks. Each bank contains a separate set of preset slots, allowing you to organize and access a larger number of presets.
Loading a new preset
To load a new preset onto Electra One Mini, first select the preset slot where you want the new preset to be stored. The selected slot can be empty or can already contain another preset.
Next, open the Electra One web application on your computer and use the [Send to Electra] button. The selected preset slot will be overwritten with the new preset, which becomes available on the controller immediately after the transfer completes.
Overwriting presets
A preset stored in a preset slot on a controller may include additional settings and data. Examples of such files include performance pages, device overrides, and persisted Lua table data. If you overwrite a preset with a different one, these additional files will be removed from the preset slot along with the original preset.
However, if you upload a newer version of the same preset to the slot, only the preset and its Lua script will be updated, and the additional files will remain in place.
The preset's projectId attribute is used to determine whether it is the same preset.
The Context
Context is a key concept introduced on Electra One Mini. It defines what actions are assigned to the four assignable hardware buttons, depending on what you are currently doing on the controller.
In other words, the same four buttons can perform different actions based on the current context, allowing the Mini to offer powerful functionality with a small number of physical controls.
Available contexts
Electra One Mini currently supports three different contexts:
- Preset context - In this context, the four buttons are defined by the active preset. Preset designers can assign actions to these buttons using the Web Editor, for example by placing Pad controls on them. The buttons can then be used to trigger MIDI messages, Lua functions, or other preset-defined actions.

- Controller context - provides access to controller-level actions, such as resetting preset values, opening system or utility windows, and other global functions that are not tied to a specific control.

- Control context - provides actions related to the currently active controls. It is typically used to work with multi-value controls, for example to switch between envelope stages, reset individual controls to their default values, or perform other control-specific actions.

WARNING
If you see actions in the Controller or Control contexts that differ from those described here, it means that the default configuration has been replaced by custom settings.
Changing contexts
- The Preset context is active by default when a preset is loaded and whenever you exit another context.
- The Controller context becomes active when you press the
[CONTEXT]button without touching any knobs (that is, when no controls are active). - The Control context becomes active when you press the
[CONTEXT]button while touching at least one knob (that is, when at least one control is active).
Leaving a context
You can exit both the Controller context and the Control context by pressing the [CONTEXT] button again. This returns you to the default Preset context.
Interacting with Controls
Since Electra One Mini does not include a touchscreen, all interaction is performed using the touch-sensitive knobs and hardware buttons. You do not interact with controls by touching the display itself—instead, you touch, turn, and press the knobs to select and adjust controls.
Controls were introduced earlier in the user guide in the section Concept of Control. Now, we will take a look how we interact with them on the Electra One Mini controller.
Active control
To make navigation and interaction easier, touching a knob highlights the corresponding control on the display by underlining it. This visual cue shows which control is currently active—even if you do not turn the knob. Multiple knobs can be touched at the same time, which means multiple controls can be active simultaneously.
The image below shows the Coarse control in its active state:

You can change a control’s value by turning the corresponding knob. Turning a knob works consistently across all control types, including dials, lists, pads, and checkboxes.
Pressing a knob performs an action that depends on the type of control:
- Pads and checkboxes – toggle the value on or off.
- List controls – advance to the next available value.
- Multi-value controls (such as envelopes or vertical faders) – open the Control Detail view, where individual parameters can be adjusted.
When at least one control is active (that is, its knob is being touched), pressing the [CONTEXT] button opens a menu with actions related to the currently active control or controls. More information about these actions is provided in the section describing the Context.
Control detail
Pressing a knob assigned to a multi-value control opens the Control Detail window. This view displays an enlarged version of the control, allowing for more precise adjustments.
The Control Detail window acts as a sub-page, where you can interact with the individual values that make up the multi-value control, such as stages of an envelope or segments of a fader.

When you are finished editing, press any knob to close the Control Detail window and return to the preset page.
Changing active value
In the default configuration, the active value of a multi-value control can be changed using the Active Control context buttons.
To activate the Control context, touch at least one knob (to make a control active) and then press the [CONTEXT] button, the Control context buttons will show up:
The Control context and its behavior are described in more detail in the section The Context.
When the Active Control context is displayed, the [PREVIOUS] and [NEXT] buttons are used to switch between the individual values of the currently active controls—that is, controls whose knobs are being touched.
This allows you to easily move between segments of an envelope or between individual faders in a multi-value control, without leaving the current page or opening the Control Detail view.
When a multi-value control is active, the currently selected value is visually highlighted on the display. This provides clear feedback about which value will be affected when you turn the knob.
The image below shows the third value of the "5 - 8" control being active, and the Control context selected. pressing the [PREVIOUS] and [NEXT] context buttons will cycle the currently selected value of the control.

Power On & Sleep Mode
Electra One Mini powers on automatically when it is connected to any USB power source, such as a computer or a USB power adapter. No power switch is required.
To safely disconnect or restart the controller, it is recommended to place it into Sleep Mode first. Sleep Mode puts the controller into a low-power standby state and ensures that the internal file system and database are properly closed.
Open the System window in the Menu and press the [SLEEP] button.
To enter Sleep Mode:
- Press the
[MENU]button. - Open the System window by pressing the
[SYSTEM]button. - Press the
[SLEEP]button.
To wake the controller from Sleep Mode, simply press any hardware button.
The System window also provides an option to restart the controller, which can be useful after configuration changes or if the controller becomes unresponsive.