Preset Editor
WARNING
Please note that the documentation is currently being updated to reflect the latest version of the Project editor. Some parts of the user guide may still be slightly outdated.
The Electra One Preset Editor is a comprehensive web-based tool for creating, editing, and managing presets for your Electra One MIDI controllers. It gives you complete control over the layout, behavior, and MIDI logic of your presets, whether you're building simple control pages or advanced interactive setups with Lua scripting and SysEx handling.
The editor is divided into several key areas:
- Visual Editor – A drag-and-drop interface to arrange controls, groups, and pages
- Lua Script Editor and Debugger – tools to add custom logic, handle incoming MIDI data, and extend preset behavior with Lua
- Device Editor – an editor to define target MIDI devices and edit SysEx request/response handling for patch dumps and advanced SysEx messaging
- MIDI Console – an interactive MIDI tool to send MIDI messages and monitor all incoming and outgoing traffic
In the following sections, we will walk through each part of the editor in detail.
Project vs Preset
Throughout this guide, you will often encounter the terms Project and Preset. They may seem similar at first, but they serve different purposes.
Project represents all the work you create in the editor. In addition to the data used by the controller, it also contains extra information such as descriptions, tags, and layouts for different controller models. A Project is meant for editing, organizing, and managing your work.
Preset - on the other hand, is the final output that is sent to the hardware controller. It always targets a specific controller model and is optimized for maximum efficiency.
The Project Editor window is divided into six main sections:
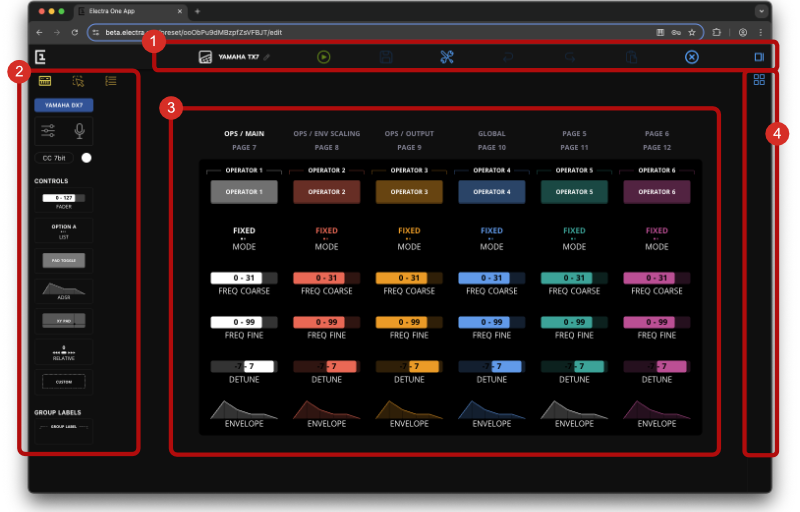
- Top menu
- View
- Control repository
- Defaults
- Page inspector
- Project actions
Top menu
The Top Menu provides actions for managing your preset and controlling the editing process.

Preset name

Displays the name of the current preset. To rename it, simply click on the name and type the new one.
View tabs

View tabs are buttons used to switch between different editor views and tools within a project. Switching views does not change the preset itself; instead, each view offers a different perspective on the same project data:
- Layout - a visual drag-and-drop tool for placing controls on project pages
- Controls - a list of all controls used in the project
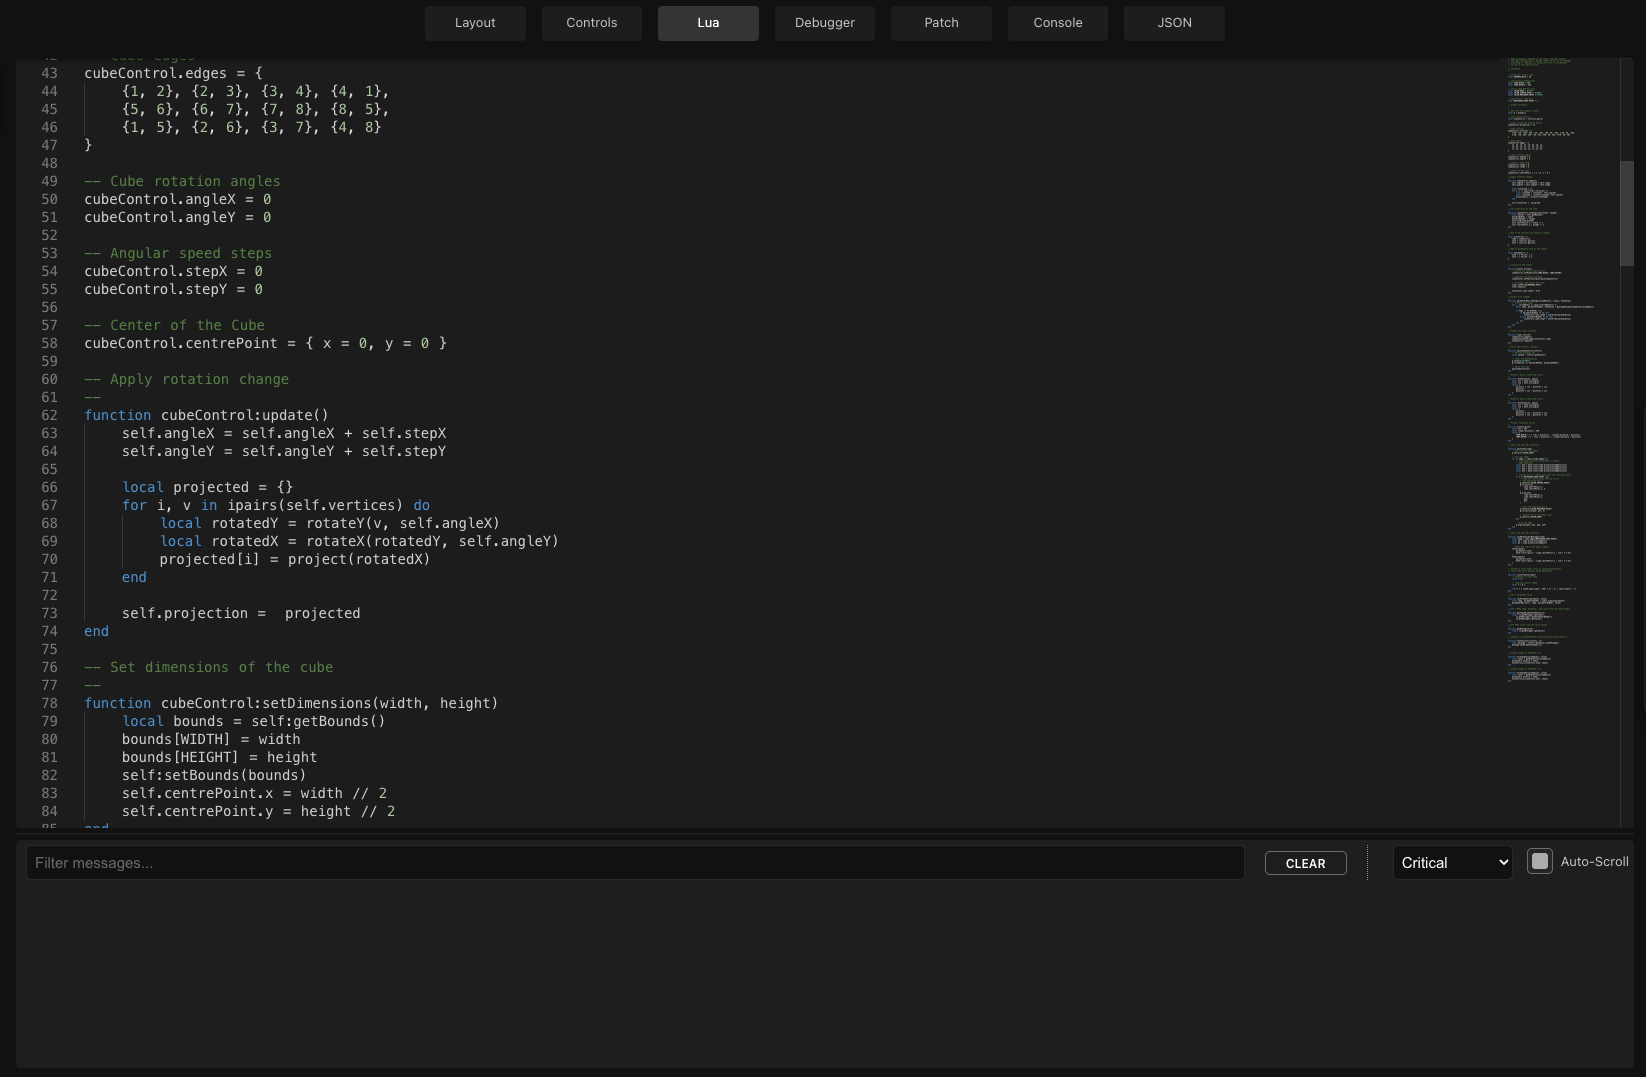
- Lua - an editor for the project's Lua script
- Debugger - an interactive console for executing Lua code and observing its output
- Patch - a suite of tools for processing patch dumps and SysEx messages
- Console - a built-in tool for sending and monitoring MIDI messages
The currently active view is is highlighted.
Leave the editor

Closes the editor and takes you back to the Preset Library. Any unsaved changes are automatically saved before exiting.
Views
Views are dedicated workspaces within the Electra One Editor, each focused on a specific aspect of project creation, configuration, or MIDI interaction.
All views operate on the same project data - switching between them, or opening a second view, allows you to adapt the editor to the most efficient setup for your work.
The following text briefly introduces each view and explains its purpose and typical use cases. Detailed descriptions are provided in dedicated chapters later in this document.
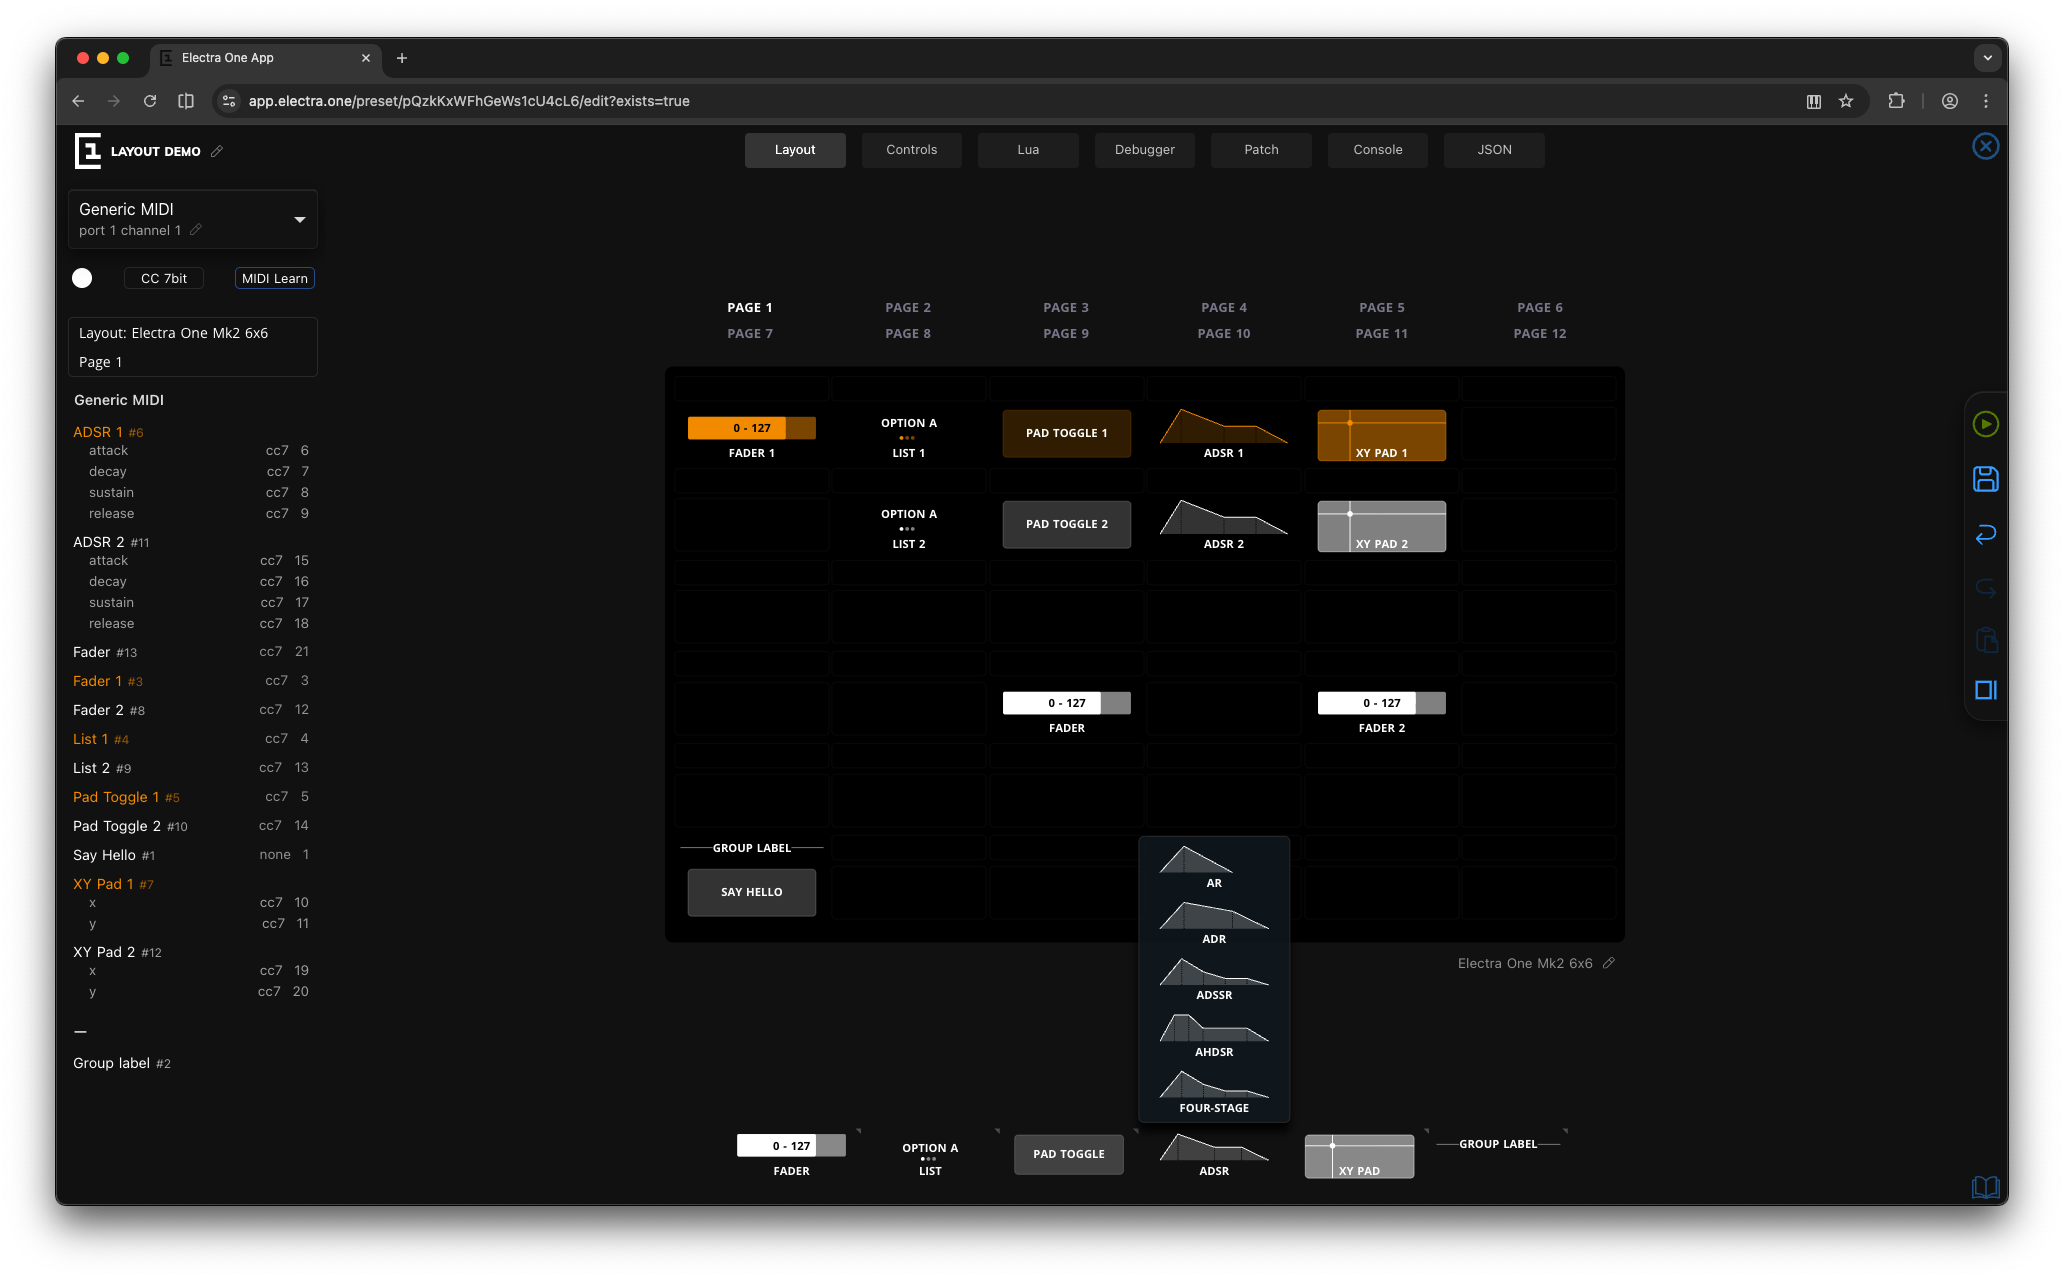
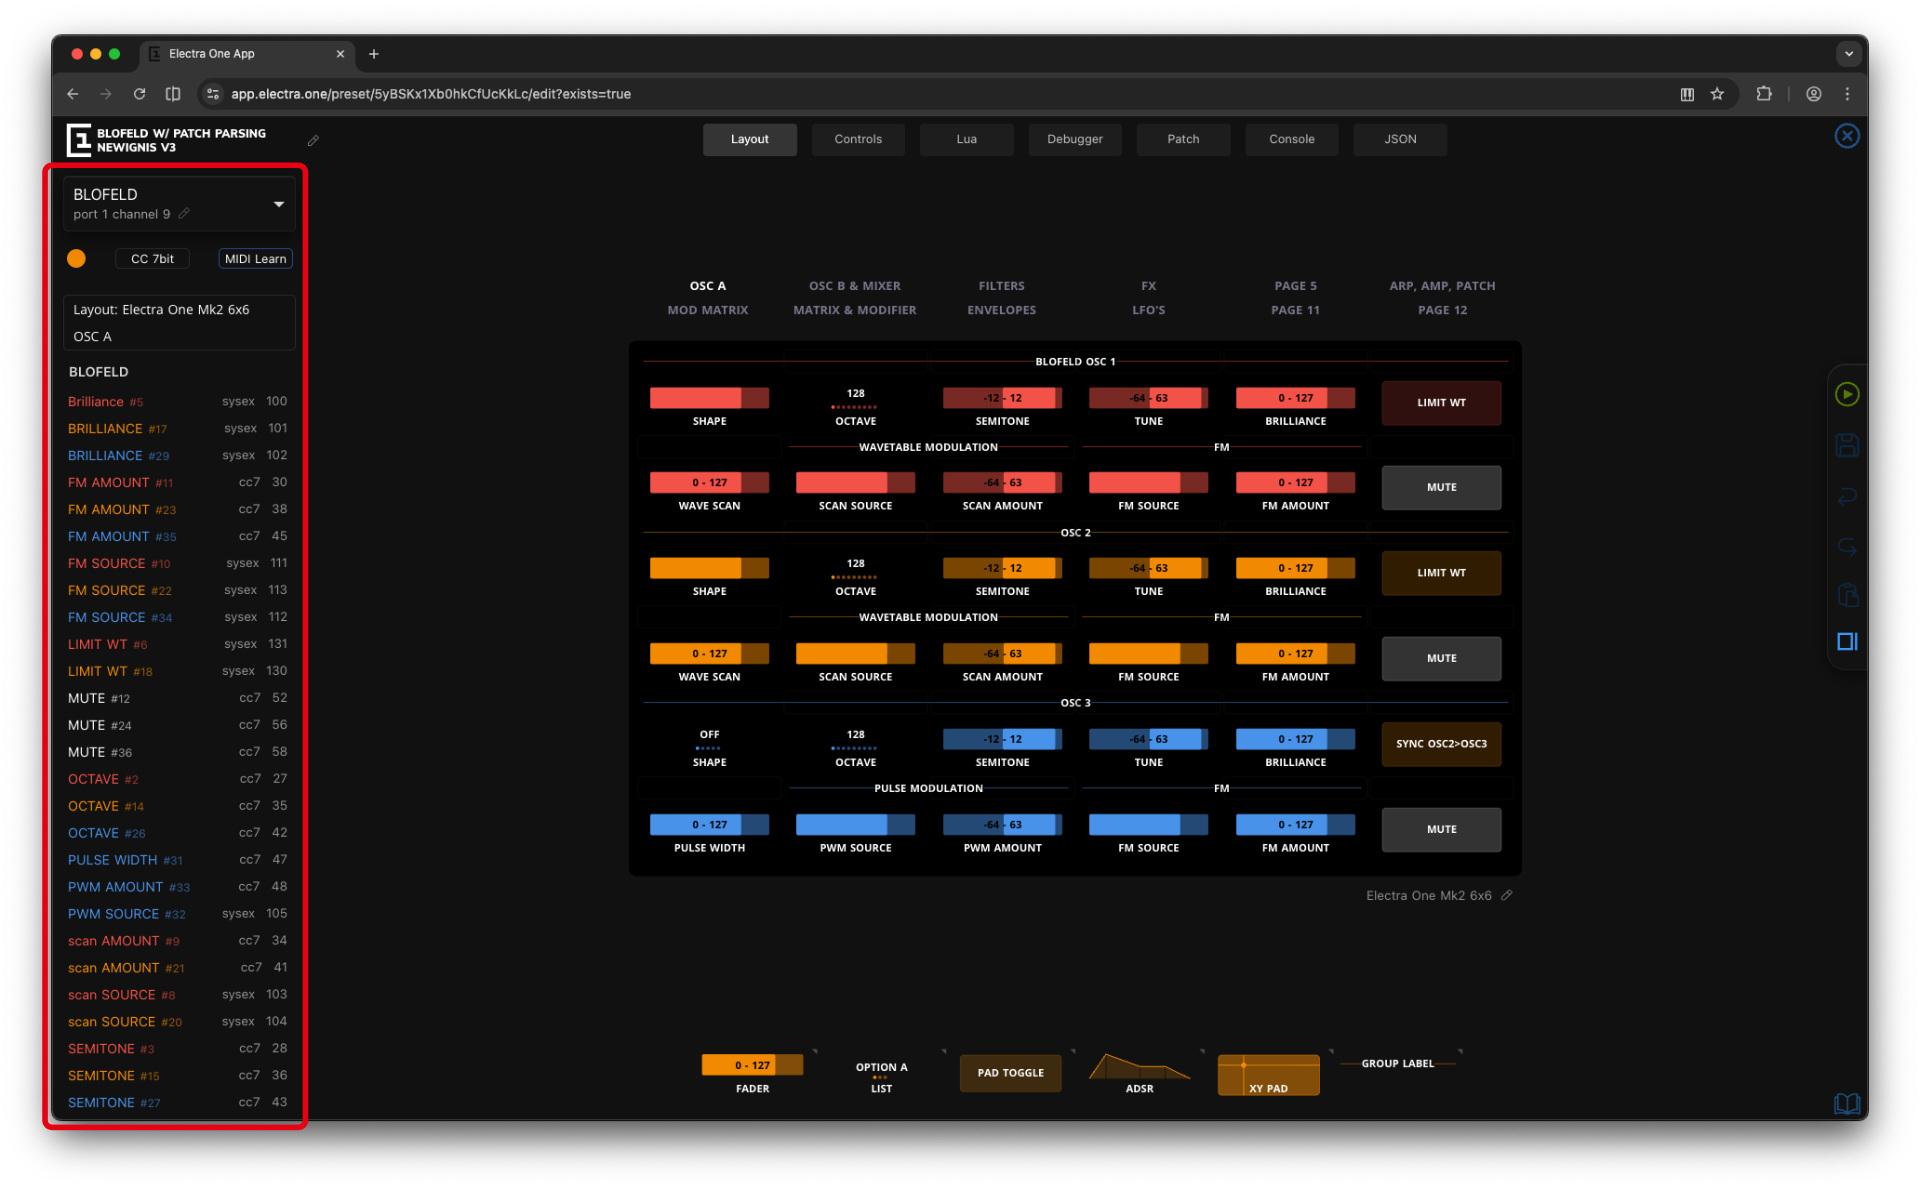
Layout
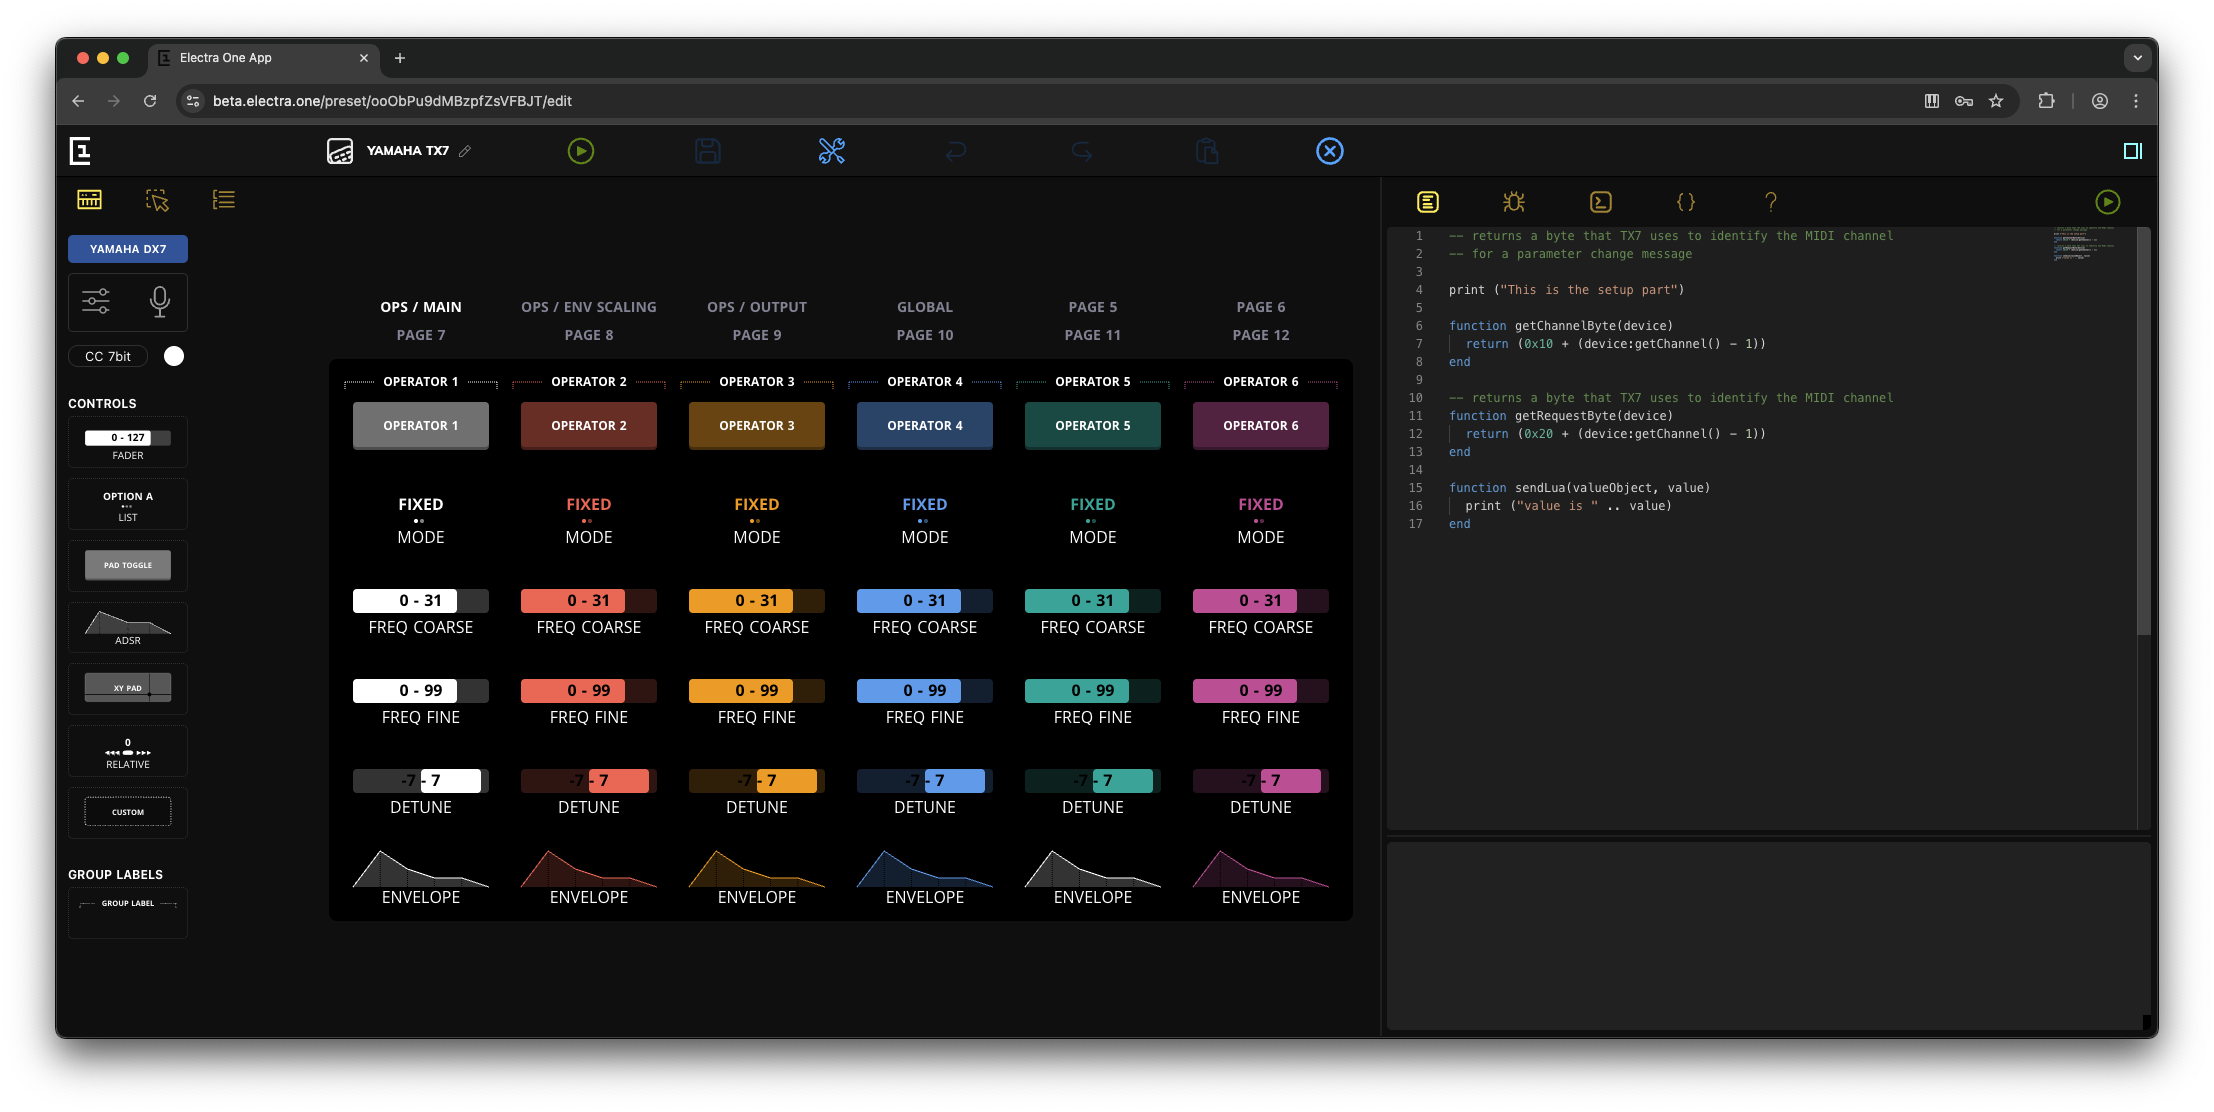
The Layout view is the most frequently used view in the editor. Its primary purpose is to place controls and groups on pages, adjust their visual appearance, and configure their MIDI behavior.
The layout mirrors the controller’s screen, so what you see in the editor closely matches what will appear on the device. New controls are added to the layout using drag and drop from the Control Repository, a panel at the bottom of the editor that contains all available control types and reusable control templates.
The sidebar provides additional options for fine-tuning control properties and MIDI messaging.
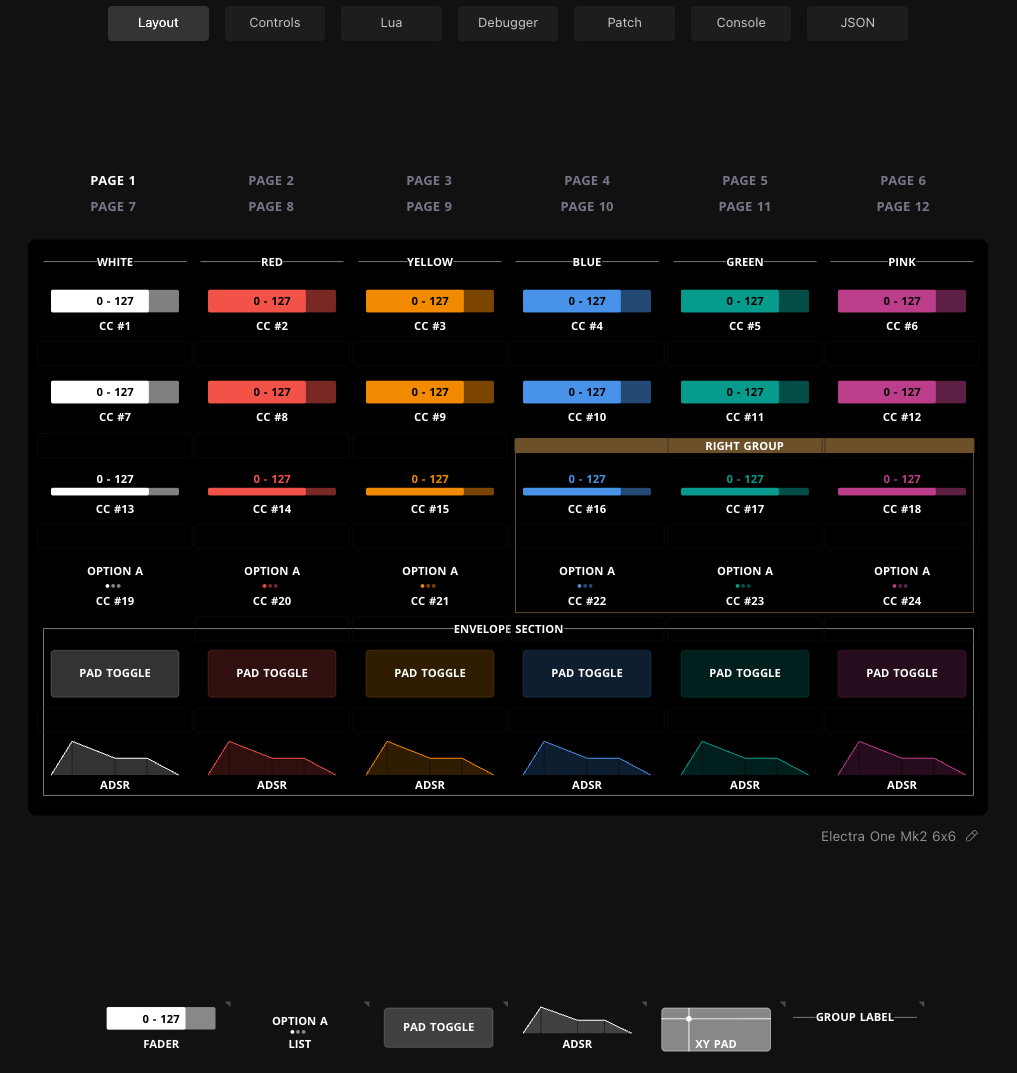
The Layout view supports maintaining multiple preset layouts in parallel. Different layouts are typically used for different models of Electra One controllers.
The active layout can be switched using the selection list at the bottom of the layout display area.

Currently, two layouts are supported: Electra One mk1/mk2 and Electra One Mini.
Controls
The Controls view shows a list of all unique controls used across all layouts in the project. It provides a central place to find, review, and edit controls without needing to locate them on individual pages.
The Controls view is designed to give you a clear overview of everything defined in the project and to provide fast, efficient access to control editing.
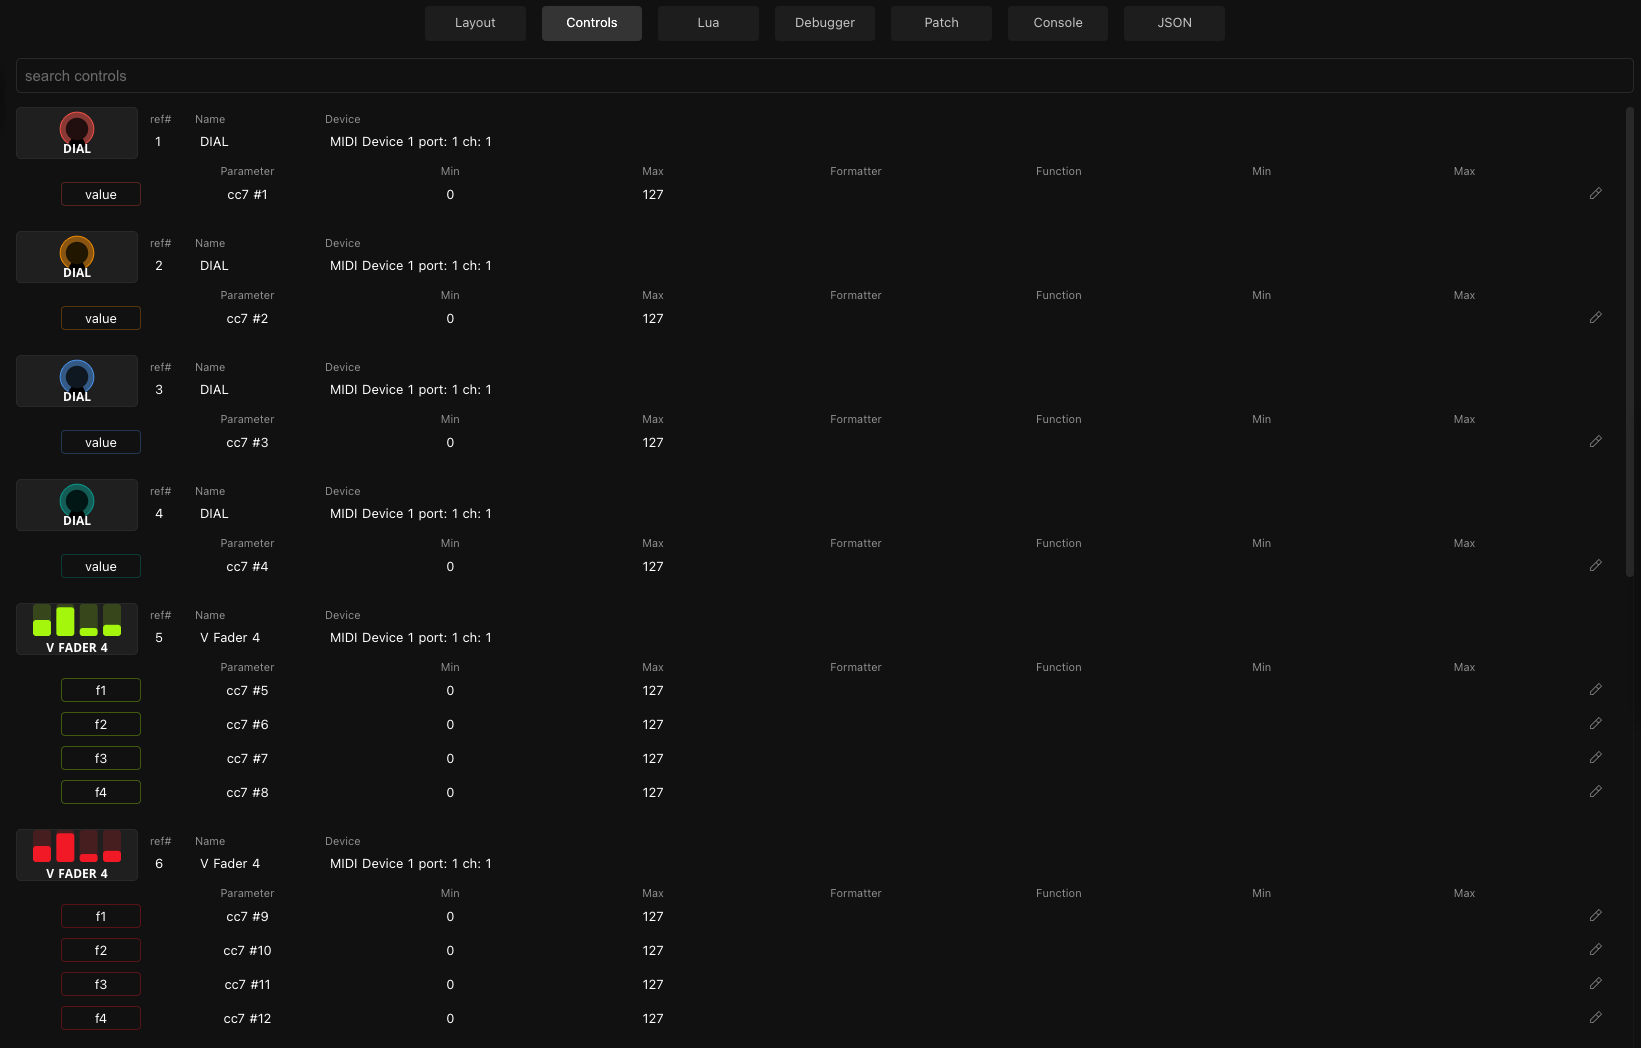
Each entry in the list represents a control and its associated values. Simple controls, like a fader, have a single value. More complex controls - for example an ADSR envelope — include multiple values: Attack, Decay, Sustain, and Release.
The edit icon allows you to toggle a control's values between read-only and edit mode.

When edit mode is enabled, built-in form appear, allowing you to adjust control settings quickly and consistently from a single place. Multiple edit forms can be opened in the same time.
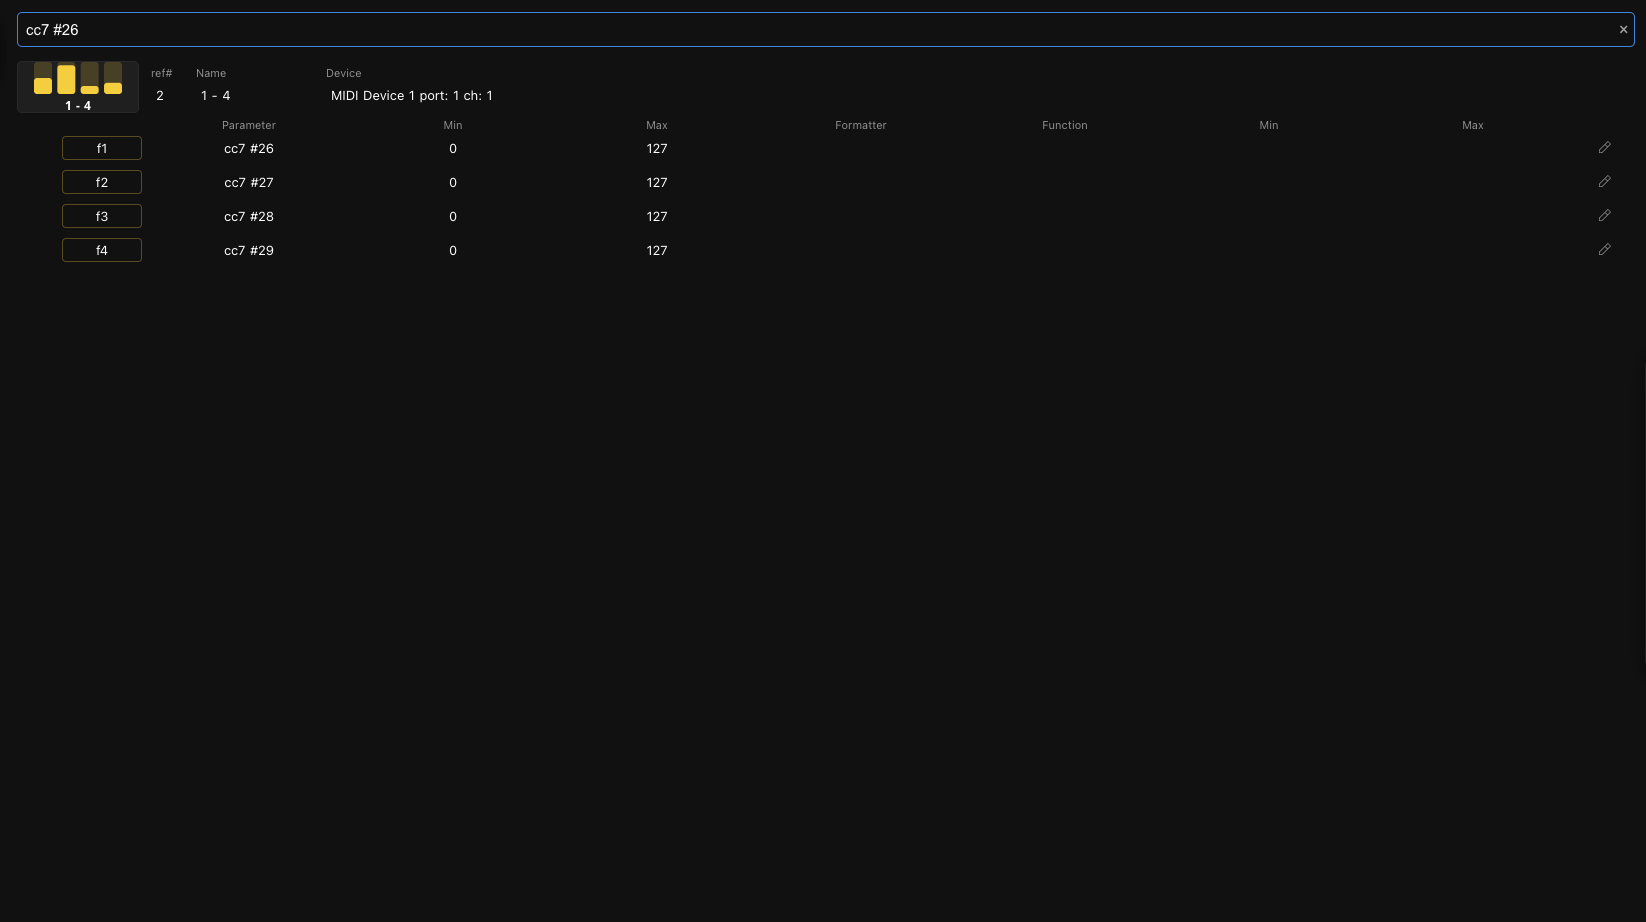
You can also use the search field to quickly find controls based on their properties, including control attributes and MIDI-related settings. Detailed information about search terms and search behavior is provided later in this document.
Lua
The Lua editor is a programmer-grade text editor for editing the Electra One Extension Lua script. The Lua script allows you to enhance a project with dynamic and programmatic behaviour, ranging from simple layout adjustments and MIDI messaging to complex MIDI processing and visual applications.
The editor is divided into two sections: the text editor and the log window. The text editor is displayed in the upper part of the view, with the log window below it. You can adjust how much space each section uses by dragging the divider between them.
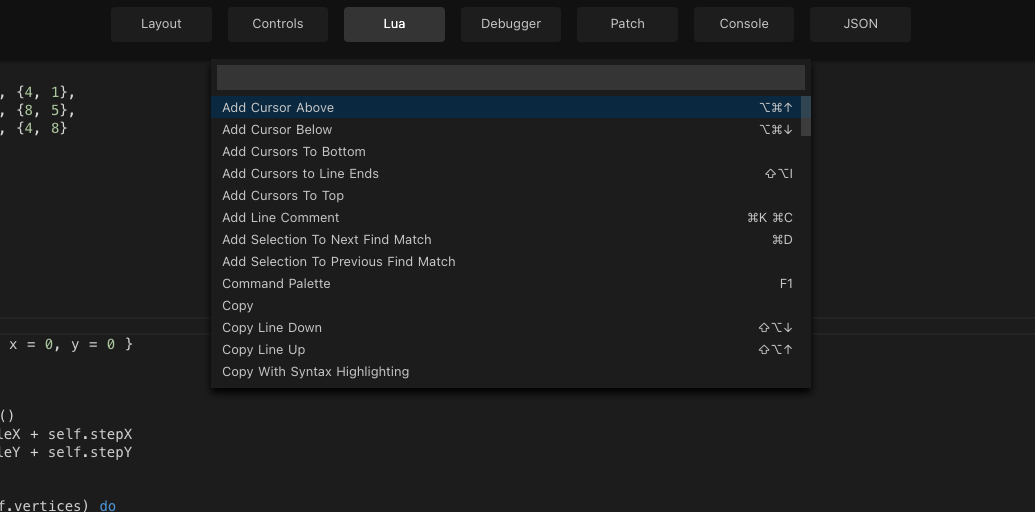
The editor has wide variety of commands mapped to keyboard shortcuts. All available commands can be shown by pressing the F1 key or right-clicking the text editor window and selecting the Command palette.
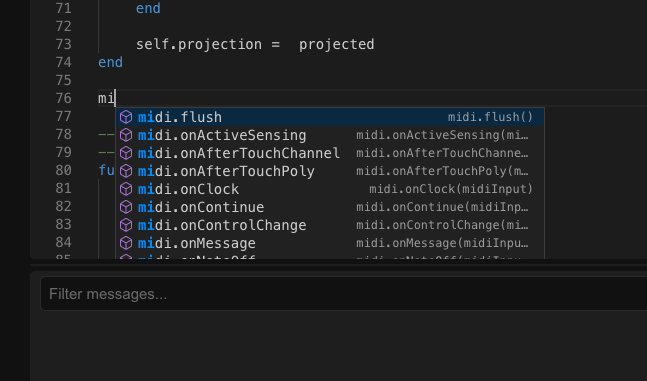
The text editor also features a code autocomplete function, fully supporting all Electra One Lua extension API functions and commands.
The log window shows a stream of log messages from the hardware controller. The log window comes with tools filter messages, set the verbosity of the logs, and enable / disable the auto-scroll.

Debugger
The Debugger views is a close companion of the Lua editor. It is tool to interact with the Electra One Lua script interpreter. It can be used to run Lua commands, call functions defined in the Project's Lua script and observe the log output.
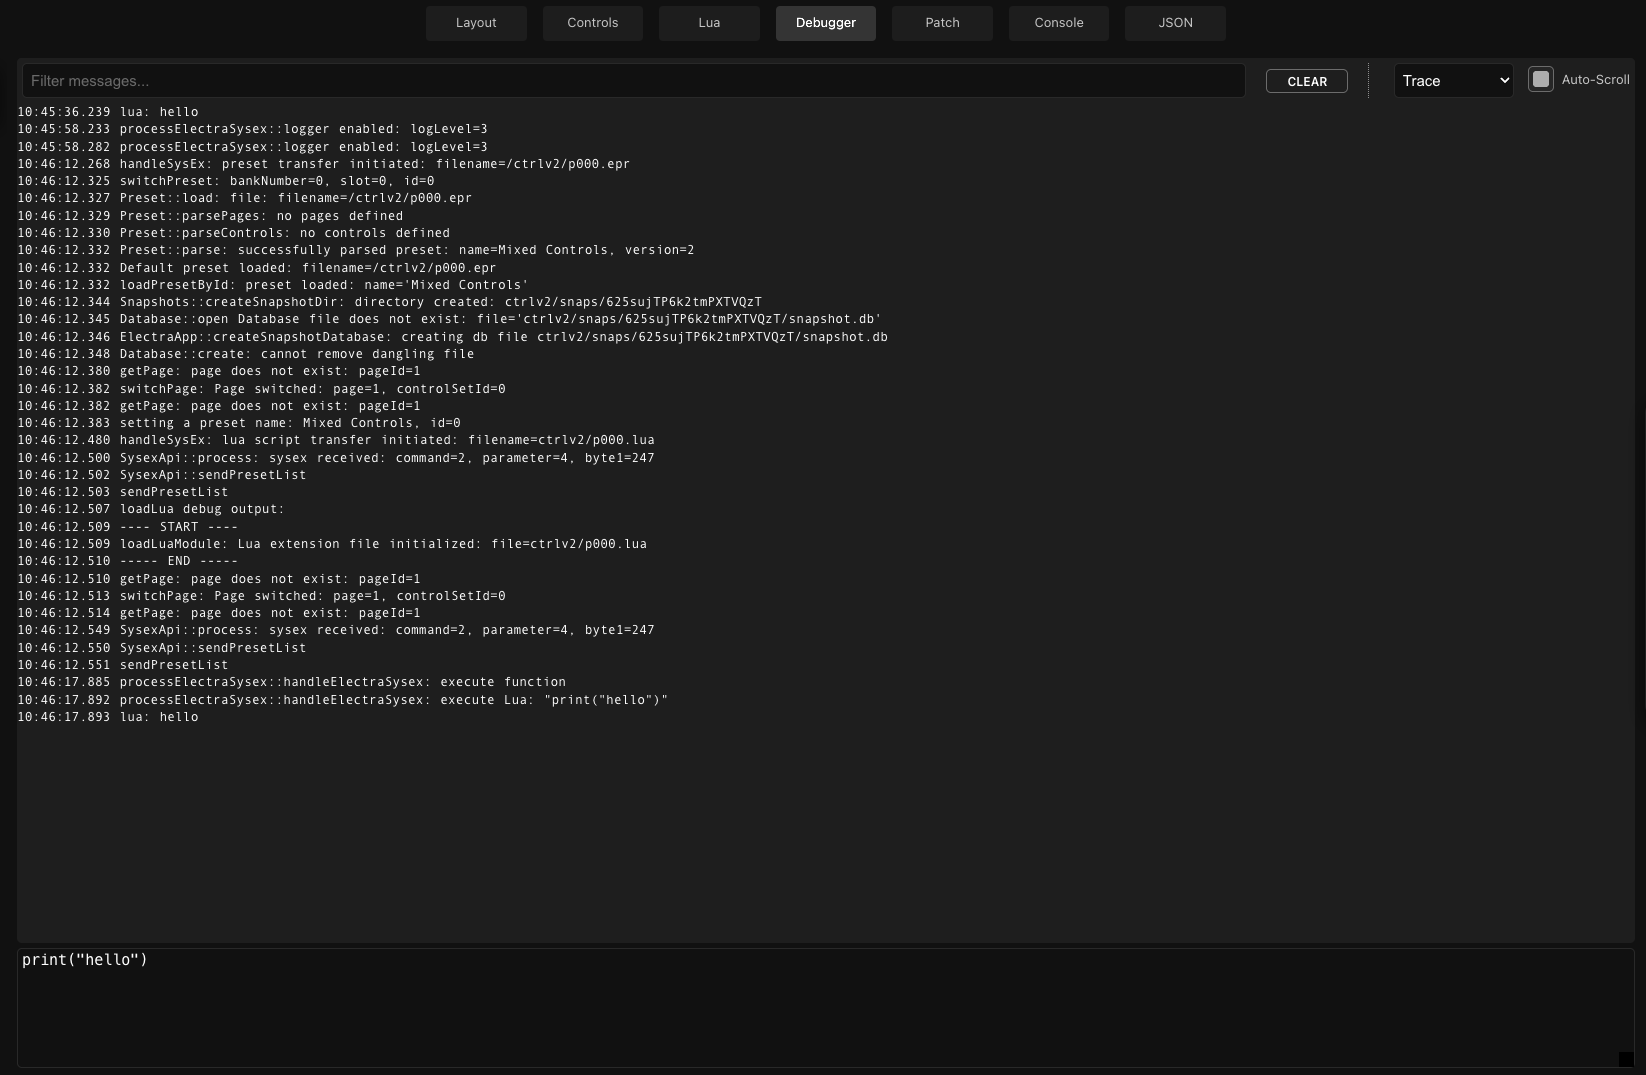
The Debugger consists of two sections. The log window and the Lua command prompt. The log window is in the upper part and it has identical functionality as the log window in the Lua editor view. The Lua command prompt is below the log window and can be used to type in and execute Lua code.

The Lua command prompt allows users to type in Lua commands and call Lua functions. The commands and function calls are executed by pressing the Enter key.

An example of a Lua command to enter is:
print ("variable X = " .. x)Patch
The Patch editor view is a powerful tool for working with SysEx (System Exclusive) MIDI data. SysEx messages are device specific MIDI messages, commonly used to transfer patches, presets, and detailed configuration data between MIDI devices.
Together with the MIDI Console view, the Patch editor provides a comprehensive toolset for building presets that fully support the SysEx implementations of complex MIDI devices. This allows Electra One to communicate with devices that go far beyond standard MIDI messages.
The Patch editor is designed to manage and process SysEx data exchanged between the Electra One MIDI controller and connected MIDI devices. Typical tasks include requesting patch dumps, decoding received data, transforming it, and sending modified data back to the device.
Due to its complexity and advanced capabilities, the Patch editor is described in its own dedicated chapter.
Console
The Console view, previously mentioned in the Patch editor section, is a tool for sending and monitoring MIDI traffic. You can think of it as a built-in MIDI monitor — similar to tools like MIDI-OX or MIDI Monitor — with the added ability to send MIDI messages directly.
The Console is deeply integrated with the rest of the Project editor. Captured MIDI messages can be easily transferred to the Patch editor for further processing or reverse engineering. This integration makes communication with connected MIDI devices highly interactive.
The Console window is divided into two parts: the MIDI Monitor and the MIDI command prompt.
The MIDI Monitor displays incoming and outgoing MIDI messages and allows you to filter and further process them.

The command prompt at the bottom of the window lets you type MIDI messages manually and send them to connected devices.

A full description of the MIDI Console is provided later in this document.
JSON
The JSON view is intended for technically minded users who want direct insight into the data structures used by the Electra One Editor. It displays the JSON-formatted data that defines both the Project and the generated Presets.
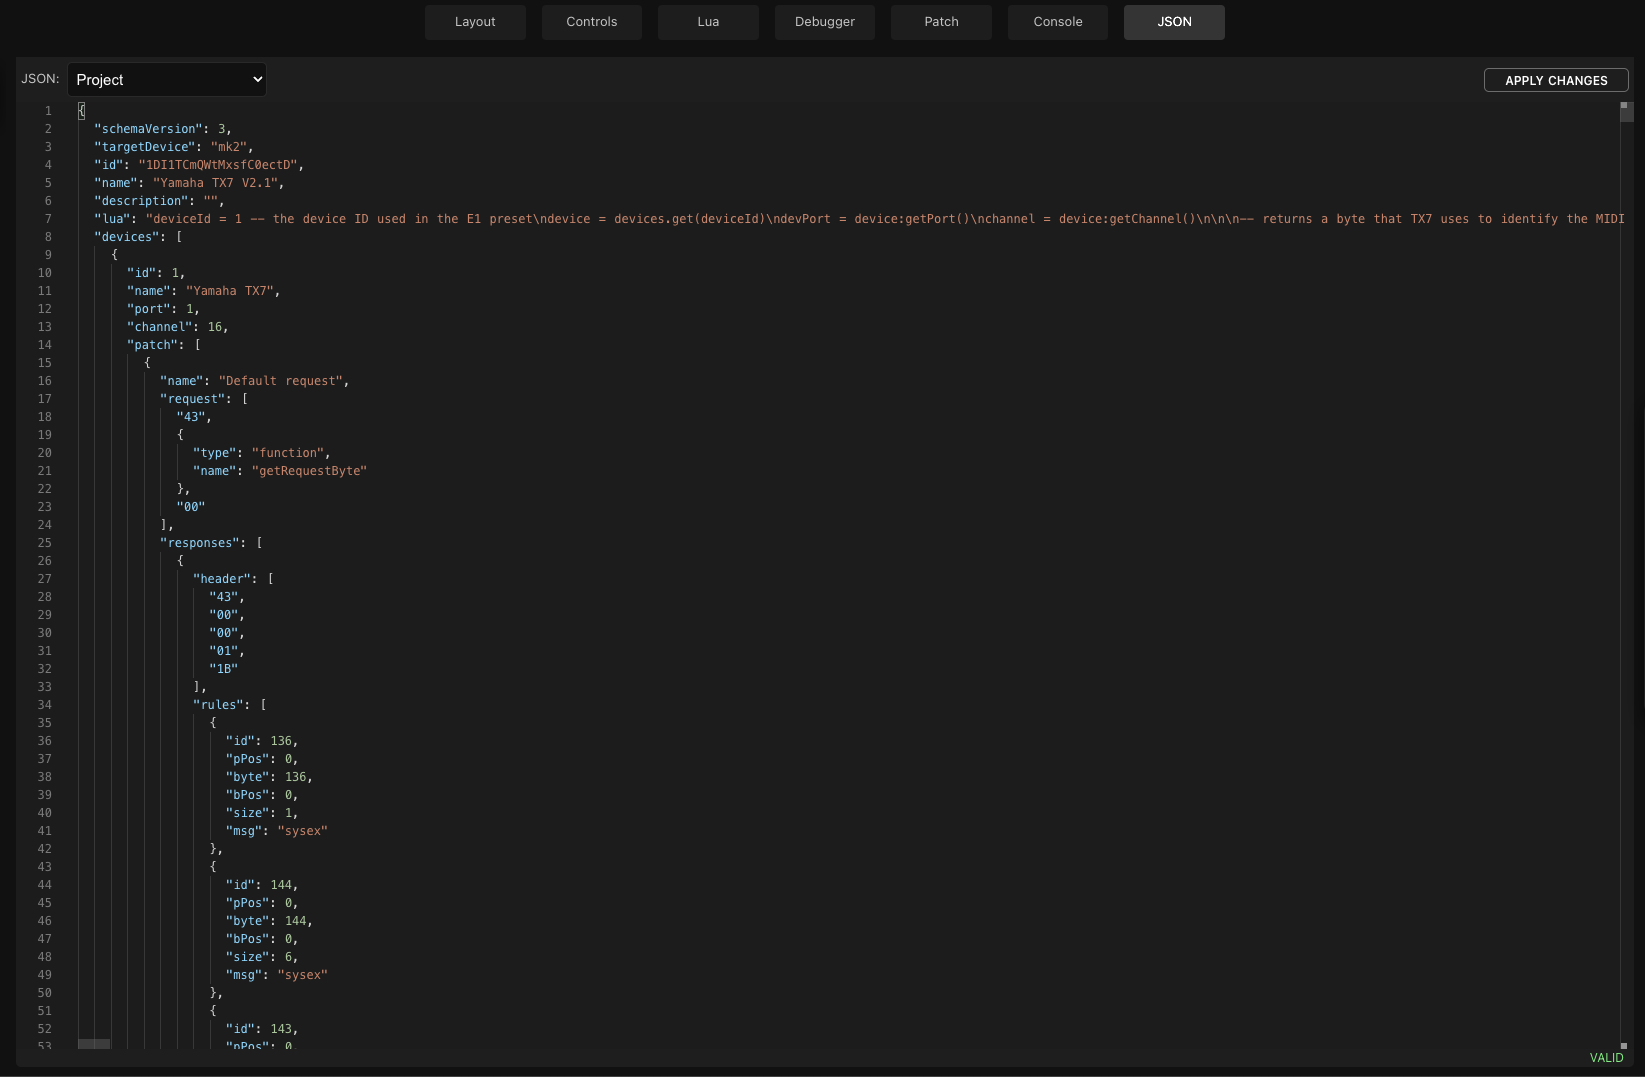
You can switch between Project JSON and Preset JSON using the selection list at the top of the view.
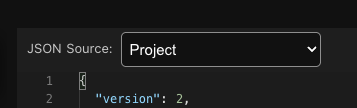
When viewing Preset JSON, you can also select which project layout is used to generate the preset data.
The Project JSON view allows you to inspect and, if needed, edit the project directly at the JSON data level. This can be useful for advanced workflows, debugging, or understanding how the editor represents your project internally.
Preset JSON, on the other hand, shows how the project data is compiled for a specific target controller. This view is read-only and provided for inspection and verification only.
Project Actions
Before diving into adding your first controls and editing them, it is useful to become familiar with the project related actions located on the right side of the application page. You will use them often.

Send to Electra

Uploads the current version of the preset to your Electra One hardware controller. The preset is generated for the currently connected controller model. If no controller is connected, the Send to Electra button is not available.
If there are unsaved changes, a new revision is automatically saved to the revision history before the preset is uploaded. This ensures you always have a copy of the project exactly as it was at the moment it was sent to the controller.
The preset can also be sent using the SHIFT + CMD + s (MacOS) or SHIFT + CTRL + s (Windows) keyboard shortcut.
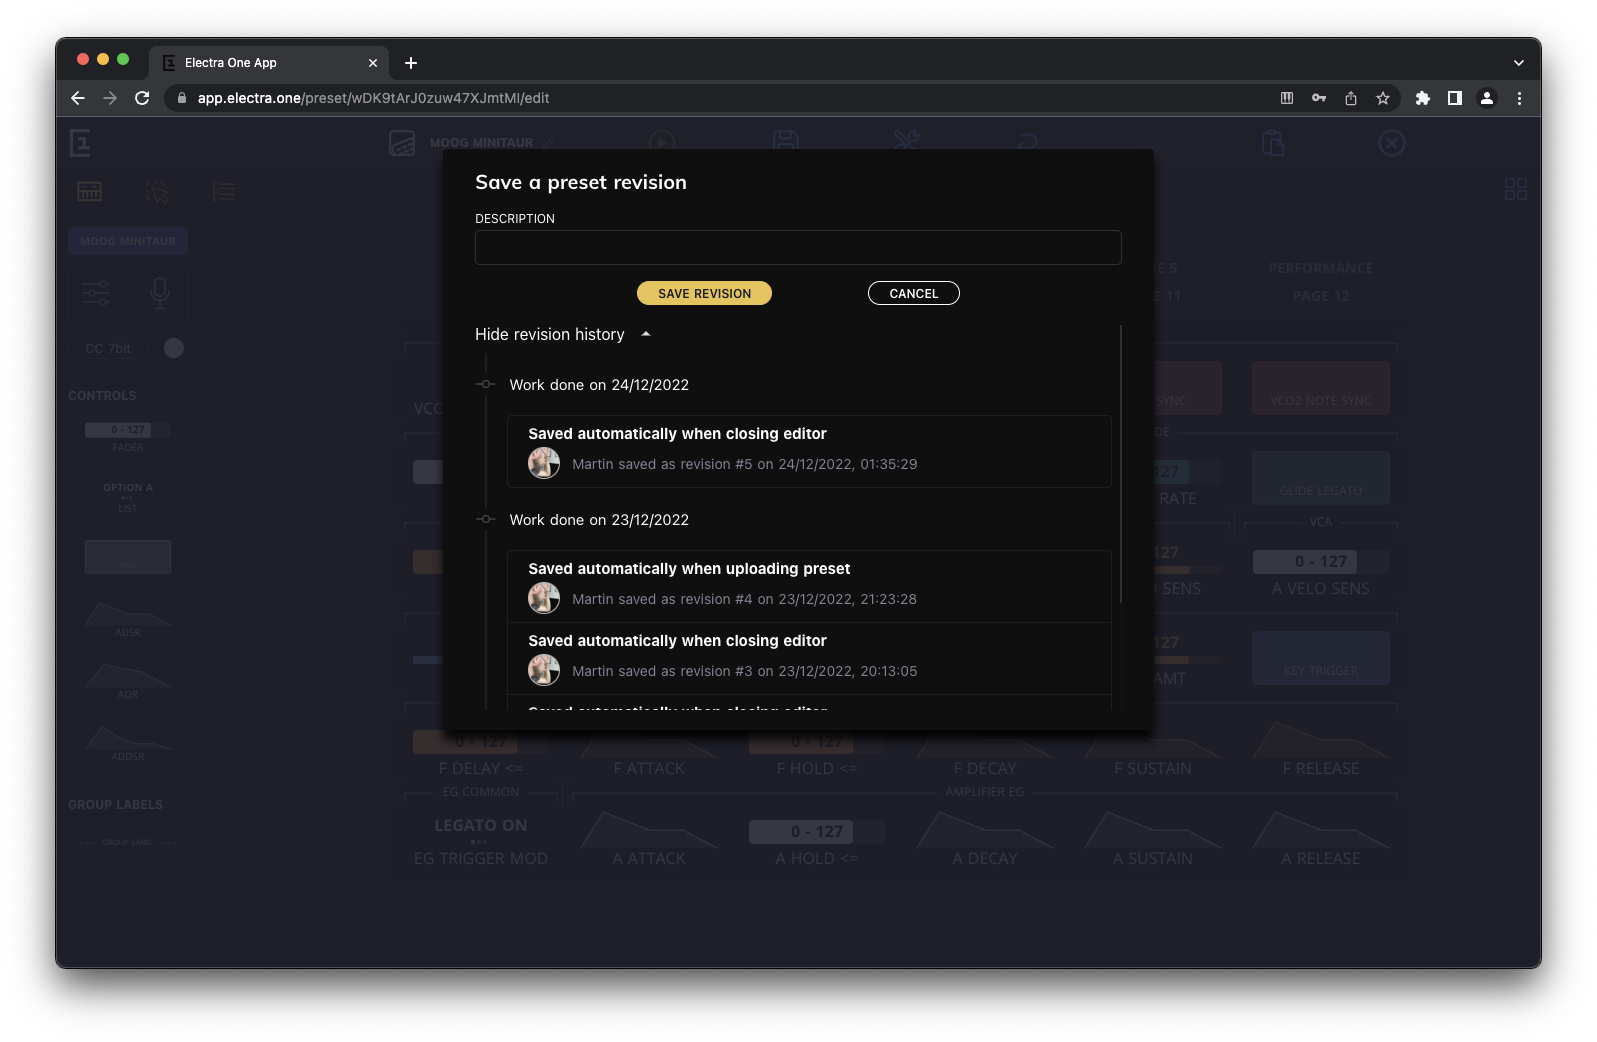
Save a revision

Saves the preset and stores a new revision. You can add a note to describe the changes made. For more details, see the Preset revisions section.
The preset can also be saved using the CMD + s (MacOS) or CTRL + s (Windows) keyboard shortcut.
Undo

Reverts the most recent change made to the preset layout or properties.
Redo

Reapplies the last undone change.
Paste

Inserts the contents of the clipboard into the Layout at the currently selected position. Use CMD + c (MacOS) or CTRL + c (Windows) to copy controls to the clipboard.
Pasting can also be performed using CMD + v (MacOS) or CTRL + v (Windows).
Note: Controls cannot be pasted into group slots. In addition, the editor restricts pasting controls into layout slots assigned to hardware buttons on the Electra One Mini. If you attempt to paste a control into an unsupported slot, the editor will notify you that the action is not possible.
Split view

The Split view opens a second instance of the editor, allowing you to work with two views side by side. This can significantly improve efficiency — for example, you can keep the Layout view open while editing Lua code at the same time or work on the Patch dump parsing while using the MIDI Console view.
Split view requires a sufficiently wide screen to display both views comfortably. If the screen is too narrow, the option is disabled.
The width of each view can be adjusted by dragging the divider between them.
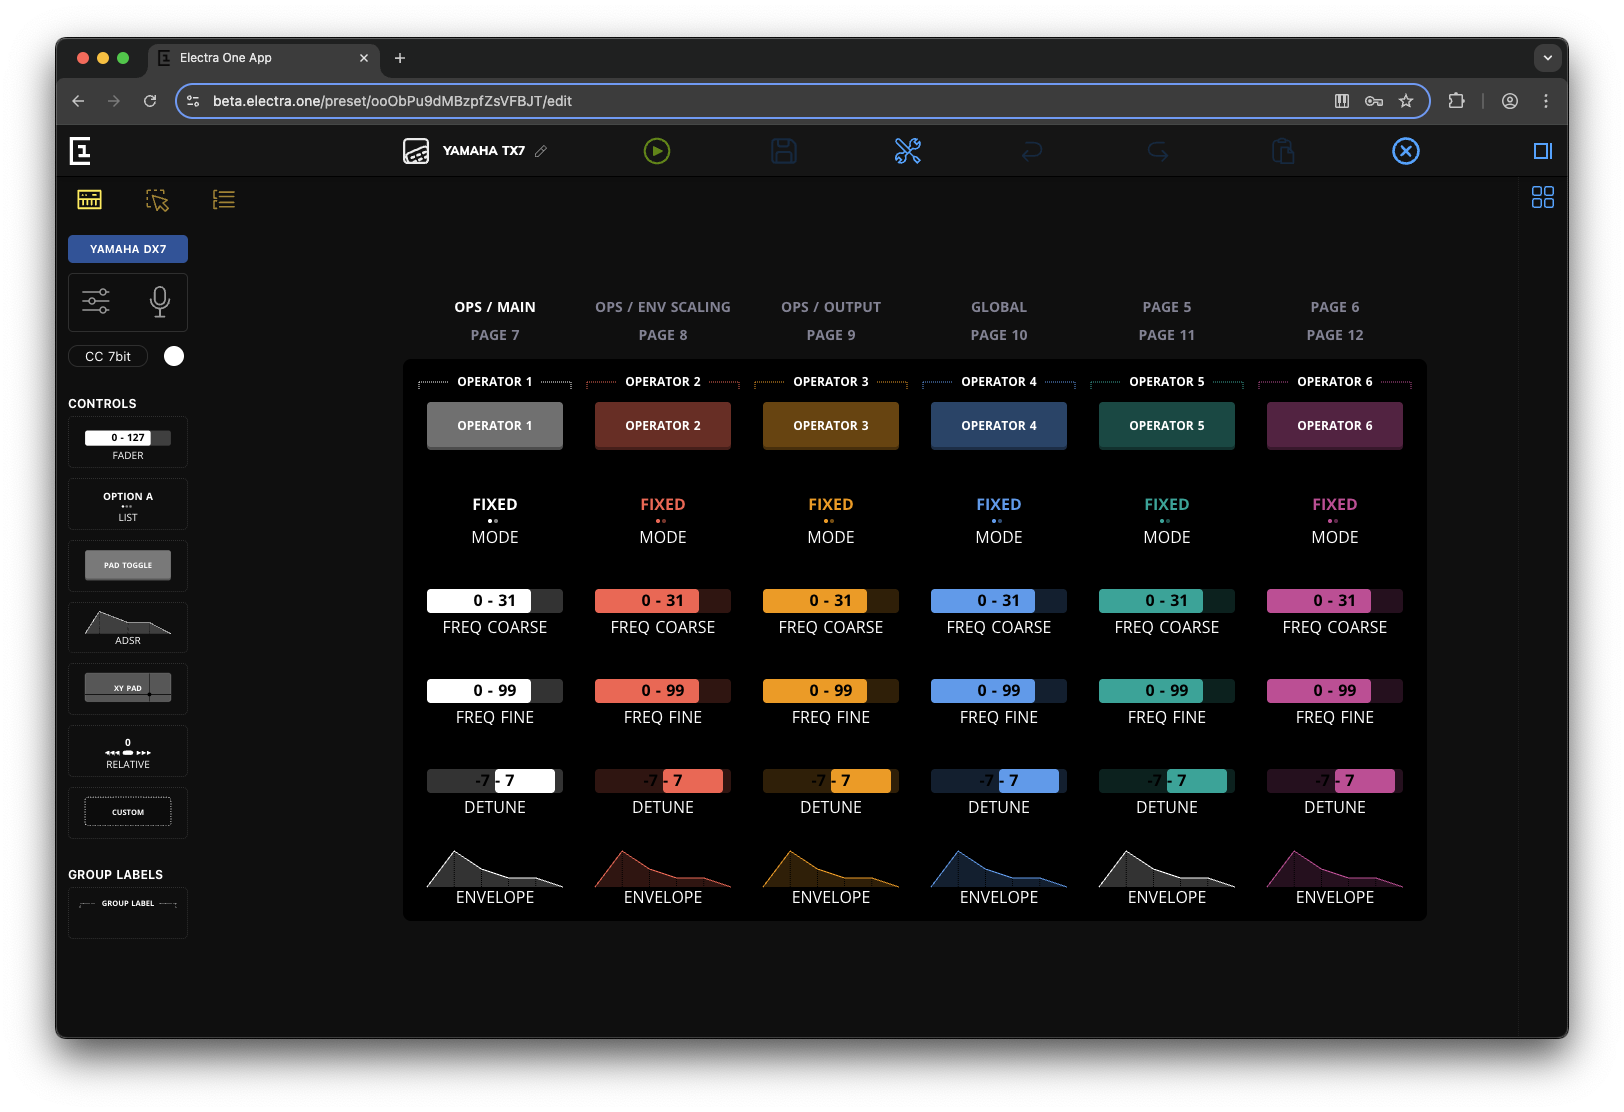
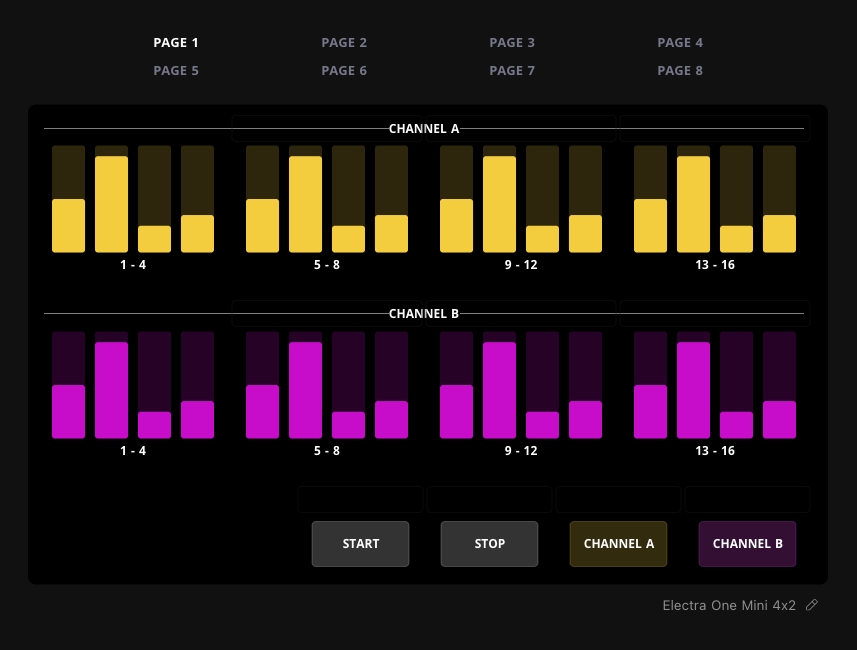
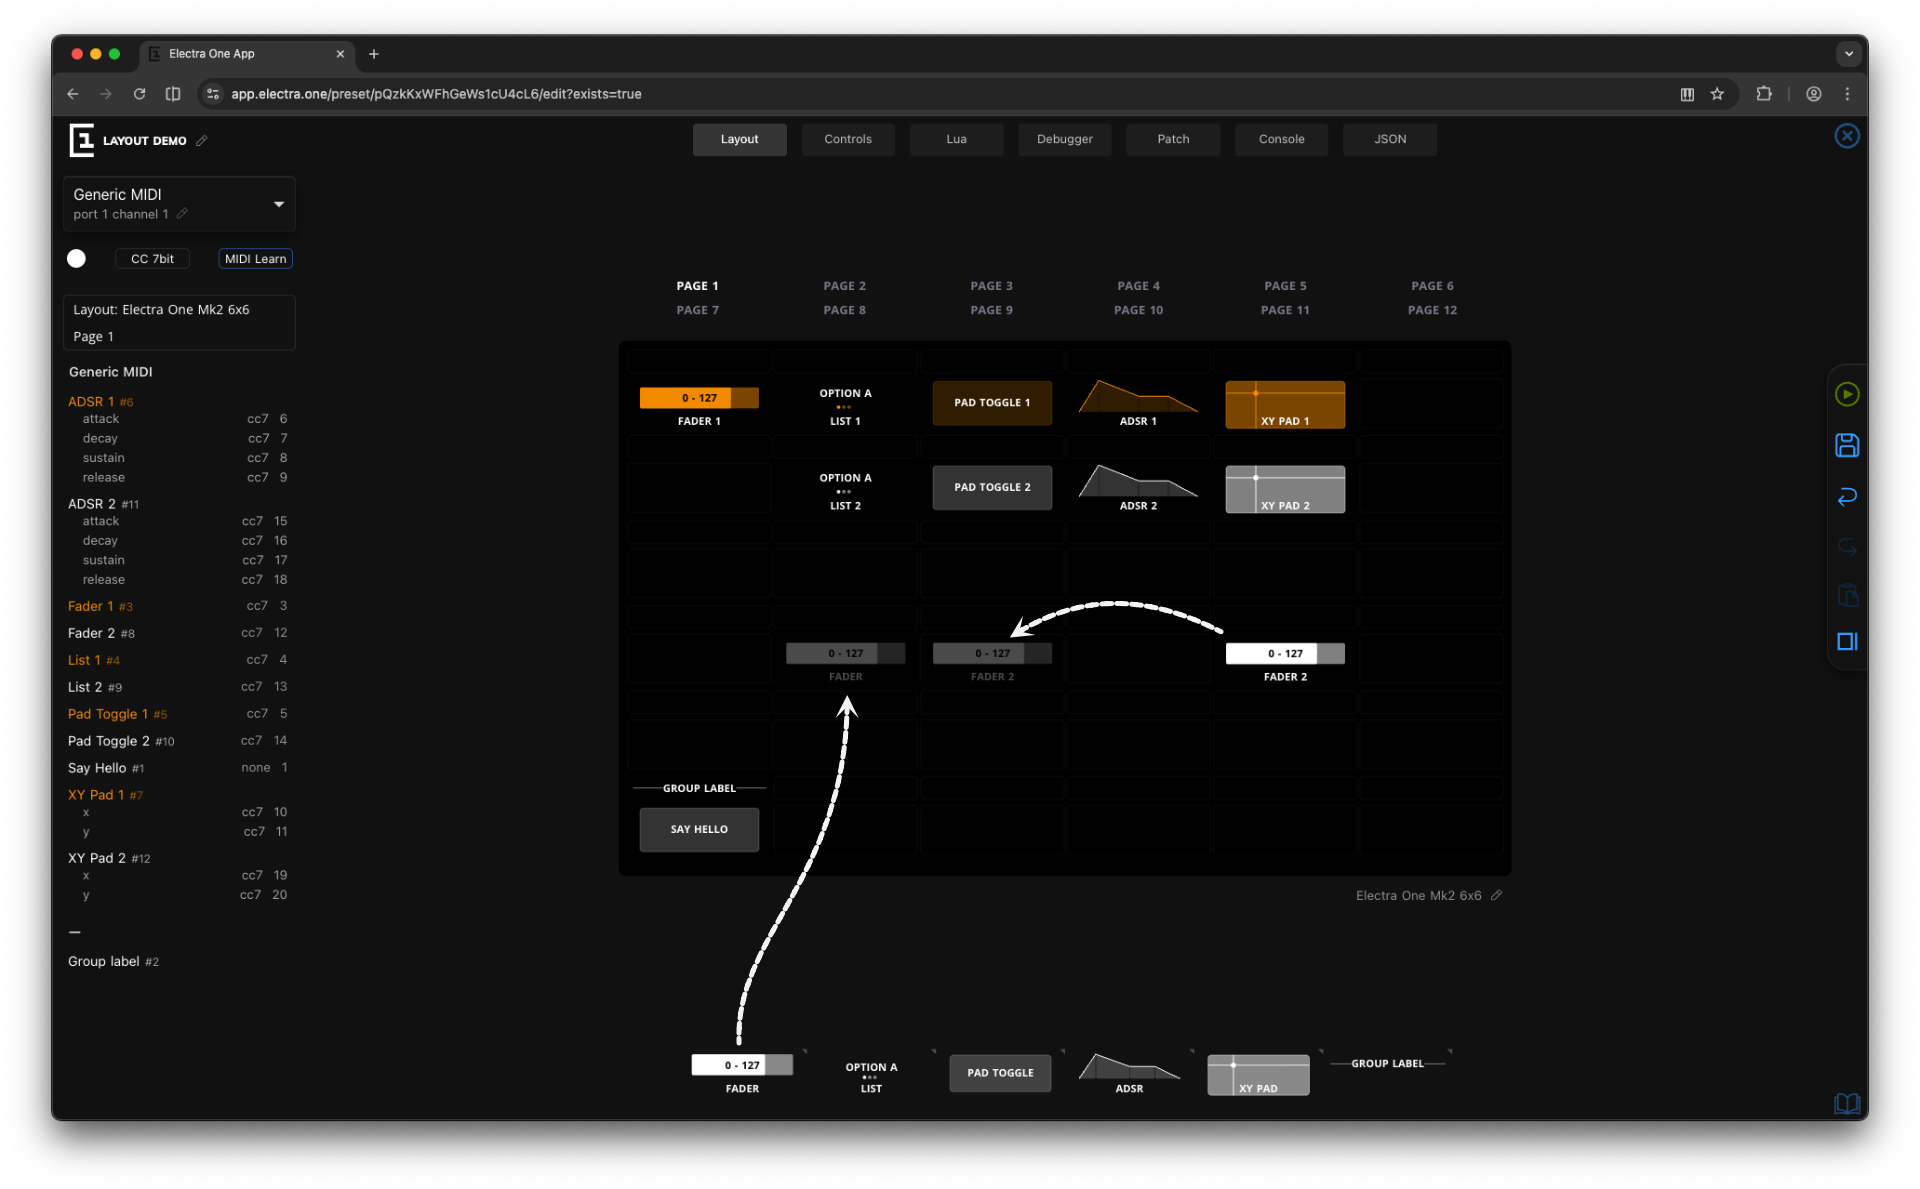
Layout
The Layout represents one preset page displayed the Electra One controller. This is the tool you use to build your preset by placing, arranging, and editing the controls and groups.
Page selection
Pages are an important part of Electra One presets. They increase the number of controls available within a single preset and help you organize them in a clear and meaningful way. How pages are used is entirely up to you — they do not change how controls behave, but serve purely as an organizational tool.
Most users group related controls on the same page. Other approaches are also possible; for example, a page can represent a single song, a scene in a live performance, or a specific sound or mode of a device.

The page is selected by clicking on its name. The edit icon is there to open the page properties in the Sidebar. Editing pages is described later in this document.
Adding controls
To add a control, simply drag it from the Control Repository panel at the bottom of the screen onto the Layout grid using your mouse. You can also use drag-and-drop to reposition controls within the Layout grid.
Changing control variants
The Control repository provides a selection of controls that can be placed on the Layout grid. Because many controls are available in multiple variants, displaying all of them at once would be impractical. Instead, controls are grouped by type.
You can select a specific variant by clicking a control group and choosing the desired variant. The selected variant then becomes active and is used for subsequent drag-and-drop actions.
To close the variant selection, click the variant you want to use, click anywhere outside the selection, or press the Escape key on your keyboard.
Working with multiple layouts
When Split view is used to open a second Layout view, you can use drag-and-drop to move or reuse controls and groups between pages and layouts.
There are two different outcomes when dragging a control, depending on where you drop it:
Moving a control (within the same layout)
When you drag a control between pages of the same layout, the control is moved. This means the control is removed from its original page and placed on the new one.
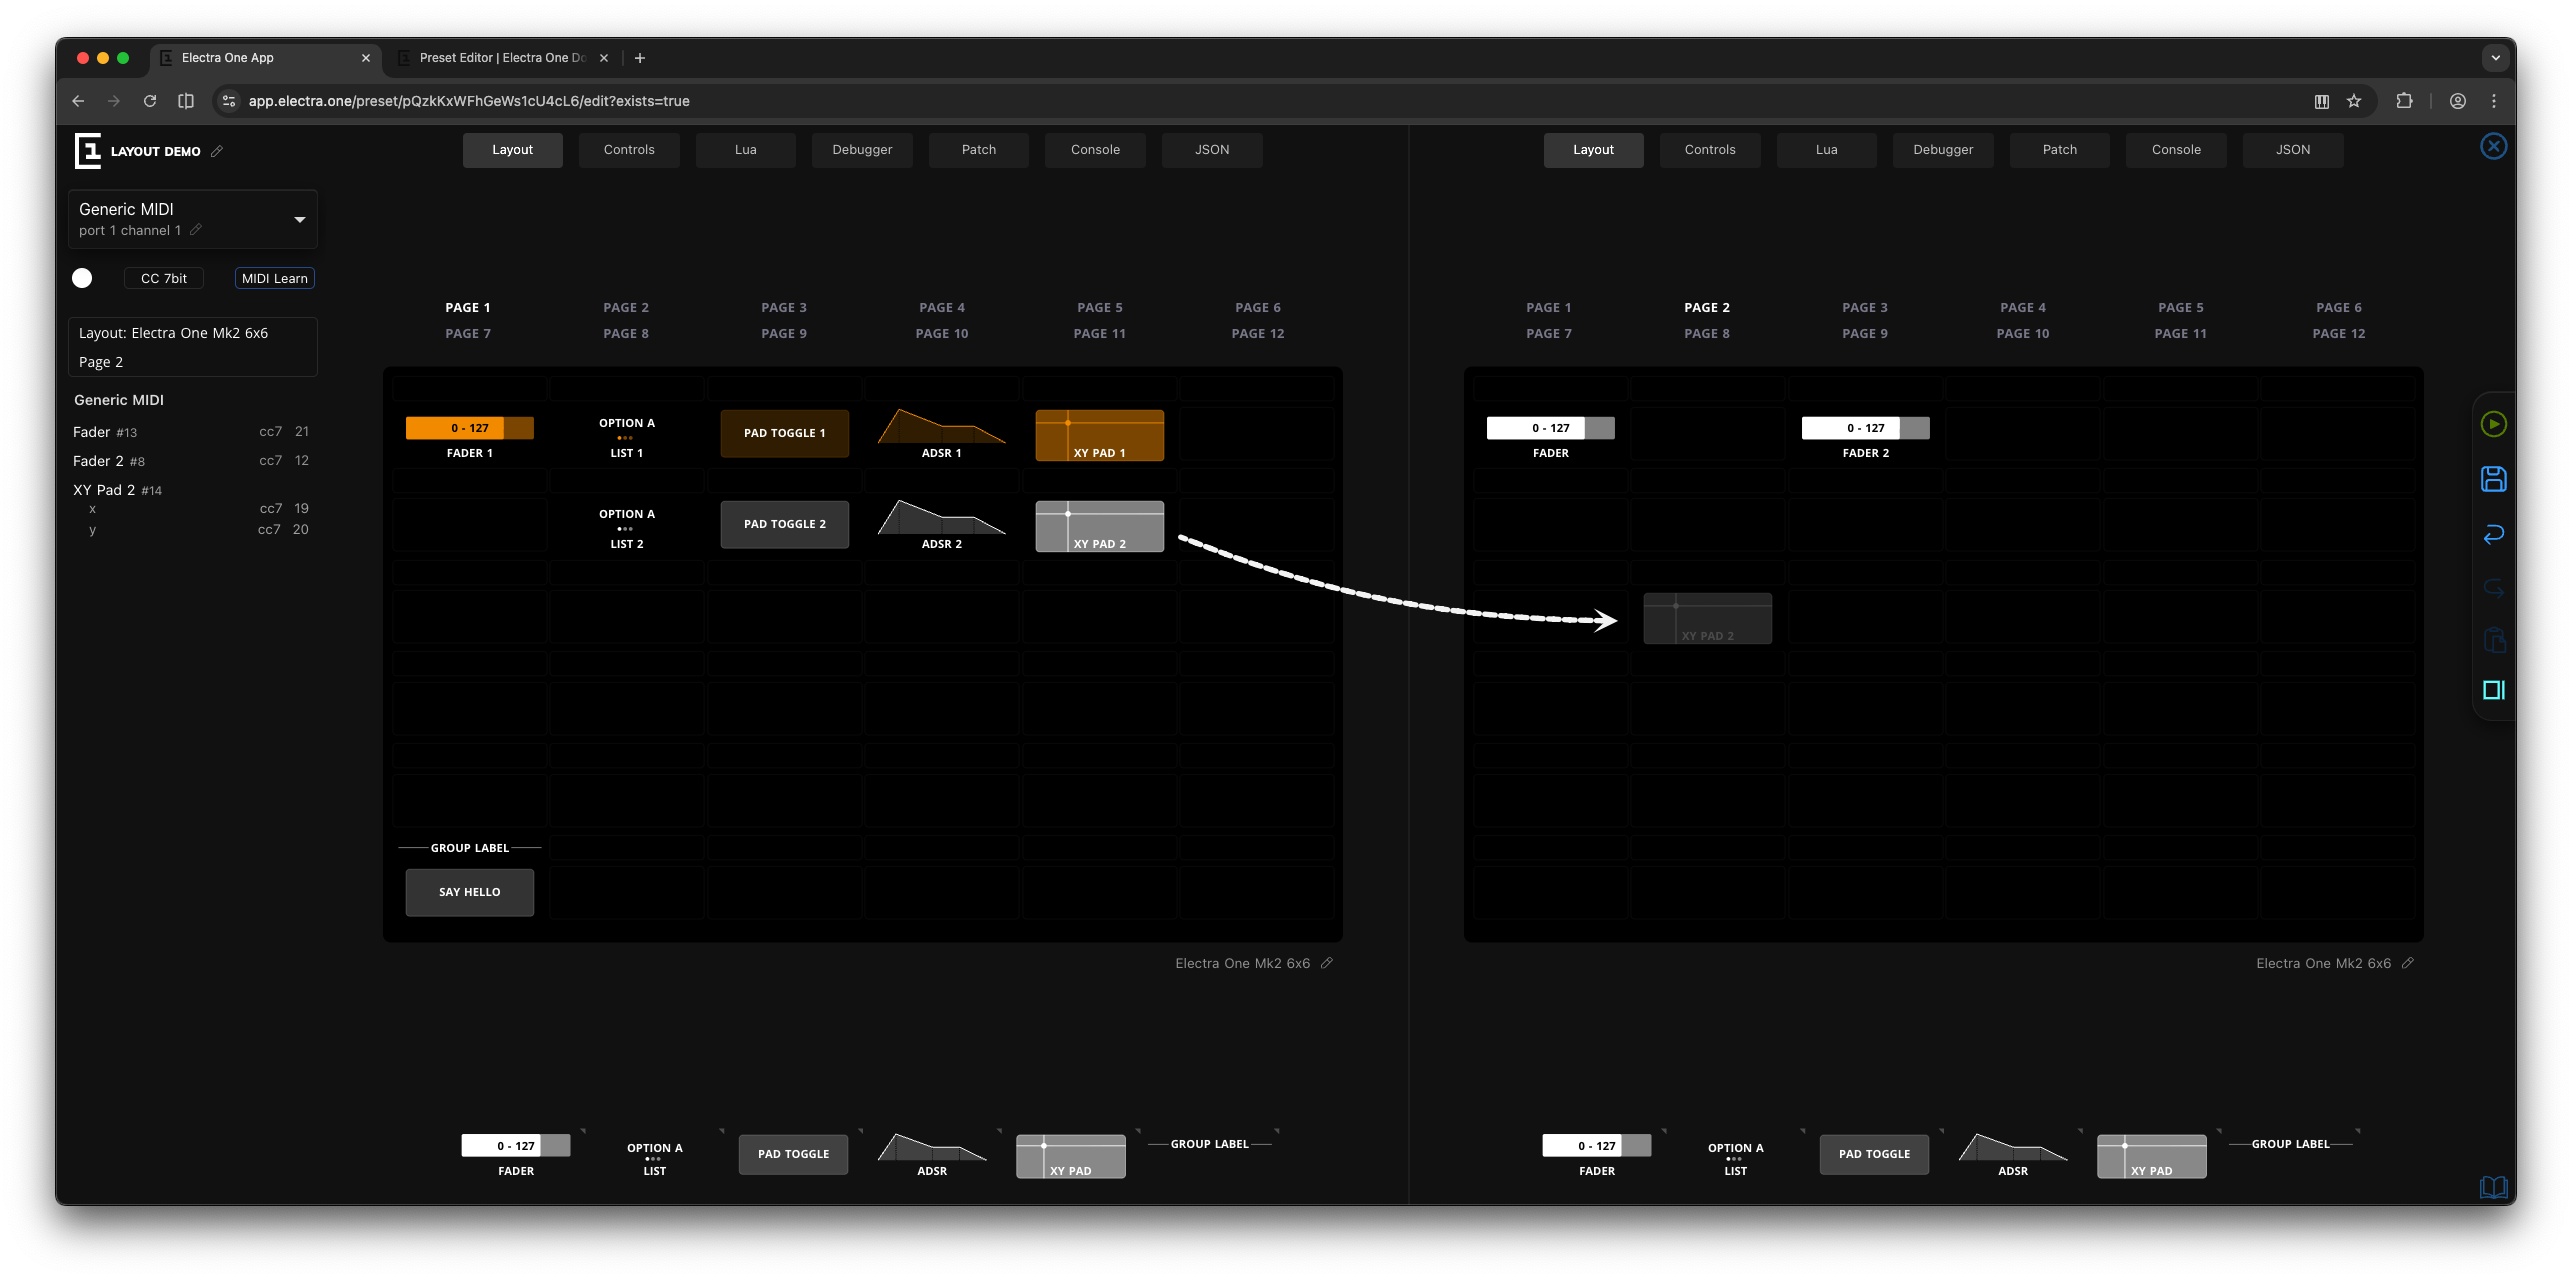
Reusing a control (between different layouts)
When you drag a control from one layout to a different layout, the control is reused rather than copied. Reusing a control means that both layouts reference the same control instance.
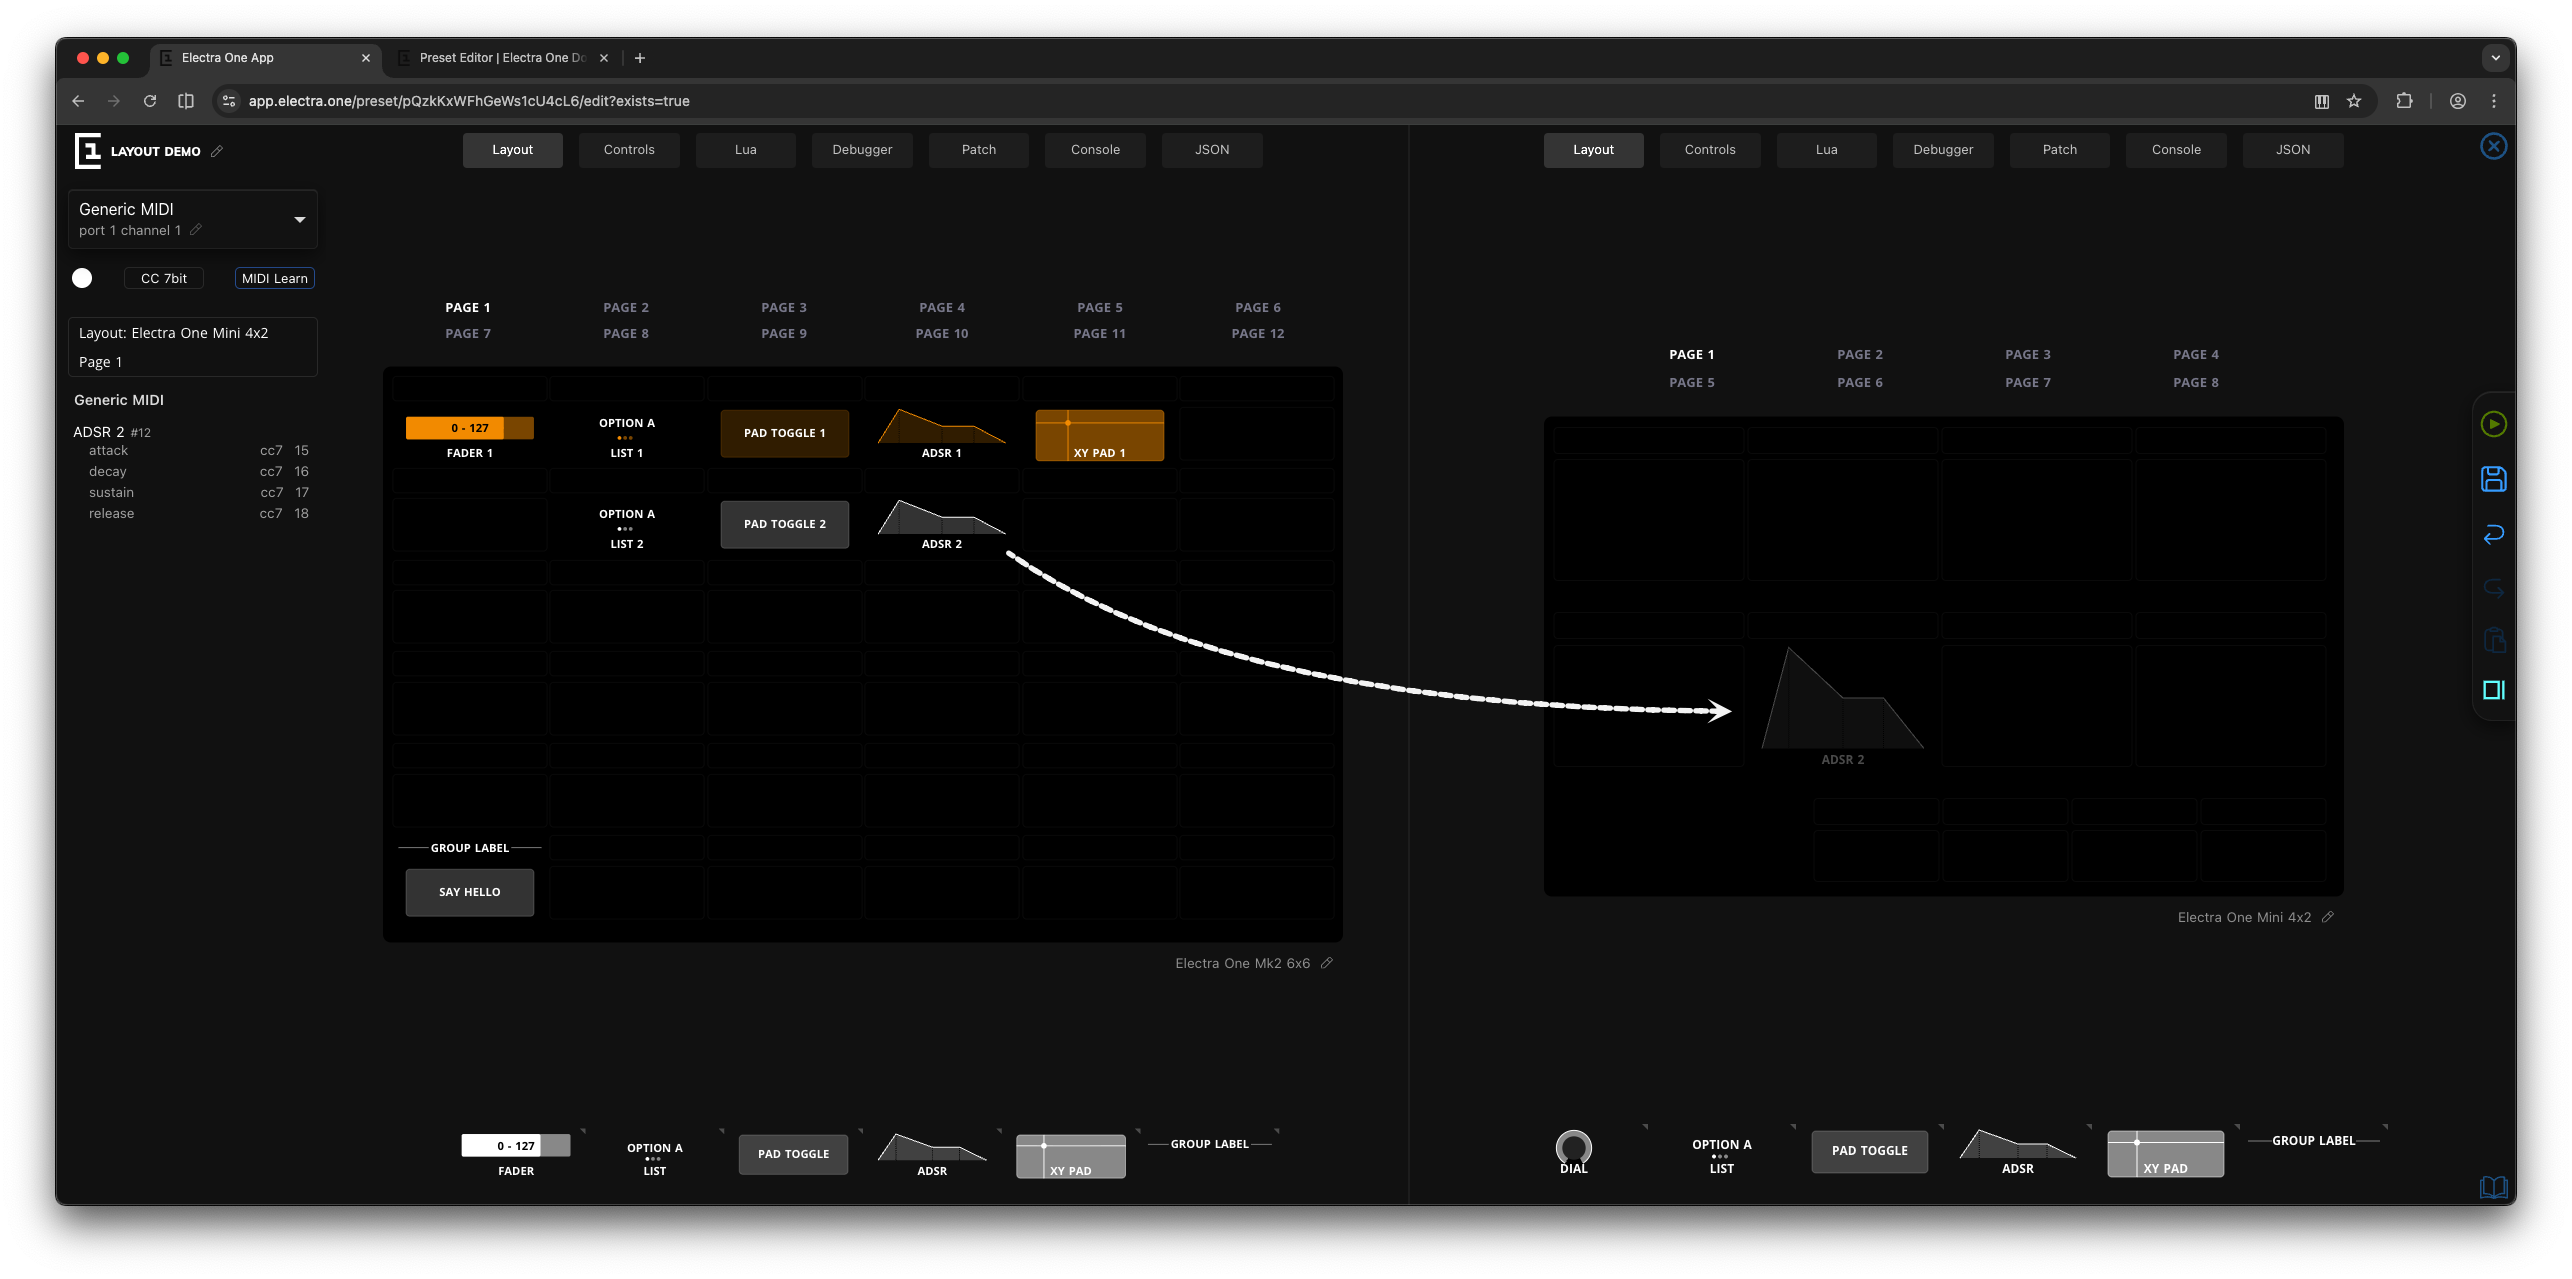
A reused control:
- does not create a duplicate
- shares all attributes with the original control, including the reference
- stays fully synchronized, any change made to the control affects all layouts where it is used
This is especially useful when creating layouts for different controller models, uch as Electra One mk2 and Electra One Mini.
Selecting controls
You can select an individual control by clicking it with the mouse or by navigating the Layout using the arrow keys.
To select multiple controls:
- Click the top-left control of the desired selection area
- Hold
SHIFTand click the bottom-right control
All selected controls and groups are highlighted with a dark blue background:
When at least one control is selected, the Sidebar is displayed. If a single control is selected, the Sidebar shows its attributes (properties). If multiple controls are selected, the Sidebar displays a list of the selected controls.
The Sidebar is described in more detail later in this document.
Keyboard shortcuts
The Layout can also be navigated using the arrow keys, and several useful keyboard shortcuts are supported for quicker editing:
| Keyboard shortcut | Action |
|---|---|
| SHIFT + mouse click | select a continuous range of Controls |
| CMD / CTRL + c | copy to the clipboard |
| CMD / CTRL + x | cut to the clipboard |
| CMD / CTRL + v | paste from the clipboard |
| BACKSPACE | remove |
| ARROWS | navigating within the grid |
| SPACE | will display information about Category and Parameter assignment for all Controls on the page |
| 1 .. 6 | set a color of selected controls and groups |
Keyboard shortcuts are especially helpful when working with multiple selected controls. You can use cut and paste to quickly move groups of controls between pages.
Sidebar
The Sidebar is located on the left side of the editor window and provides access to context sensitive tools and settings.
The content of the Sidebar changes depending on what is currently selected or which action you are performing. This allows the editor to show only the options that are relevant at the moment, keeping the interface focused and easy to use.
Depending on the context, the Sidebar can display:
- A Defaults selector
- A Page overview
- The MIDI Learn panel
- Forms for editing properties of the currently selected object or objects
Defaults
When you add a new control from the Control repository, it is initially configured to send a CC (Control Change) message to the first MIDI device defined in the project and is assigned a white color.
In many cases, these initial settings are not what you want. Changing the MIDI message type, MIDI device, and color for every new control individually would be time consuming and repetitive.
The Defaults panel helps you avoid this repetitive work. It lets you define the settings that will be automatically applied to all newly added controls.
You can configure the following default settings:
- MIDI device - select the default MIDI device that new controls will send messages to. The edit icon allows you to adjust the MIDI port and channel for the selected device.
- Control color - the color picker sets the color used for newly added controls in the Layout.

- MIDI message type - choose the default MIDI message type that will be assigned to new controls.
The [MIDI learn] button opens the MIDI Learn panel, which allows you to assign MIDI messages by interacting with an external device. More details about MIDI Learn are provided later in this document.
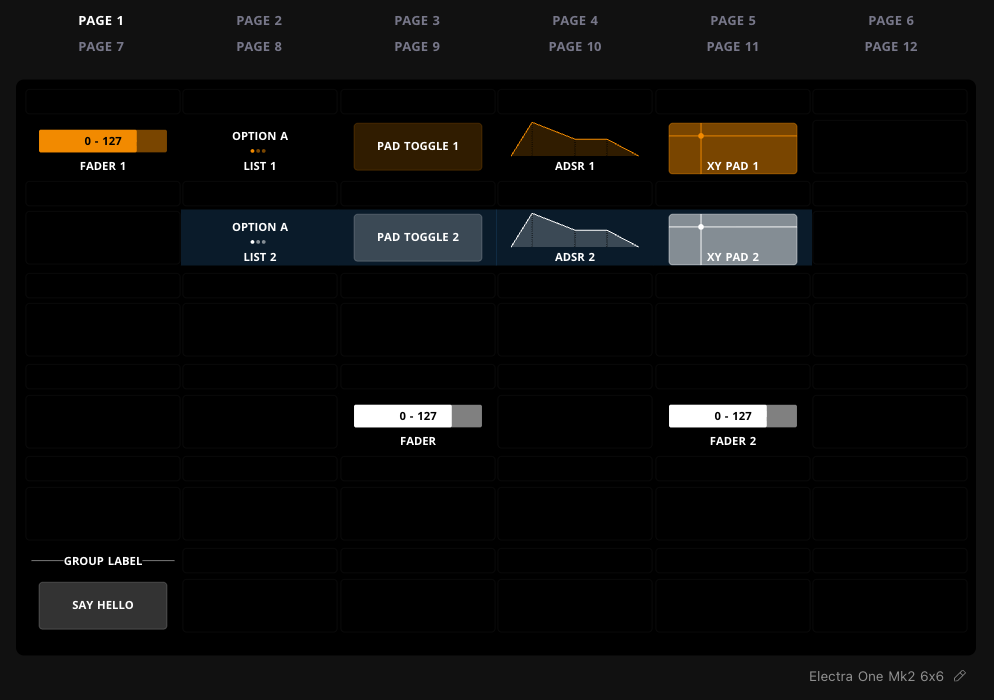
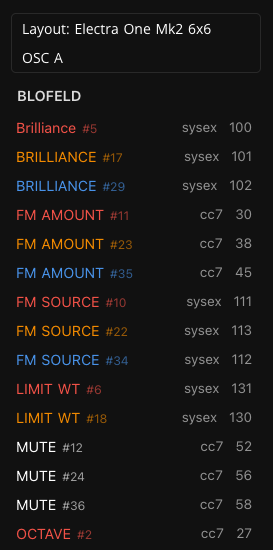
Page overview
The Page overview is shown when no objects are selected. It provides a quick summary of the controls on the currently selected page, including their assigned MIDI messages and reference numbers.
When using Split view to display two layouts at the same time, the Page overview always shows information for the layout that is currently active.
Moving the mouse pointer over an entry in the Page overview highlights the corresponding control in the Layout view. Likewise, moving the pointer over a control in the Layout highlights its entry in the Page overview. This makes it easy to identify and locate controls at a glance.
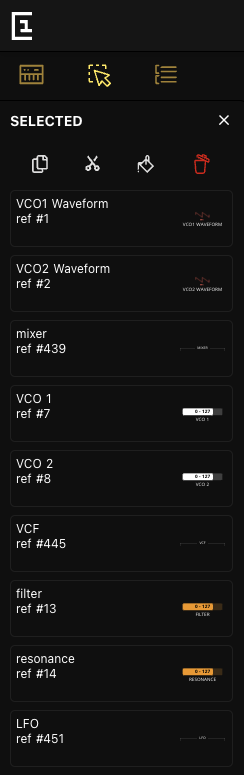
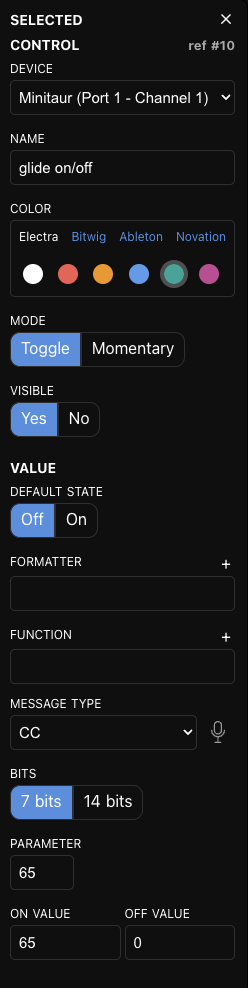
Selected panel
![]()
The Selected panel appears whenever one or more objects are selected in the Layout grid. Selected objects can include controls, groups, or pages.
When a single object is selected, the panel displays its editable properties. When multiple objects are selected, the panel shows a list of the selected items and provides actions that can be applied to all of them at once.
Currently, the following actions are available for selected objects:
- Cut or copy to clipboard
- Change color
- Delete
A more detailed description of the Selected panel for a single selected object is provided in the following chapter.
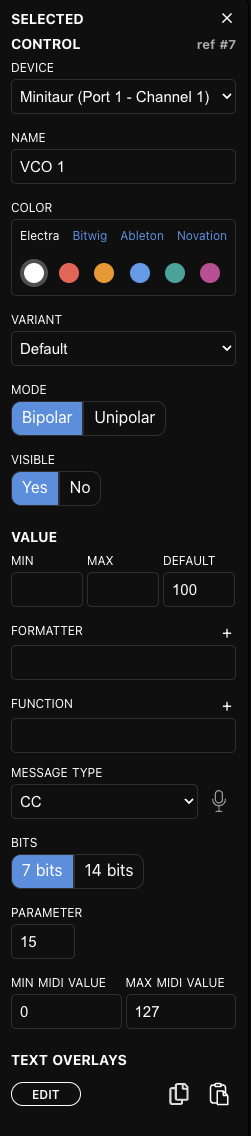
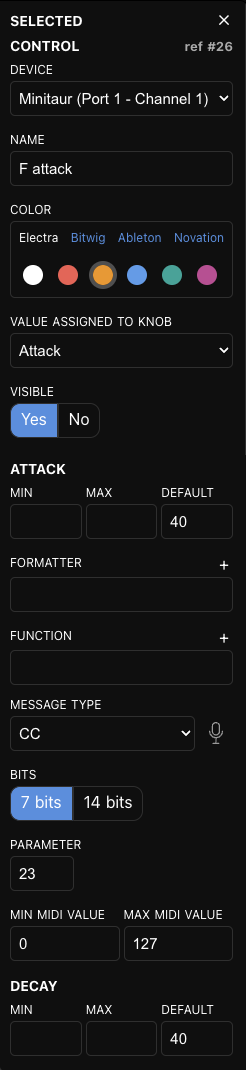
Control attributes
When a single control is selected on the Grid, its attributes are shown in the Selected panel on the left side of the editor window.
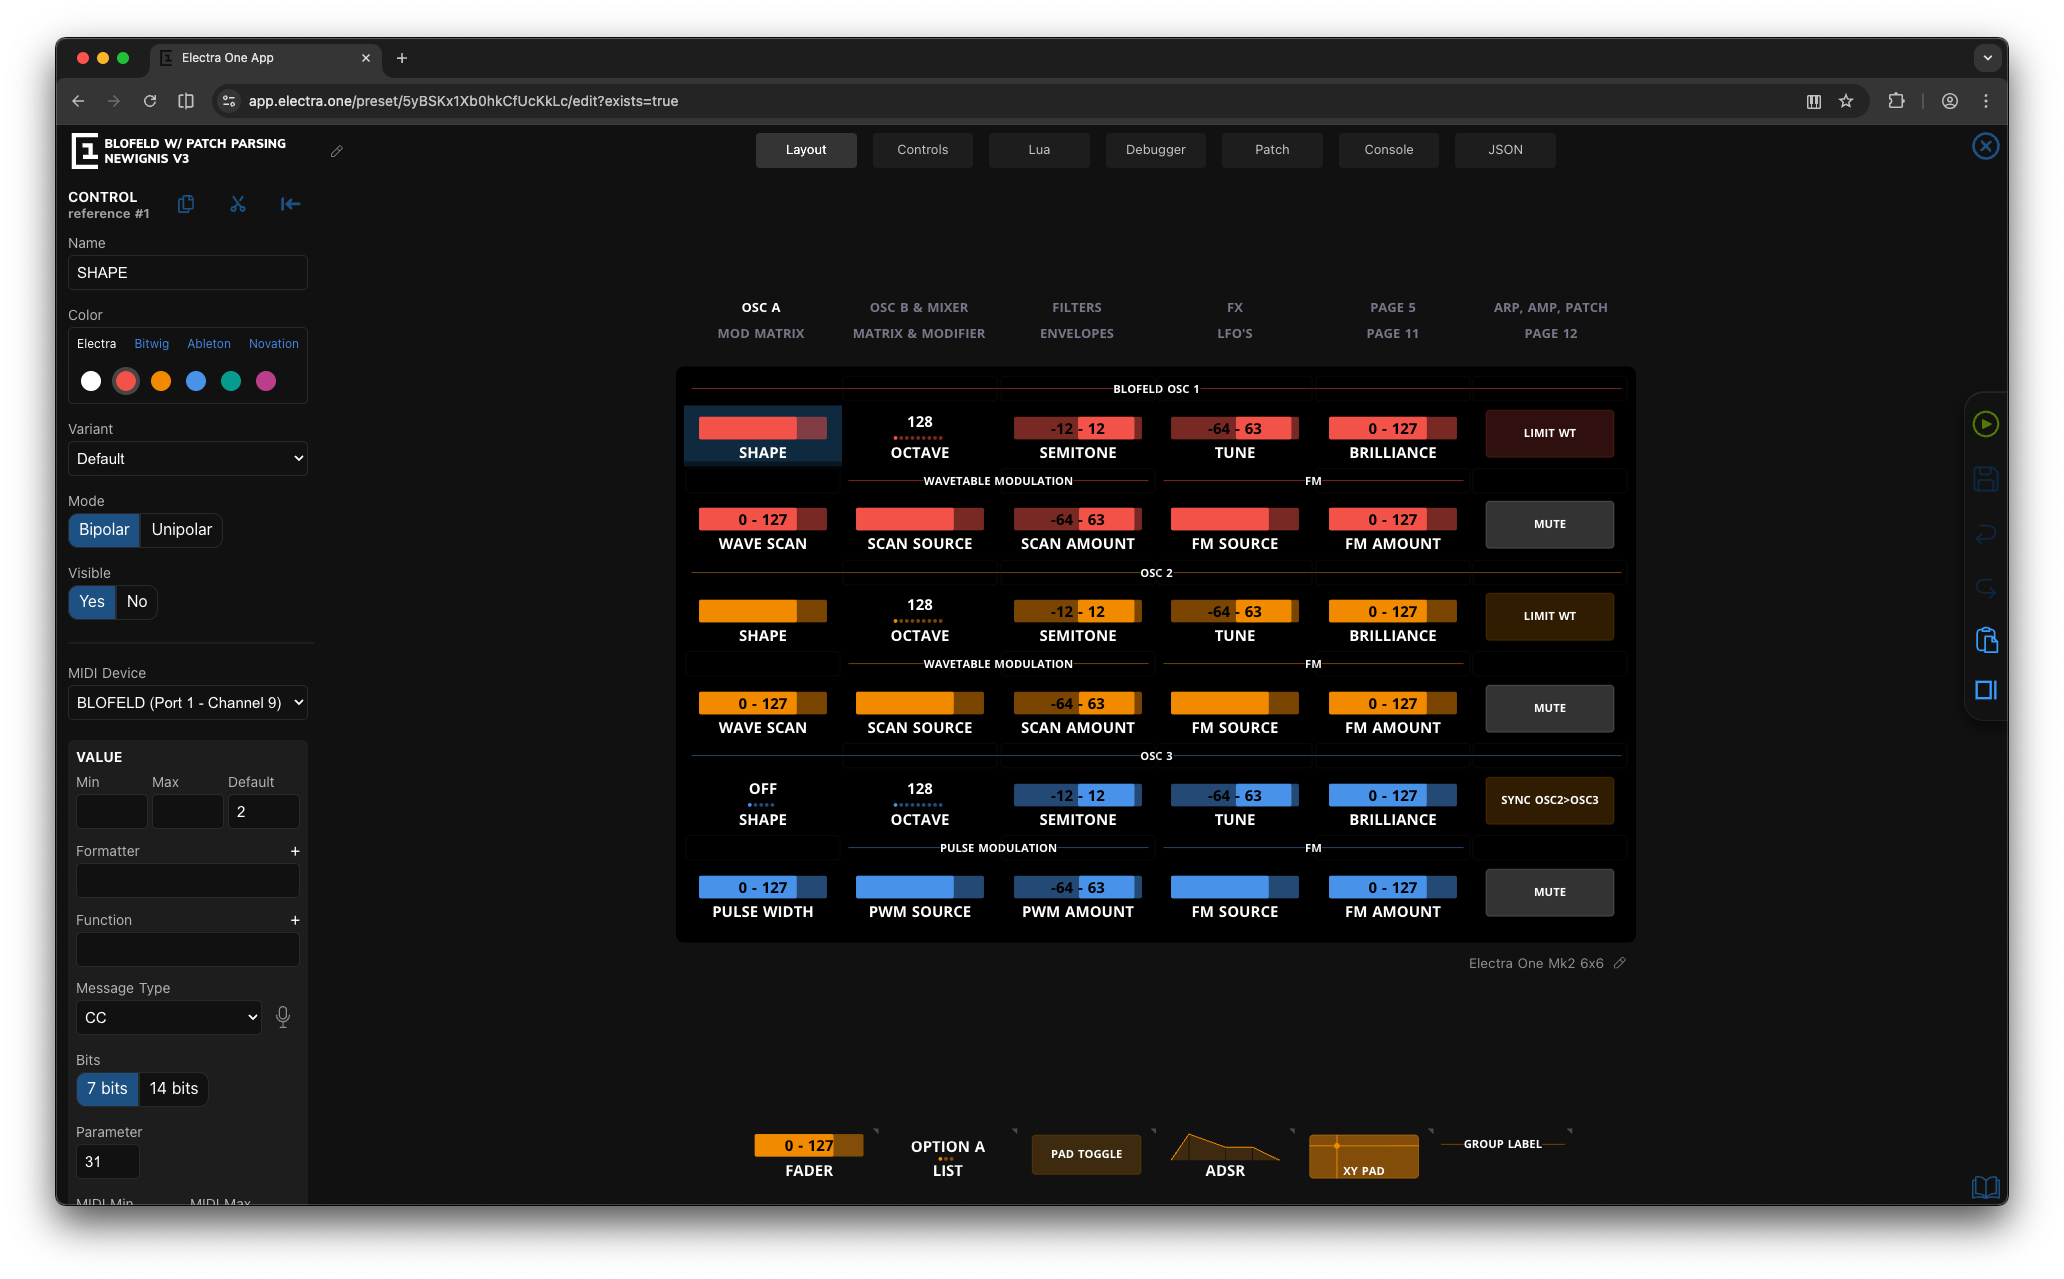
This attribute panel allows you to edit various properties of the selected control. It is where most of the detailed work on a preset takes place.
Each control has a set of configurable attributes. Some attributes are common to all control types, while others are specific to a particular control type.
Control attributes are grouped into four sections:
- Common Attributes – Basic properties such as the control’s name and color
- Value Attributes – Define how the control’s value is displayed and interpreted
- Message Attributes – Specify which MIDI message is linked to the control’s value
- Text Overlays & List Values – Used to define overlays or list items, where applicable
Multi-value controls, such as envelopes, include a Value section for each parameter. For example, an ADSR envelope will show separate sections for Attack, Decay, Sustain, and Release.
Examples of Control attributes
The fader
The list

The pad
The envelope
General Attributes
As the name suggests, the general group of attributes covers attributes common to all types of Controls.
The general attributes allow user to assign the Control to a device, set the name, color, variant, and mode. When the preset includes a Lua script, the visibility toggle is shown too.
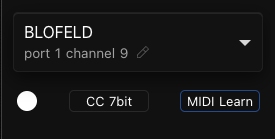
Device
An identification of the synthesizer, sampler, VST plugin, or any other MIDI device where the MIDI messages generated by the Control will be sent. An example of a device is “Yamaha DX7, Rack 1”. The device represents a particular synthesizer connected to a MIDI port and channel.
Name
The name of the Control that will be shown on the display. The name is shown below the value. For example, a “Filter cutoff”
Color
Color of the Control. It is up to the user how the colors are used. They are meant to improve the readability of the presets and to help to organize controls to logical clusters of parameters. For example, users might want to have all Controls of one device sharing the same color or to have one color for all parameters related to the VCF.
Variant
Variant of the Control. The variant affects how the Control looks like. For example, you can choose between regular and thin faders. Some controls have more variants while others may have only the default variant.
Mode
Mode of the Control operation. The mode affects how the Control behaves. For faders you can choose between unipolar and bipolar functionality. For pads, you can choose between momentary pads and toggles.
- Momentary pads always return to the Off position after they are released
- Toggle pads act as switches between the Off and On values
Value attributes
The value attributes tell Electra One how the values should be displayed on the screen and how they behave towards the user. The values can be considered to be display values that are at some point translated to the MIDI data sent out or received.
The value section also allows user to enter Lua callback functions for processing the display value and for triggering custom Lua programatic sequences.
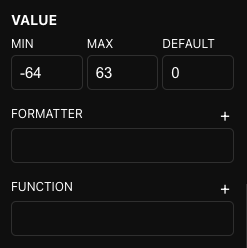
Fader values
For faders, users can define the minimum, maximum, and default value. The Lua formatter and function attributes are available.
List values
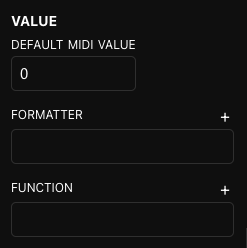
For lists, users can define default MIDI value associated with a list item. The Lua formatter and function attributes are available.
Envelope values
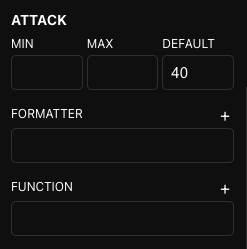
For envelopes, users can define the minimum, maximum, and default value. The Lua formatter and function attributes are available. Envelopes have multiple values, each covering specific part of the envelope. For example, an ADSR envelope consists of Attack, Decay, Sustain, and Release values.
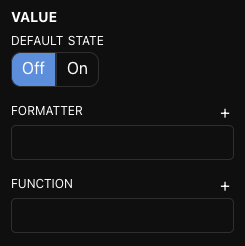
Pad values
For pads, users can define whether the pad is On or Off when the preset is loaded. The Lua formatter and function attributes are available.
Min display value
Defines the minimum value of the data range controlled with a fader. The minimum may be negative.
Max display value
Defines the maximum value of the data range controlled with a fader.
Default value
A default value to be pre-filled when the preset is loaded. The default value is set to 0 when not filled in. Double-tap on the Control will reset the current value of the Control to the default value.
Default state
Tells Electra if the pad is set to On or Off state, when the preset is loaded.
Default MIDI value
A default MIDI value is relevant only for lists. It is the MIDI value that identifies the list item to be selected when the preset is loaded.
Formatter
A name of a Lua function that will be used to format the display value.
Function
A name of a Lua function that will be called when the display value changes.
TIP
The "+" sign next to the Formatter and Function fields add an empty Lua function definition to the Lua script source code, making it easier do develop the Lua script.
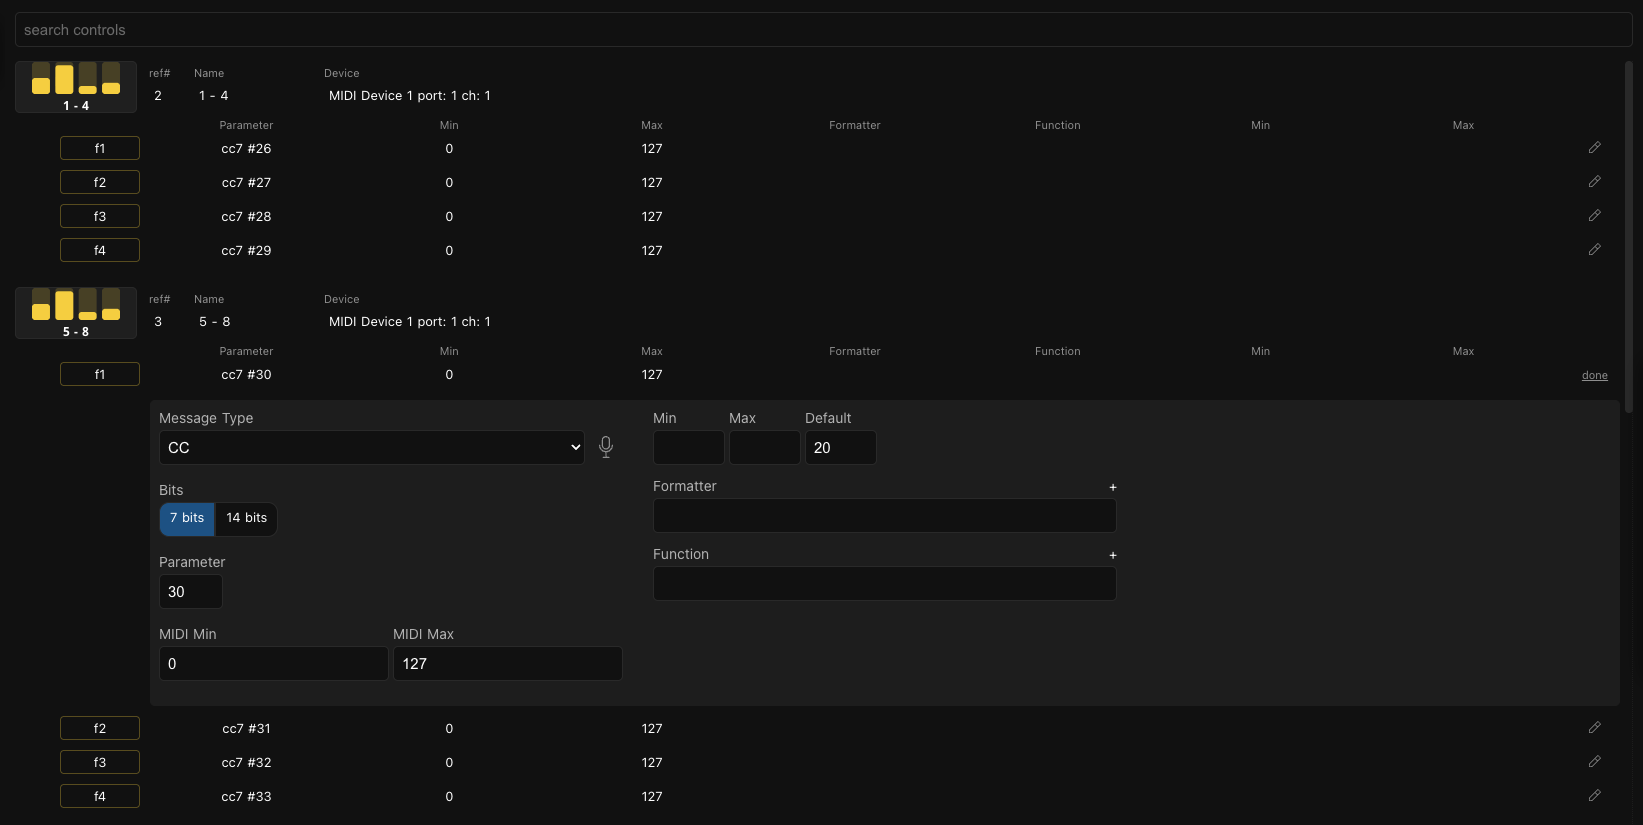
Message attributes
The message attributes are used to describe the MIDI message associated with the Control value. It means what MIDI message will be send out when user changes the value and how the MIDI message value will be calculated.
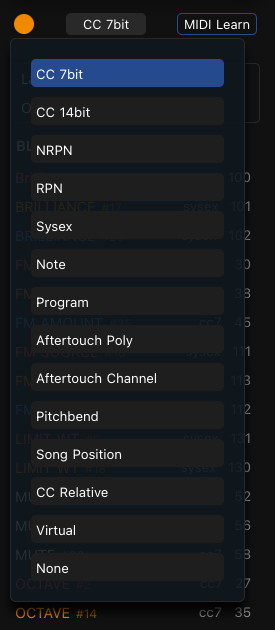
Type
The parameter type defines the type of MIDI message assigned to the Control. Whenever the value of Control is changed by turning the knob or with touch, a given MIDI message will be sent to the connected synthesizer. On the receiving side, whenever there is a MIDI message coming from a connected synthesizer and it matches a parameter settings of the Control, the value of the Control will be updated accordingly.
Electra supports the following MIDI message types:
CC
7-bit or 14-bit Control Change MIDI message. The value of 7-bit Control change is restricted to a range of 127 values. There is an option to switch CC to 14-bit Control Change mode. 14-bit Control change follows the MIDI standard which says that the first 32 7-bit control change messages (CC #0 .. CC #31) can be used as 14-bit messages. The parameter that users specify is the MSB part of the control change, LSB part is automatically calculated by Electra. It is always MSB parameter + 32.
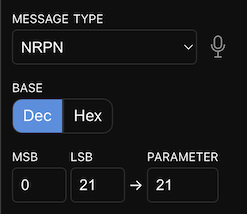
NRPN
NRPM MIDI message type is used to send a standard MIDI NRPN message. The parameter and the value are both 14-bit numbers.
RPN
RPM MIDI message type is used to send a standard MIDI RPN message. The parameter and the value are both 14-bit numbers.
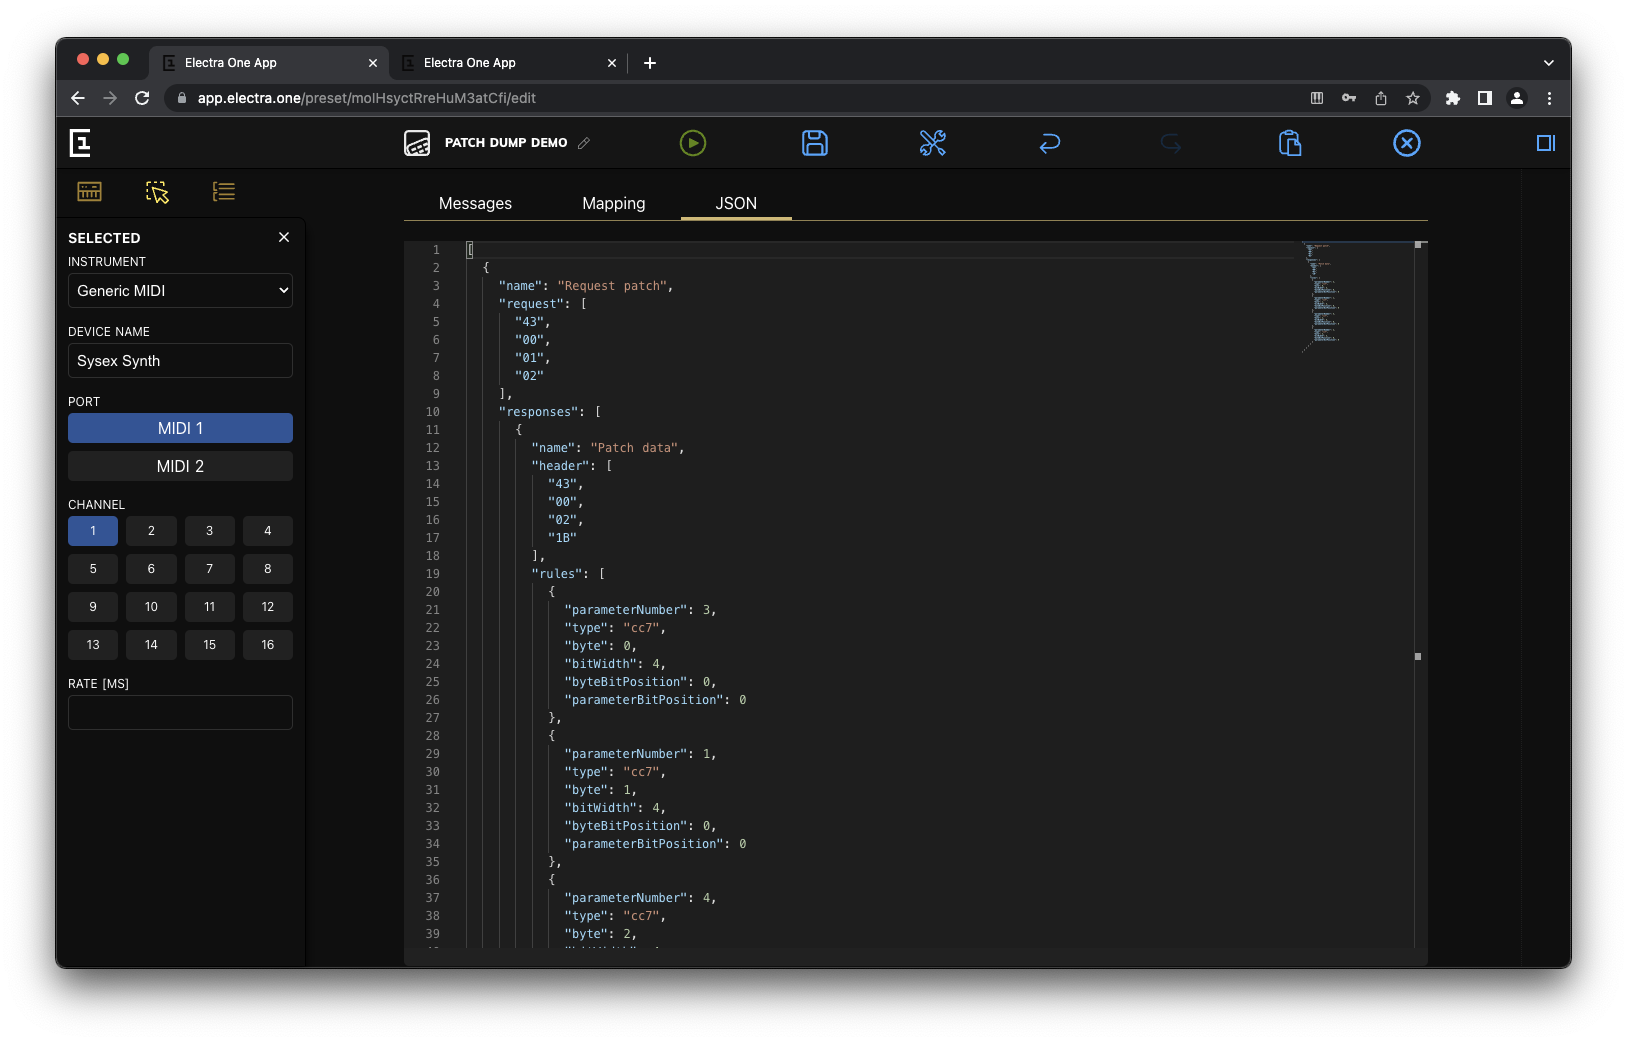
Sysex
SysEx MIDI message type is used to send templated MIDI SysEx messages. Users are allowed to specify an array of bytes that will be sent whenever the Control’s value is changed. The fact that the message is templated means that users are not restricted to sending constant bytes only, instead, they can insert Variable, Checksum, Parameter placeholders to the message. The placeholders will be transformed to values at the time of sending the templated SysEx MIDI message.
Note
Note is used to send note on and off MIDI messages. The note type is supported only by pads. The note on is triggered when pad is pressed and note off is send when the pad is released.
Program change
Program change type sends a standard MIDI Program change message.
Aftertouch poly
Aftertouch poly type sends a standard MIDI polyphonic pressure message.
Aftertouch channel
Aftertouch channel type sends a standard MIDI channel pressure message.
Pitchbend
Pitchbend type sends a standard MIDI pitchbend message.
Song position
Song position type sends a standard MIDI song position pointer message.
Start
START type sends a standard MIDI real-time Start message. The start can be used only with pads.
Stop
STOP type sends a standard MIDI real-time Stop message. The stop can be used only with pads.
Continue
STOP type sends a standard MIDI real-time Stop message. The stop can be used only with pads.
Tune request
TUNE type sends a standard MIDI Tune request message. The tune can be used only with pads.
Virtual
Virtual is a special type of message. It is not associated with any MIDI message type. Instead it just sets the value Electra's internal parameter map storage. Virtual parameters are used in combination with Lua scripts.
Parameter
Identifier of the parameter to be assigned to the Control value. When control is used to send CC MIDI message and parameter is set to 56, the value of the Control will be sent as CC #56 MIDI message. There are situations when there is no real parameter identifier, for example, if the parameter is represented only by a few bits with a byte of a SysEx message. In such situations, users must invent their own Parameter Ids. More information on this can be found in Writing SysEx templates.
When working with NRPN and RPN Controls, the MSB and LSB fields are shown. These fields make it easier to enter the parameter Id if the synthesizer manual uses MSB and LSB notation. The MSB and LSB must be entered in decimal notation.
Min MIDI value
Defines the minimum midi value mapped to the Min display value. A typical example is mapping Min MIDI value of 0 to the Min display value of -64. In such a case, the Control will show negative figures while it will still send out positive data in MIDI messages according to this setting.
Max MIDI value
Defines the maximum MIDI value mapped to the Max display value.
On Value
A MIDI value to be sent when the pad goes from the Off state to the On state. If the field is left empty, no MIDI message will be sent.
Off Value
A MIDI value to be sent when the pad goes from the On state to the Off state. If the field is left empty, no MIDI message will be sent.
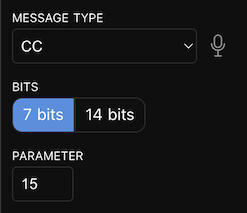
Bits
When the control is set up to send CC MIDI messages, you can specify whether it will be a simple 7-bit message or a two-byte 14-bit message.
Bits order
14-bit CC, NRPN, and RPN MIDI messages send the value of the parameter in the form of two 7-bit bytes. These two bytes represent MSB (most significant/coarse) and LSB (least significant/fine) part of the 14-bit value. Although the MIDI standard says what part is the MSB and what the LSB is, some synthesizers do not follow the standard. Bits order option gives you a chance to swap MSB and LSB part of the 14-bit value.
Two's complement
When the display value configuration allows going below zero to negative values, the Two's complement option tells Electra One controller if two's complement representation of the negative numbers should be used.
No reset
It has become quite a common practice that each NRPN or RPN message is followed by the Reset instructions (sending CC #100 and CC #101). If this is not appropriate for your instrument, set No reset to Yes.
Edit Sysex Data
The Edit Sysex Data button opens a Sysex Template editor, a tool to create sequences of Sysex bytes with message values and Lua function calls included in them. The Sysex editor is described further below in this document.
List items / Overlays
The List items / Overlays are text labels that can be assigned to specific values of fader and lists. List items are required to be used with List Controls. They define the actual entries on the list. Overlays are used for faders. Detailed information about List items / Overlay editor is described further below in this document.
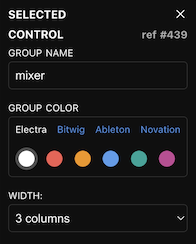
Groups
Groups are meant to improve the visual layout of the preset and give it more structure. They can be used to make collections of Controls that are related to a specific type of parameters, for example, parameters of VCF section. Groups, however, do not impose any functionality. It is fully up to users how the groups will be used.
To add a group, drag it from the Repository panel on to the Grid.
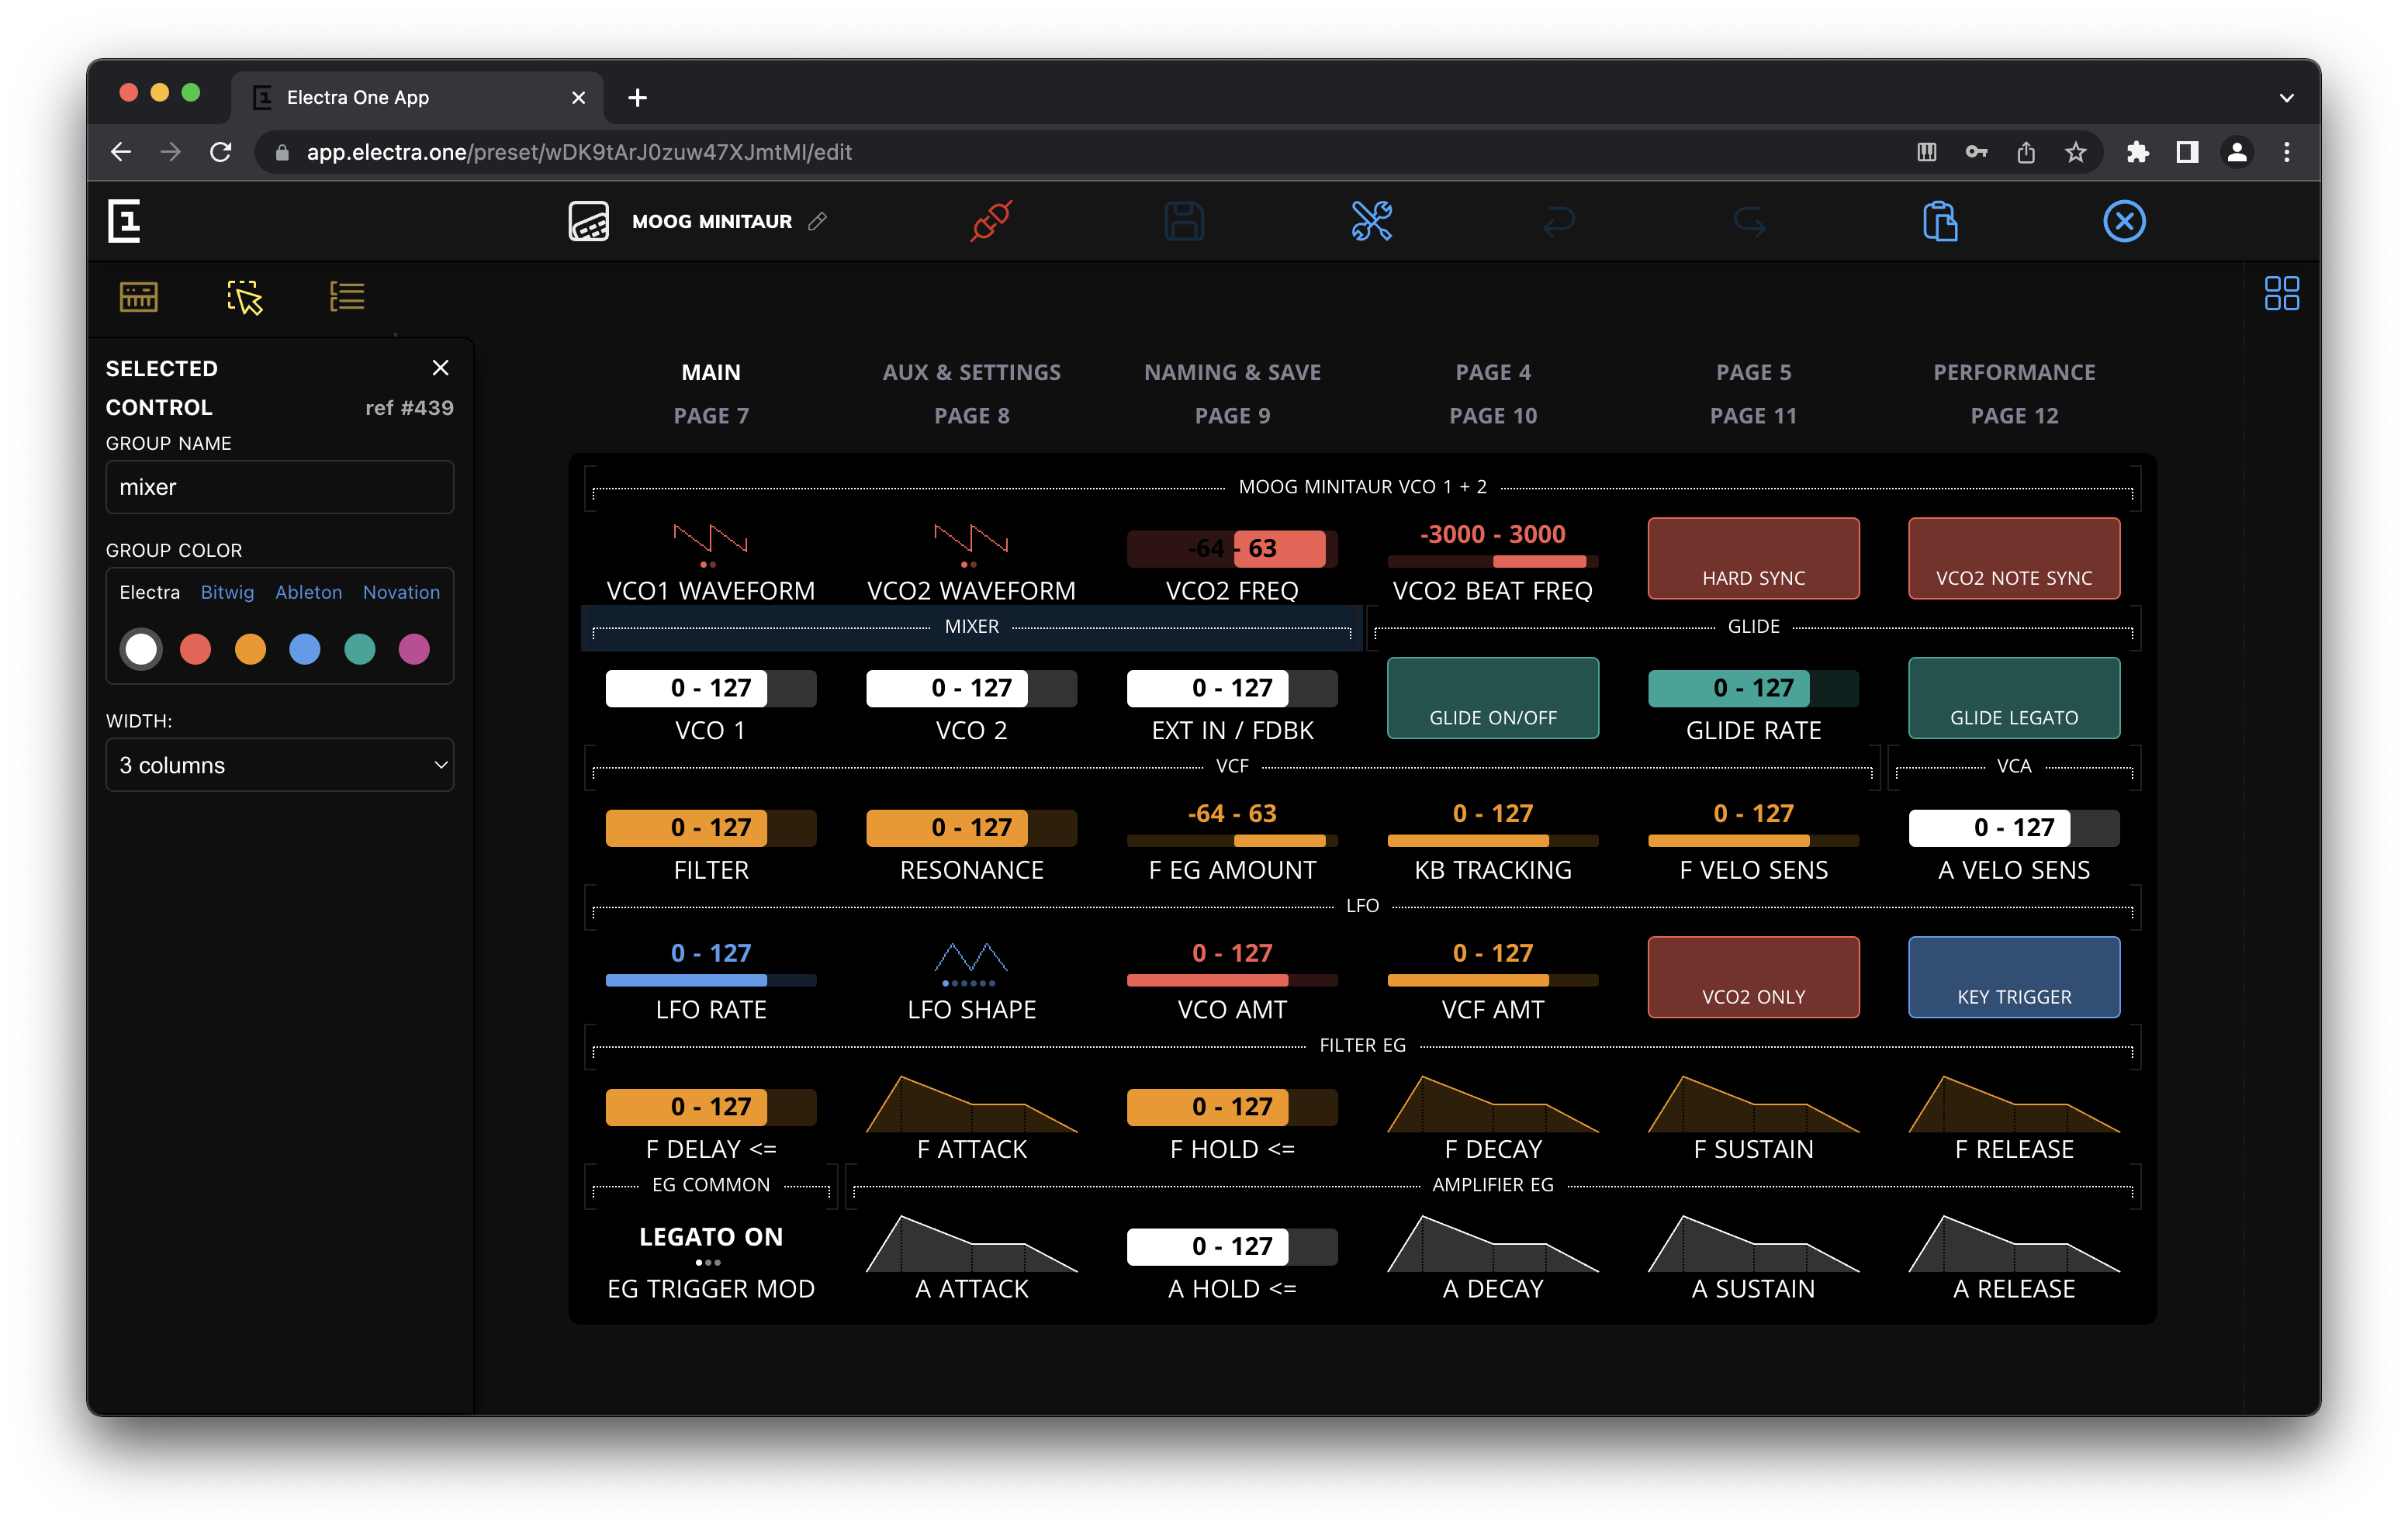
Each group can be customized to suit your needs. The following can be adjusted:
- Name of the group
- Color
- Width of the group
TIP
The size of the group can be changed by dragging the corners of the group directly on the Grid.
Devices
As it is important to understand the concept of devices, their meaning is fully described in a separate chapter of this User Guide. The following paragraphs just describe how to manage devices in the Preset editor.
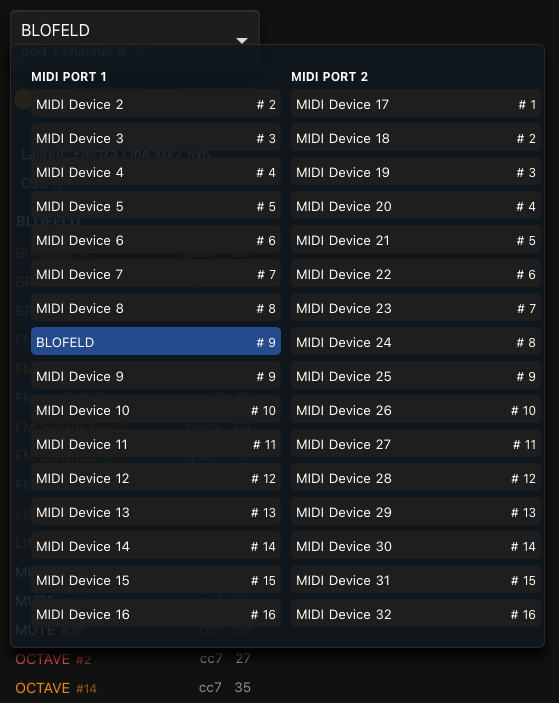
The new controls are always picked from the Repository panel in the context of currently selected device. The currently selected device can be seen at the top of the Repository panel. All Controls you pick and place on the grid will be always associated with that device.
If your preset uses more than one device, you can switch between them, by clicking the device name in the sidebar. A list of all available devices will be shown. You can choose the device that you want to work with.
If you need to adjust the settings of a device, for example when the MIDI channel of the device was changed, click the Edit device icon in the device section. The device details will be shown.
You can set here:
- Name of the device
- MIDI port
- MIDI channel
Users, who wish to create a preset that supports exchange of Patch and SysEx data between the Electra One controller and the MIDI device, can use the Patch editor view in the editor window.
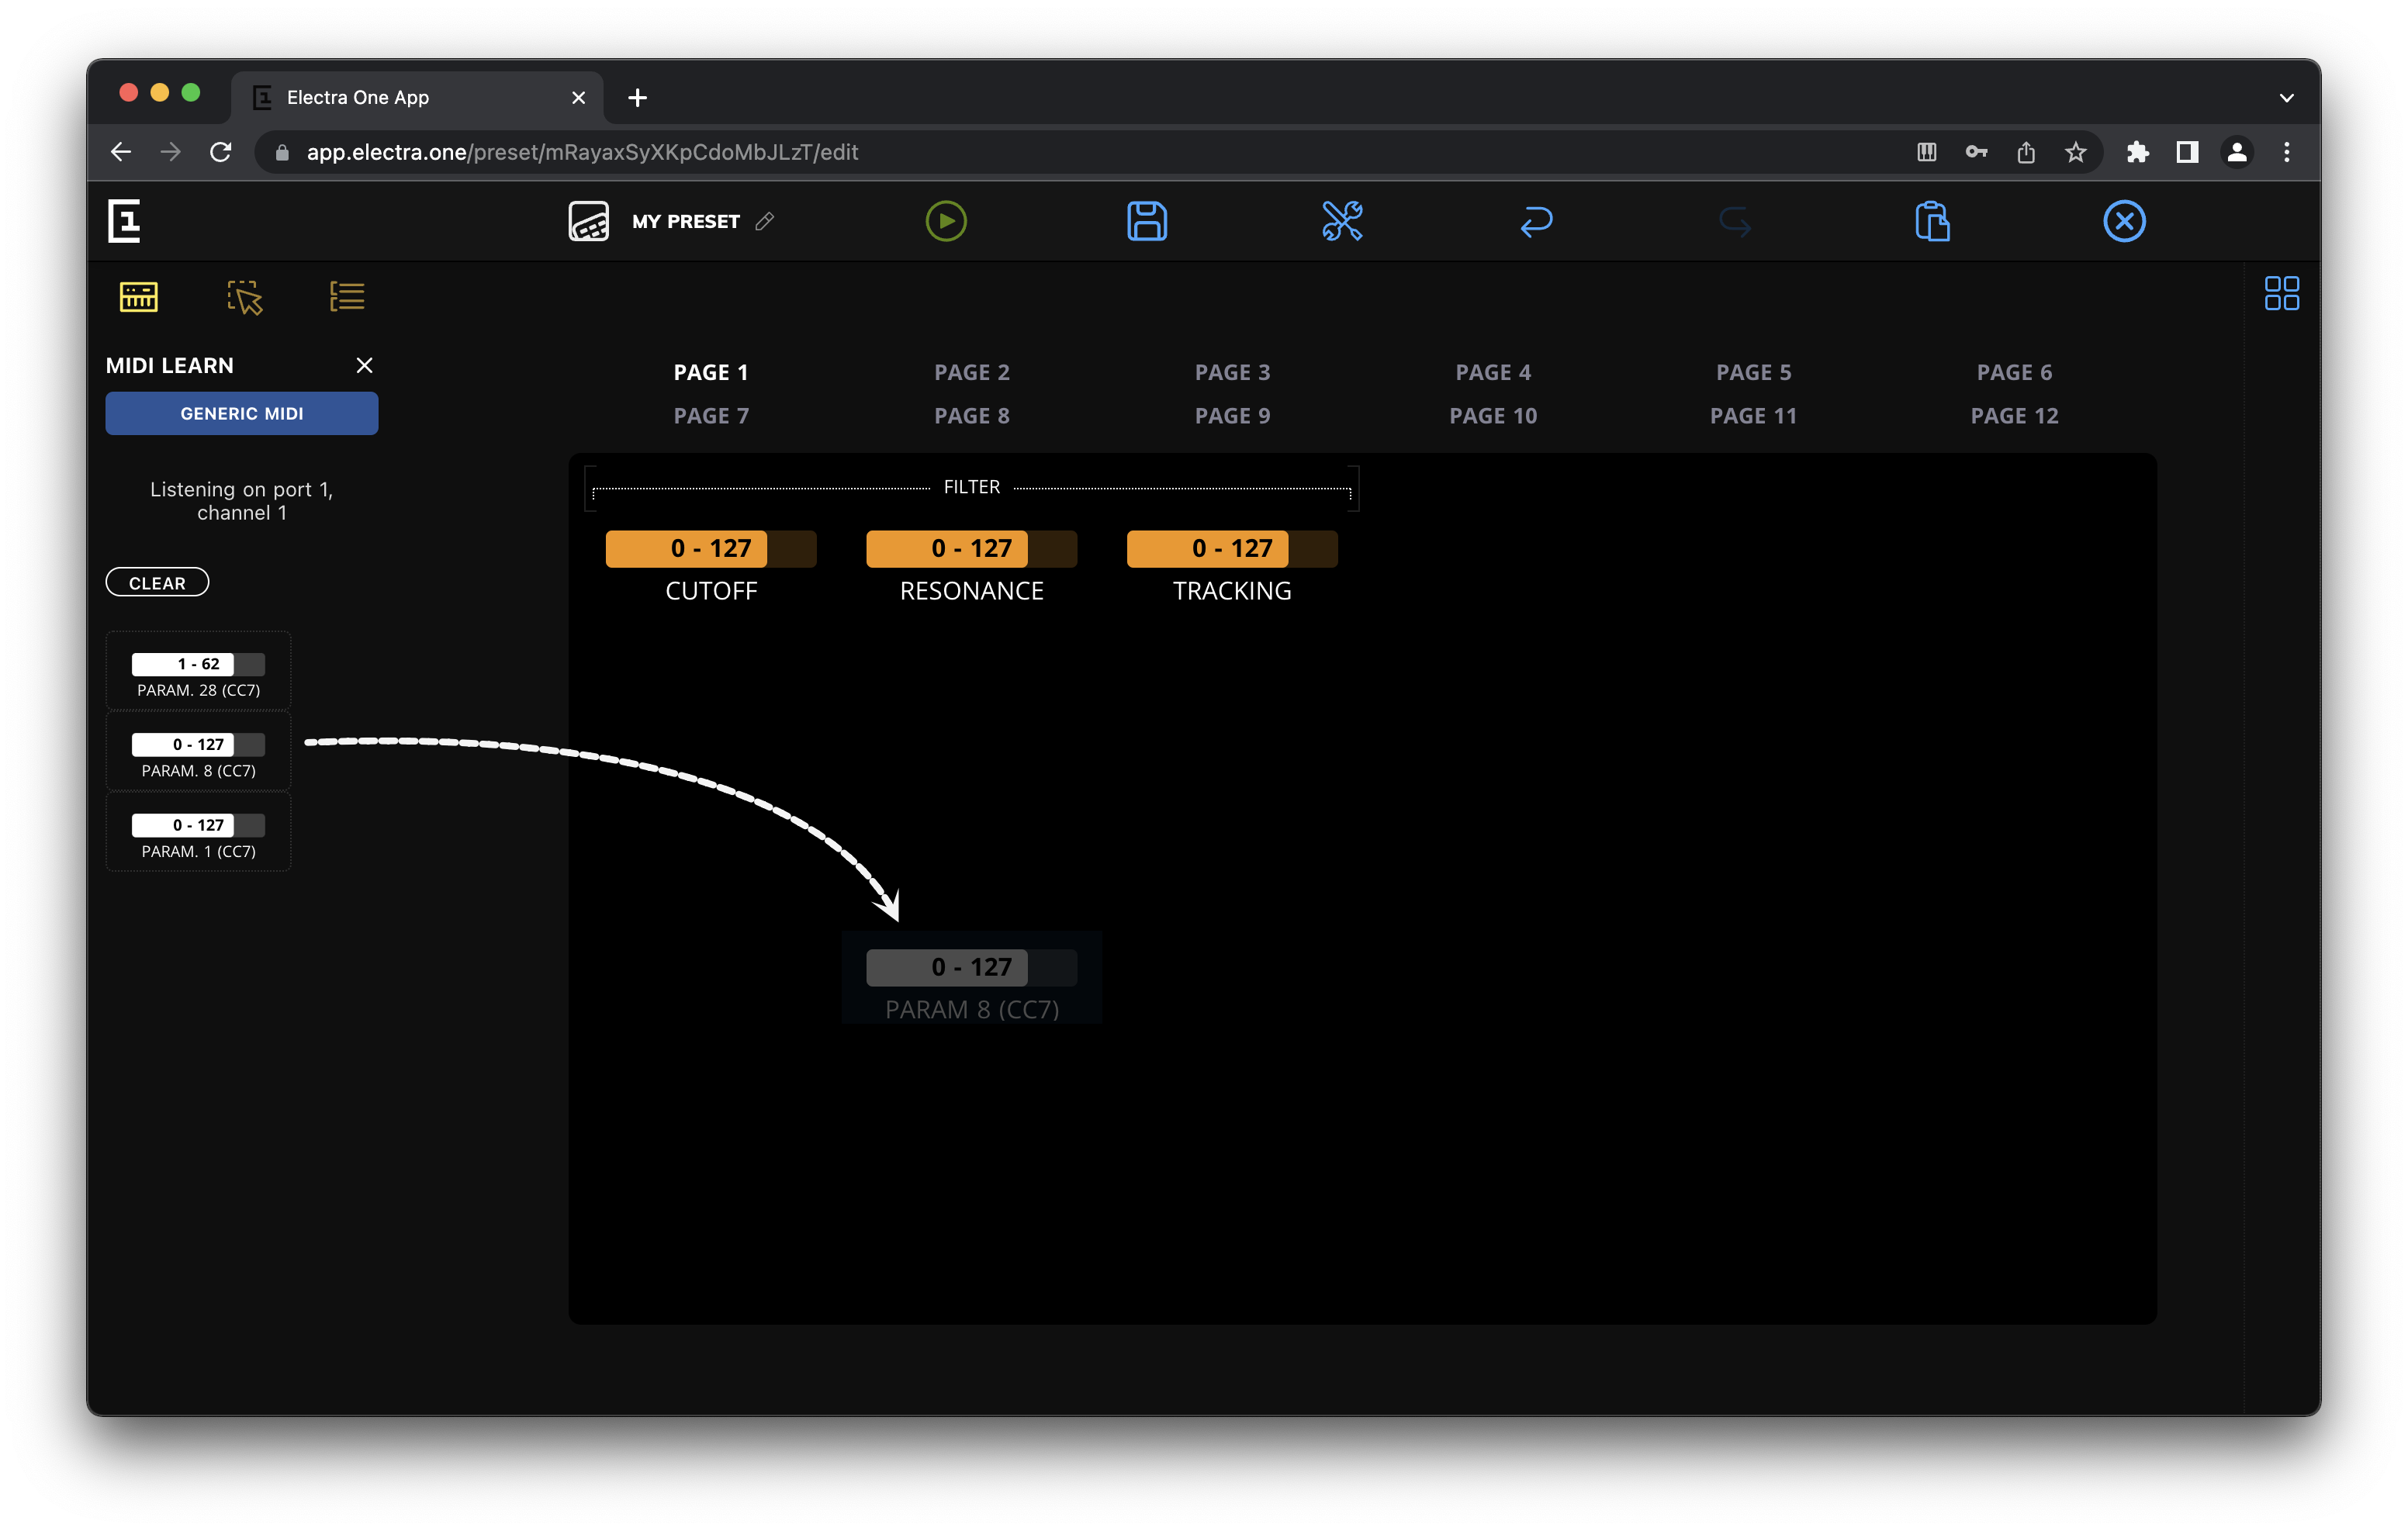
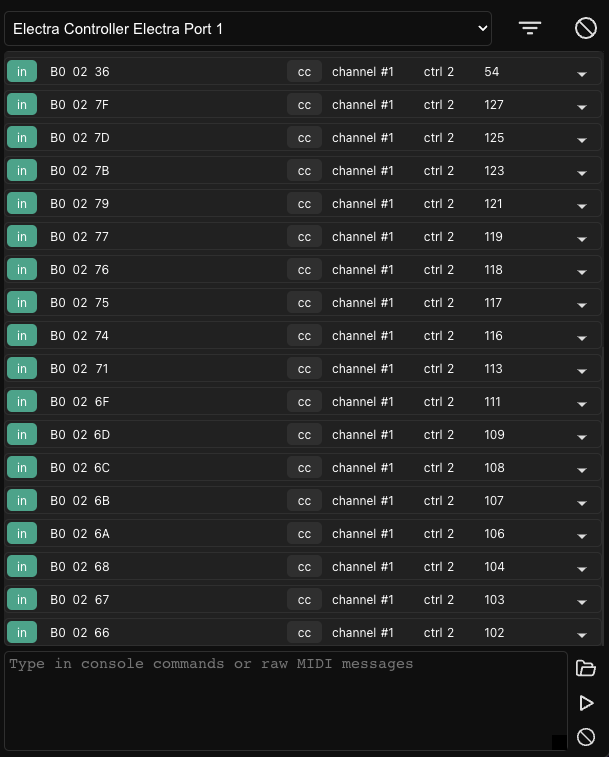
MIDI learn
The MIDI learn function is another tool that makes the preset development less tedious. The MIDI Learn is activated by clicking the MIDI Learn (microphone) icon.
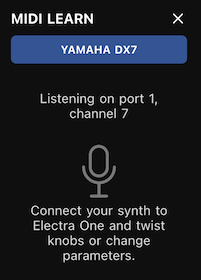
Enabling the MIDI learn switches Electra One controller to a special mode when it listens to the incoming MIDI data and reports it to the editor. If the MIDI message matches currently selected devices (MIDI port and MIDI channel), a new Control with a corresponding MIDI message is created and shown in the MIDI learn panel.
The MIDI learn icon is pulsating when the MIDI learn is enabled. Note, Electra does not process MIDI messages in an ordinary way when it is in the MIDI learn mode. It merely collects the MIDI learn information for the Preset editor.
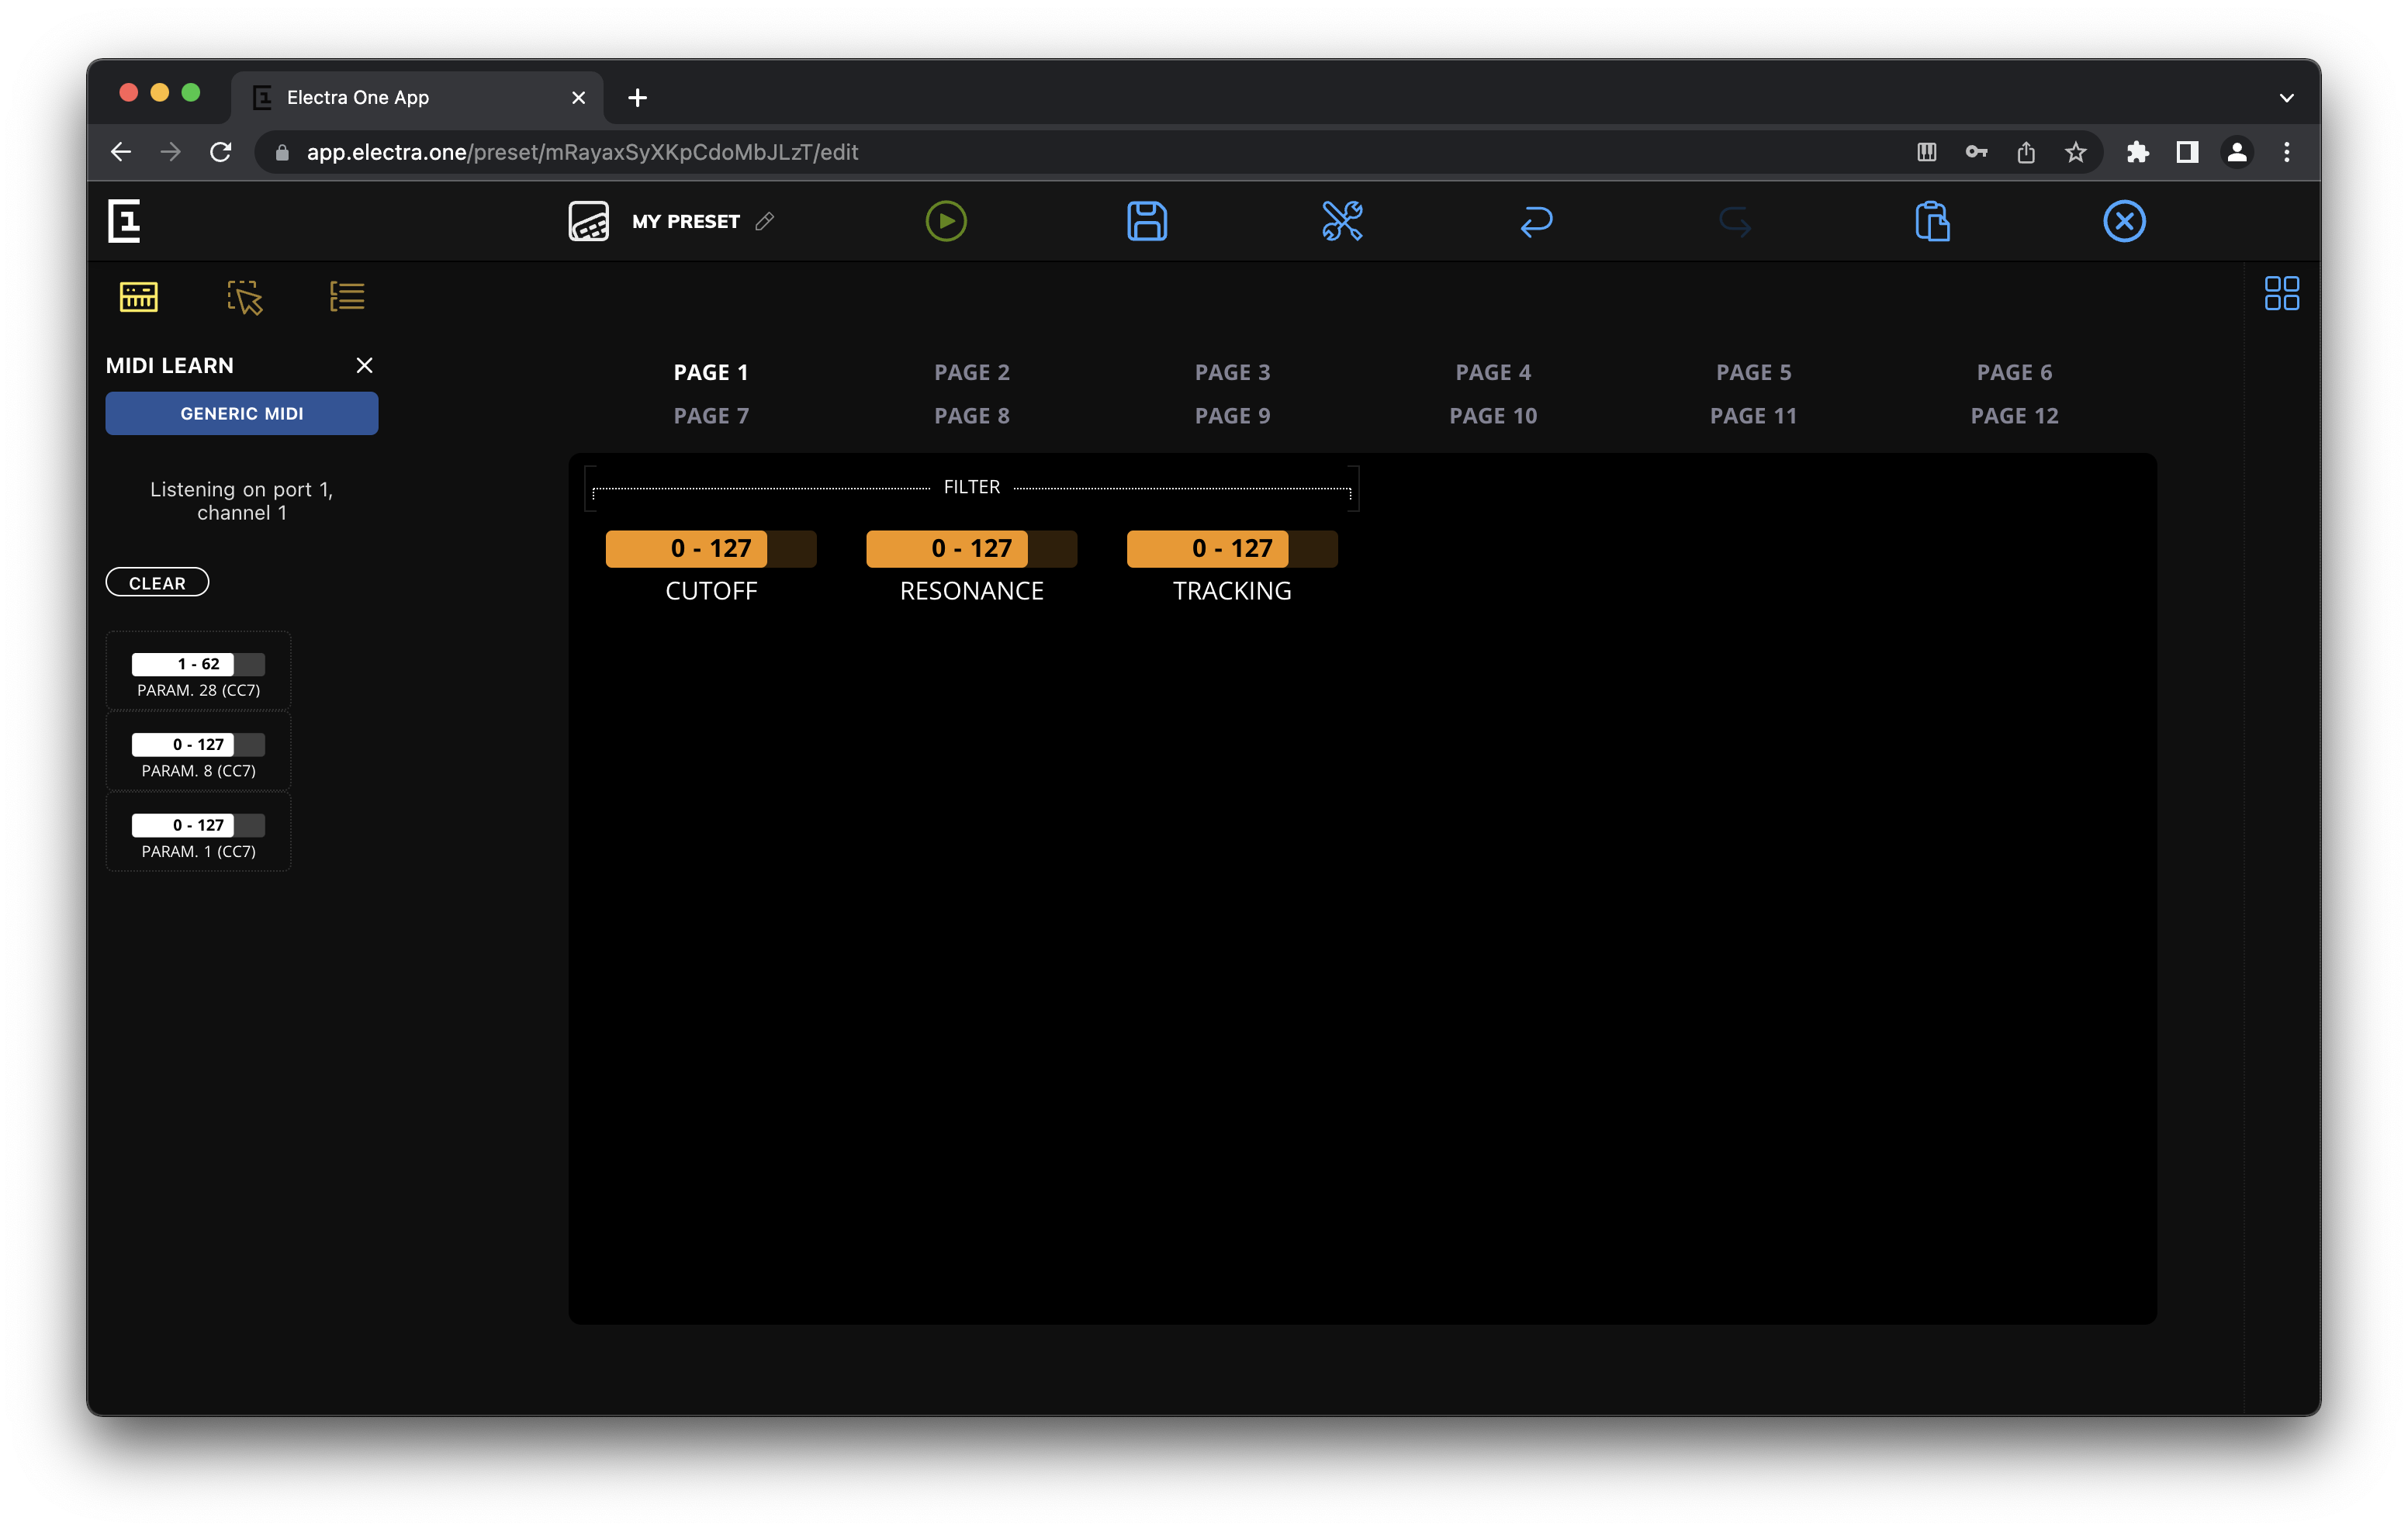
The best approach to let Electra One controller and the editor to understand the MIDI implementation of your instrument is to twist the knobs of the instrument for various parameters while the MIDI learn is enabled.

That way MIDI learned Controls are created for each parameter and shown in the MIDI learn panel. The MIDI learn does not detect MIDI message type and parameter number only, it can also detect the minimum and the maximum MIDI value.
TIP
Always try to twist the knob all the way to the left and then to the right. That way Electra One will be able to detect the full range of the values of given parameter.
The Controls collected in the MIDI learn panel can be dragged on to the grid as any other Control on the Repository panel. The CLEAR button removes all MIDI learned Controls from the sidebar so that you can start the process of learning all over again.
Managing pages
You learned earlier how the pages can be swicthed on the Layout view. Now it is time to descripe how to customize them.
Pages can be rearranged by dragging them to different page location with a mouse.

Page attributes
The pages come only with two attributes. The name and the default active control set.
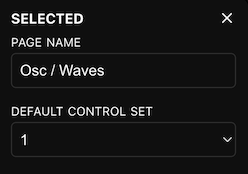
Name
Name of the page that will be shown in the Page selection window on the controller.
Default control set
An identifier of the default control set, a row of 12 controls assigned to the knobs. Setting a default control set allows you to change what section of the page will have knobs assigned when the user opens the page.
Controls list
We are currently working on this section...
List Item / Overlay Editor
List items and Overlays are texts to be used wherever a numeric value of the Control does not have a real meaning for the user. A text label and image may be assigned to such values and displayed instead.
Two types of lists
The editor is used to edit both, the List items and the Overlays. Both types of lists share common functionality but there are a slight differences between them too.
List items
The List items represent discrete entries of the List control. They represent the data that List control allows to choose from. The value associated with each list item is the MIDI value that will be sent and received, when the list item is selected.
Overlays
Overlays are used with Fader controls. They are replacement text labels for specific fader values. For example, a text "Zero" can be displayed instead of numeric value 0. Overlays usually cover only a few specific values of the continuous value range. The value assigned to an overlay item is the display value, it means not the MIDI value to be sent or received, but the value displayed on the controller screen.
The editor
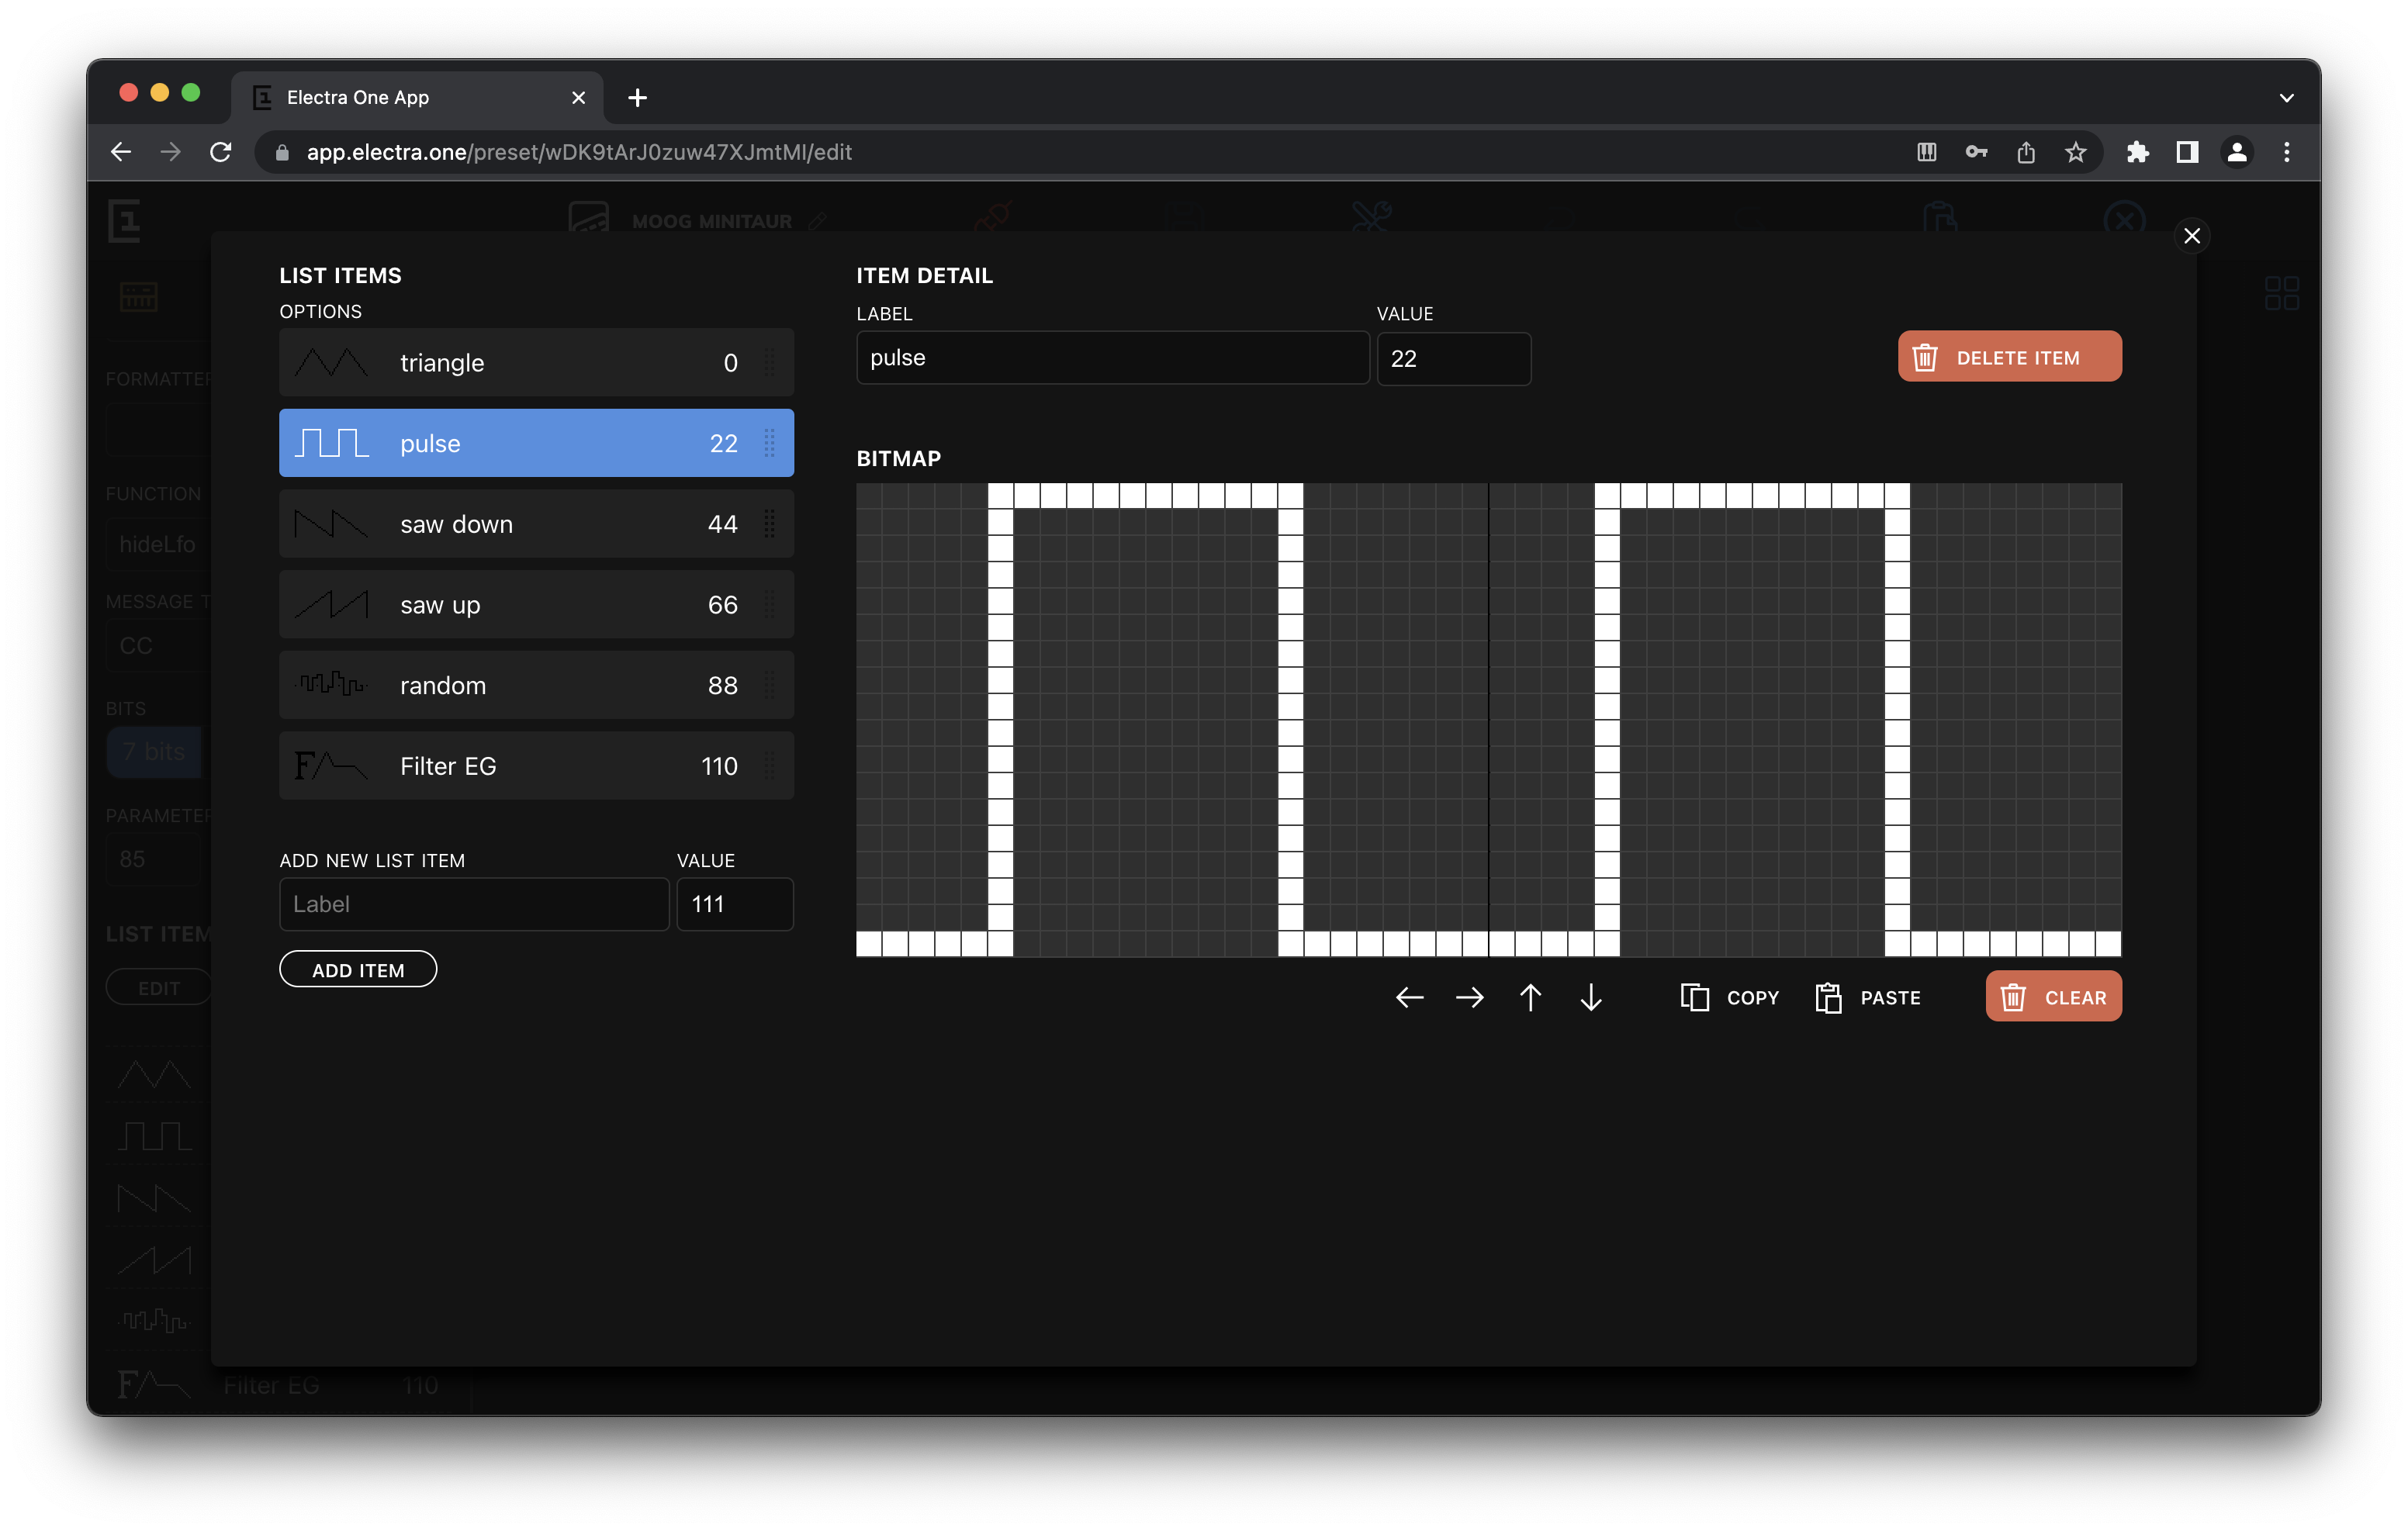
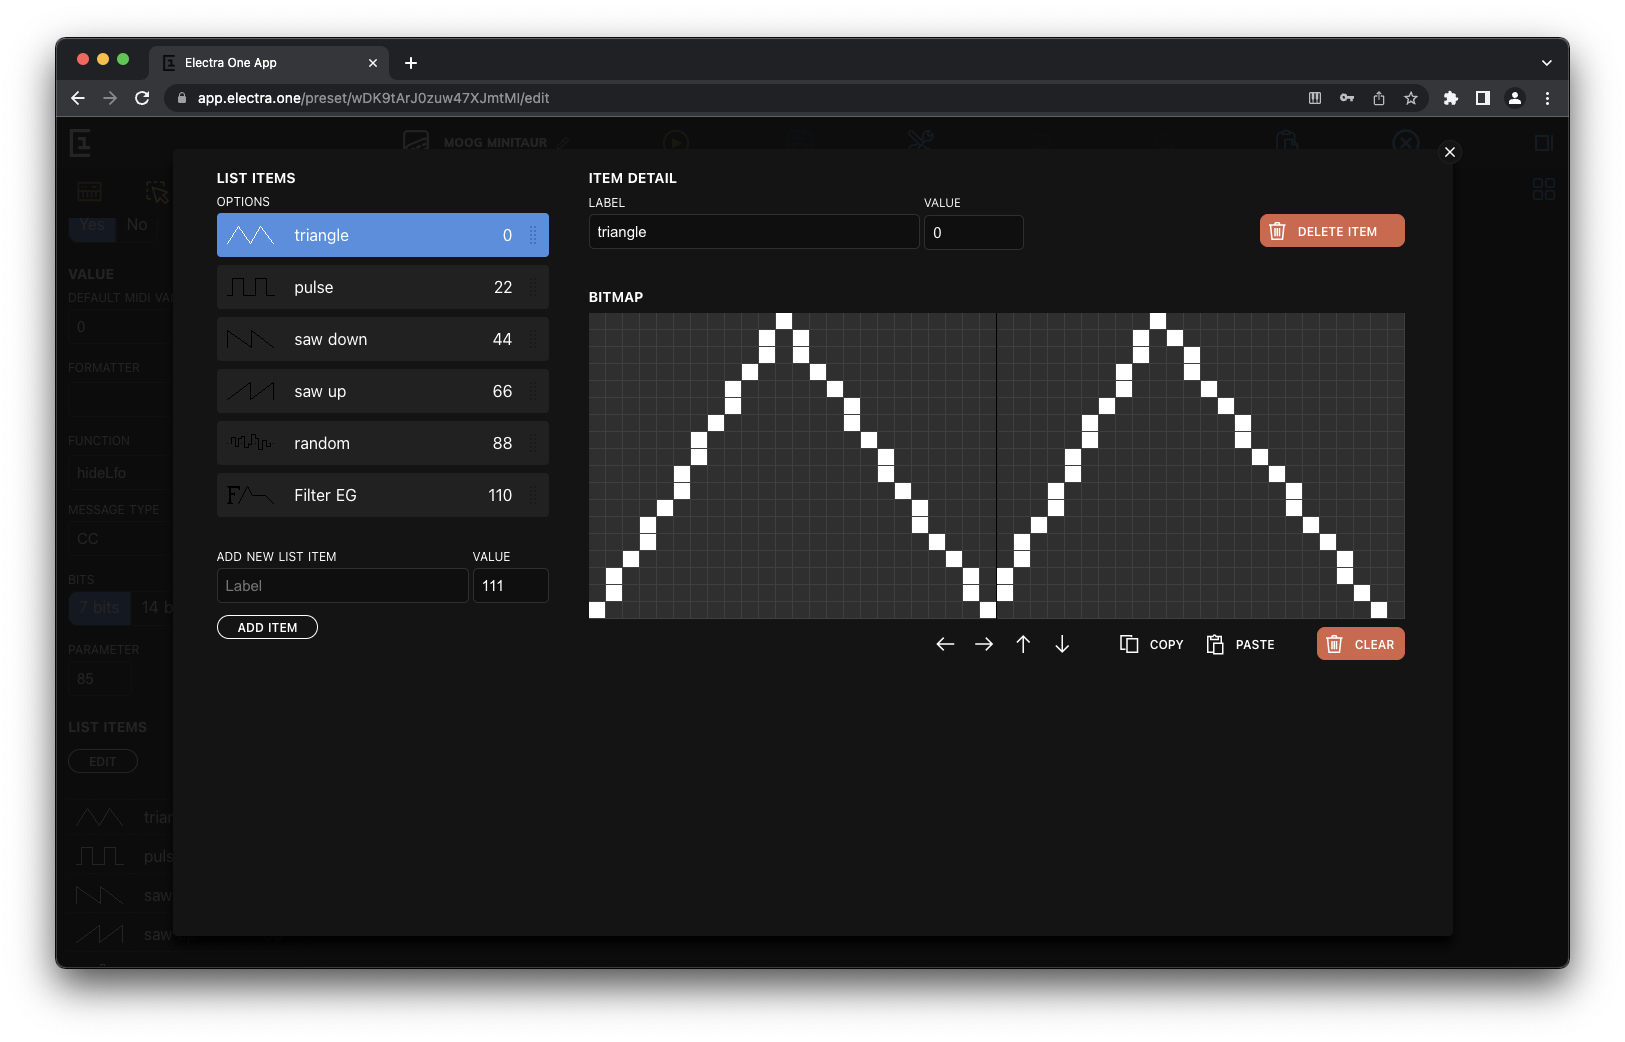
The editor is used to assign text labels, values, and optionally images to the list items and overlays. The editor window is composed of three sections:
- List of items
- Item detail
- Bitmap editor
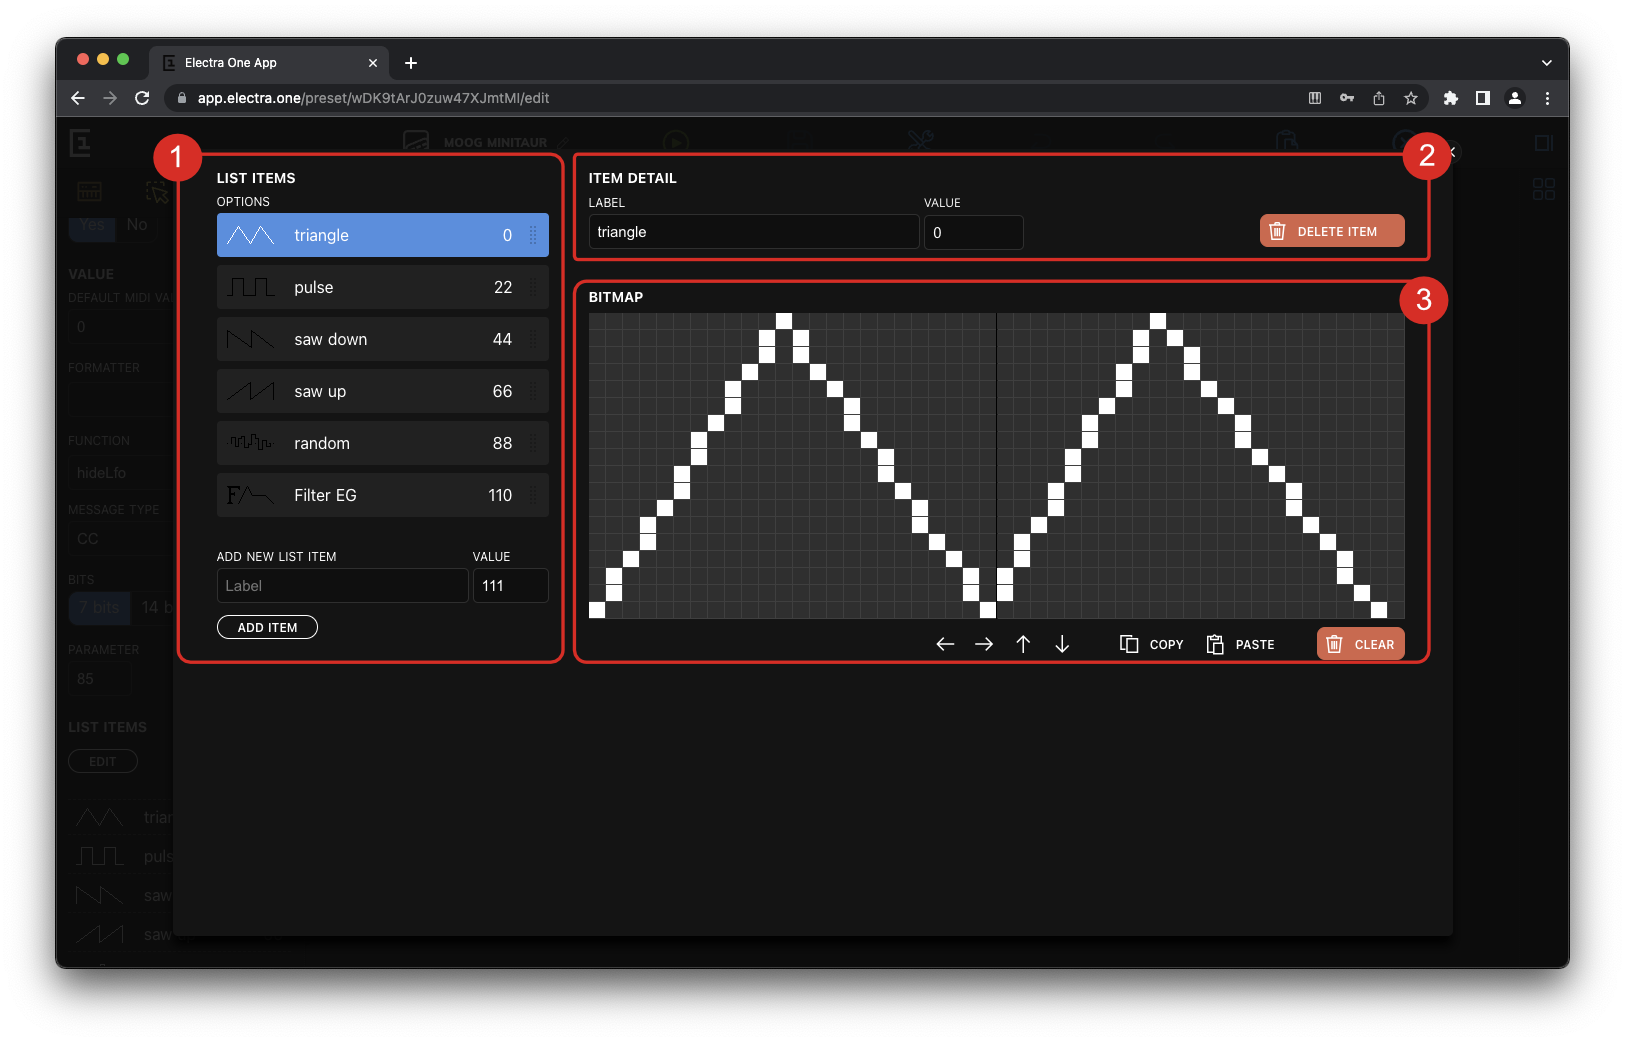
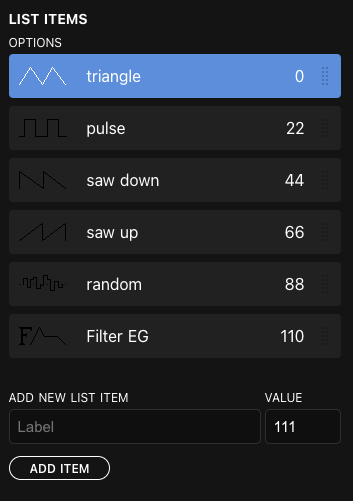
List of items
The list of items can be used to add new items and reorder existing ones.
To add a new item, simply fill the text label and associated value in the Add new item section of the list and click the ADD ITEM button. Please note, when editing the text overlays the wording is different. The field for adding a new overlay is named Add a new text overlay and the button ADD OVERLAY.
The order of items in the controller is identical with their order in the editor. The list of items can be rearranged by dragging the items to new locations on the list.
Item detail
Text labels and values can be reviewed and edited in the item detail section. The DELETE button is used to permanently remove the item from the list.

Bitmap editor
A bitmap image can be optionally assigned to a list item. Such an image is displayed instead of the text label wherever it is possible.

The bitmap images can be drawn using the mouse as a painting tool. White dots represent dots that will be displayed on the controller.
Images can be copied and pasted to other list entries. The arrow buttons allow moving the image around on the grid.
The CLEAR button, clears all drawings. It does not, however, delete the list item.
Sysex Editor
The Sysex Editor simplifies working with outgoing Sysex messages. It can be used to compose sequences of Sysex bytes that will be sent out when Control values change. The sequence of bytes is not limited to constant numbers only. Instead, user may inject bytes that are generated dynamically. This adds enormous potential to controlling Sysex based device parameters.
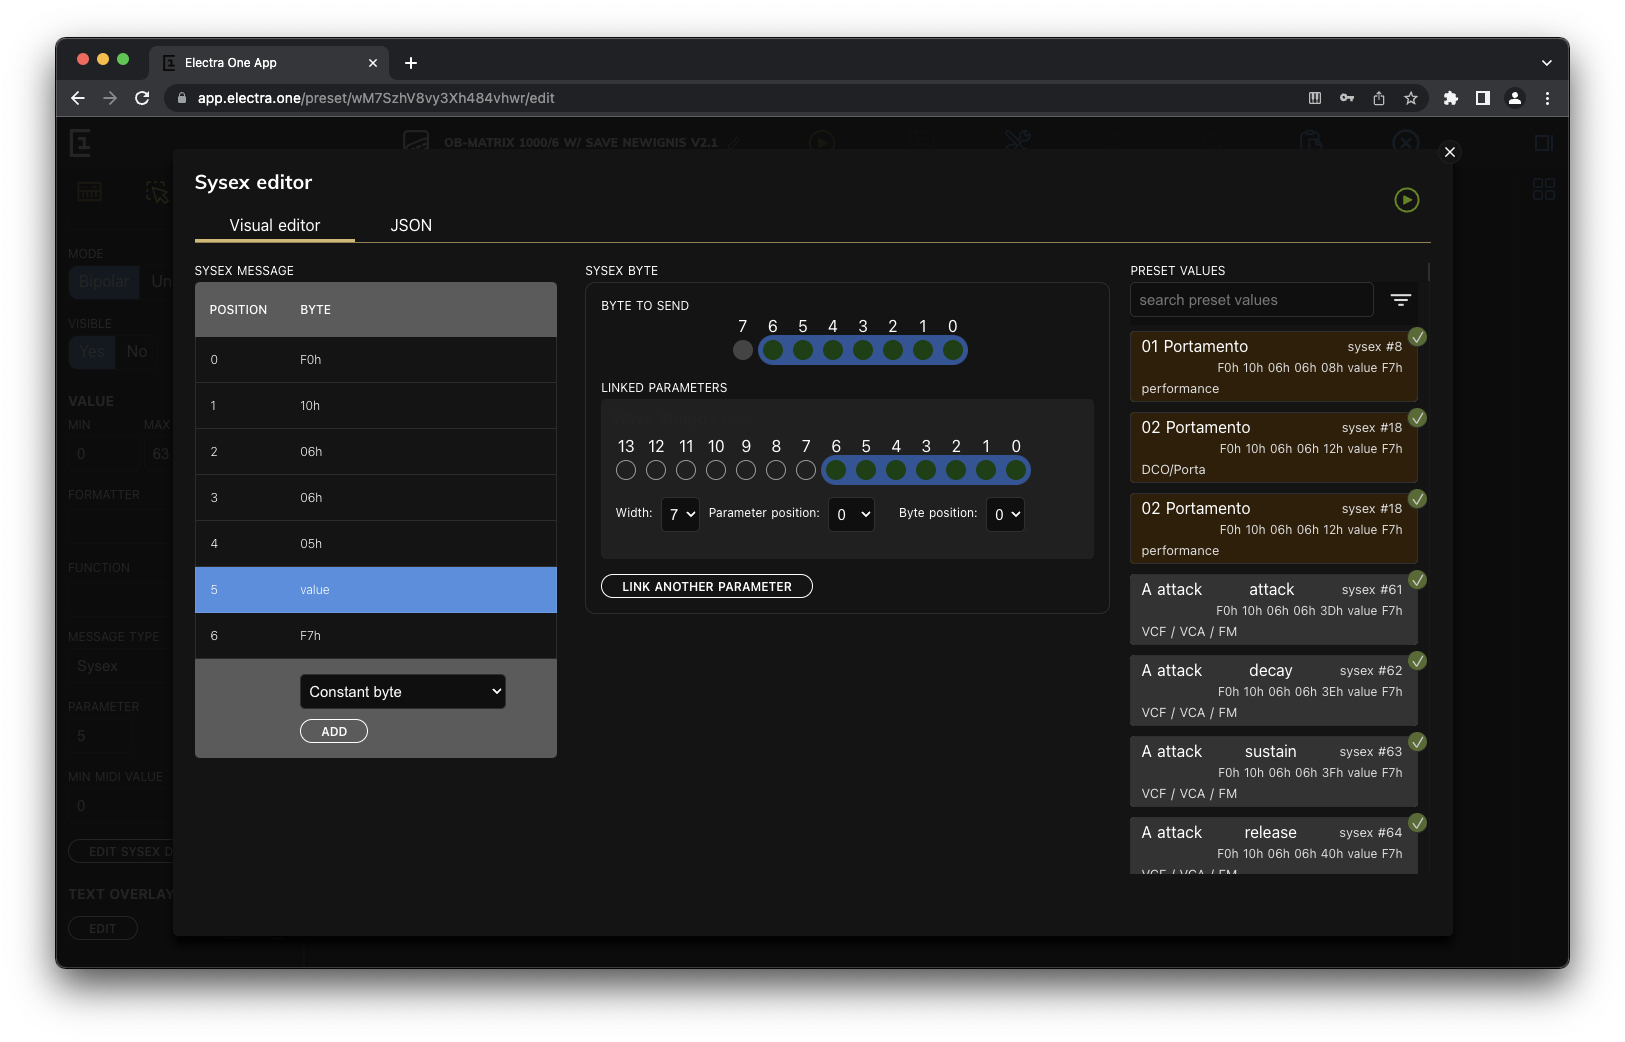
The Sysex editor window is composed of two sections:
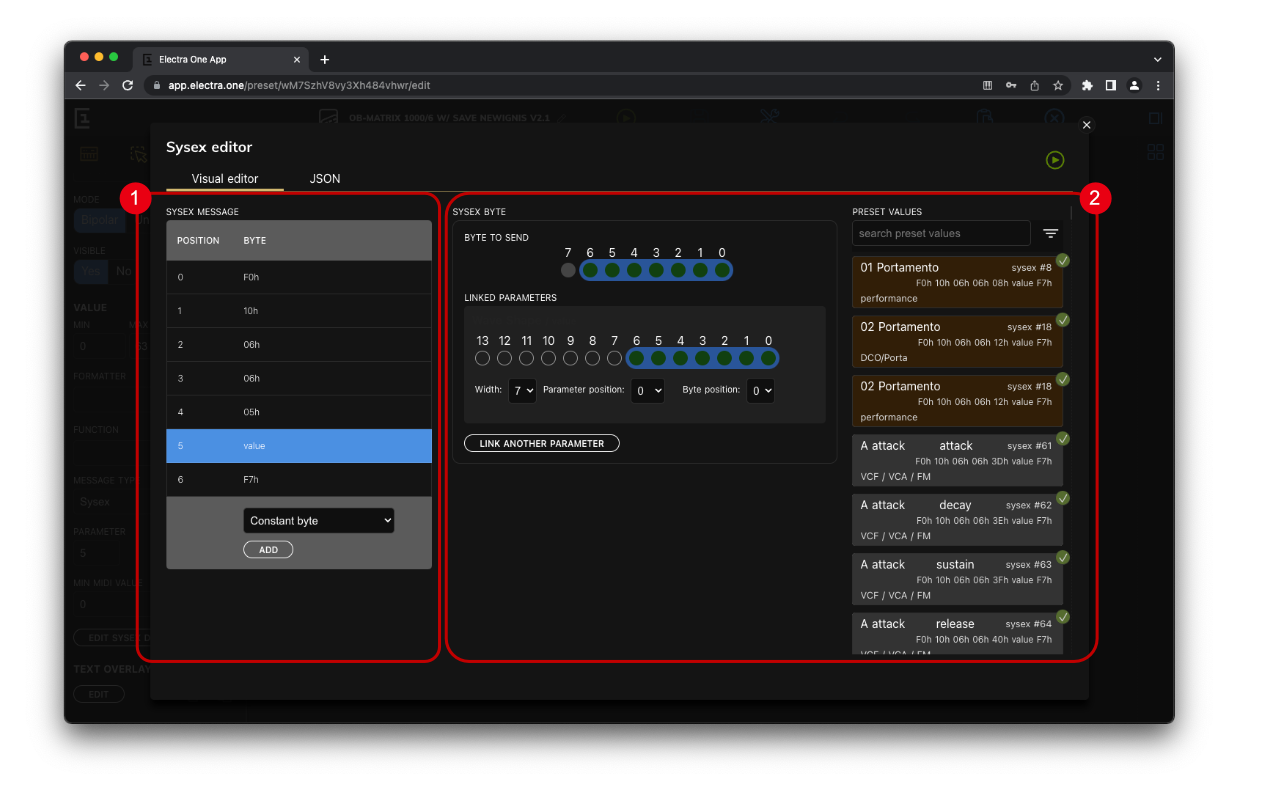
- The Sysex message
- The Sysex byte detail
Sysex message
The Sysex messages is a list of individual bytes of the Sysex message to send out. Each row represents one byte of the Sysex message. New bytes chan be added by choosing a byte type and clicking the ADD button.
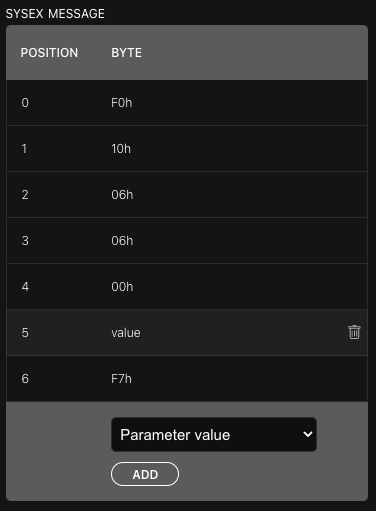
The F0h and F7h Sysex bytes may be included in the beginning and end of the Sysex message. If they are not present, Electra One controller will add them automatically when sending the message.
Clicking on the Bin icon removes the byte from the Sysex message.
When the byte record is clicked, it becomes selected and the detailed information about the byte is shown on the right side of the window.
There are four types of bytes to be added to Sysex messages:
- Constant numbers
- Parameter values
- Lua function calls
- Checksum calculations
Each byte type comes with different editor in the byte detail section
Sysex byte detail
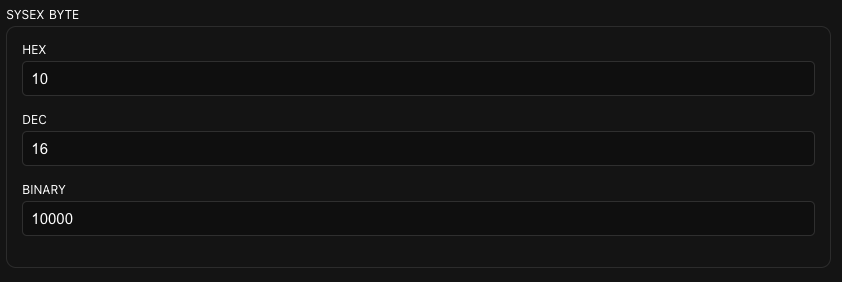
Constant number
The constant number is the most simple Sysex message entry. It represents a plain number to be sent out. The number can be entered in Hexadecimal, Decimal, or Binary format.
Parameter value
The parameter value is one of Electra One's hidden gems. It allows users to create Sysex bytes out of parameter value of preset Controls. The final Sysex byte can be either an assignment of single parameter value or a product of complex transformation of several parameter values or their parts.
The parameter value detail section consists of two parts, the Sysex byte detail and the list of all available parameter values in the preset.
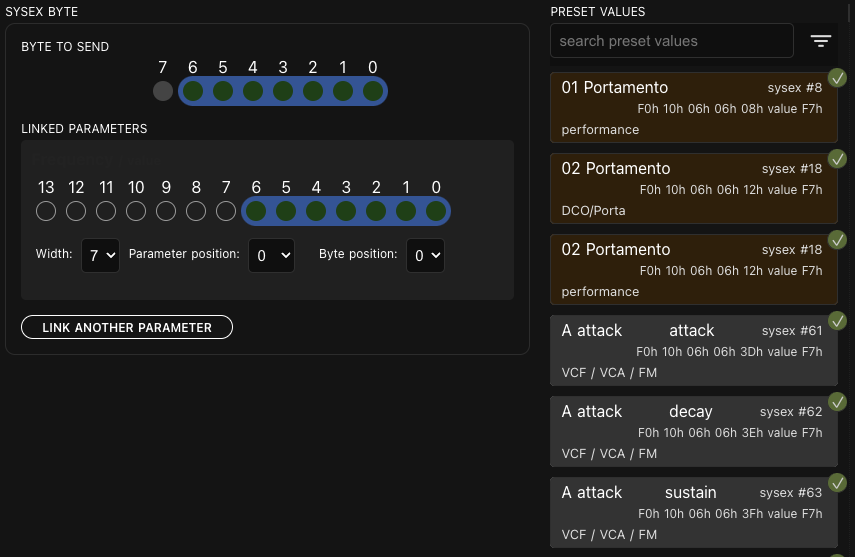
Parameter value byte detail
It shows how the Sysex byte is composed out of the one or several parameter vales. The Byte to send represent individual bits of the Sysex byte. The bits marked with blue highlight are linked to a parameter value. Each group of highlighted bits corresponds to one linked parameter.
An example of a Sysex byte composed of whole value of 7-bit parameter value: 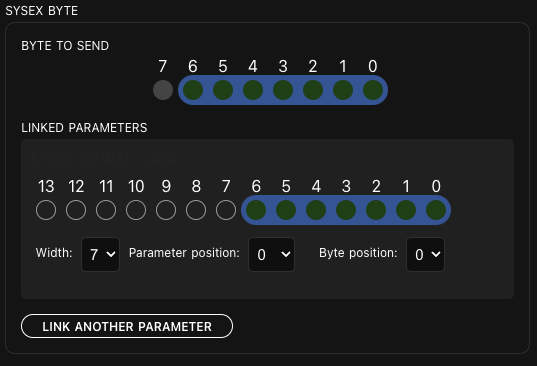
An example of a Sysex byte composed of combination of values of two parameters, 4 bits taken out of the first parameter and 3 bits taken out of the second parameter:
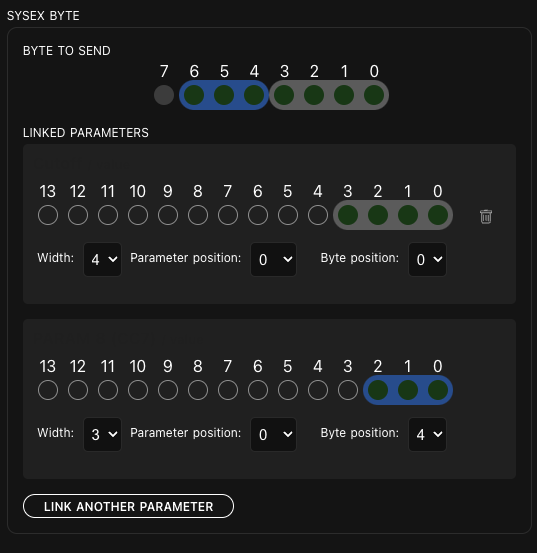
The user can specify how many bits are taken out of the parameter value, from what position within the parameter value, and to what position they (the bits) should be placed in the Sysex byte.
Width
The width specifies number of bits to be copied from the parameter value to the Sysex byte.
Parameter position
The position of the LSB (least significant bit) of the bits to be copied from the parameter value to the Sysex byte.
Byte position
The position of the LSB (least significant bit) of the Sysex byte where the bits identified with Width and Parameter position will be placed.
A few examples to ilustrate it:
Width: 7
Parameter position: 0
Byte position: 0
Tells Electra One to use all 7-bits of the parameter value and place them to the Sysex byte.
Width: 4
Parameter position: 0
Byte position: 0
Tells Electra One to copy 4 lowest bits of the parameter value and place them to the 4 lowest bits of the Sysex byte.
Width: 3
Parameter position: 0
Byte position: 4
Tells Electra One to copy 3 lowest bits of the parameter value and place them to the Sysex byte at position 4, ie. bits 4, 5, and 6.
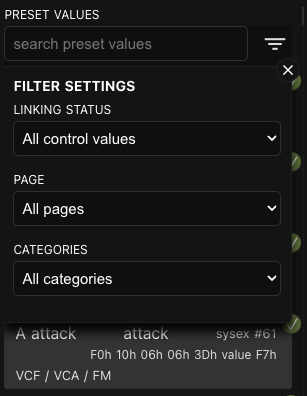
Preset parameter value list
The preset parameter list is used to select the parameters to be linked to the Sysex byte bits. Users use the list to find the parameter they wish to work with. The parameter is selected by clicking on it. Once the parameter is selected, all the work of linking the parameter bits to the Sysex byte is done using that selected parameter.
The list provides information about:
- The name of the Control where the parameter is used.
- The name of the Value within the Control where the parameter is used, eg. Sustain for envelope.
- The name of the Page where the Control is located.
- The name of the category that the Control has assigned.
- Information about the MIDI messages associated with the parameter.
- Information whether or not the parameter value is used in the Patch parsing (the check off mark). Detailed information about the Patch parsing can be found further below in this document.

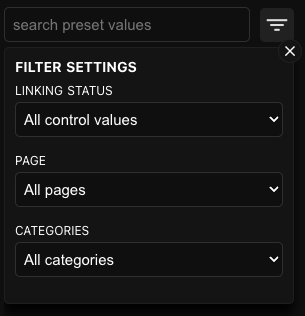
The list of parameter values can be filtered to make it easier to find the parameter values.
Lua function
The Lua function is another handy tool to calculate the Sysex byte. Electra One calls the Lua function when it needs to send given Sysex byte. The value returned by the function is sent. More information on using the Sysex byte Lua functions is available in the Preset Lua extension document.

The Lua function form is used to enter the name of the Lua function to be called.
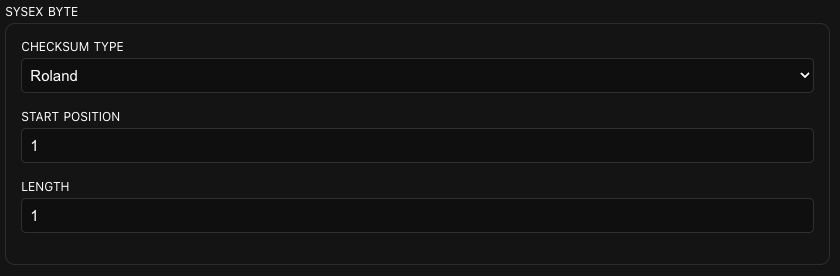
Checksum calculation
The checksum calculates the Sysex byte value using one of the well-known checksum calculation algorithms.
In order to calculate the checksum user must tell Electra One controller the position of the first byte of the block of bytes used for the checksum calculation and the total length of the block of bytes.
Checksum type
A list of all possible checksum calculation algorithms.
Start position
The position of the first byte of the block of Sysex bytes to be used for the checksum calculation. The position 1 corresponds to the first byte after the F0h leading byte.
Length
Total number of bytes to be included in the calculation.
JSON editor
Users may opt to define their Sysex messages using the JSON formatted source code. The JSON editor allows editing of the raw JSON file. The work in the visual and JSON editor can be freely combined.
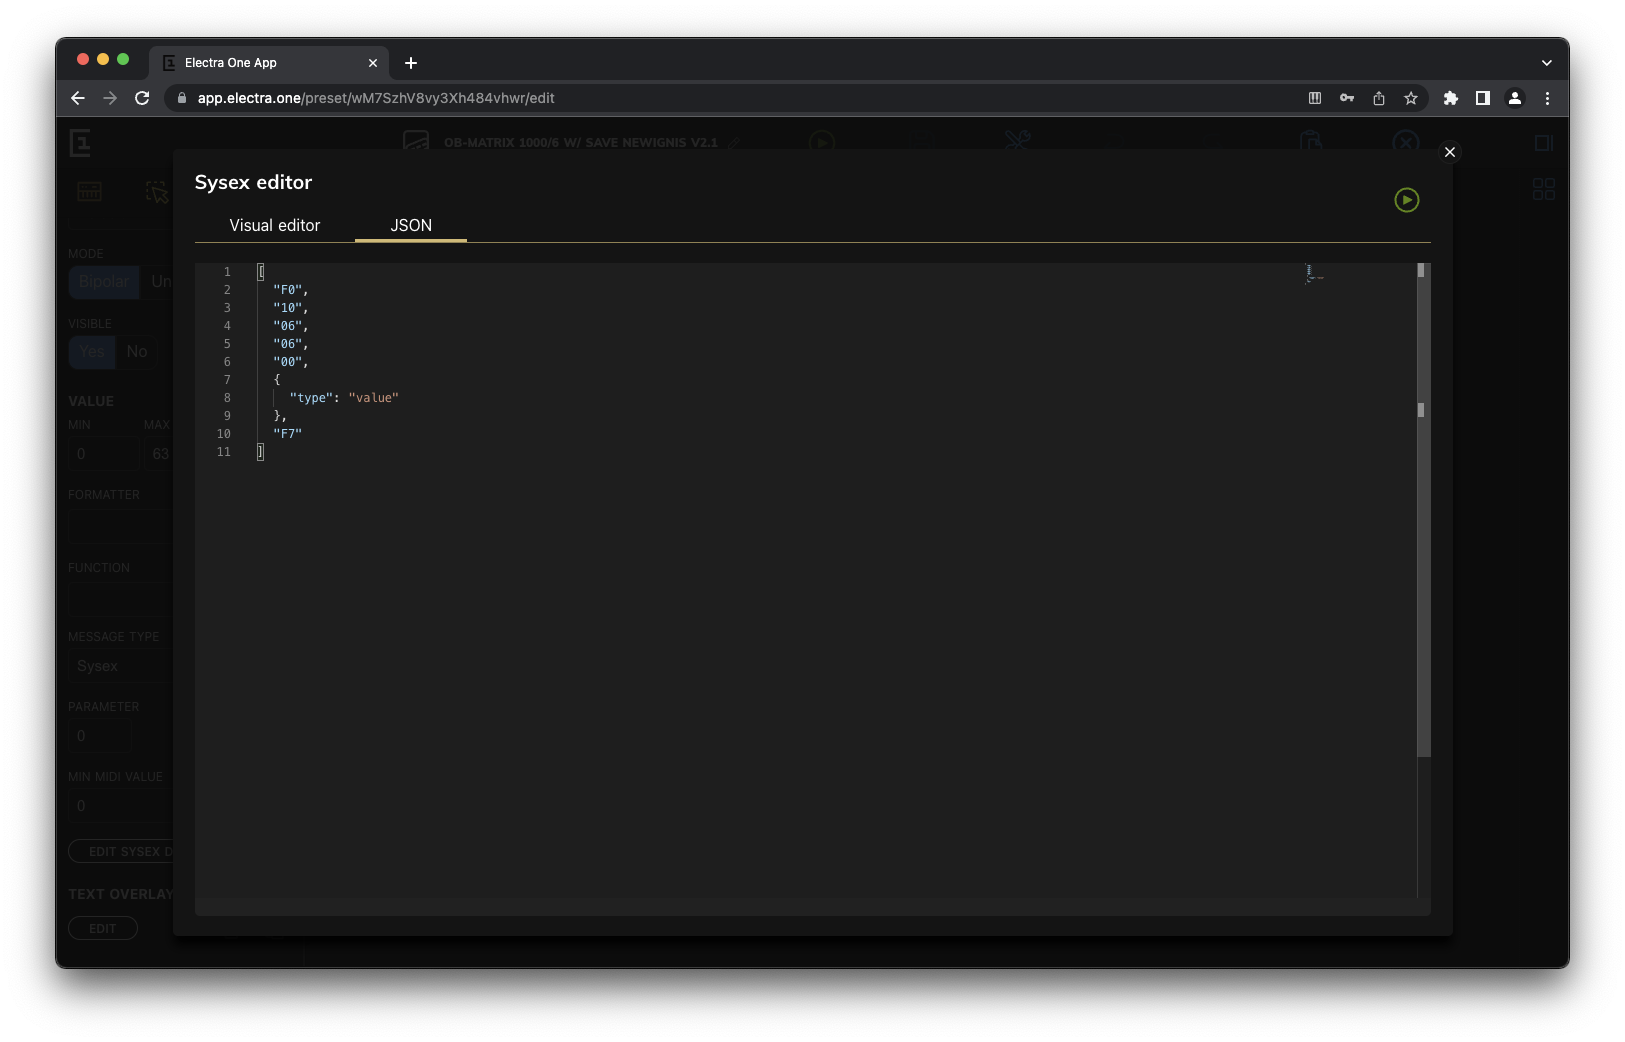
Detailed information about developing Sysex templates in JSON format can be found in Writing Sysex Templates document.
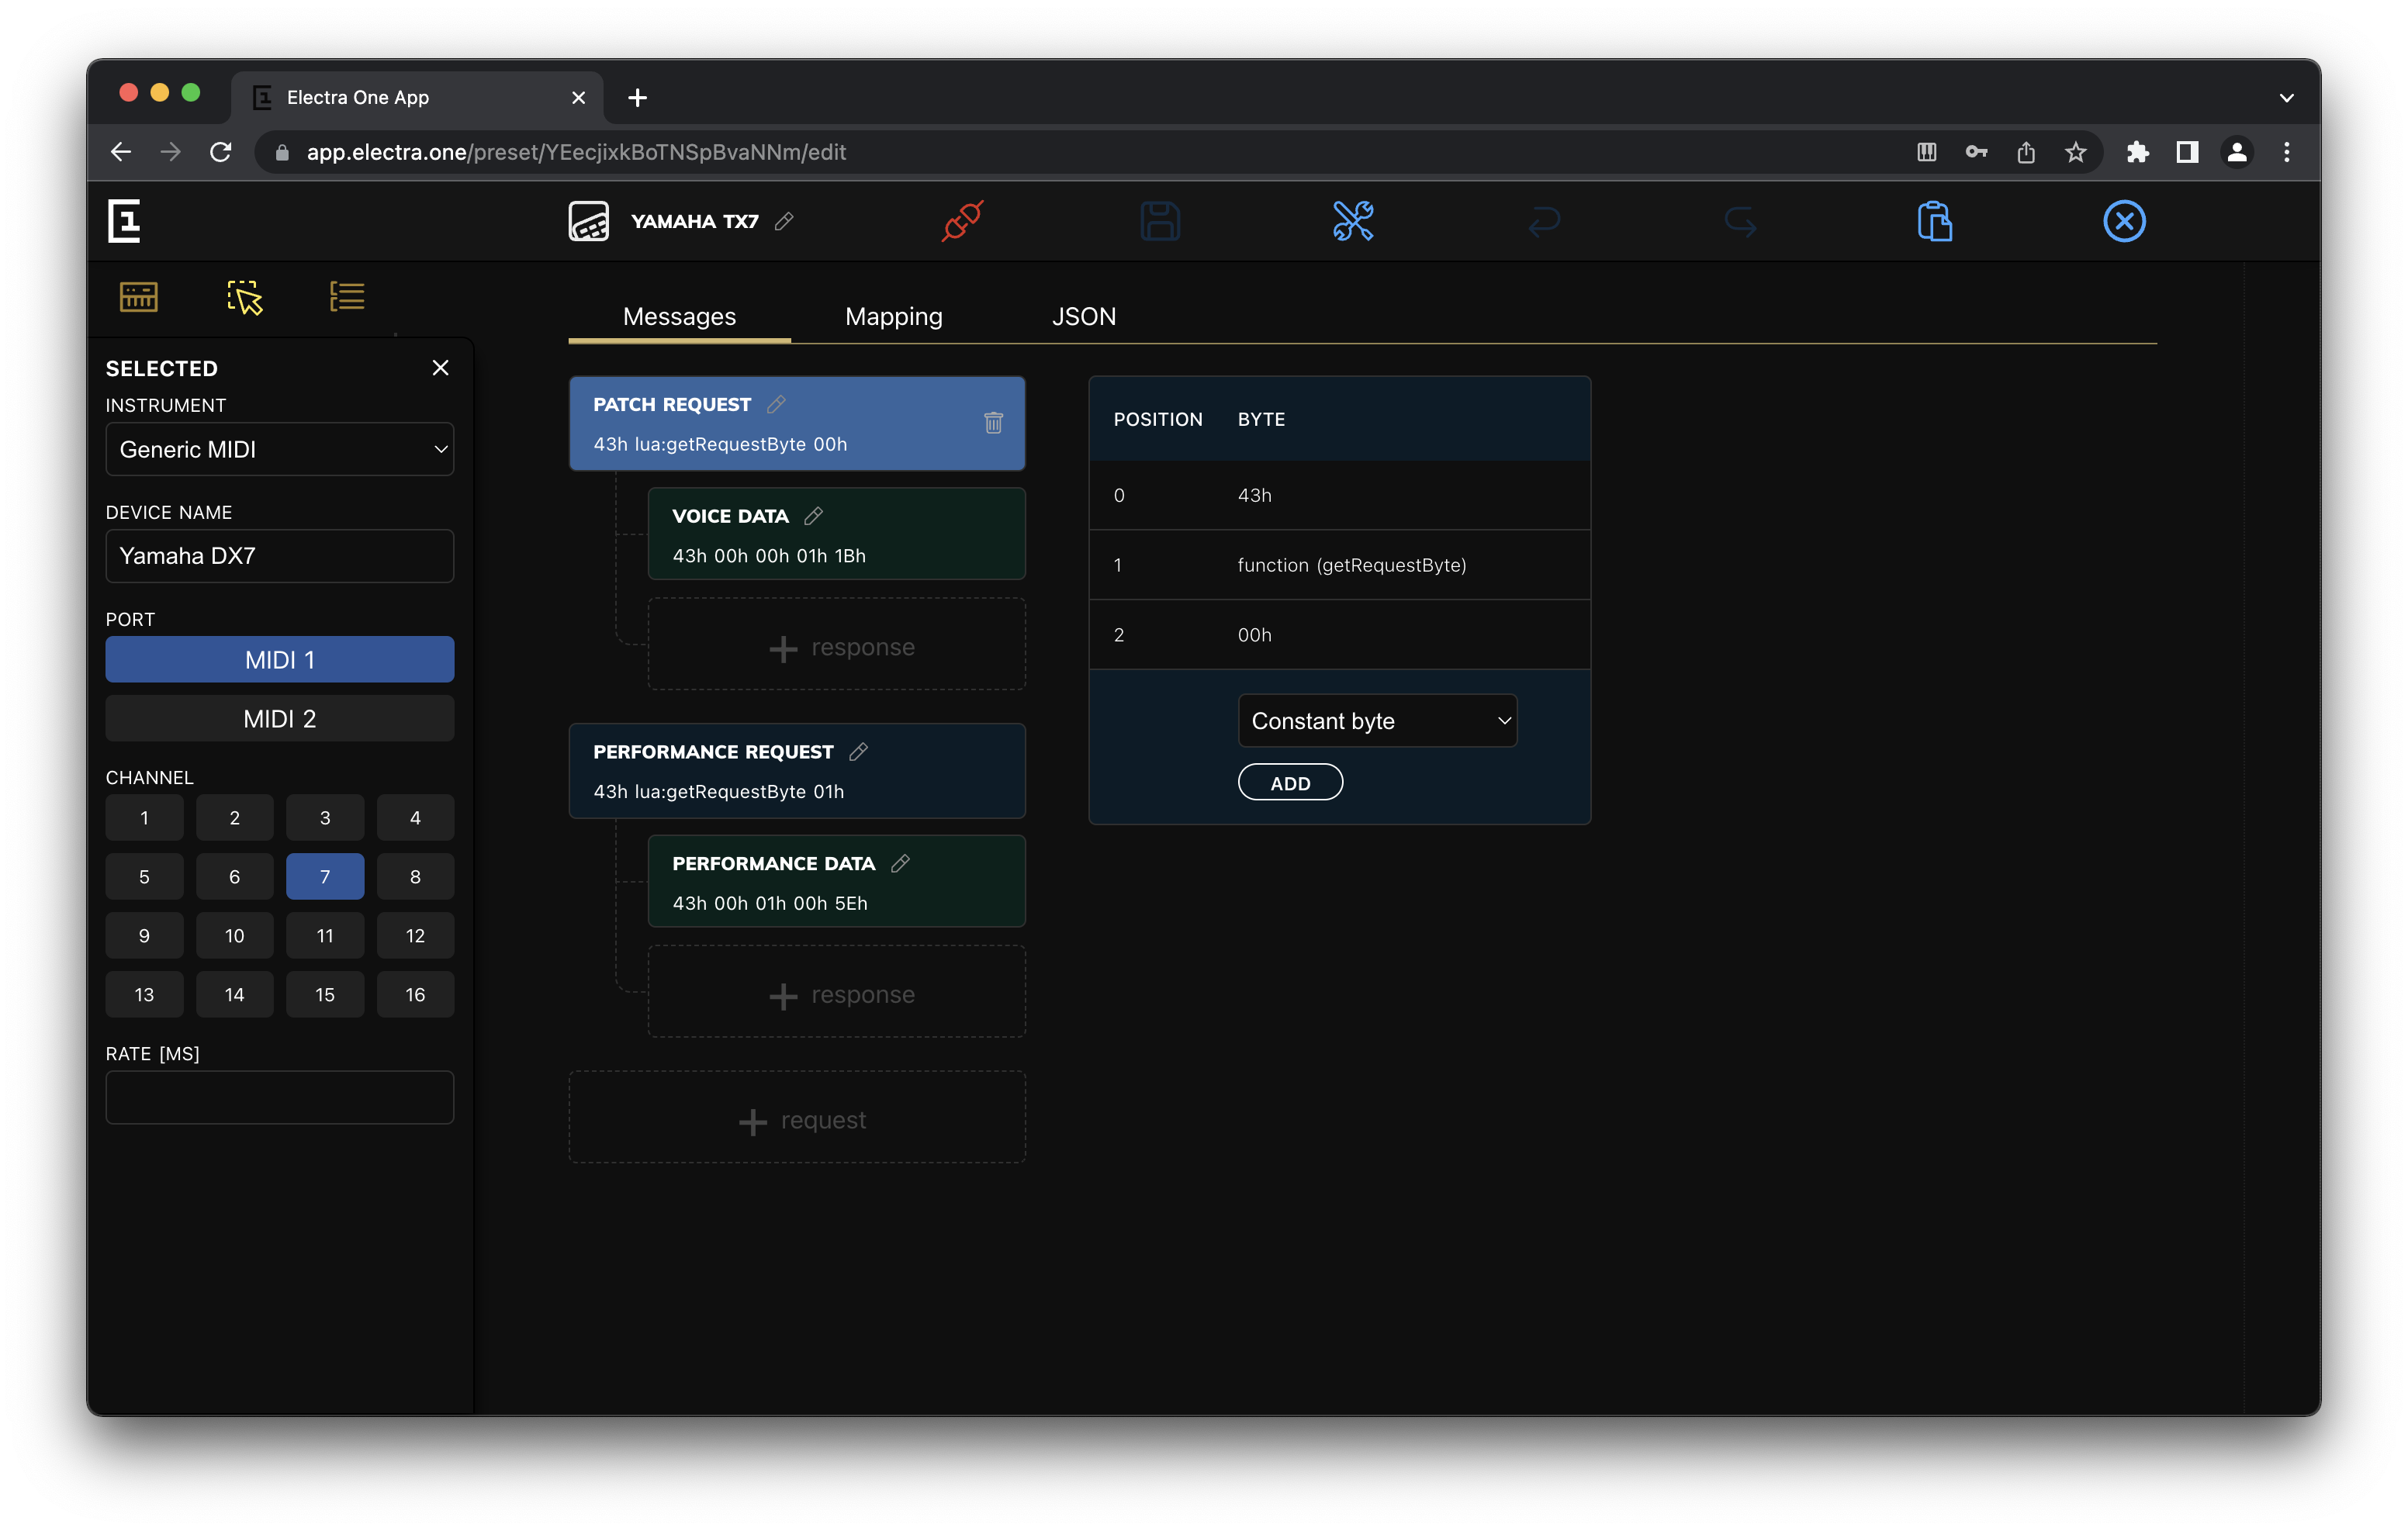
Patch Editor
The Electra One Patch editor is one of the most advanced Sysex editors around. The Patch editor and the Toolbox provide powerful toolset to build presets that fully cover Sysex implementation of complex MIDI devices.
The Patch editor is part of the Device detail. It can be opened by clicking the Edit device button in the repository panel.
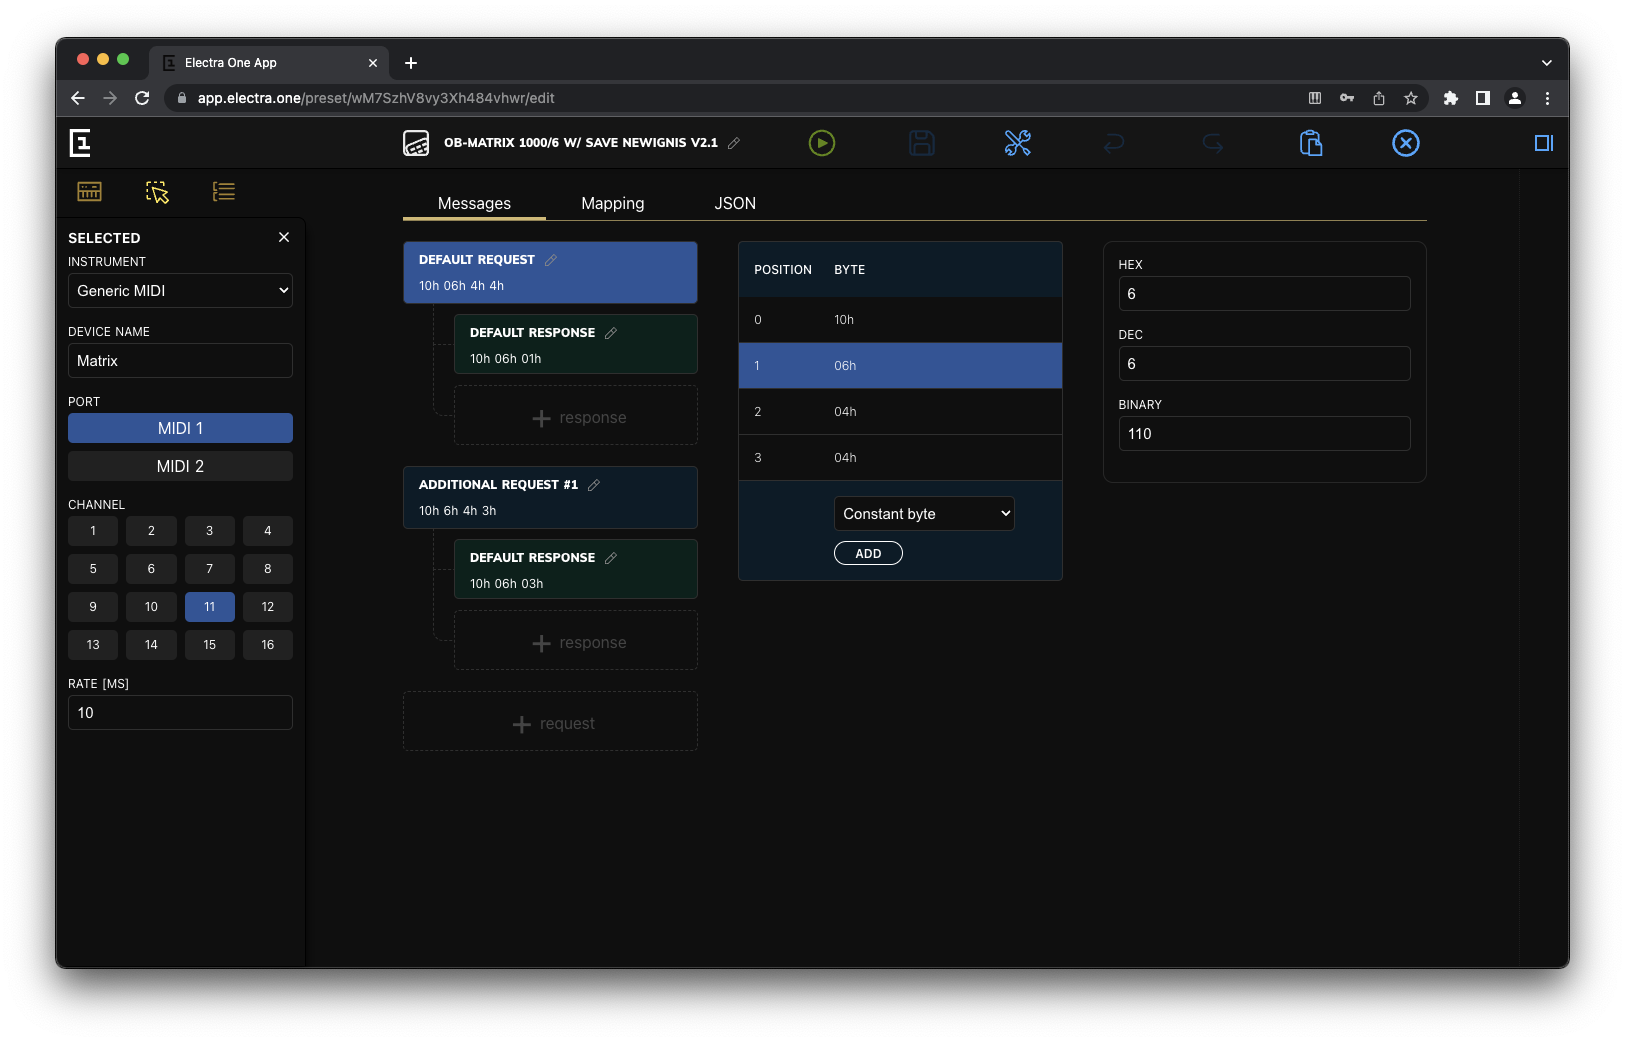
The Sysex communication is based on protocol of exchanging Sysex data messages in request - response manner. It means that the MIDI device responds with a Sysex data response upon receiving a Sysex request. There can be, of course, situations when a Sysex request just makes changes in the MIDI device and the device does not respond with any response. There are also situations when a MIDI device sends a response even if there was not any Sysex request sent to it, for example upon a user action, such is pressing a button on the MIDI device's panel.
The Patch editor is built around the idea of defining the Sysex requests and their responses. They are referred as to Messages in the Patch editor.
The messages
The messages can be organized in hierarchical structure, where one request may have none, one, or multiple responses.
The request
The request is a Sysex message composed of constant or dynamically calculated bytes. The requests are sent out when the [PATCH REQUEST] button is pressed on the Electra One controller or programatically with Lua functions, see the Patch section of the Lua Extension documentation.
In the Patch editor, the request always has a name and it is associated with a Sysex message. New requests can (be):
- Added with the + Request button.
- Deleted with the Bin icon.
- Have name edited by clicking the Edit icon.
The Sysex message editor is identical with the one used in the Sysex editor. It allows users to enter constant bytes in the Hexadecimal, Decimal, or Binary format.
The Lua functions can be be used as well. When Lua function is used, it is expected to return a byte value that will be send as part of the request Sysex message. For more information about Lua functions to generate Sysex bytes, visit Sysex byte functions of the Preset Lua Extension guide.
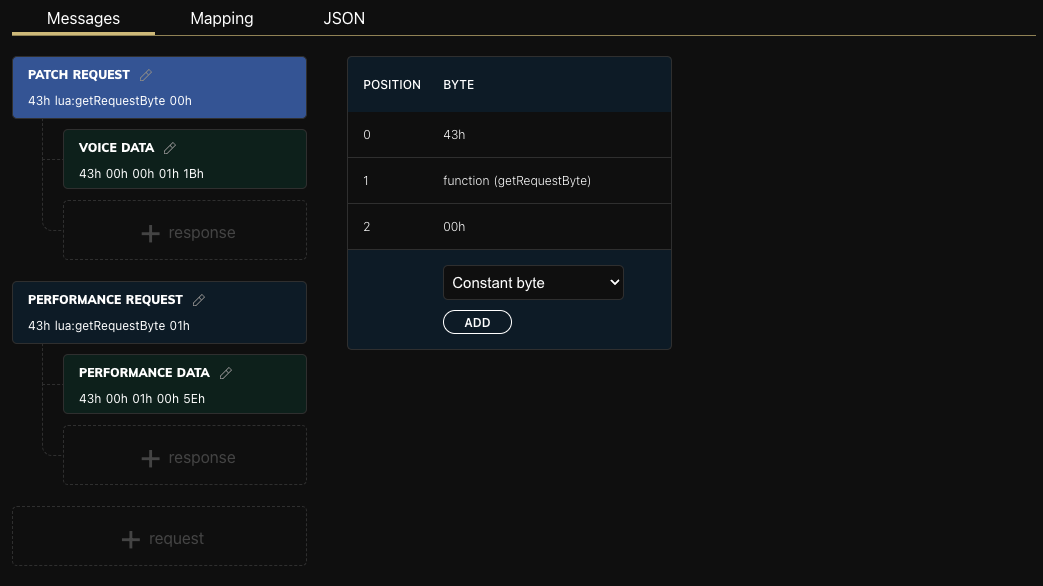
The response
The response is a Sysex message that a MIDI device sends back to the Electra One controller. The responses are identified with so-called header bytes, a sequence of leading bytes of a Sysex message. When there is an incoming Sysex message with its leading bytes matching the header bytes, it is accepted for further processing. Such processing is either a parameter value parsing or a Lua function can be called to process the response Sysex message.
The responses can (be):
- Added with the + Response button.
- Deleted with the Bin icon.
- Have name edited by clicking the Edit icon.
The Sysex message editor is identical with the one used in the Sysex editor. It allows users to enter constant bytes in the Hexadecimal, Decimal, or Binary format.
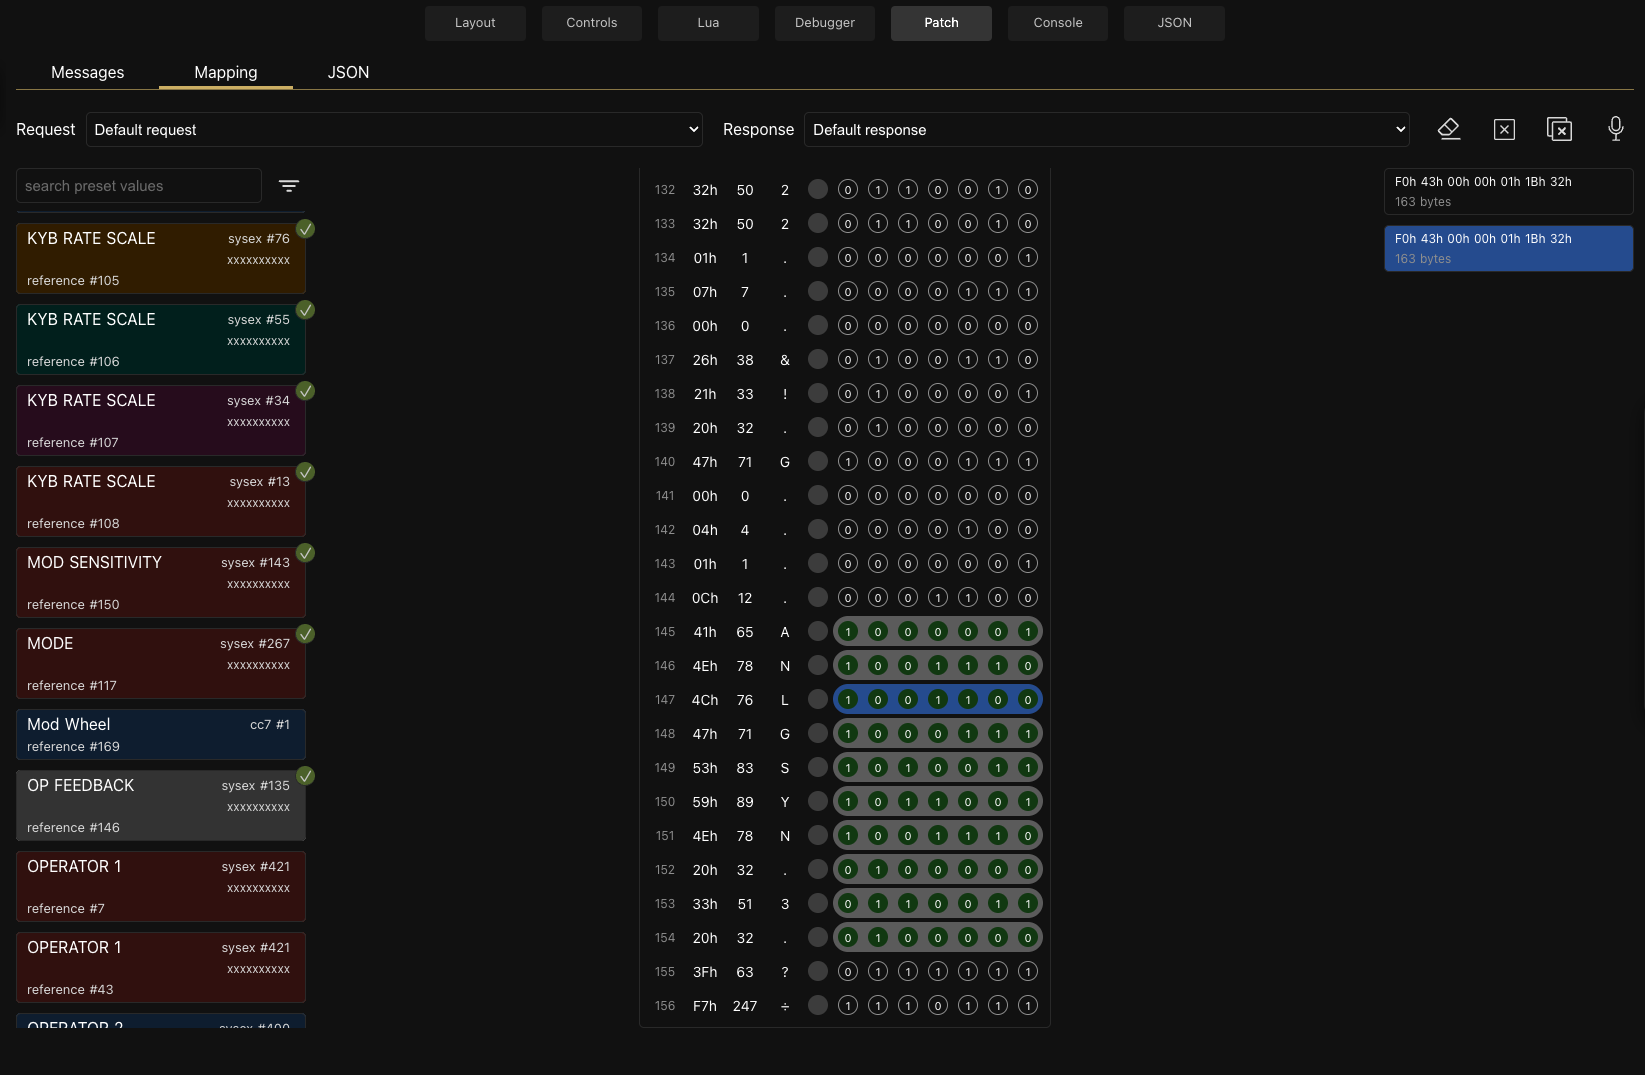
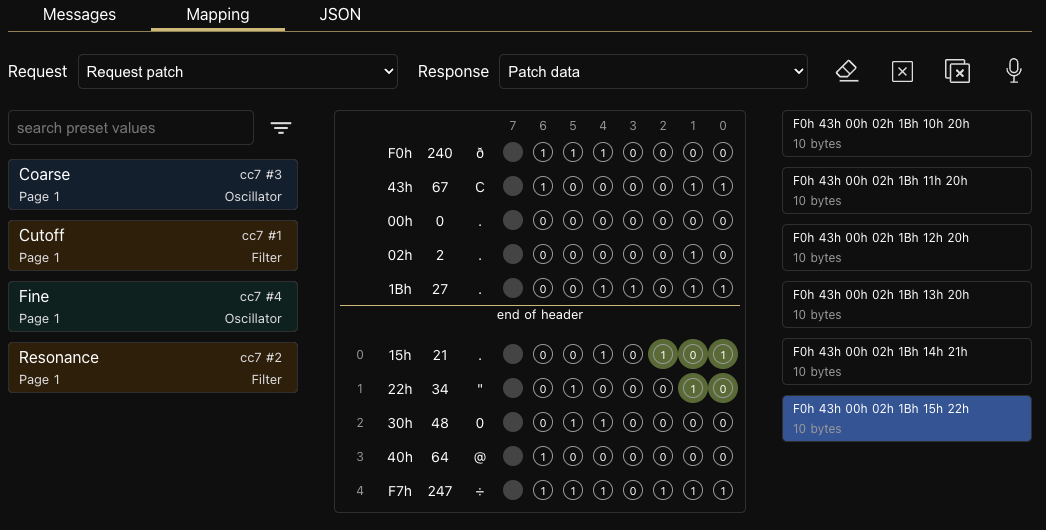
The value mappings
Once the requests and responses are defined, the response Sysex message bytes can be mapped to the preset parameter values.
The general idea of the mapping is very similar to how the Sysex editor works. Each mapping represents a rule that tells which bytes and bits of the response Sysex message are translated to particular preset parameter values. It is just done in the reversed direction.
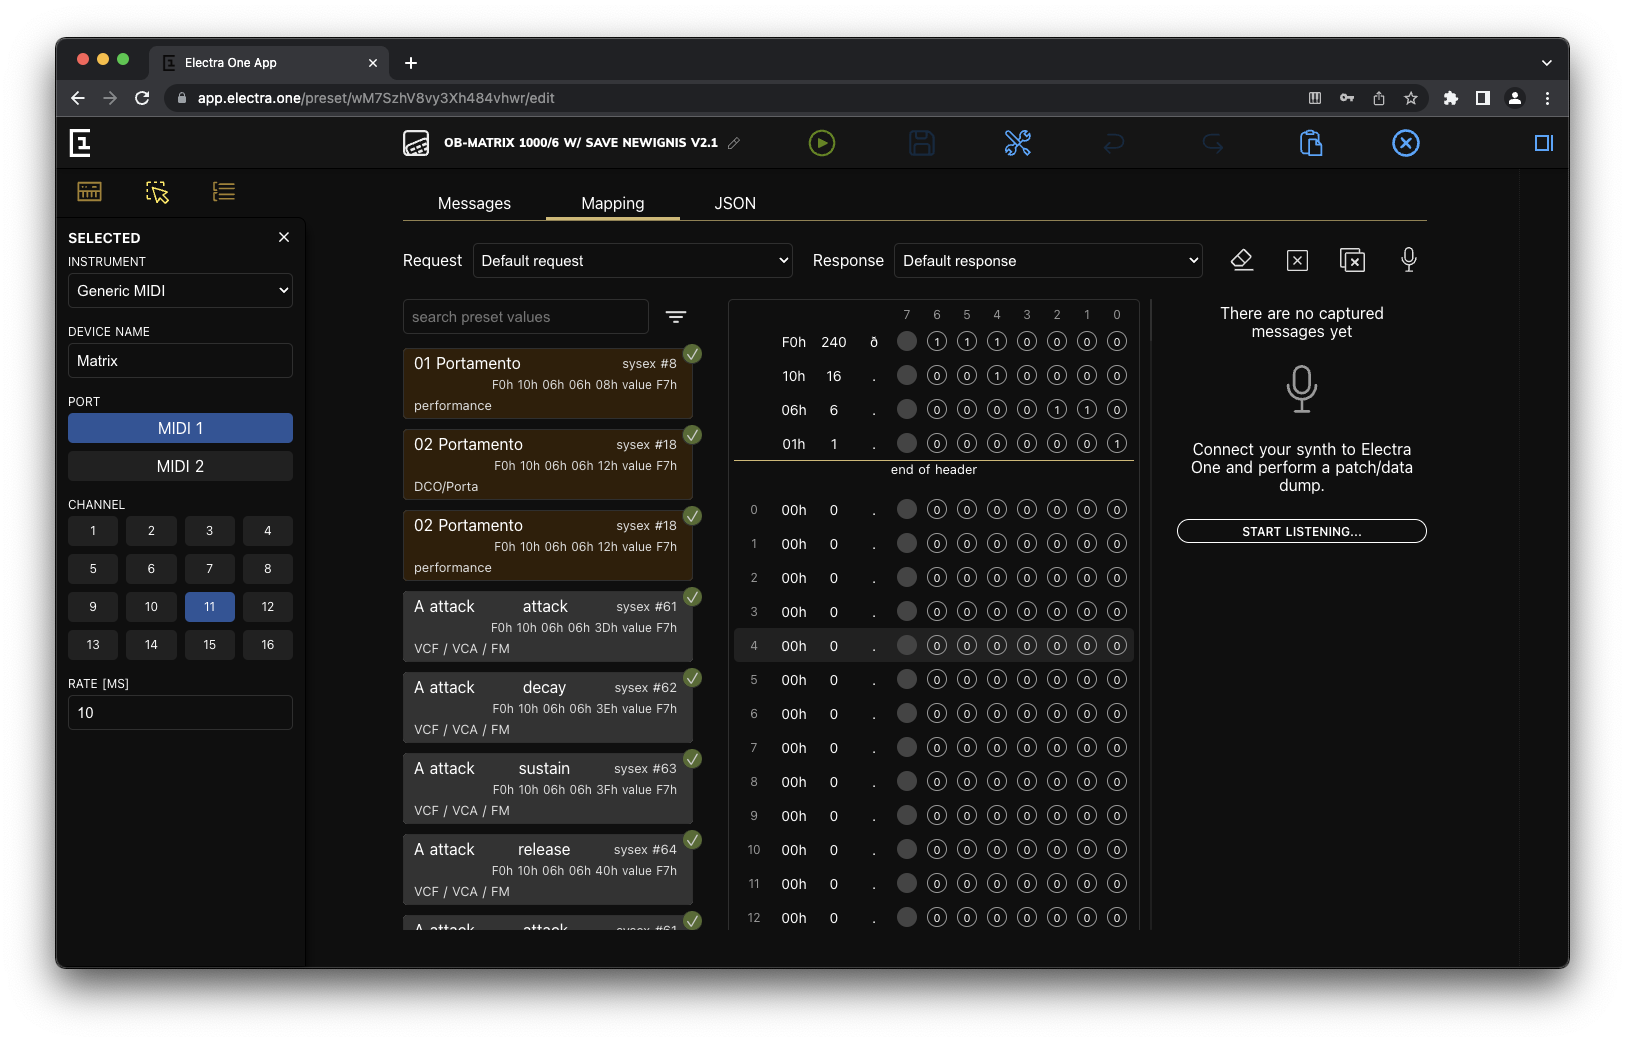
The window with mappings consists of four sections:
- Menu
- List of preset parameter values
- Response Sysex message bytes
- List of captured Sysex messages
Menu
The menu allows user to navigate between the requests and responses. There are also buttons to manage the captured messages. 
Request selection

Request selection list changes current request. Upon changing the request the selection list of Responses is updated.
Response selection

Response selection list changes current response.
Clear marked bits

Clears marks identifying changes in the Sysex messages.
Clear Sysex message

Clear currently shown Sysex messages by setting all bytes to 0.
Clear Captured messages

Clear all captured messages.
Enable / Disable MIDI learn

Enable or disable the MIDI learn function on the hardware controller. The MIDI learn icon is pulsating when the MIDI learn is active.
Preset parameter value list
The preset parameter list is used to select the parameters to be associated with the response Sysex byte bits. Users use the list to find the parameter they wish to associated with the Sysex byte. The parameter is selected by clicking on it. Once the parameter is selected, all the work of linking the Sysex byte bits is done using that selected parameter.
The list provides information about:
- The name of the Control where the parameter is used.
- The name of the Value within the Control where the parameter is used, eg. Sustain for envelope.
- The name of the Page where the Control is located.
- The name of the category that the Control has assigned.
- Information about the MIDI messages associated with the parameter.
- Information whether or not the parameter value is already associated with any byte of the response Sysex message (the check off mark)

The list of parameter values can be filtered to make it easier to find the parameter values.
The list of parameter value mappings is shown when a parameter value is selected with the mouse:
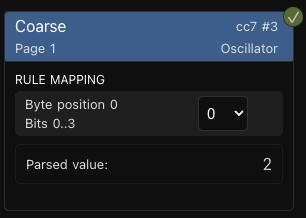
The above example tells Electra One that bits 0 .. 3 of the Sysex byte at position 0 (within the response Sysex message) are copied to the parameter value at the LSB (least significant bit) position 0.
The position where the parsed bits will be copied can be changed by using the selection list on the right side of the mapping rule.
Parsed value field calculates value using currently selected captured message and all mapping rules of given parameter value.
The Bin icon can be used to remove a mapping rule.
The Response Sysex message
The Response Sysex message allows user to review the Sysex messages received from the MIDI devices - captured messages.
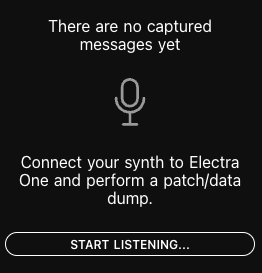
The Response Sysex message is a view of currently selected captured message. If there are not any captured messages available, the response header bytes are shown instead, and the user is advised to enable the MIDI learn function by clicking the START LISTENING... button.
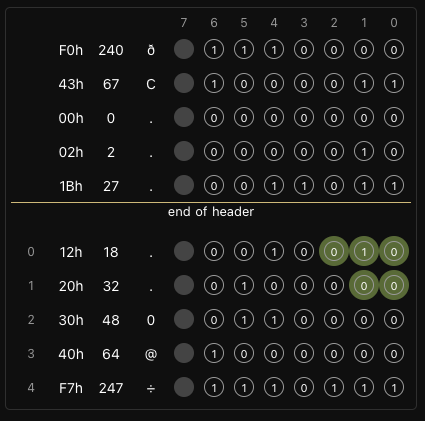
The data bytes of captured messages are shown only if selected captured message matches the response header bytes.
Captured messages
The right-most section of the Mapping provides a list of all Sysex messages received from the MIDI device.
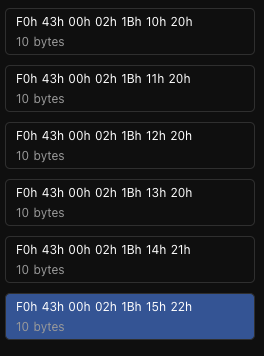
When there have not been any captured messages received yet, the Patch editor instructs the user to enable the MIDI learn by clicking the START LISTENING... button.
When a captured message is selected and its leading bytes match the response header, the data bytes of the captured message are shown in the Response Sysex message section in the middle of the window.
Mapping the parameters
Once the Response Sysex message is successfully matched and shown, a process of assigning the Sysex bytes values to preset parameter values can be started.
Start with choosing the parameter you want to map:

Locate corresponding bits in the Sysex message and assign them to the mapping rule by clicking on each bit. All consecutive bits will form one mapping rule:
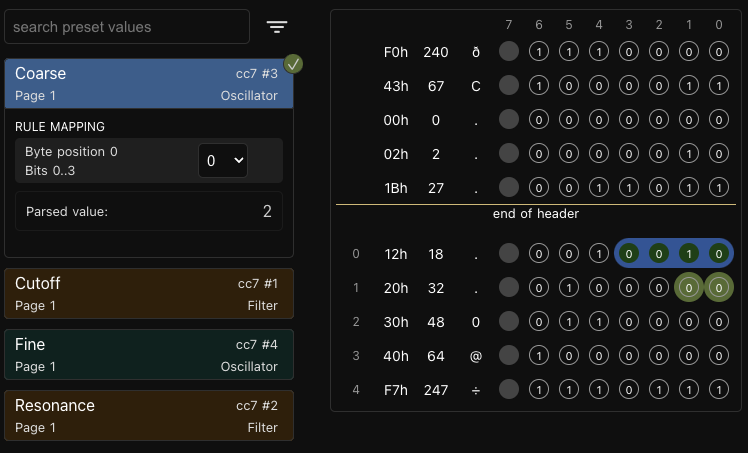
Should the parameter value be composed of bits from more than one Sysex byte, mark all bits in these bytes too.

TIP
When you have more captured messages available for one parameter, eg. you twisted the parameter knob, the Patch editor will highlight the changing bits with green background. This makes it possible to easily reverse-engineer Sysex messages even if there is not technical documentation available.
JSON editor
Users may opt to define their Patch parsing definition using the JSON formatted source code. The JSON editor allows editing of the raw JSON file. The work in the visual and JSON editor can be freely combined.
Detailed information about developing Patch parsing mappings in JSON format can be found in Parsing Sysex messages document.
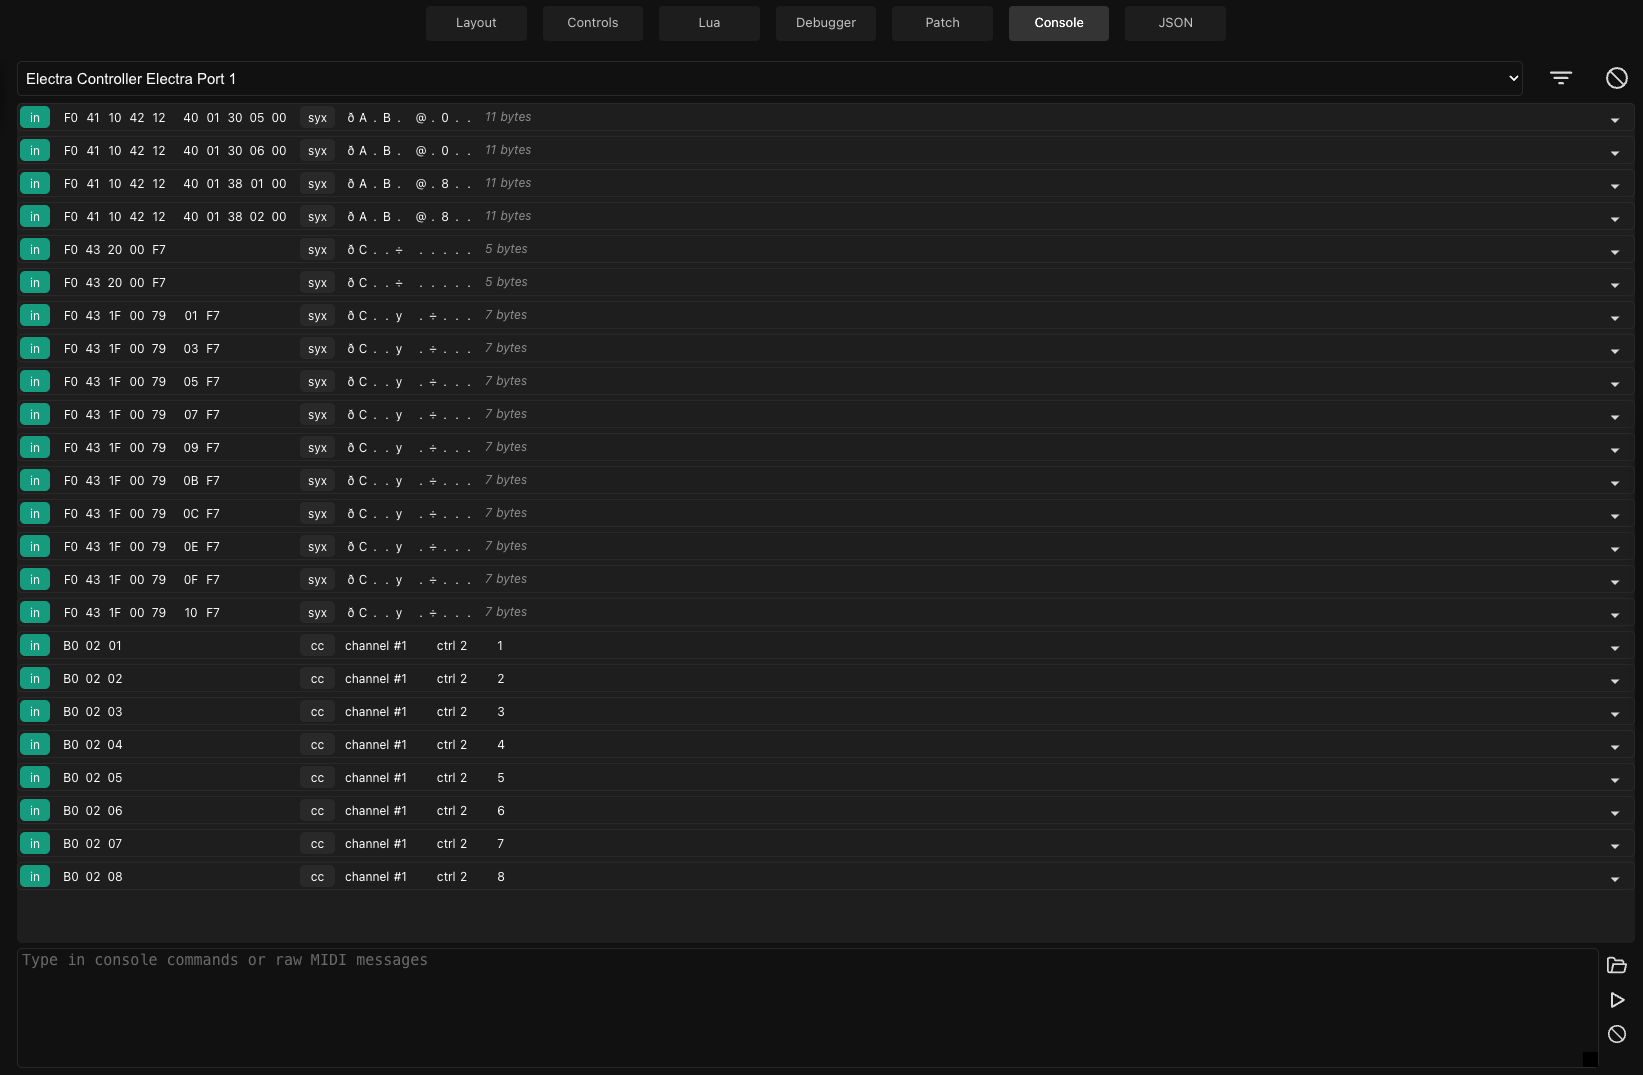
MIDI Console
The MIDI Console is a tool to send MIDI messages and monitor MIDI communication between the Preset editor and the MIDI devices, including Electra One controller.
The MIDI Console consists of three sections:
- Menu
- Monitor window
- Message prompt
Menu
The menu allows user to select the MIDI device / port to interact with and filter and clear MIDI messages in the monitor window.

Filter

Configures the MIDI message filter. MIDI messages that are not chosen are completely ignored by the MIDI console.
Clear

Clears the content of the Monitor window.
Message prompt
The message prompt is used to enter the MIDI messages, MIDI commands, and load files with MIDI messages.

The MIDI messages can be entered either as MIDI command with the syntax inspired by the sendmidi tool, or as raw strings of MIDI data.
There are three actions associated with the Message prompt:
Load message file

Loads raw MIDI data from a file and executes them.
Send the message

Sends MIDI messages currently present in the Message prompt to selected MIDI device. Clicking the Send button has the same function as pressing the Enter key.
Clear the Message prompt

Clears content of the Message prompt.
Commands syntax
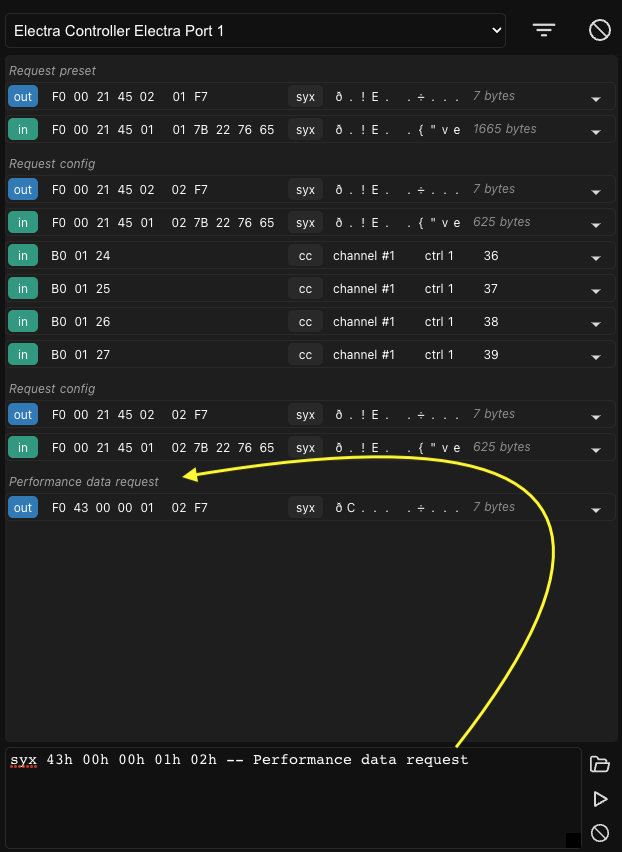
The raw MIDI messages can be entered in decimal and hexadecimal format. The decimals use format of whole numbers (0, 10, 12, 127, 240). The hexadecimals must have 'h' letter attached to them (01h 10h 1ah 2Bh F0h).
Notes can be entered as numbers, in both decimal or hexadecimal format, or as a text strings (a4, g#3, db2, c-1, f#-1).
Next to that messages can be entered using a simple syntax much inspired by the sendmidi command line tool:
ch <nn>channel selectionon <note> <velocity>note onoff <note> <velocity>note offcc <ctrl number> <value>control changepc <program number>program changepp <note> <pressure>poly pressurecp <pressure>channel pressurepb <msb> <lsb>pitch bend (this needs doing)syx <byte1, byte2, ...>sysex, do not include F0h and F7hstartstopconttun- tune requestspp <msb> <lsb>song pointer positionss <song number>song select
a few examples of MIDI Console commands:
cc 1 64
ch 2 cc 1 127
syx 43h 00h 01h 1bh
syx 10 20 30 10h 20h 30h
ch 4 on c4 127
off 3Ch 64
start
b0h 1ah 10h
f6h
82 60 100
Please note, when channel is not set, it defaults to channel 1
When lua style comment is added at the end of the MIDI console command, it will be shown in the stream of MIDI messages in the Monitor window.
eg.
syx 43h 00h 00h 01h 02h -- Performance data request will result in:
Project revisions
The Preset editor supports a system of saved revisions. Whenever there are unsaved changes in the project and the user:
- Saves the project.
- Sends the preset to the Electra One controller.
- Closes the Preset editor.
The project is saved and a separate saved revision is created. The saved revisions can be later browsed and managed in the Electra One Account web application.
For more details, please refer to Preset detail - section Preset revisions.
When saving a project, user may provide a short description of the revision, ie. an annotation of what was changed. The annotation is always showed along with the revision number. When the annotation is not provided, the Preset editor will use a default annotation text.
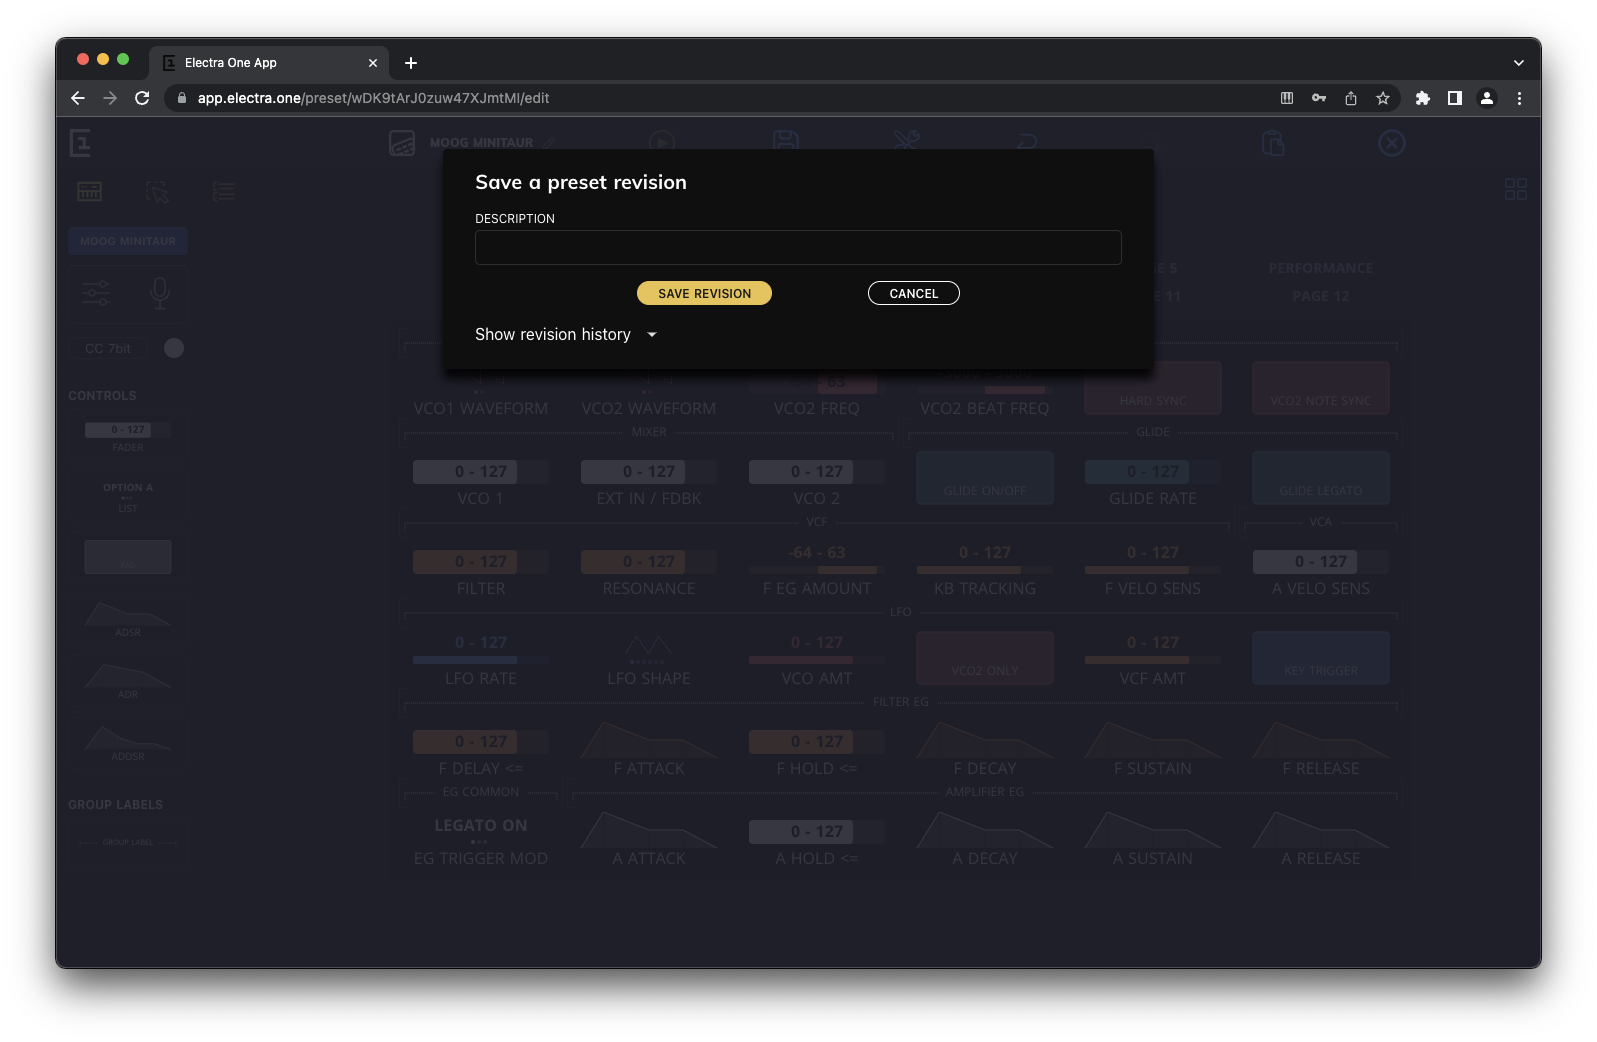
It is possible to review earlier project revisions before saving a new revision.