

Version5.0.0 beta
The Overview
Electra One Mini is a MIDI controller for hands-on control of your synthesizers, effects and software. It has no touchscreen: you work with it through eight knobs and six buttons, and the colour display shows what they do.
This manual describes the controller itself. How presets are made, and the ideas behind controls, devices, snapshots and captures, are described in the User Guide.
The Mini has:
- A colour display that shows the controls of the current preset, the menus and the settings.
- Eight knobs. Each knob can be turned endlessly, senses when you touch it, and can be pressed like a button. Turning changes a value, touching selects a control, and pressing toggles pads, steps through lists, opens detail windows and chooses items in menus.
- Six buttons under the display. On a preset page,
[MENU]opens the menu and[CONTEXT]switches the other four between the preset's controls and controller actions, the context. In menus and windows, all six do what the labels above them say. - MIDI connections: one pair of MIDI IN and MIDI OUT sockets (3.5 mm TRS type A), a USB Device port for your computer, and a USB Host port for USB MIDI instruments and controllers.
Firmware version
This manual describes firmware 5.0 and later. Some functions, such as SAVE in the Settings window and the default button layout, are not available in earlier versions.
You can also connect other MIDI controllers to the Mini to get more knobs and buttons. This is described in External MIDI Control.
The Mini has no Performance mode. The Performance pages, with their simple references and macros, are a Mk2 feature and there is no Performance window on the Mini.
The chapters of this manual
| Chapter | What it covers |
|---|---|
| Overview | the panels, the display, connecting the Mini, changing pages and presets, working with controls, power and recovery |
| Main Menu | preset selection, page selection, snapshots, captures |
| Settings | the Settings window and the Mini's configuration in the Electra One app |
| Preset Menu | the actions of the current preset and its user functions |
| The Bootloader | USB disk mode and manual firmware updates |
| Firmware update | updating the firmware |
| Buttons and Contexts | [MENU], [CONTEXT], the four buttons and what they do in each context |
| Mini Presets in the Editor | what is special about Mini layouts in the Preset Editor |
Panel layout and connectors
Front panel
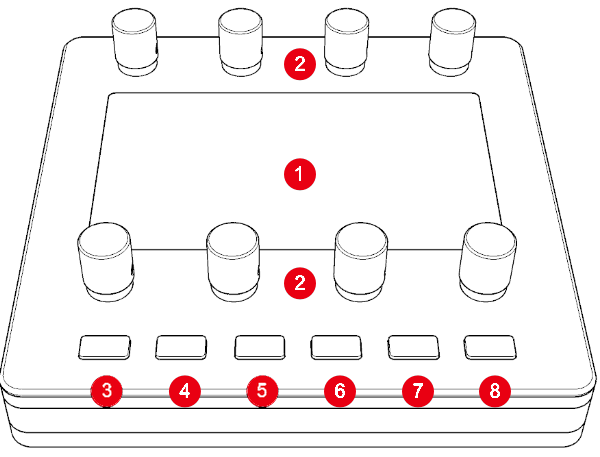
- Colour display – shows controls, menus and settings.
- Eight knobs,
KNOB 1(top left) toKNOB 8(bottom right). The top row of knobs belongs to the top row of controls on the display, the bottom row to the bottom row. [MENU]button[CONTEXT]button[BUTTON 1][BUTTON 2][BUTTON 3][BUTTON 4]
Each button sits under the label that the display shows for it. Most screens draw a label along the bottom edge above each button, so you can read what a button does before you press it.
On a preset page:
[MENU]opens the menu. Holding it for a second opens the Settings window. In a window,[MENU]isBACK.[CONTEXT]switches the four buttons next to it between the preset's own controls and controller actions. See Buttons and Contexts.
[BUTTON 1] to [BUTTON 4] do different things in different situations. On a preset page they play the preset's pads and lists. After you press [CONTEXT] they run controller actions, and in menus and windows they do what the labels above them say.
Rear panel
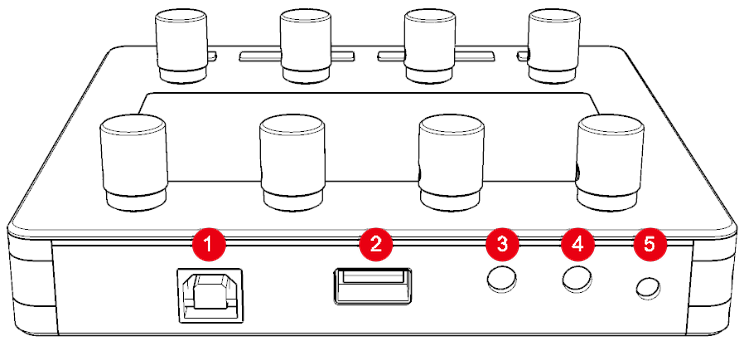
<USB DEVICE>port – connects the Mini to your computer. The computer sees it as a USB MIDI interface and powers it.<USB HOST>port – connects USB MIDI devices, such as synthesizers and keyboards, directly to the Mini.<MIDI 1 IN>– MIDI input, 3.5 mm TRS type A (Port 1)<MIDI 1 OUT>– MIDI output, 3.5 mm TRS type A (Port 1)[RESET]button – restarts the controller
<MIDI 1 OUT> and <MIDI 1 IN> together are called <MIDI IO> in this manual.
The [RESET] button is described in Rear panel buttons.
Display layout
The display shows the page of the preset you are working with, the state of the MIDI ports and the labels of the six buttons.
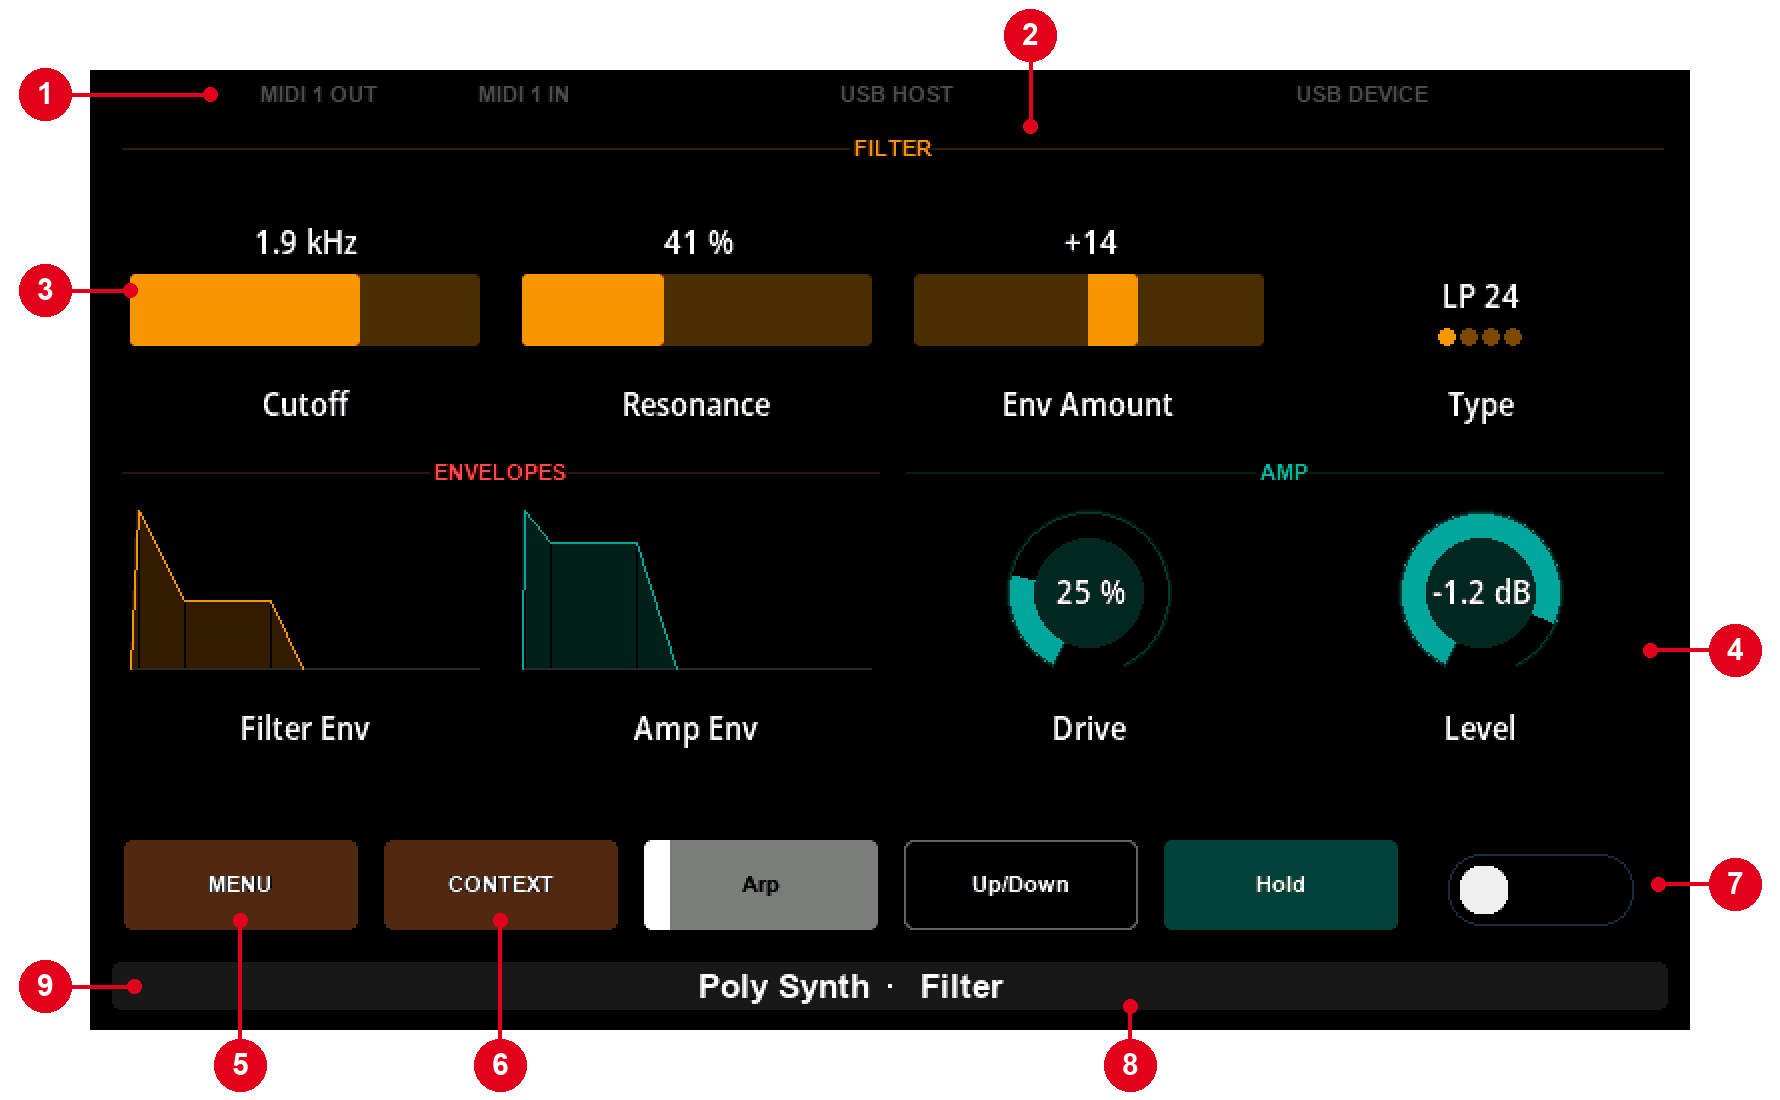
- Status bar – activity on the MIDI ports
- Group – a title that the preset uses to label controls that belong together
- Control of
KNOB 1– the controls are laid out in two rows of four, in the same arrangement as the knobs - Control of
KNOB 8 MENU– the label of[MENU]CONTEXT– the label of[CONTEXT]- Button row – the preset's controls on
[BUTTON 1]to[BUTTON 4]: here a pad, a list, another pad and a checkbox - Bottom bar – the preset name and the page name
- Mode indicators – icons for modes that are switched on, such as low knob sensitivity
A page has up to eight controls on the knobs and up to four on the buttons. A preset can draw its own screens with Lua, so some presets look different.
The Status bar
The status bar at the top of the display shows MIDI activity on every port.

From the left it shows MIDI 1 OUT, MIDI 1 IN, USB HOST and USB DEVICE: the connectors of the rear panel as you see them from the front. A label lights up when MIDI passes through its port.
MIDI IO ports
MIDI 1 OUT and MIDI 1 IN light up when MIDI is sent or received on the <MIDI IO> sockets.

USB Host devices
The USB HOST label shows what is connected to the <USB HOST> port. When a USB MIDI device is connected, the label shows its name, as the device reports it.

Up to two USB MIDI devices can be connected through a USB hub. With two devices, the label reads 2 HOST DEVICES.
USB Device port
USB DEVICE, on the right, shows the MIDI activity between the Mini and your computer.

MIDI clock
A small triangle next to a port label shows where MIDI clock is travelling.
 | Pointing down – MIDI clock arrives on this port, and it is the clock the controller follows. |
 | Pointing up – MIDI clock leaves through this port. |
The triangle blinks with the tempo: it changes between grey and dark grey on every beat, so at 120 BPM it changes twice a second.
Clock leaving a port is marked whatever sends it: the router forwarding clock from another port, a preset's Lua script, or the controller's own clock. With a sequencer on the USB Host port and the router forwarding its clock to the computer, the USB HOST label points down and the USB DEVICE label points up.
The USB ports carry MIDI in both directions, so their labels can show either triangle. When clock both arrives on and leaves through the same USB port, the label shows the clock arriving. The triangle of a port that was sending clock goes out about half a second after the clock stops; the triangle of a port that was receiving, a couple of seconds after.
A thin amber line under the status bar means that the Lua debugger of the Preset Editor is attached. It turns red while the script is stopped at a breakpoint.
The Bottom bar
The bottom bar shows which preset and page you are on, and which modes are switched on.

- On the left, icons show the modes that are switched on: low knob sensitivity, MIDI learn (started from the Preset Editor), the Lua debugger, a running Lua timer, and a screenshot being saved.
- In the middle are the preset name and the page name. A window, such as the menu, shows its own name there.
- On the right, a preset can show a short text of its own.
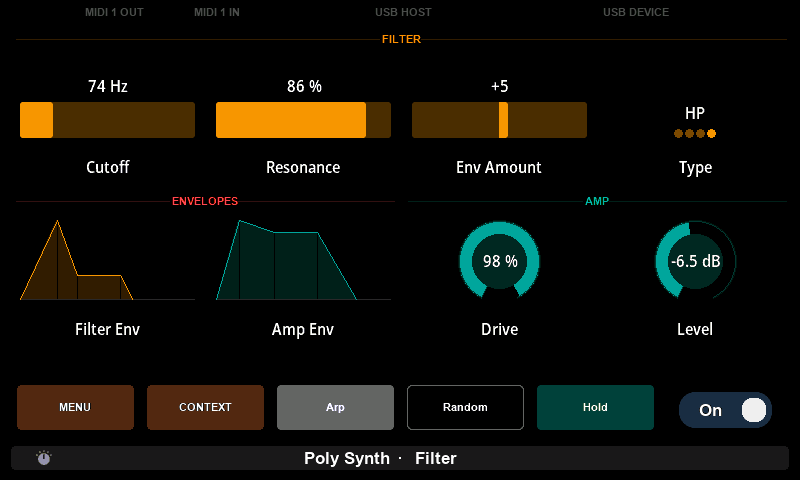
When the controller runs into a problem you should know about, the bottom bar turns red and shows a short description instead. This happens when:
- the SD card is missing or cannot be read. Nothing loads or saves until it is replaced, and the message stays until you restart with a working card.
- the current preset's Lua script fails to load.
- a preset's Lua timer or scheduled functions have been stopped, because they took too long or because of the panic grip.
The message goes away when the problem is gone: for a stopped timer, when a timer runs normally again.
Connecting Electra
The next sections show how to connect Electra One Mini to your setup. There are many ways to do it; these examples are a good starting point.
A basic setup
The simplest setup is the Mini with one hardware synthesizer and a computer.
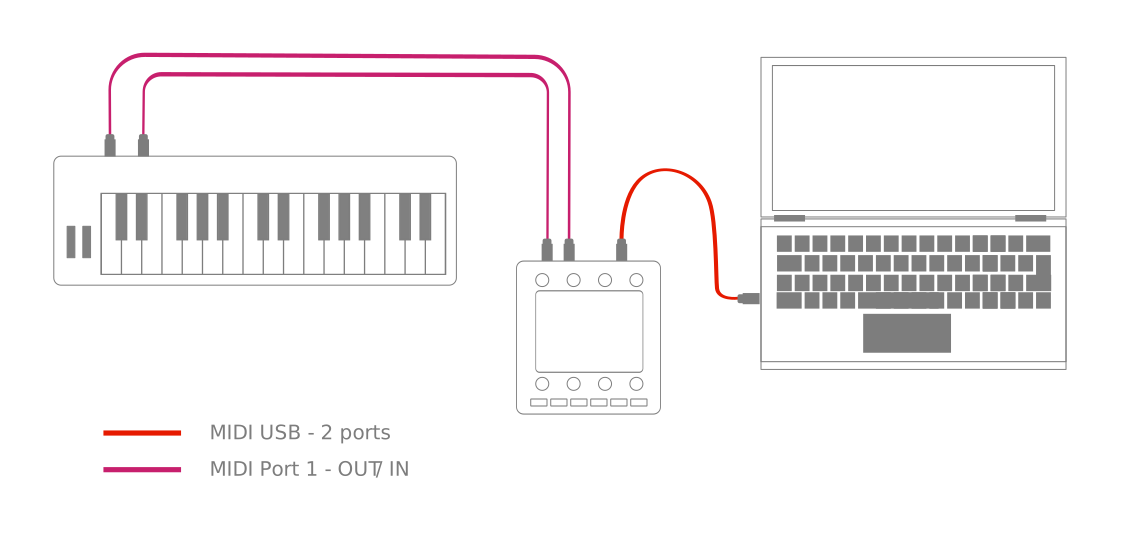
The synthesizer is connected to the Mini's <MIDI IO> sockets. Through them, the Mini sends the MIDI messages that change the synthesizer's sound parameters, such as filter cutoff or envelope times, and receives what the synthesizer sends back.
The Mini is connected to the computer with a USB cable. The computer sees the Mini as a USB MIDI device with its own MIDI ports. Software such as a DAW can use them to send and receive MIDI.
In this setup the Mini does two jobs at once:
- It is a MIDI controller: its knobs and buttons control the synthesizer.
- It is a USB MIDI interface: MIDI travels between the computer and the synthesizer through the Mini, without another MIDI interface.
The USB connection is also how the Electra One app talks to the Mini, to send presets, change settings and update the firmware.
The Mini has three USB MIDI ports. Two are for you, and one is reserved for the Electra One app. On macOS they are called:
Electra Port 1Electra Port 2Electra CTRL
On Windows you will most likely see:
Electra ControllerMIDIIN2 (Electra Controller)MIDIIN3 (Electra Controller)
In the factory configuration, everything your computer sends to Electra Port 1 goes out of the <MIDI 1 OUT> socket, and everything that arrives on <MIDI 1 IN> is passed to Electra Port 1 on the computer. The Mini has one pair of MIDI sockets, which belong to Port 1, so Electra Port 2 connects your computer only with instruments on the <USB HOST> port.
Which messages travel between the Mini's ports is decided by its MIDI router. You set its routes in the Electra One app, as described in the Router chapter and in Router.
Electra CTRL is used only by the Electra One app.
TIP
If you don't see Electra CTRL, it may be listed as MIDIIN2 / MIDIOUT2. Some versions of operating systems do not read the port name correctly. See The Connection Troubleshooting Guide.
A larger setup
This example uses more instruments.
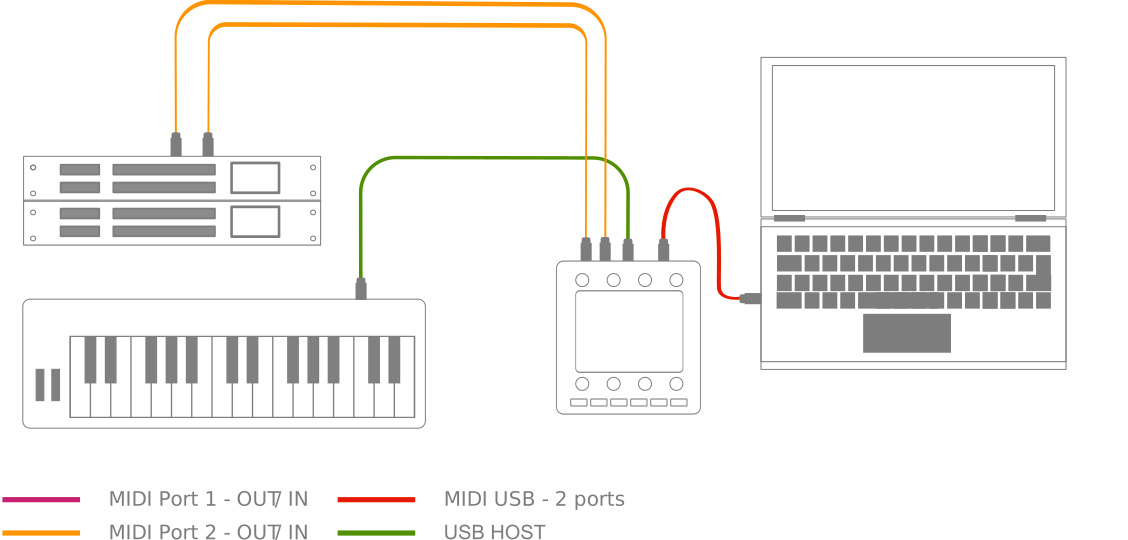
Several synthesizers are connected to the Mini's <MIDI IO> sockets. The Mini has one MIDI output, so the instruments are chained through their MIDI THRU sockets, or connected through a MIDI thru box.
A USB MIDI keyboard is connected to the Mini's <USB HOST> port, so it needs no computer or extra interface.
In this setup:
- The Mini controls all the synthesizers.
- With a route from
<USB HOST>to<MIDI IO>, the keyboard plays the synthesizers. - With a route from
<USB HOST>to<USB DEVICE>, the keyboard's messages also reach the computer.
The messages that the Mini's own knobs and buttons send don't pass through the router. They go straight to the preset's devices, on the ports those devices use, and are merged there with the messages the router forwards.
A MIDI router setup
The Mini also works well with a dedicated MIDI router, such as those from iConnectivity, Blokas (MIDIHub) or Conductive Labs (MRCC). This is useful with many instruments and computers, or when you need advanced routing, filtering or merging.
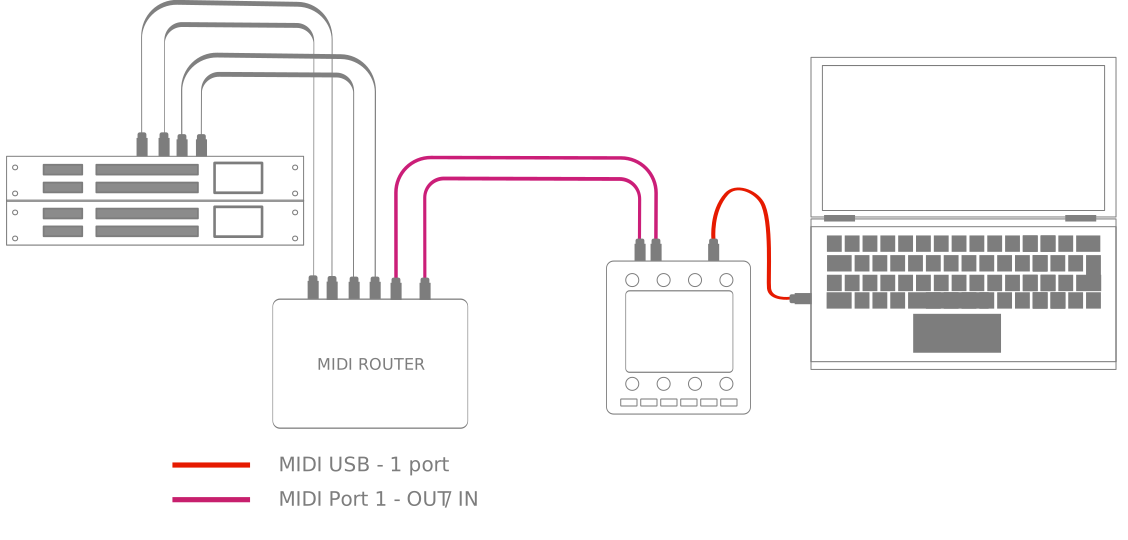
Here the Mini is connected to the router through its <MIDI IO> sockets, and the router passes the MIDI on to the instruments.
Depending on the router, you can also:
- connect the router to the Mini's
<USB HOST>port, where it appears as a USB MIDI device, or - connect the Mini's
<USB DEVICE>port to a USB host port of the router.
WARNING
If you connect the Mini to a USB host port other than a computer's, make sure the port can supply 300 mA. If it cannot, use a powered USB hub or a USB Y-cable to provide the extra power.
Changing pages
A preset shows its controls on pages. Each page has up to eight controls on the knobs and up to four on the buttons.
A Mini preset can have up to 16 pages. The Poly Synth preset used in this manual has nine: Filter, Oscillators, Envelopes, Mixer and five more.
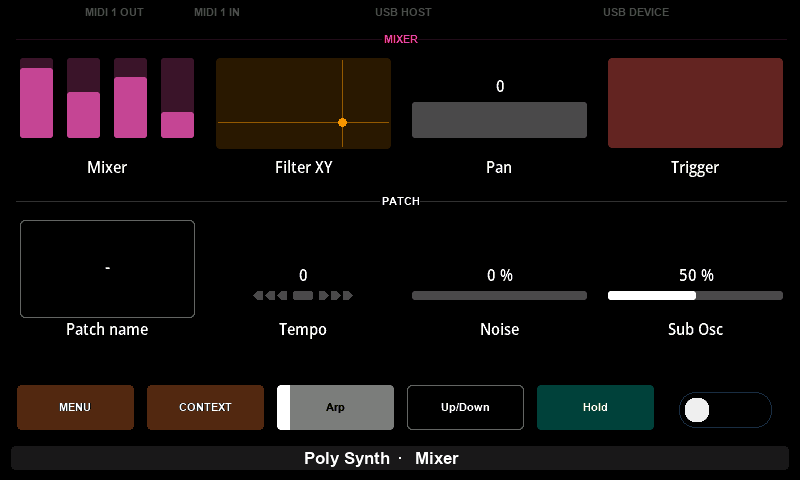
The page selection screen has one pad for each knob, so it shows eight pages at a time. The 16 pages are therefore shown in two page sets:
- Page set 1: pages 1 to 8
- Page set 2: pages 9 to 16
To change the page:
- Press
[MENU]. ThePAGE SELECTIONscreen opens and shows the page set of the current page. - If the page you want is in the other set, press
[CONTEXT], labelledPAGE SET 2orPAGE SET 1. - Press the knob under the page.
The screen closes and the page is shown. See Page selection for details.
Page sets are only a way of showing the pages on the controller. A preset, the Electra One app, MIDI control and Lua number the pages 1 to 16.
Changing and Loading presets
Presets are stored in slots on the controller. Press [MENU], then PRESETS, and press the knob of a slot to load the preset in it. The window is described in Preset selection.
Loading a new preset
To put a new preset on the Mini:
- Open preset selection and load the slot where the new preset should go. The slot can be empty or hold a preset you want to replace.
- In the Electra One app, open the preset and click
Send to Electra.
The preset in the current slot is replaced, and the new preset is shown when the transfer is complete. You can also move presets between slots in the app; see Preset slots.
Overwriting presets
A preset stored in a slot can carry more than the preset itself: the changes you made to its devices and data that its Lua script saved. If you replace it with a different preset, these files are removed from the slot with the old preset. Snapshots and captures belong to the preset's project, not to the slot, and are not removed.
If you send a newer version of the same preset, only the preset and its Lua script are updated. The rest stays, and the controller keeps the page you were on. The controller recognises the same preset by its project, the projectId of the preset file.
Interacting with Controls
The types of controls, and what they are for, are described in The Concept of Control. This section describes what the knobs and buttons do with the controls.
The eight controls in the upper part of the display belong to the knobs. The top row of four controls belongs to KNOB 1 to KNOB 4, the bottom row to KNOB 5 to KNOB 8. A knob with no control under it does nothing.
Active control
When you touch a knob, a line appears under the name of its control. The control is now active. You don't have to turn the knob; touching is enough.
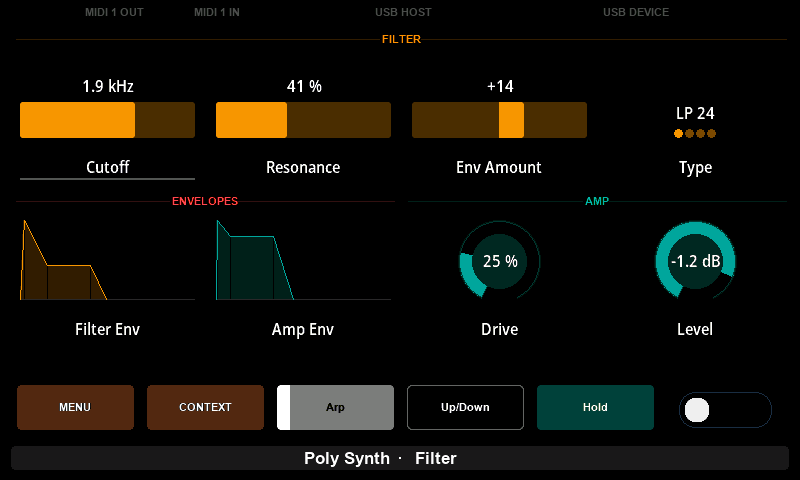
The active control matters for:
- the Control context: pressing
[CONTEXT]while you touch a knob shows actions for that control, such as resetting it to its default value. - multi-value controls, such as envelopes: the part of the control that the knob changes is highlighted.
- presets that react to touch: a preset can run actions or Lua functions when a knob is touched.
You can touch several knobs at once.
Turning a knob
Turning a knob changes the value of its control. The knobs have no end stops, and a control never jumps: the value continues from where it is.
- Faders and dials move smoothly through their range.
- Lists step through their items.
- Pads and checkboxes switch on when you turn the knob to the right and off when you turn it to the left. A momentary pad also switches off when you take your finger off the knob.
- Multi-value controls change the value the knob is assigned to. On an ADSR envelope, for example, the knob changes the attack; the other stages are changed in the detail window.
- Relative controls send a step up or down for each movement, for instruments and software that expect relative messages.
Low knob sensitivity
If the knobs move values too fast for fine adjustments, switch on low sensitivity. The SENSITIVITY action in the Control context switches it on and off, and the knob icon on the left of the bottom bar shows that it is on. It stays on until you switch it off or restart the controller.
Pressing a knob
Every knob is also a button. What a press does depends on the control:
| Control | Pressing the knob |
|---|---|
| Pad, toggle | switches the pad on or off |
| Pad, momentary | on while you hold the knob, off when you let go |
| Checkbox | switches it on or off |
| List | selects the next item; after the last item, the first again |
| Fader, dial | nothing |
| Relative control | nothing |
| ADSR, AHDSR, ADSSR, ADR, AR and DX7 envelopes | opens the detail window |
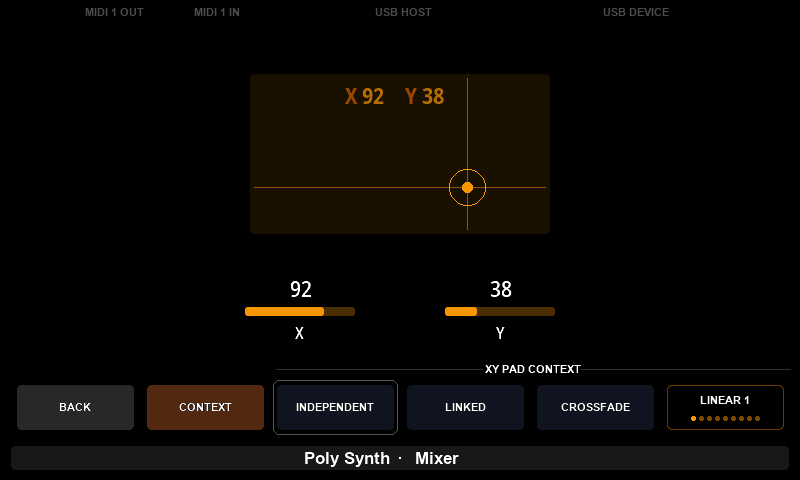
| V Fader 4, XY pad | opens the detail window |
| Text box | opens the keyboard to edit the text |
| Custom control | whatever the preset's Lua script does with it |
A preset can give a control its own action for a knob press, such as switching to another page or running a Lua function. Then pressing the knob does that instead.
The controls on the buttons
The row at the bottom of the display, next to MENU and CONTEXT, belongs to [BUTTON 1] to [BUTTON 4]. A preset can place a pad or a list on each of them.
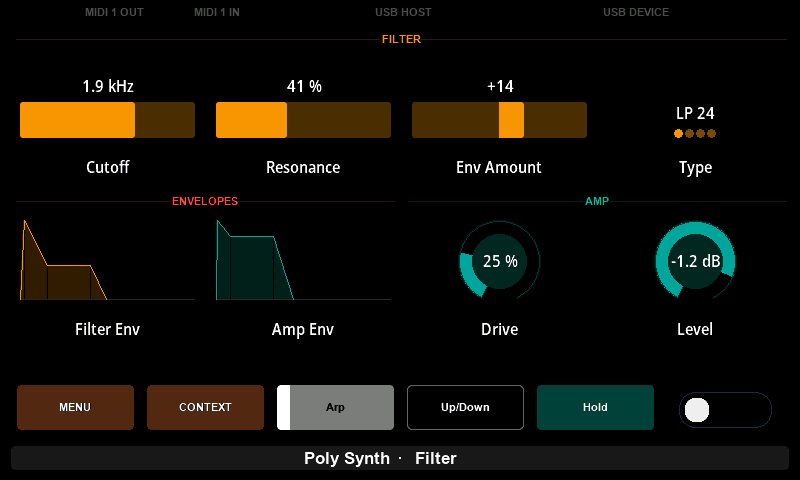
- Pad: pressing the button switches a toggle pad on or off. A momentary pad is on while you hold the button.
- List: each press selects the next item; after the last item it starts again at the first. The button shows the selected item.
A button with nothing on it does nothing on the page.
The button row is replaced by controller actions when you press [CONTEXT]. Press [CONTEXT] again to get the preset's controls back. See Buttons and Contexts.
Control detail
Multi-value controls, such as envelopes, have one knob on the page but several values. Their detail window shows the control large, with a knob for each value.
To open a detail window, press the knob of the control. To close it, press any button or any knob. The press that closes the window does nothing else. The text box keyboard is the exception, see Editing text.
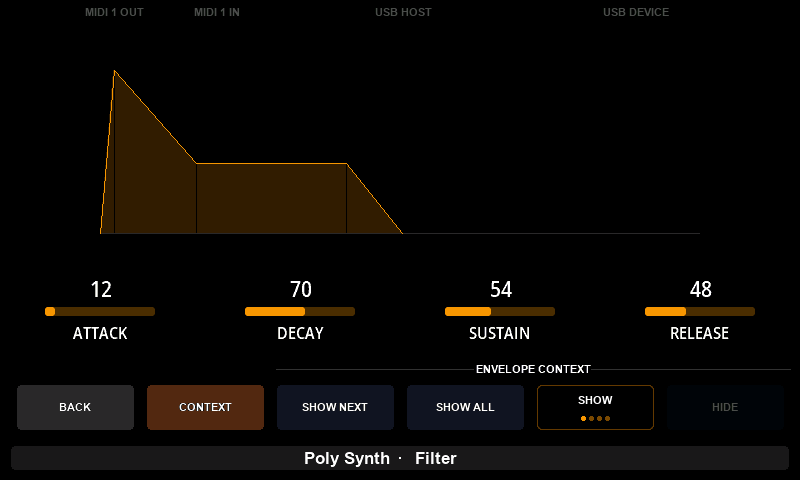
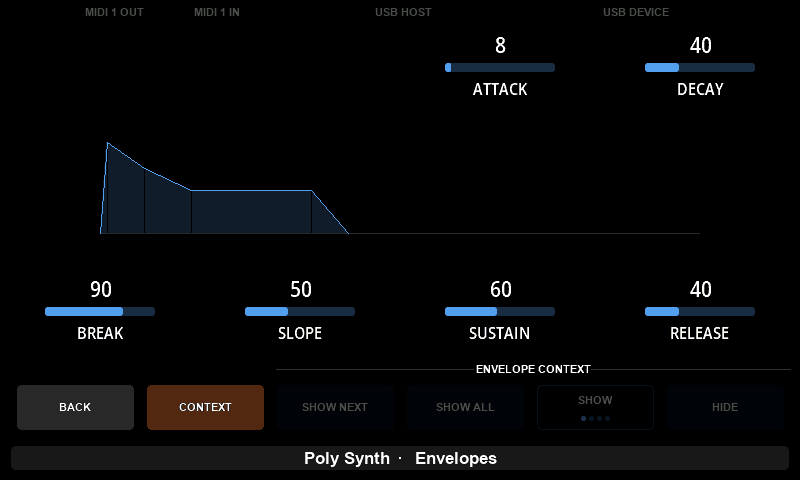
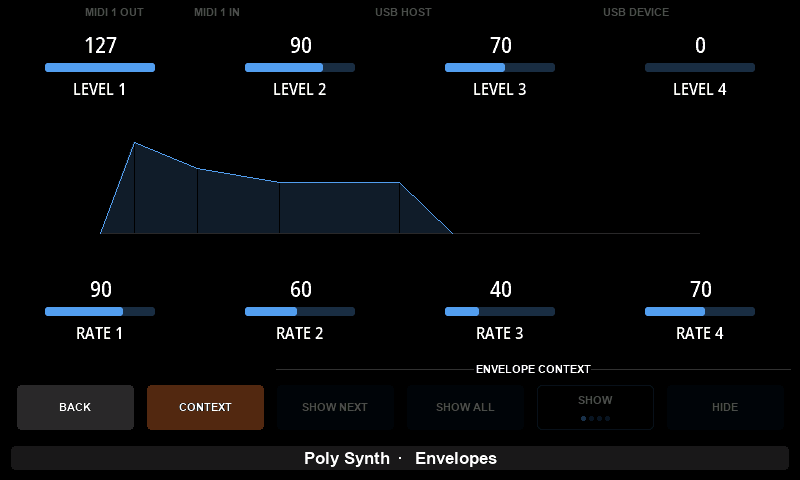
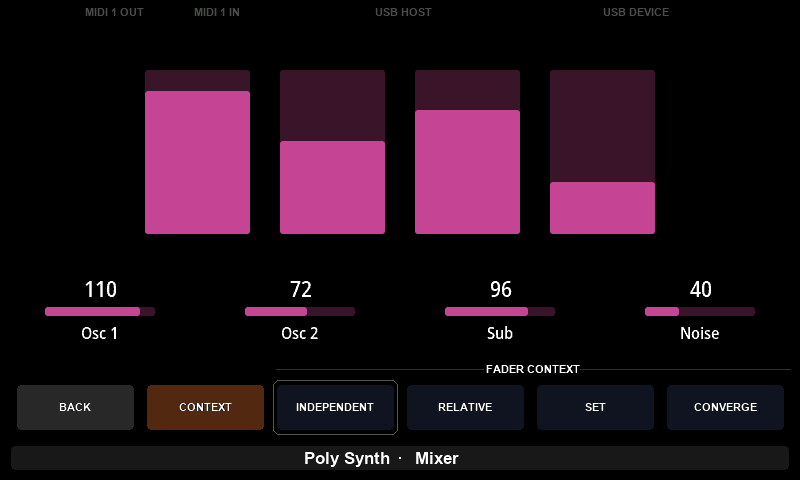
Each value of the control has a small fader with its name, placed where its knob is: values on the top row of knobs are shown at the top of the window, values on the bottom row at the bottom. The button labels stay visible under the window.
| Control | Knobs in the detail window |
|---|---|
| ADSR | KNOB 5 attack, KNOB 6 decay, KNOB 7 sustain, KNOB 8 release |
| AHDSR | KNOB 4 attack, KNOB 5 hold, KNOB 6 decay, KNOB 7 sustain, KNOB 8 release |
| ADSSR | KNOB 3 attack, KNOB 4 decay, KNOB 5 break, KNOB 6 slope, KNOB 7 sustain, KNOB 8 release |
| ADR | KNOB 5 attack, KNOB 6 decay, KNOB 7 release |
| AR | KNOB 6 attack, KNOB 7 release |
| DX7 envelope | KNOB 1 to KNOB 4 levels 1 to 4, KNOB 5 to KNOB 8 rates 1 to 4 |
| V Fader 4 | KNOB 5 to KNOB 8 the four faders |
| XY pad | KNOB 6 X, KNOB 7 Y |
Editing text
A text box shows a text, such as the name of a patch. Pressing its knob opens a keyboard.
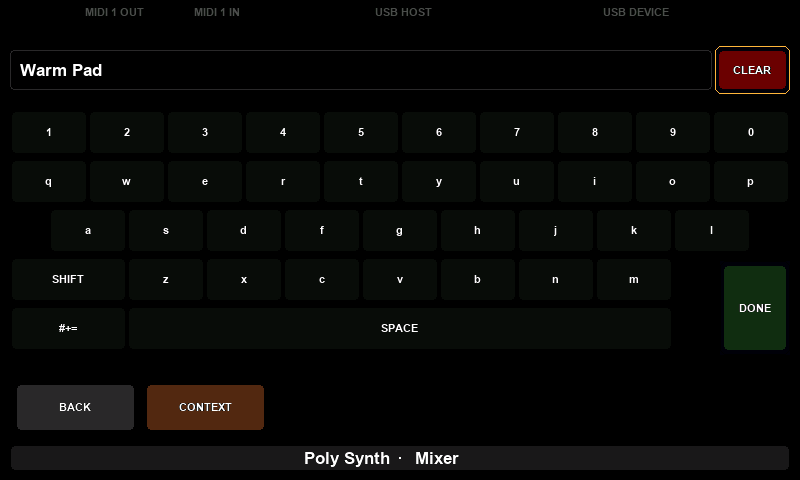
- Turn
KNOB 8to move the cursor over the keys.CLEARcomes before the first key andDONEafter the last. - Press
KNOB 8to type the key under the cursor.SHIFTswitches to capital letters until you press it again.#+=switches to symbols, and the same key, then labelledABC, back to letters.CLEARdeletes the last character. - Move the cursor to
DONEand pressKNOB 8to keep the text.
Pressing any other knob or button closes the keyboard without changing the text.
Changing active value of multi-value controls
You can also change the other values of a multi-value control without opening its detail window:
- Touch the knob of the control and keep your finger on it.
- Press
[CONTEXT]. TheCONTROL CONTEXTrow appears. - Still touching the knob, press
PREVIOUSorNEXTto choose the value. The selected part of the control is highlighted. - Turn the knob to change that value.
The row stays when you lift your finger, but PREVIOUS, NEXT and DEFAULT act only on knobs you are touching at the moment you press them.
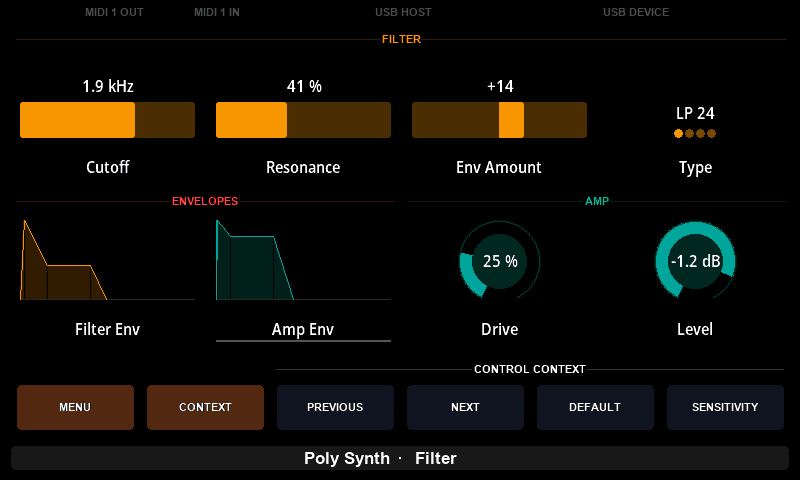
PREVIOUS and NEXT are the default actions of [BUTTON 1] and [BUTTON 2] in the Control context. See Buttons and Contexts.
Rear panel buttons
Reset button
The [RESET] button restarts the controller. Pressing it has the same effect as unplugging and reconnecting the USB cable.
Resetting does not delete presets, snapshots, captures or settings. Changes that were not saved yet are lost: pins not saved with SAVE, a brightness change, and preset values when the controller keeps them across restarts. When the controller still responds, restart it from the Settings window instead.
You don't need the reset button in normal use. It is there to recover a controller that has stopped responding.
Power On & Sleep Mode
Electra One Mini starts as soon as it is connected to USB power: a computer, a powered USB hub or a USB power adapter. It has no power switch.
When it starts, the Mini loads the preset you used last and starts the pinned presets that were saved with SAVE.
Sleep puts the controller into standby: the display fades out, MIDI stops on all ports, and the database is closed.
- Hold
[MENU]for one second to open Settings. - Press
SLEEP.
Press any button, or press a knob, to wake the controller. Turning a knob does not wake it. The press only wakes it: it does not play a pad or run an action.
If Restore preset values on start-up is on in the configuration, the values of the presets are saved when the controller goes to sleep.
Recovery
Starting without a preset
If a preset stops the controller from starting properly, for example because its Lua script blocks it, start the controller without loading presets:
- Unplug the Mini.
- Hold
[BUTTON 1]. - Plug the Mini in, and keep holding
[BUTTON 1]until the display shows a page.
The controller starts with an empty preset and does not start the pinned presets. Your presets stay on the controller. Use the Electra One app to replace or delete the preset that caused the problem, then restart the controller. If you restart without doing so, the same preset and the saved pins are loaded again.
Stopping a runaway script
If a preset's Lua timer or scheduled function keeps the controller so busy that the display and buttons no longer respond, you can stop them:
Hold all six buttons together for two seconds.
This stops the timers and scheduled functions of every running preset, pinned presets included. The bottom bar turns red and says that the preset timers were stopped by the front panel. The rest of the presets keep working, so you can switch to another preset or fix the script in the Preset Editor. A timer runs again when the script starts it again, for example when the preset is loaded again.
The grip does not stop a script that is stuck in its own code rather than in a timer, such as an endless loop in onReady. Use Starting without a preset then.
The presses of the grip still count as button presses, so [CONTEXT] may show a context and the menu may open when you let go.
If the controller does not respond at all, press the [RESET] button on the rear panel. Presets and saved settings are not lost; pins not saved with SAVE, a brightness change and preset values since the last sleep or reboot are.
To update the firmware by hand, the controller is started in bootloader mode. See The Bootloader and Firmware update.