

Version5.0.0 beta
Settings
The Settings screen allows you to customize and manage various aspects of the controler's behavior and functionality. The Settings screen can be accessed from the main Menu.
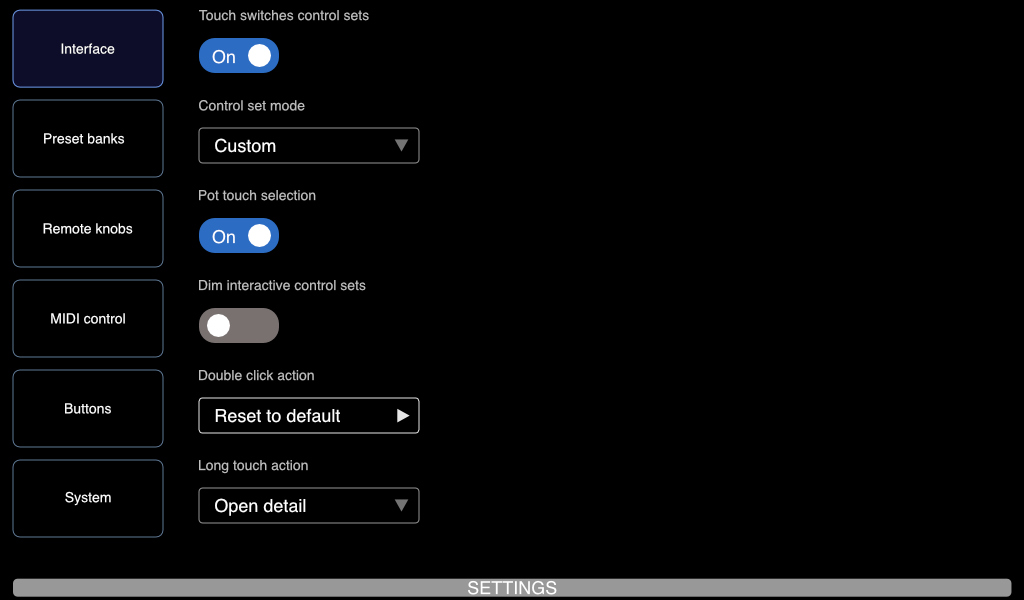
The screen is divided into several tabs, each focused on a specific configuration domain:
- Interface – Adjust settings that affect the behavior of the user interface.
- Preset Banks – Manage preset banks stored on the device.
- Remote Knobs – Configure support for external MIDI controllers used to extend Electra One’s knobs.
- MIDI Control – Set up control of Electra One using incoming MIDI messages.
- Buttons – Customize the functions assigned to Electra One’s hardware buttons.
- System – View information about the Electra One hardware and runtime resources.
To switch between tabs, simply tap the corresponding tab.
The Settings screen has no SAVE button and no BACK button. Everything you change is written to the controller when the screen closes, and pressing any hardware button closes it. The SAVE STATE button on the System tab writes the same thing without leaving the screen; see System.
The same settings can also be made in the Electra One app, where a few of them have different names and two of them exist only there. See The configuration in the Electra One app at the end of this chapter.
Each tab is covered in detail in the following sections.
Interface
The Interface tab allows you to configure how you interact with the Electra One controller. These settings control how touch, knob actions, and display behavior are interpreted, enabling you to tailor the experience to your preferences.
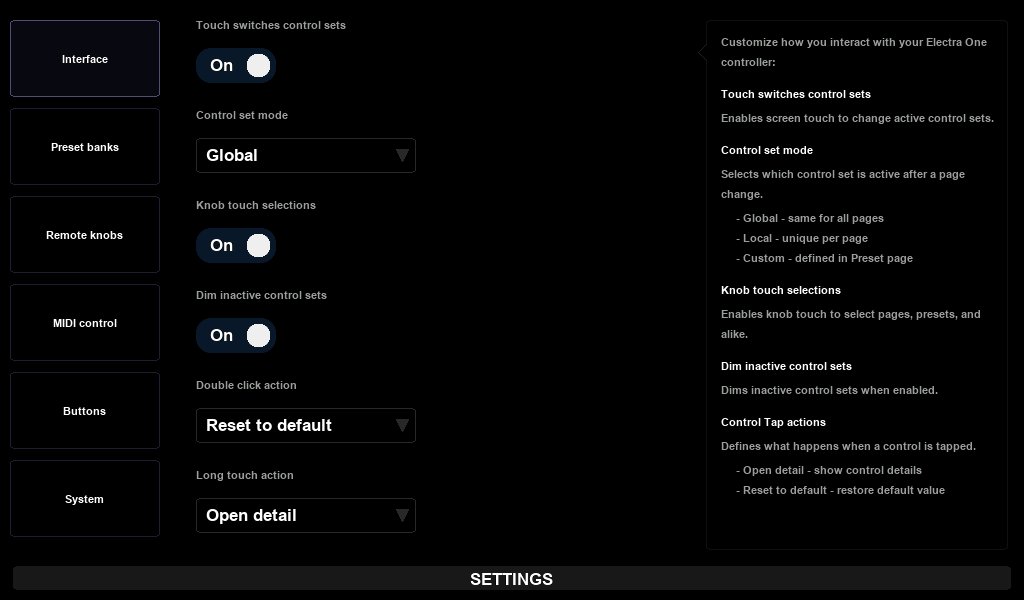
The tab includes the following options:
Touch Switches Control Sets
When enabled, touching the screen will automatically switch to the corresponding active control set. When disabled, you’ll need to use hardware buttons (configured accordingly) to switch between control sets.
Control Set Mode
Defines how control sets are handled:
- Global – The active control set is shared across all preset pages. Changing the page does not change the control set.
- Local – Each preset page remembers its own active control set. When you return to a page, it restores the control set that was active when you last left it.
- Custom – Each preset page uses a default control set, as defined in the preset. If no default is specified, the first control set is selected when switching to that page.
Knob Touch Selections
The switch on the screen is called Knob touch selections. When enabled, a touch on a knob can be used to make selections in windows such as Preset Selection, Page Selection, Snapshot Bank Selection, and others. When disabled, selections must be made using the touchscreen only. It is enabled by default.
In the Electra One app the same switch is called Use knob touch selections.
Dim Inactive Control Sets
Chooses how the controller shows which control set its knobs are turning.
- Off, which is the default, draws a white bar down each side of the screen beside the active control set.
- On dims the controls of the other control sets instead, and the bars are not drawn.
It is one setting with two indicators, not an on/off: one of the two is always shown. In the Electra One app it is the Indicator picker of the User Interface section, with the choices Bars and Dim inactive control sets.
Double Click Action
Defines what happens when you double-tap a control on the touchscreen:
- None – No action is triggered.
- Reset to default – Resets the control’s current value to its default setting.
- Open detail – Opens the detail window for the selected control.
Long Touch Action
Defines what happens when you touch and hold a control on the touchscreen. The available actions are the same as for the double-tap gesture:
- None – No action is triggered.
- Reset to default – Resets the control’s current value to its default setting.
- Open detail – Opens the detail window for the selected control.
Preset Values
Two more user interface settings decide whether a preset comes back with the values you set on it. They are made in the Electra One app, in the same User Interface section as the options above; there is nothing for them on the controller.
- Keep preset values covers a preset slot being read from the card again while the controller is running: the preset is reloaded, a preset is uploaded into the slot, or the slot is loaded in the background. With it on, the values the preset had are put aside first and given back to it as it loads.
- Restore preset values on start-up covers switching the controller off. With it on, the values of the presets you used are written when Electra One goes to sleep, and read back when it starts up again.
Both are off unless you turn them on, and they work independently of each other. Neither changes the preset file, and neither is a snapshot.
Switching from one preset to another never lost your values in the first place: the preset you switch away from stays in memory, values and all. These settings are about the preset being read again.
Both need the preset to have a project id, which the Preset Editor gives every preset it saves. The values are kept under that id, so a preset uploaded over a slot does not inherit the values of the one it replaced, and a preset with no project id keeps nothing at all.
The two settings are described in full in Keeping preset values.
Preset Banks
Electra One provides six preset banks for organizing and accessing your presets. Each bank can be customized to help you organize the color-coding to your needs.
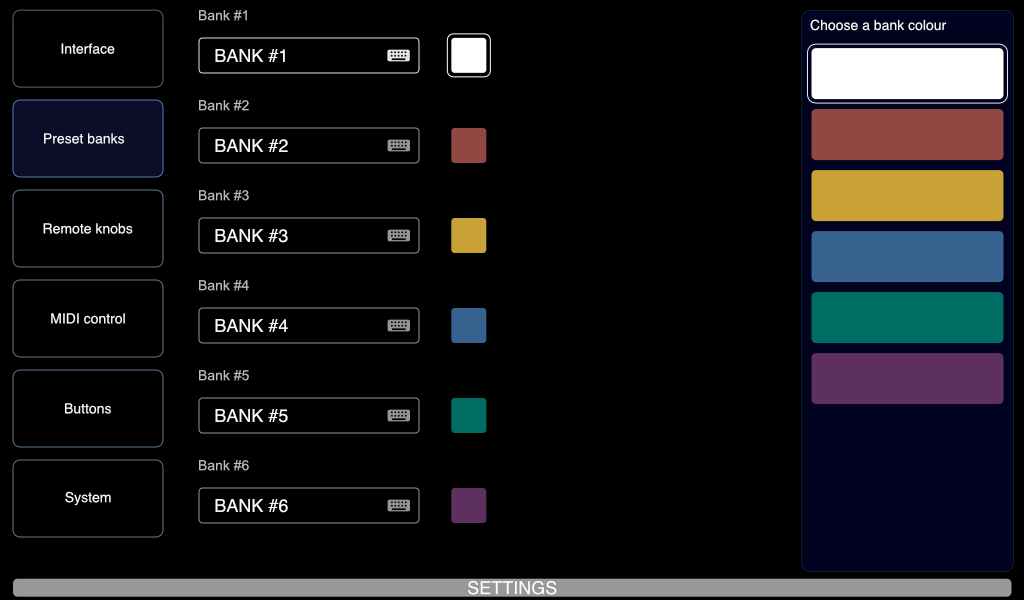
The banks are listed as Bank #1 to Bank #6. For each bank you can set:
- Name – You can assign a custom name to each bank using the on-screen keyboard. A name can be up to 20 characters long. This helps identify the purpose or contents of each bank at a glance. To open the on-screen keyboard, tap on the Bank name text field.
- Color – A color can be selected from six predefined options: white, red, orange, blue, green and purple. To change the color, tap on the color button next to the Bank name text field.
The banks start out as BANK #1 to BANK #6, in those six colours in that order.
Remote Knobs
The Remote Knobs feature allows you to control on-screen parameters using external MIDI controllers that send MIDI CC (Control Change) messages. This expands Electra One’s control surface, enabling more hands-on control or automation from software and hardware.
Key capabilities:
- Map external CC messages to Electra One controls, enabling real-time interaction with on-screen parameters.
- Use external MIDI controllers to expand the number of physical knobs available for hands-on control.
- Automate control changes from a computer or DAW by sending CC messages to Electra One.
- Send CC messages back out when controls are adjusted using Electra One’s knobs or touchscreen.
Because Electra One sends out the same CC messages it receives via Remote Knobs, these messages can be recorded as automation in a DAW and played back later. This allows users to automate even non-CC parameters—such as SysEx, NRPN, or Lua-triggered functions—by simply recording and replaying standard CC automation.
Example: Automating SysEx with a DAW
Let’s say you’re controlling a vintage synthesizer that only accepts SysEx messages for parameter changes. Normally, automating SysEx in a DAW is difficult or unsupported, but with Electra One’s Remote Knobs, this becomes easy.
- Assign a Remote Knob CC (e.g., CC #21 on MIDI Channel 1) to a control in your preset that sends a SysEx message.
- In your DAW, record automation for CC #21 by adjusting that parameter on Electra One, or by sending CC messages from another controller.
- When you play the automation back, the DAW sends CC #21, which Electra One interprets through the Remote Knobs mapping and converts to the appropriate SysEx message.
This lets you automate complex SysEx messages using simple CC data, without needing SysEx support in your DAW.
Mapping modes
Remote Knobs offers two ways of deciding which on-screen control an incoming CC message drives. They solve different problems, and which one is in force is decided by the preset you are looking at rather than by a setting: a preset that has a remote map of its own uses it, and every other preset uses the knob slots.
| Dynamic mode | Static mode | |
|---|---|---|
| A CC is mapped to | a knob slot | a specific control |
| Follows the current page | yes | no |
| Follows the control set | yes | no |
| Number of mappings | 36 (one per slot) | up to 128 (one per CC) |
| Mappings are stored in | the controller configuration | a remote map, per preset slot |
| Mappings are made | on the controller | in the Electra One app |
| In force when | the preset has no remote map | the preset has a remote map |
| Typical use | extend Electra’s own knobs | build a fixed hardware control surface |
Dynamic mode
Dynamic mode is the original Remote Knobs behaviour. A CC message is mapped to one of Electra One’s 36 knob slots—the same 3 × 12 grid of positions that Electra’s own hardware knobs address, arranged on screen as a 6 × 6 grid.
A slot is a position, not a parameter. Whatever control currently occupies that position on the page you are looking at is the control the CC drives. Turn to a different page, or switch to a different control set, and the same CC now drives whatever sits in that position there.
This makes Dynamic mode the right choice when you want to extend Electra’s knobs: a single template on your external controller works on every page of every preset, exactly the way Electra’s own twelve knobs do.
The mapping is global—shared across all preset pages, all presets, and the performance page. For example, if CC #21 is mapped to the first slot (row 1, column 1), it will control whatever control occupies that same position on every page.
By using the Performance page you can gather a dedicated selection of preset controls you want to automate or play remotely, without rearranging or modifying the original preset layout.
Static mode
Static mode maps a CC message directly to a named control in the preset. The mapping does not move when you change page or control set, and it works whether or not the control is currently visible on screen.
Up to 128 CC messages—the complete CC range, #0 to #127—can be mapped, and each one can address any control on any page of the preset, including controls that have no hardware knob of their own.
This makes Static mode the right choice when you want to build a control surface: the faders of an Akai MIDImix always drive the same eight mixer levels, the knobs always drive the same eight filter cutoffs, and the layout does not shift under your fingers when you turn a page on Electra.
Because the mappings name controls that only exist inside one preset, they cannot live in the global configuration the way the dynamic slot mappings do. They are held in a remote map: a small file of its own that sits in the preset slot next to the preset, and is loaded with it.
A remote map is not part of the preset, and this is deliberate. The mappings describe your external controller, not the preset. The person who wrote the preset has no way of knowing what hardware you own, and should not have to decide in advance which of their controls you are allowed to reach. So any preset can be given a map—one you wrote, or one somebody else wrote—without the preset itself being touched. A preset downloaded from the library today can be mapped to your MIDImix this afternoon.
Because a map is an ordinary file, it can be exported from the controller and shared. One user's MIDImix map for a given preset is a file another user can load onto their own controller.
For controls that carry more than one value—an ADSR envelope, a vertical fader group, an XY pad—a static mapping addresses one value at a time, so an ADSR envelope can be spread across four faders of your external controller.
A remote map replaces the knob slots
It also replaces the rest of the Remote Knobs settings. Each of its assignments carries its own takeover, and the enable switch does not silence it—the only setting that still applies is the REMOTE routing on the Router screen, because which port and channel your hardware speaks on is a fact about the wiring rather than about a preset.
There is no mode to choose. While a preset that has a remote map is loaded, that map is the whole answer: the knob slots are switched off, and a CC the map does not mention does nothing. Load a preset that has no map and the knob slots are back, exactly as before.
That is deliberate. A map is a statement about which of this preset's controls your hardware drives, made deliberately and in full; leaving the knob slots running underneath it would mean a fader you had not mapped quietly moving whatever happened to be under it.
Where maps are made
Remote maps are made in the Electra One app, not on the controller. Mapping a CC to a control means picking one control out of a whole preset, which is work for a screen and a mouse; the controller's own screen edits the knob slots, which are a grid of thirty-six.
Once made, a map is uploaded into the preset's slot alongside the preset. It is an ordinary file, so it can be downloaded again, kept, and shared: one user's MIDImix map for a given preset is a file another user can load onto their own controller.
Message types
Each mapping declares how the incoming message should be read.
Absolute
The CC value 0–127 is the position of the parameter. A value of 0 sets the parameter to its minimum, 127 to its maximum. This is what faders and potentiometers on almost every controller send.
Absolute mappings are the ones that need takeover—see below.
Relative
The CC value is a signed increment rather than a position. Endless encoders send these. Electra One supports the three encodings in common use; pick the one your controller documents.
| Encoding | Also known as | Increment | Decrement |
|---|---|---|---|
| Two’s complement | Relative 2, Binary offset | 1…63 | 127…65 |
| Signed bit | Relative 1 | 1…63 | 65…127 |
| Signed bit 2 | Relative 3 | 65…127 | 1…63 |
Relative mappings never need takeover: an increment is applied to wherever the parameter already is.
Note
A Note On / Note Off pair drives the control instead of a CC. This is how pads and keys on most controllers speak, and it makes them usable as remote controls without reprogramming the controller. A note mapping can behave as:
- Momentary – the control is on while the key is held, and goes back to what it was when you let go
- Toggle – each Note On flips the control, and the release is ignored
- Velocity – the note velocity 1–127 sets the value, like an absolute CC
Notes are matched on note number, so a 25-key keyboard can drive 25 different controls.
Note mappings are a static mode feature: they are made in a remote map. The knob slots take control changes only, and a note that no remote map asks for is handed on to the preset as usual.
Takeover
When a physical fader is mapped to a parameter with an absolute CC, the fader and the parameter can disagree. You change the parameter on Electra’s touchscreen, or load a different preset, or turn to a page where the same slot holds a different control—and now the fader is at 20 while the parameter reads 100. The moment you touch the fader, the parameter jumps.
Takeover decides what happens in that moment. It applies only to absolute mappings; relative and note mappings are unaffected.
Jump
The parameter follows the incoming value immediately. This is the current, and simplest, behaviour: useful when the external controller is the only thing touching the parameter, or when you are playing back DAW automation and want it to be obeyed exactly.
Pickup
Incoming values are ignored until the fader passes through the parameter’s current value. Once it does, the fader catches the parameter and drives it normally from then on.
Nothing moves until you sweep past the right spot, which is the safest choice on stage—no accidental jumps—but it does mean a small fader movement may do nothing at all.
Scale
The parameter moves proportionally with the fader, converging on the fader’s position as the fader approaches an end of its travel. Move the fader up and the parameter moves up by a proportional share of the distance remaining to the maximum; by the time the fader reaches 127, the parameter is at its maximum too.
Every fader movement does something, and no movement causes a jump. This is the recommended default for hardware fader boxes.
Nudge
The parameter is moved by the same amount the fader moved, ignoring the fader’s absolute position entirely. Sliding an absolute fader up by 10 raises the parameter by 10, wherever it happened to be. This turns any absolute fader into a relative one.
When takeover re-arms
A mapping that has caught its parameter stays caught until something else moves the parameter behind the fader’s back. Takeover re-arms when:
- the parameter is changed by Electra’s own knobs or touchscreen
- the parameter is changed by an incoming MIDI message or by a Lua script
- a different preset is loaded
- (Dynamic mode) the page or the control set changes, so the slot now holds a different control
A modulated parameter is the one exception: modulation moves a value continuously without anybody touching it, so it does not re-arm takeover. A fader that has caught a modulated parameter keeps it.
Seeing which controls are out of sync
A control whose external fader has been moved but has not yet caught it is marked on screen: a thin amber bar along the top edge of the control, spanning from where the value sits to where the fader sits, with the fader's own end of it brighter than the rest.
So the bar says how far there is left to go, and the bright end says which way to move. Under Pickup it sits still until the fader sweeps through the value and then disappears; under Scale it shrinks as the two converge. Controls whose faders you have not touched are not marked at all, and neither is anything under Jump or Nudge, where there is nothing to catch.
Electra One remembers where each of your external controls was the last time it heard from it, so the marks appear as soon as something moves a value out from under them — a snapshot recalled, a patch read back from a synthesizer, a control change arriving from a DAW, or Electra One's own knobs. You do not have to move a fader to discover that it has gone out of sync.
The same memory is what makes the marks survive turning a page or loading a preset: the controls are rebuilt, but your hardware has not moved, so the new page can say straight away which of its controls your faders disagree with. Before a fader has been moved even once, Electra One has no way of knowing where it is — nothing is marked, and the first message it sends is taken as a statement of where it sits rather than an instruction to move anything.
For Dynamic mappings, takeover is chosen once, from the Takeover selector on the Remote Knobs screen's Options tab, and applies to every absolute knob slot.
A Static mapping carries its own takeover instead, set per control in the remote map. One surface routinely wants more than one behaviour: a mixer's faders want Pickup so recalling a snapshot cannot jump the levels, while the buttons beside them want Jump, because a button has nothing to catch. An assignment that says nothing gets Jump.
Configuration
The configuration of Remote Knobs is divided into sections, each accessible from its own screen within the Remote Knobs tab:
- Slots — the 6 × 6 knob slot grid
- Outgoing — the interface, port and channel the knob slots report on
- Options — takeover, and when Electra One tells your hardware where the parameters are
Tap the tab you want along the top of the screen.
Every screen shares the global enable switch for the Remote Knobs feature, labelled Remote knobs enabled. Disabling the switch does not delete your mappings, it simply suspends the Remote Knobs functionality until re-enabled. A preset's remote map is not affected: it answers whether the switch is on or off.
Every screen also carries a CLEAR ALL button, which removes every knob slot mapping. Press and hold it until it fills; letting go early does nothing.
Options
Takeover is described above.
Send values on preset and snapshot load and Send values on page change both answer one question: should Electra One tell your hardware where the parameters are, at a moment when they arrived somewhere without your hardware moving?
A motorised fader or an LED ring is only right while it agrees with the parameter it drives. Loading a preset or recalling a snapshot moves the parameters and leaves the faders where they were; turning a page is worse, because a knob slot names a position on the page, so all thirty six of them are handed to different parameters at once and none of those parameters has moved. Nothing reports either moment on its own.
Both are off by default. Each is a burst of MIDI that a controller with no motors and no lights has nothing to do with, and on a busy port it competes with the MIDI your preset is sending.
The page-change switch concerns the knob slots only. A preset carrying a remote map of its own switches the slots off, and a static assignment reaches its control whichever page is on screen — so there is nothing for a page turn to correct. A remote map can override the load switch for its own preset; see the remote map format.
Slots
The Slots screen allows you to assign incoming MIDI CC messages to individual knob slots using MIDI Learn. This is where you define the dynamic mappings.
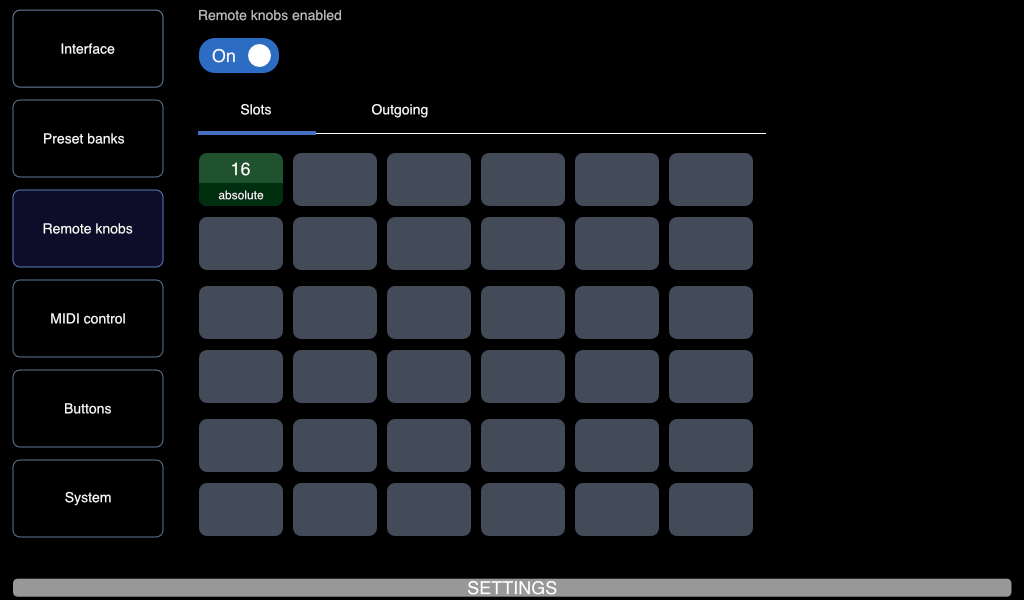
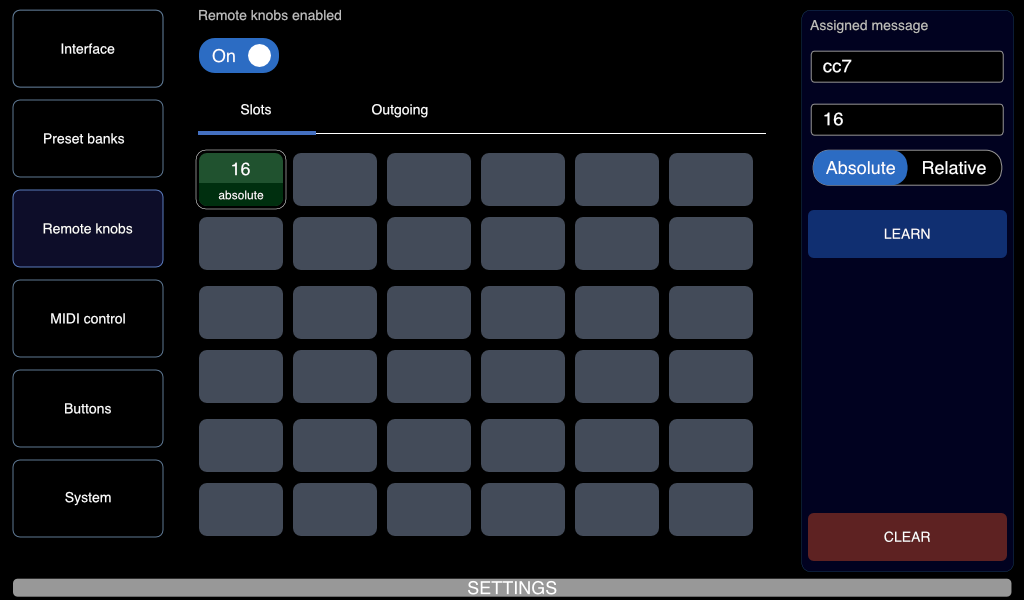
You can select any slot on the 6 × 6 grid by tapping it. The selected slot is highlighted with a light gray outline.
- Unused slots are shown in dark gray.
- Mapped slots are shown in green, displaying the assigned CC number and message type (absolute or relative).
An example:

Represents a CC #16, sent as an absolute value.
The sidebar on the right displays information and options for the currently selected slot, including:
- The CC message number
- The CC message type (absolute or relative)
- A button to re-learn the MIDI message
- A button to clear the mapping and to clear all mappings
An example of mappings:
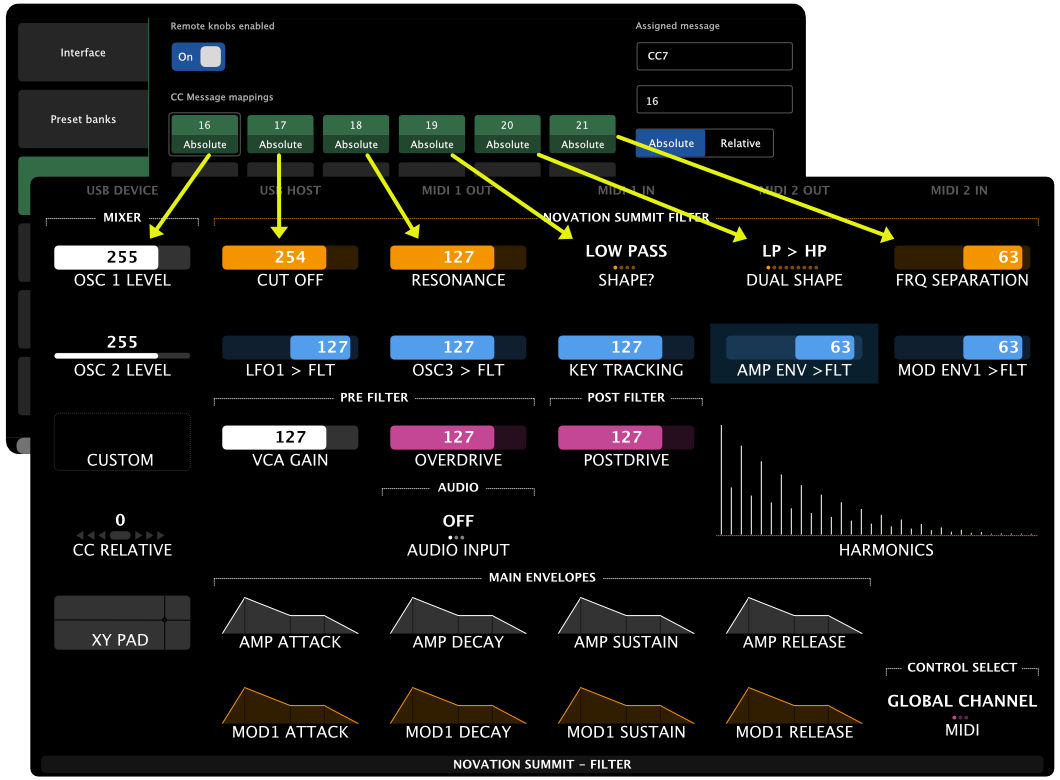
The image above shows CC #16 assigned to control the first slot of the preset page, CC #17 assigned to the second slot, and so on.
Remote maps
A preset's remote map is made in the Electra One app and uploaded into the preset's slot; there is no editor for it on the controller, and nothing about it to configure here. While a preset that has one is loaded, the Slots grid above is switched off and the map answers for every message instead.
The remote map format documents the file, for anyone who would rather write one by hand or build a tool that does.
Which inputs the Remote Knobs listen to
The MIDI inputs and channels that the Remote Knobs listen to are set on the Router screen, in its REMOTE column. Select the square in the row of the input, then choose:
- All channels, or
- Individual channels, one or more specific channels.
This gives you precise control over which connected devices or software sources can send Remote Knobs data to Electra One.
Messages that the Remote Knobs take are not passed to the preset. A message that no slot or remote map has a use for is handed back to the preset as usual. Routes to other interfaces still forward all of them, like any other message from that input.
Outgoing
The Outgoing screen lets you configure where Electra One will send Remote Knobs messages when preset controls are adjusted on the controller (with knobs or touchscreen).
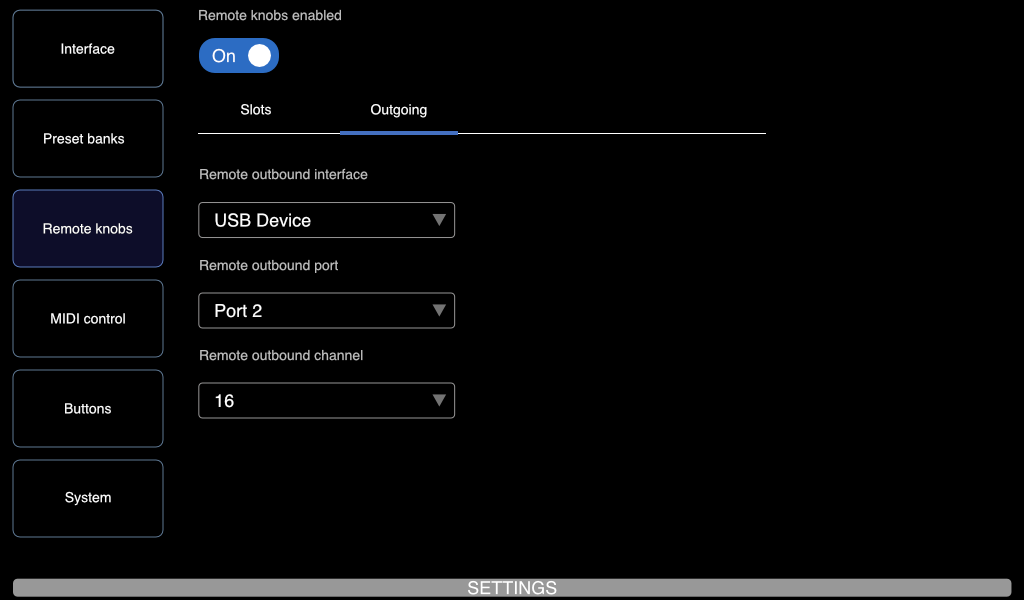
You can choose a MIDI interface for sending these messages, or disable outbound transmission entirely. If an interface is selected, you must also specify:
- A MIDI port (Port 1 or Port 2)
- A MIDI channel
Unlike the REMOTE routes on the Router screen, where multiple sources can be enabled, the outbound routing supports only one MIDI destination at a time. A valid MIDI channel must be selected, as Electra One needs to know exactly where to send the Remote Knobs messages.
This setup allows Remote Knobs activity on Electra One to be recorded or processed externally, such as by a DAW or another MIDI device. If you do not need this, keep the outgoing messages disabled.
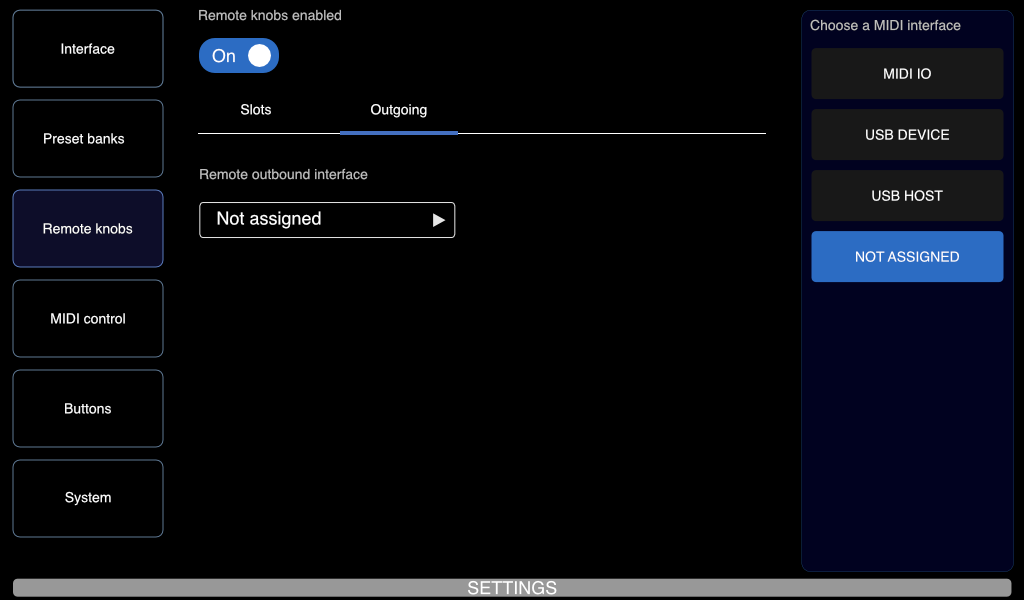
Outbound messages carry the parameter’s current position as an absolute CC value, whatever the message type of the mapping that produced it. Controllers with LED rings or motorised faders will therefore follow Electra One’s screen.
Examples
The message numbers below are the factory defaults of each controller. Both controllers can be reprogrammed, so treat the tables as a starting point and confirm what your unit actually sends by using LEARN, or with the MIDI console of the Electra One app.
Akai MIDImix
The MIDImix is a bank of eight channel strips: three knobs and one fader each, plus a master fader and a grid of buttons. Everything transmits on MIDI channel 1 by default.
| Strip | Knob 1 | Knob 2 | Knob 3 | Fader |
|---|---|---|---|---|
| 1 | CC 16 | CC 17 | CC 18 | CC 19 |
| 2 | CC 20 | CC 21 | CC 22 | CC 23 |
| 3 | CC 24 | CC 25 | CC 26 | CC 27 |
| 4 | CC 28 | CC 29 | CC 30 | CC 31 |
| 5 | CC 46 | CC 47 | CC 48 | CC 49 |
| 6 | CC 50 | CC 51 | CC 52 | CC 53 |
| 7 | CC 54 | CC 55 | CC 56 | CC 57 |
| 8 | CC 58 | CC 59 | CC 60 | CC 61 |
The master fader sends CC 62. The MUTE, SOLO and REC ARM buttons send notes, not CCs, so they can only be used in a remote map, where notes can be mapped.
All of the MIDImix’s controls are absolute, so takeover matters here. Scale is the mode to start with.
Setting it up in Dynamic mode
The MIDImix has 24 knobs, Electra has 36 slots; the knobs cover the first two control sets neatly.
- Connect the MIDImix to Electra One’s USB Host port.
- Open Router from the main menu, select the square in the row of the USB Host port the MIDImix is on and the
REMOTEcolumn, and pick channel 1 under Individual channels. - Set the takeover mode to Scale.
- Go to Slots. Tap slot 1 (row 1, column 1), tap LEARN, and turn the top-left knob of the MIDImix. The slot now reads
16 ABS. - Repeat across the grid, working left to right: knob row 1 of the MIDImix onto slots 1–8, knob row 2 onto slots 9–16, knob row 3 onto slots 17–24.
Slots 1–12 are control set 1 and slots 13–24 are control set 2, so the MIDImix’s top two knob rows shadow Electra’s own knobs for control set 1 and 2, and the third row reaches control set 3. Turning to another preset page moves all of them together.
Setting it up with a remote map
Use this when you want the MIDImix to be a mixer for one particular preset—the faders always the eight levels, wherever you are in the preset.
- Route the MIDImix as above. Nothing else on the controller needs setting.
- Open the preset in the Electra One app and build a remote map for it: fader 1 (CC 19) to Level 1, fader 2 (CC 23) to Level 2, and so on through fader 8 (CC 61), with the master fader (CC 62) on the master level. Leave each one absolute.
- Upload the map into the preset's slot.
The eight faders now drive those eight levels from every page of the preset. The knob slot grid is switched off while this preset is loaded, so nothing else the MIDImix sends moves anything, and Electra’s own knobs are unaffected.
Load a preset that has no map of its own and the knob slot grid comes straight back.
Novation Launchkey Mini
The Launchkey Mini MK3 has eight rotary knobs, sixteen velocity pads, 25 mini keys and two touch strips. In its default (non-DAW) mode the knobs and keys transmit on MIDI channel 1 and the pads on MIDI channel 10.
| Control | Message |
|---|---|
| Knobs 1–8 | CC 21 … CC 28 (channel 1) |
| Pads, top row | Notes 40, 41, 42, 43, 48, 49, 50, 51 (channel 10) |
| Pads, bottom row | Notes 36, 37, 38, 39, 44, 45, 46, 47 (channel 10) |
| Keys | Notes, channel 1 |
| Modulation strip | CC 1 (channel 1) |
| Pitch strip | Pitch Bend (channel 1) |
The knobs are absolute; Scale or Pickup both work well.
Knobs, in Dynamic mode
- Connect the Launchkey Mini to Electra One’s USB Host port.
- Open Router from the main menu, select the square in the row of the USB Host port the Launchkey is on and the
REMOTEcolumn, and pick channel 1 under Individual channels. Leave channel 10 off unless you intend to use the pads, so that pad hits are not swallowed by Remote Knobs. - Set the takeover mode to Scale.
- In Slots, learn knob 1 (CC 21) onto slot 1, knob 2 onto slot 2, and so on through knob 8 onto slot 8.
The eight knobs now mirror the first eight knobs of Electra’s active control set, on every page.
Because the Launchkey has only eight knobs against Electra’s twelve, mapping them onto slots 1–8 covers the top two rows of each control set. If you would rather reach a third row, map them onto slots 25–32 instead and use the Launchkey for control set 3 alone.
Knobs and pads, with a remote map
- Route both channel 1 and channel 10 to Remote Knobs.
- Open the preset in the Electra One app and build a remote map: CC 21 to Cutoff, CC 22 to Resonance, and so on. These stay put whatever page you turn to.
- Add the pads the same way. A pad sends a note, so choose a note behaviour: Toggle for a pad that switches an on/off control such as Filter Bypass, Momentary for a pad that should only hold while pressed, or Velocity for a pad that should set a value by how hard you hit it.
- Upload the map into the preset's slot.
Driving an ADSR from four knobs
An envelope control carries four values, and a static mapping addresses one of them, so four knobs can drive one envelope:
| Knob | CC | Target |
|---|---|---|
| 1 | 21 | Amp Envelope · Attack |
| 2 | 22 | Amp Envelope · Decay |
| 3 | 23 | Amp Envelope · Sustain |
| 4 | 24 | Amp Envelope · Release |
Knobs 5–8 remain free for four more parameters.
A note on the keys
The 25 keys of the Launchkey send notes on channel 1, the same channel as the knobs. If you route channel 1 to Remote Knobs and map notes statically, the mapped keys become remote switches, and they stop reaching the preset: a note the Remote Knobs use is kept by them. Keys you leave unmapped still reach the preset as usual. If you want every key to stay a keyboard, put the Launchkey’s keys on a channel that is not routed to Remote Knobs, and route only the knobs’ channel.
MIDI Control
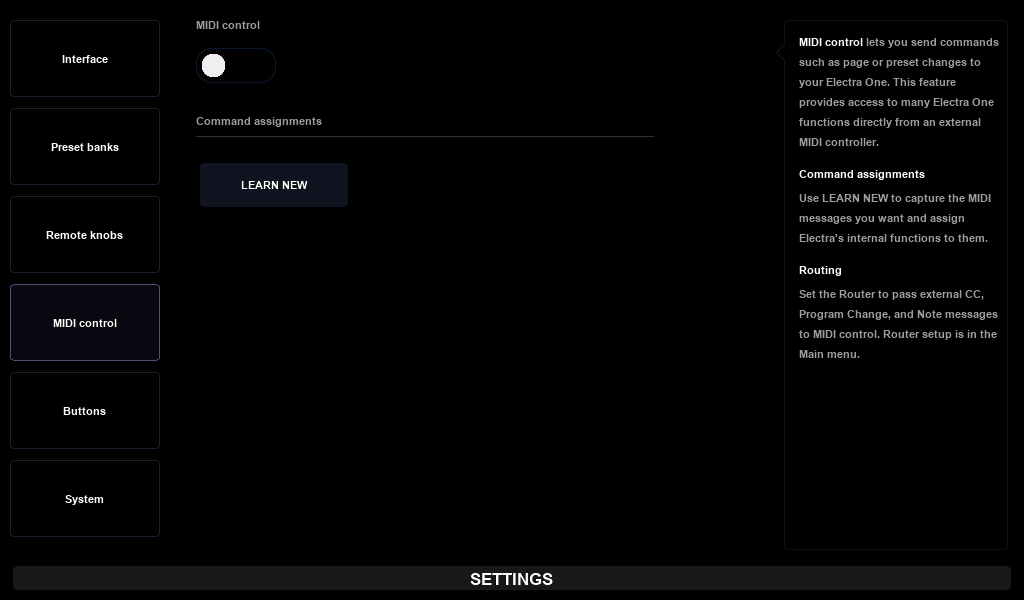
The MIDI Control feature allows you to map external MIDI messages to internal Electra One commands and actions. It works similarly to Remote Knobs, but instead of controlling on-screen parameters, it triggers system-level functions.
Configuration
You can assign incoming MIDI CC, Note, or Program Change messages to a wide range of Electra One actions, such as:
- Switching presets or pages
- Opening windows (e.g., Snapshots, Captures, Settings)
- Toggling performance and alt mode
This makes it possible to control Electra One using an external MIDI controller or a computer, greatly expanding performance and integration options.
For example, using a pad controller like the Novation Launchpad Mini, you can easily map its pads to act as extra buttons for triggering Electra One functions, such as switching pages, sending patch requests, or opening snapshot banks.
The tab carries the MIDI control switch, which turns the whole feature on and off. It is off until you turn it on, so a new controller runs no actions however many assignments it has. Below it, under the label Command assignments, is the list of mappings. A CLEAR ALL button removes every mapping; press and hold it until it fills, as letting go early does nothing.
A full list of available actions is in The actions below.
The MIDI Control tab holds the Mapping Screen. Which MIDI inputs MIDI Control listens to is set on the Router screen, as described below.
Mapping Screen
This screen allows you to create MIDI control assignments using MIDI Learn.
To create a new assignment, tap the [LEARN NEW] button. It will be highlighted with a yellow outline, indicating that the controller is now waiting for a MIDI message to learn. If you want to cancel the process, simply tap the button again to disarm it.
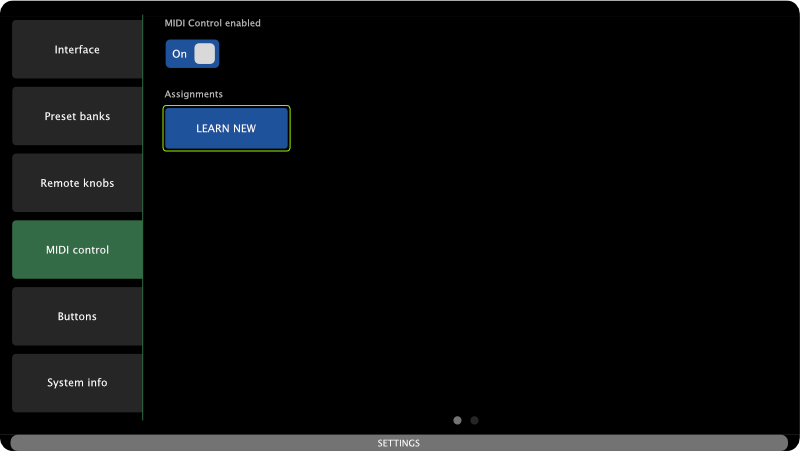
When MIDI Learn is armed, press a pad, turn a knob on a connected MIDI controller, or send a MIDI message to Electra One. The controller will capture the first valid MIDI message it receives and create a new assignment based on it.
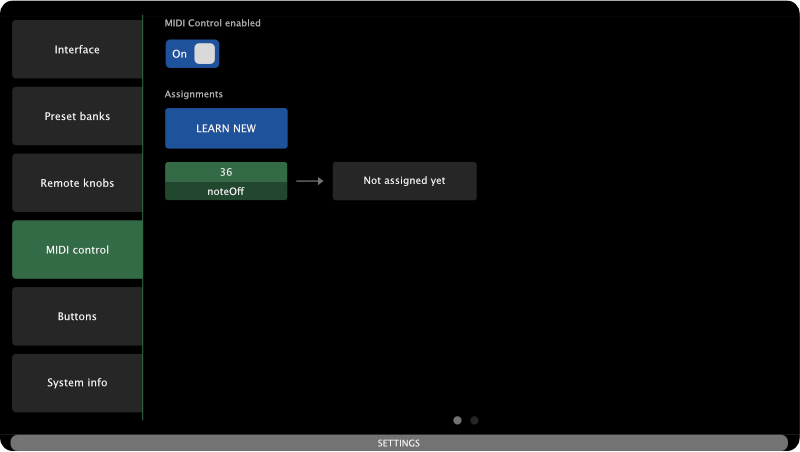
The image above shows Note On #36 as the learned MIDI message. It currently has no Electra One command or action assigned, which is indicated by the Not assigned yet box.
To assign a command, tap the Not assigned yet box. It will be highlighted with a light gray outline, and a swipeable list of available commands will appear in the right sidebar. Swipe through the list and tap the command you want to assign to the previously learned MIDI message.
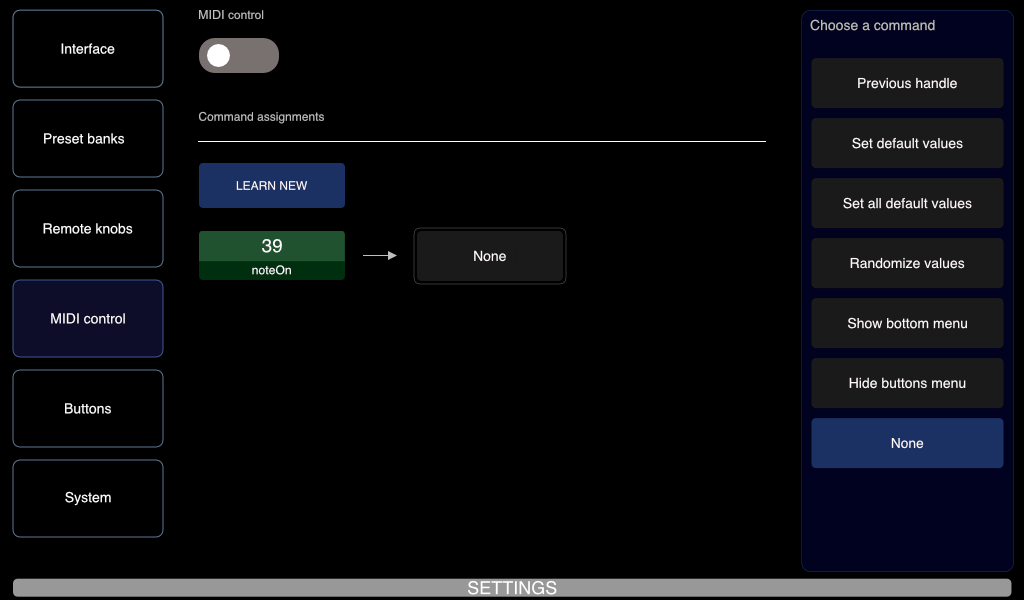
To change the MIDI message of an existing assignment, tap the MIDI message you wish to change. It will be highlighted with a light gray outline, and detailed information about the message will appear in the right sidebar.
In the sidebar, you’ll find a [LEARN] button. Tap this button to arm the learning mode and assign a new MIDI message, which will replace the existing one. To remove the assignment, tap the [CLEAR] button.
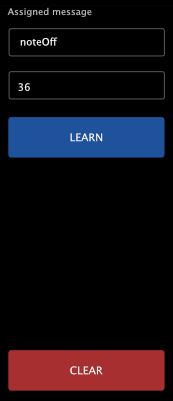
Two of the actions need a number as well: Switch to page and Switch to preset. When one of those is chosen, the sidebar shows a picker for it — a page for the first, a preset bank and a slot within it for the second.
The actions
The commands you can assign, in the order the sidebar lists them.
| Action | What it does |
|---|---|
Open menu | opens the MAIN MENU |
Open pages | opens PAGE SELECTION |
Open presets | opens PRESET SELECTION |
Open snapshots | opens the SNAPSHOTS window |
Open captures | opens the CAPTURES window |
Open preset menu | opens the PRESET MENU |
Open router | opens the ROUTER window |
Open devices | opens the DEVICES window |
Open USB Host | opens the USB HOST DEVICES window |
Open settings | opens the SETTINGS window |
Close window | closes the window that is open |
Control set 1, Control set 2, Control set 3 | makes that control set the active one |
Next control set, Previous control set | steps through the three control sets |
Next page, Previous page | shows the next or previous page that has controls |
Switch to page | shows the page you choose in the sidebar |
Next preset, Previous preset | loads the preset in the next or previous slot |
Switch to preset | loads the preset in the bank and slot you choose in the sidebar |
Toggle performance | shows the Performance page, or leaves it |
Toggle sensitivity | switches low knob sensitivity on or off |
Toggle alt mode | switches Alt mode on or off |
Request patch | sends the preset's patch request |
Open detail, Close detail | opens the detail window of the control whose knob is touched at that moment, or closes it |
Set default value | sets the selected value of the touched control to its default value |
Next handle, Previous handle | selects the next or previous value of the touched multi-value control |
Set default values | sets the controls that have a default value to it |
Set all default values | sets every control to its default value |
Randomize values | gives every control a random value |
Show pages menu, Hide pages menu | brings the row of page buttons onto the screen, or sends it away |
None | clears the assignment |
A Control Change mapping runs its action for every value it receives, so a footswitch that sends 127 when pressed and 0 when released runs the action twice.
Which inputs MIDI Control listens to
The MIDI inputs and channels that MIDI Control listens to are set on the Router screen, in its CTRL column. Select the square in the row of the input, then tick All channels, or pick Individual channels.
Messages that match a MIDI Control mapping are not passed to the preset, and neither is the Note Off of a key whose Note On runs a command. Everything else on the route reaches the preset as usual. Routes to other interfaces still forward all of them, like any other message from that input.
What the CTRL port does without a mapping
Electra One always listens to the CTRL port of its USB Device interface, whatever MIDI Control is set to and with no mapping of any kind:
- Program Changes load presets, or recall snapshots after a Bank Select.
- Control Changes on controller 60 and up move the morph and randomize sliders of the snapshot pairs, with the channel choosing the snapshot bank.
- Notes from note 60 up trigger captures, with the channel choosing the capture bank, and a note on channel 16 transposes capture playback.
The messages and the mk2's own numbers are described in The CTRL port.
A device plugged into the USB Host port can be routed to CTRL as well, in the USB Host window, which lets a pad controller do all of this.
Buttons
The Buttons settings screen allows you to customize the commands and actions assigned to Electra One’s hardware buttons.
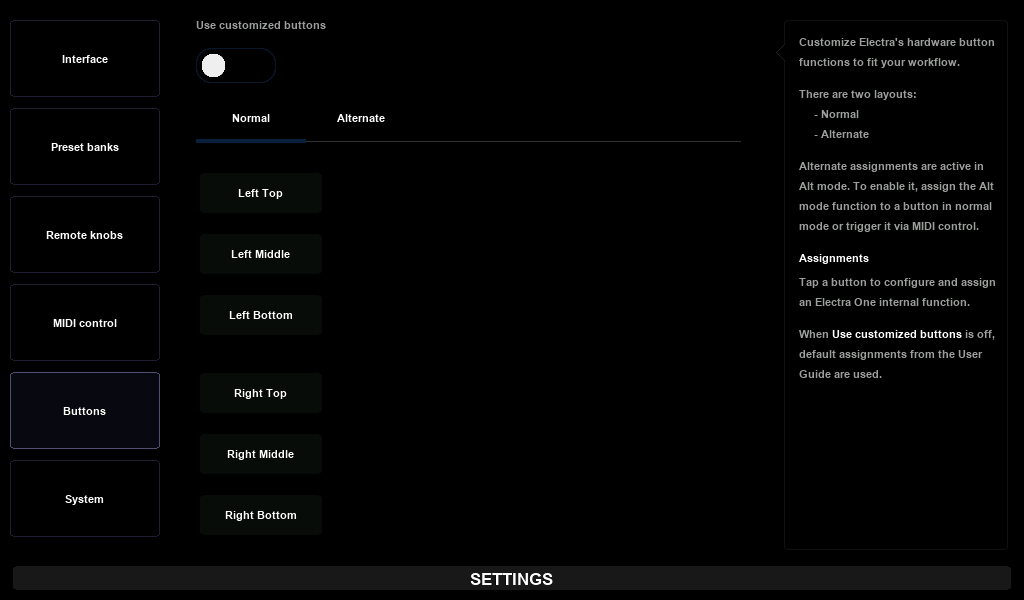
For the physical layout of the hardware buttons, refer to the Front panel section. On this screen the six buttons are named Left Top, Left Middle, Left Bottom, Right Top, Right Middle and Right Bottom.
The commands offered here are a shorter list than the one MIDI Control offers. The Buttons tab has these 23, plus None:
Open menu, Open pages, Open presets, Open snapshots, Open captures, Open preset menu, Open router, Open devices, Open USB Host, Set default value, Control set 1, Control set 2, Control set 3, Next control set, Previous control set, Next page, Previous page, Next preset, Previous preset, Toggle performance, Toggle sensitivity, Toggle alt mode, Request patch.
What each one does is in The actions above. The ones a button cannot be given are the ones that need a number typed in, the ones that act on a window, and the ones that act on the value under a touched knob: Open settings, Close window, Switch to page, Switch to preset, Open detail, Close detail, Next handle, Previous handle, Set all default values, Randomize values, Show pages menu and Hide pages menu.
A CLEAR ALL button removes every button assignment. It appears only once something is assigned, and it is press-and-hold: hold it until it fills, as letting go early does nothing.
The mk2 has no long-press button assignments. A button does its command when you press it, and holding it does nothing extra.
Default Layout
The switch at the top of the screen is called Use customized buttons, and it starts out off.
Leave it off and the buttons do what the default layout says — the factory-defined set of assignments:
| Button | Default layout | While a knob is touched |
|---|---|---|
[LEFT-TOP] | control set 1 | opens the control's detail window |
[LEFT-MIDDLE] | control set 2 | next value of a multi-value control |
[LEFT-BOTTOM] | control set 3 | previous value of a multi-value control |
[RIGHT-TOP] | sends the preset's patch request | — |
[RIGHT-MIDDLE] | opens the SNAPSHOTS window | — |
[RIGHT-BOTTOM] | opens PAGE SELECTION | — |
Switch it on and your own assignments are used instead. Switching it off again does not delete them, so you can move between the factory and your own setup without reconfiguring anything.
In the Electra One app the same switch is called Use default button layout and works the other way round: on means the default layout, off means your assignments.
A preset can also override the buttons for its own slot, and a slot override wins over both the default layout and your own assignments. See Assign Buttons in the Preset Menu.
Modes
To expand the number of assignable functions, Electra One supports two button modes:
- Normal Mode – The default set of button assignments.
- Alternate Mode (Alt Mode) – A secondary set of button assignments, activated by triggering the
Toggle alt modecommand. To use it, you must assign theToggle alt modecommand to either a hardware button or a MIDI Control assignment. This allows each hardware button to perform two different actions, depending on the current mode.
On a hardware button, Toggle alt mode is momentary, like a shift key: the other buttons give their Alternate actions for as long as you hold it, and letting go returns to Normal. A quick tap therefore leaves you back in Normal mode. To latch Alt mode on, assign Toggle alt mode to a MIDI Control message instead, where each message flips it and it stays where it is put.
Toggle sensitivity behaves the same way: holding the button gives low knob sensitivity, and releasing it restores the normal one.
To switch between the two modes on this screen — to see and edit each set of assignments — use the mode switch:
Button Assignments
The screen displays a column of six buttons, arranged in two groups of three, representing the physical hardware buttons on the controller and their assigned commands.
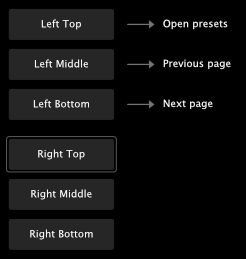
To change a button’s assignment, tap on the desired button. It will be highlighted with a light gray outline, and a list of available commands will appear in the sidebar on the right, under the label Choose a command. Simply tap the command you want to assign to that button.
System
The System screen provides a summary of key details about your Electra One controller.
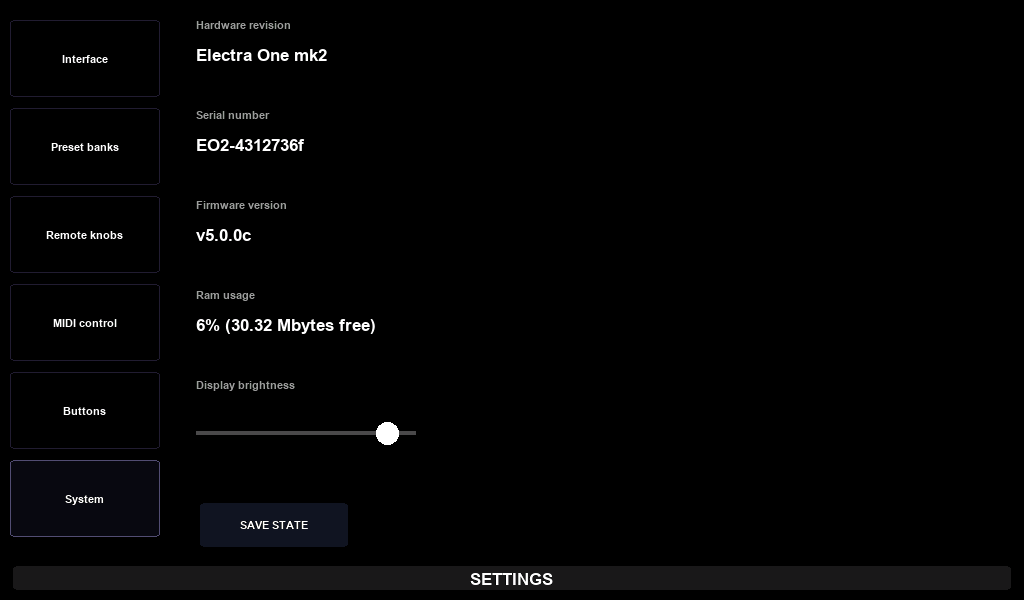
It provides info about:
Hardware revision– readsElectra One mk2Serial number– the mk2's serial numbers begin withEO2Firmware version– the installed firmwareRam usage– how much of the memory is in use, as a percentage and as megabytes free
This information is useful for troubleshooting, verifying your setup, or when contacting technical support.
The tab also carries the display brightness slider and the SAVE STATE button.
Display Brightness
Display brightness adjusts the screen brightness to suit different lighting conditions. This setting helps reduce eye strain and power consumption, especially in low-light or on-stage environments.
If your USB host (e.g. a MIDI router) does not supply enough power for the Electra One, lowering the backlight brightness can help reduce the controller’s power requirements.
The brightness is kept in the controller's own memory rather than in the configuration file, so it is not part of a configuration you upload or download.
Save State
SAVE STATE writes the controller's current state to its configuration file straight away, without waiting for the Settings screen to be closed. It stores:
- everything the Settings screens change - the interface options, preset bank names and colours, remote knobs, MIDI control and button assignments
- the display brightness
- which presets are pinned
The pinned presets are the part worth pressing the button for. A pinned preset keeps running in the background after you switch away from it, and a restart otherwise forgets which presets those were. Pin the presets you want running, press SAVE STATE, and they are started and pinned again every time the controller boots - the preset you were last using is still the one on the screen.
The list follows the slots, not the presets. Store a different preset in a pinned slot - upload one from the editor, or remove what is there - and that slot is unpinned and dropped from the list, because the preset the pin was meant to keep is no longer there.
Presets can be pinned from the preset menu on the controller, and from the Preset Slots tab in the editor.
The configuration in the Electra One app
Everything on the Settings screen can also be set in the Electra One app, on the Controller page under the Configuration tab. Connect the mk2 to your computer with a USB cable, open app.electra.one and sign in; the app reads the configuration from the controller when the page opens.
When you change something, APPLY CHANGES becomes available. Click it to send the whole configuration to the controller.
The app arranges the configuration in seven sections:
| Section | The tab it matches |
|---|---|
| User Interface | Interface |
| Preset Banks | Preset Banks |
| Remote Knobs | Remote Knobs |
| MIDI Control | MIDI Control |
| Buttons | Buttons |
| Router | the Router window |
| USB Host | the USB Host window |
Three settings are in the app only, with nothing for them on the controller:
- Keep preset values and Restore preset values on start-up, in the User Interface section. See Preset Values.
- Enable preset router scripts, in the Router section. It is off until you turn it on, and while it is off a
router.luastored with a preset is ignored and only the routes apply. See Router.
Two switches carry different names in the app than on the controller, and one of them also works the other way round:
| On the controller | In the app |
|---|---|
Knob touch selections | Use knob touch selections |
Dim inactive control sets | the Indicator picker, Bars or Dim inactive control sets |
Use customized buttons | Use default button layout, with the opposite sense |
Preset banks, remote knobs, MIDI control and button assignments have the same meaning in both places; whichever you set them in, they belong to the controller rather than to a preset, and they apply to every preset.