

Version5.0.0 beta
Electra One Account
The Electra One Account is the web application at app.electra.one. It is free. With an account you can:
- keep your presets in your own library, and edit them in the Preset Editor,
- use presets that other people share in the preset library, and share your own,
- manage the snapshots, captures and device overrides of a preset,
- keep a history of every preset, and publish tested versions of it as releases,
- work with one or more controllers: update their firmware, rearrange their presets, back up and restore slots, edit the files in a slot, and read their performance statistics,
- take pictures of the controller's screen and watch MIDI messages.
This chapter goes through the pages of the application one by one and explains every button on them. The Preset Editor has its own chapter, Preset Editor.
Browser
The application talks to Electra One over MIDI from the browser, which needs WebMIDI. Use Chrome or Edge. The first time the application wants to use MIDI, the browser asks for permission. Allow it.
Signing in
Open app.electra.one. The page shows the sign-in form and, under it, the preset library, which anyone can browse without an account.
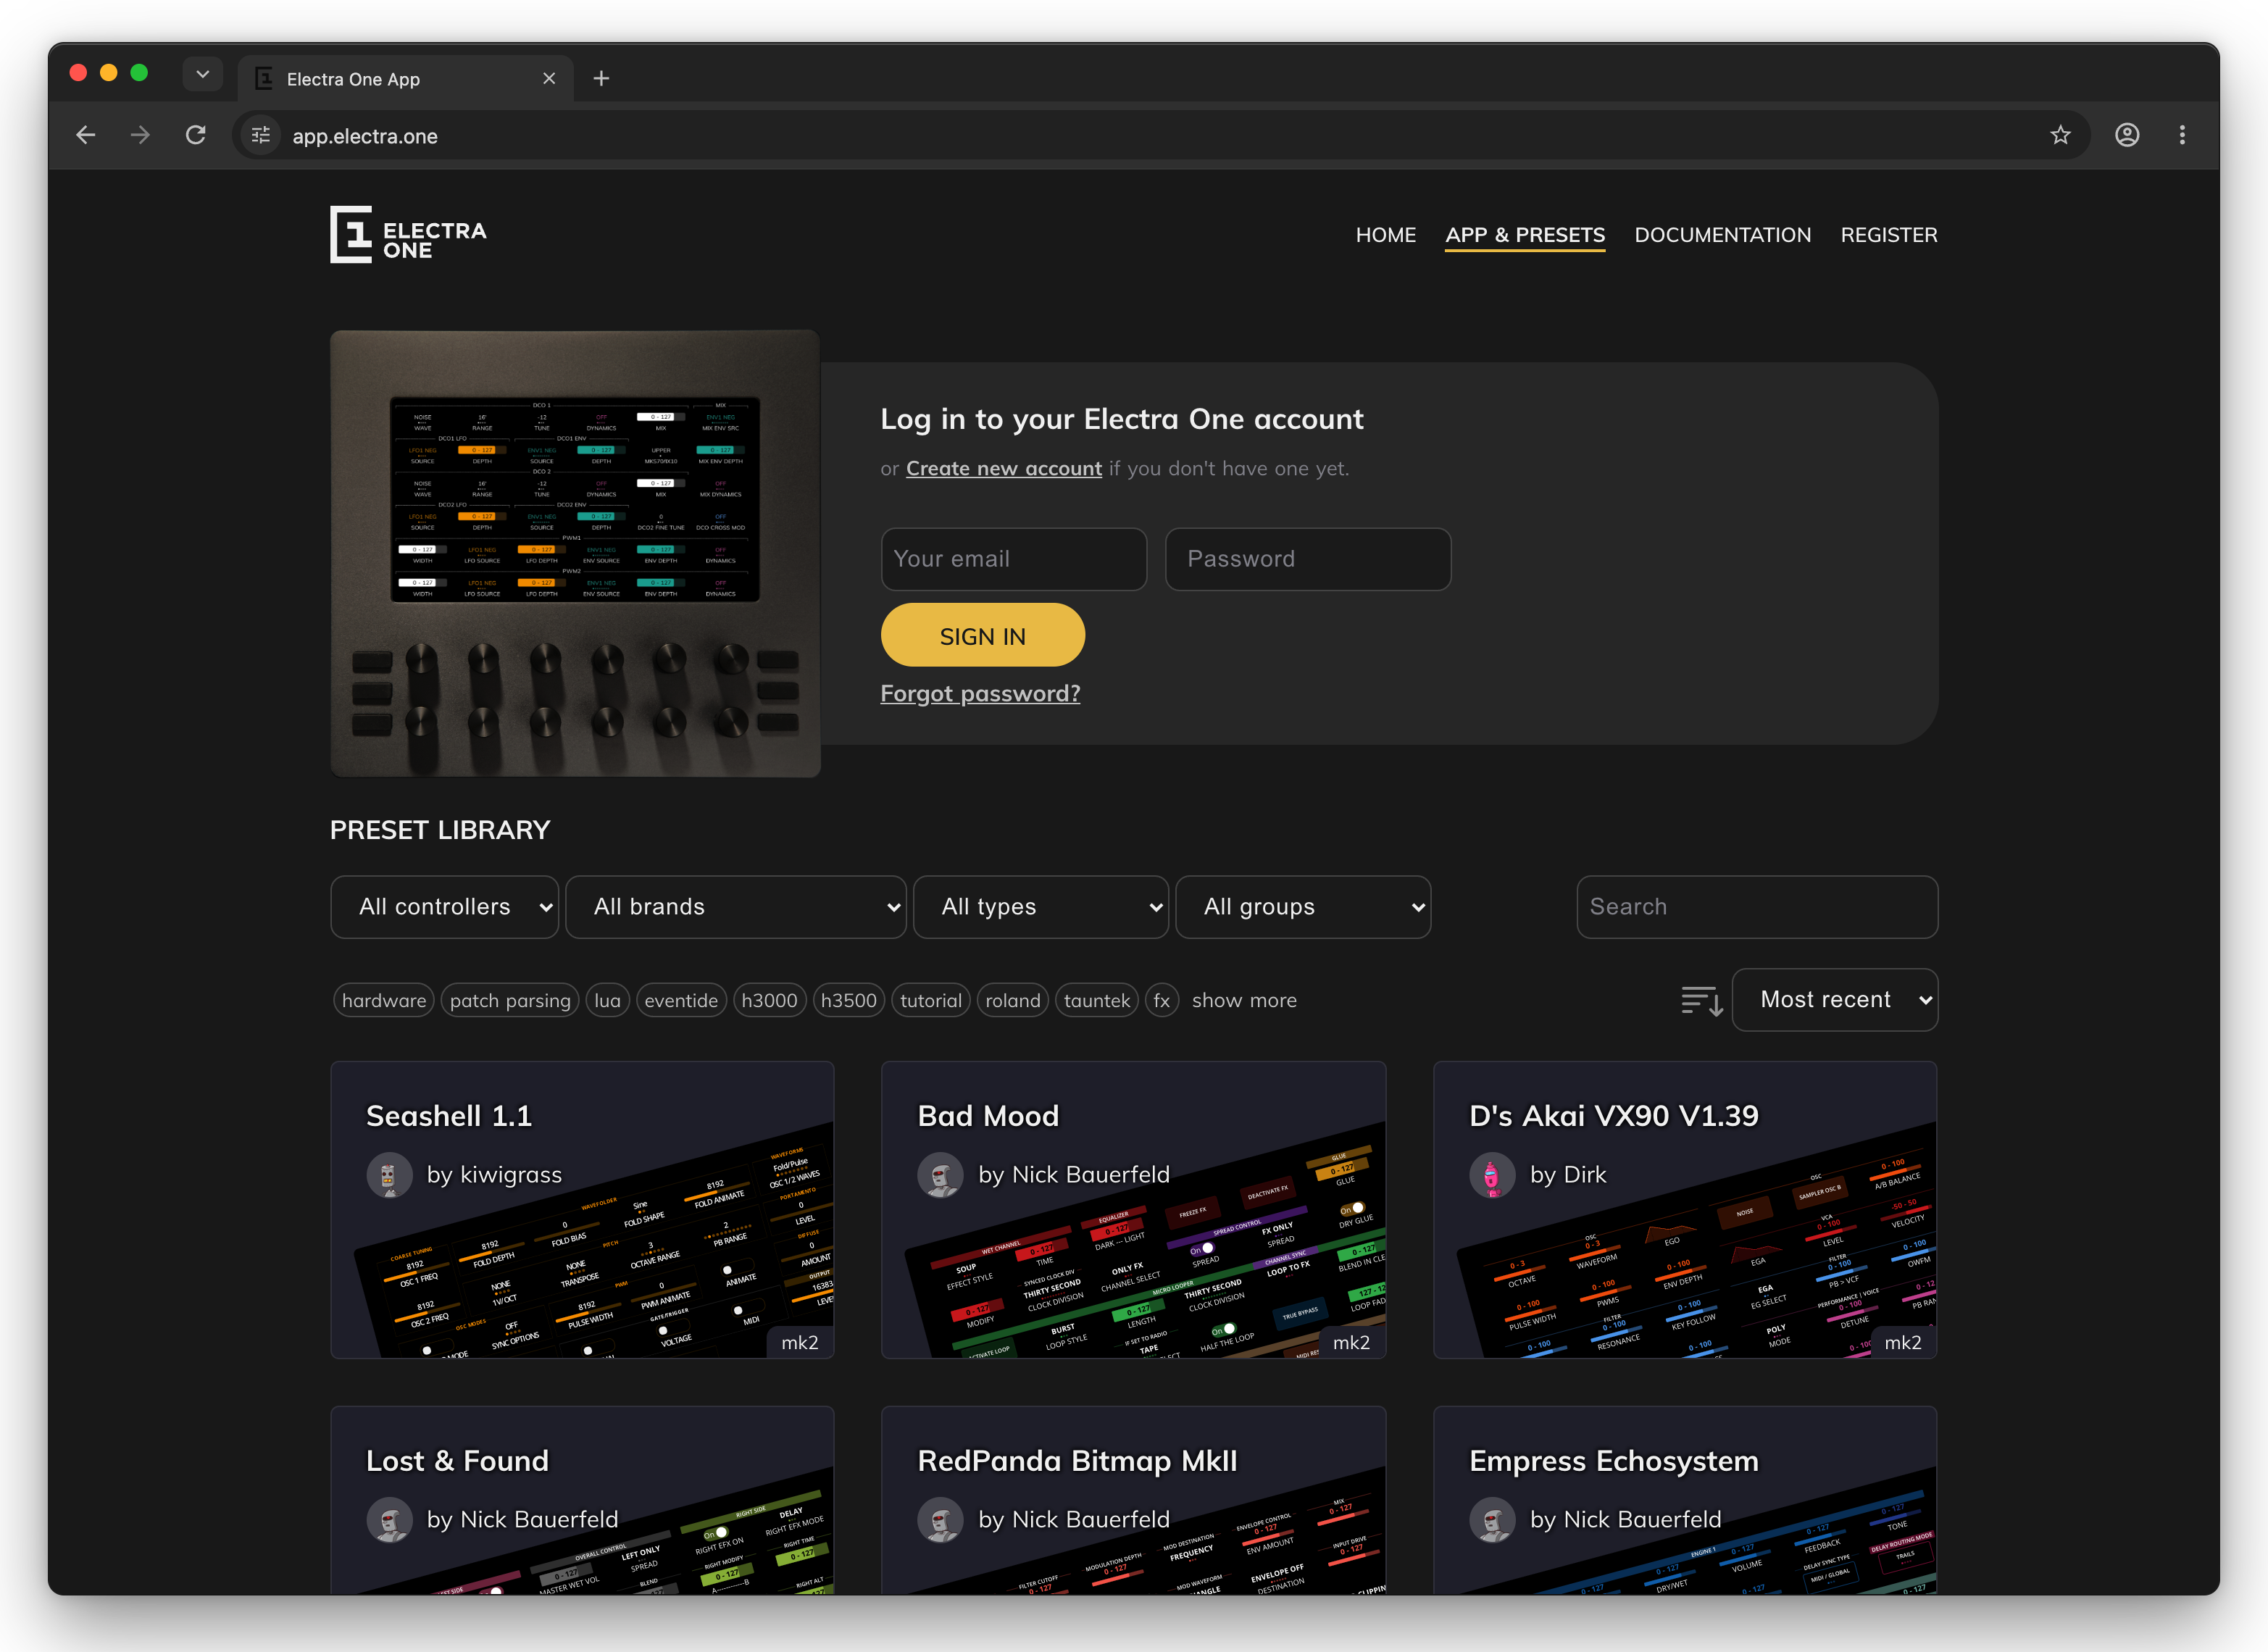
- Sign in. Enter your email and password and click
SIGN IN. You arrive at My presets. - Create new account. Opens the registration form. Enter a nickname, your email and a password, and click
CREATE ACCOUNT. The nickname is the name shown on the presets you share. You can change it later. - Forgot password? Enter your email and click
RESET PASSWORD. A link to set a new password is sent to that email.
The top bar
The top bar is the same on every page.
| Item | What it does |
|---|---|
MY PRESETS | Opens your own presets. |
PRESET LIBRARY | Opens the presets you and other people share. |
CONTROLLER | Opens the Controller page. When a controller is connected, it is a menu instead. See Controllers. |
CURRENT | Shows the presets of the connected controller and lets you switch between them. See The current slot. It is shown only while a controller is connected. |
| Your nickname | The user menu. See Your profile. |
When no controller is connected, a bar under the menu offers to connect one:
CONNECTasks the browser for permission to use MIDI.SCAN ALL MIDI PORTSlooks for a controller on every MIDI port of the computer.CONTROLLERSopens the Controller page.
When a newer firmware is available for the connected controller, a bar says so and its UPDATE FIRMWARE button opens the firmware update.
My presets
My presets is your personal library. It holds the presets you have created, imported or copied, and the presets that other people share with you in a preset gang.
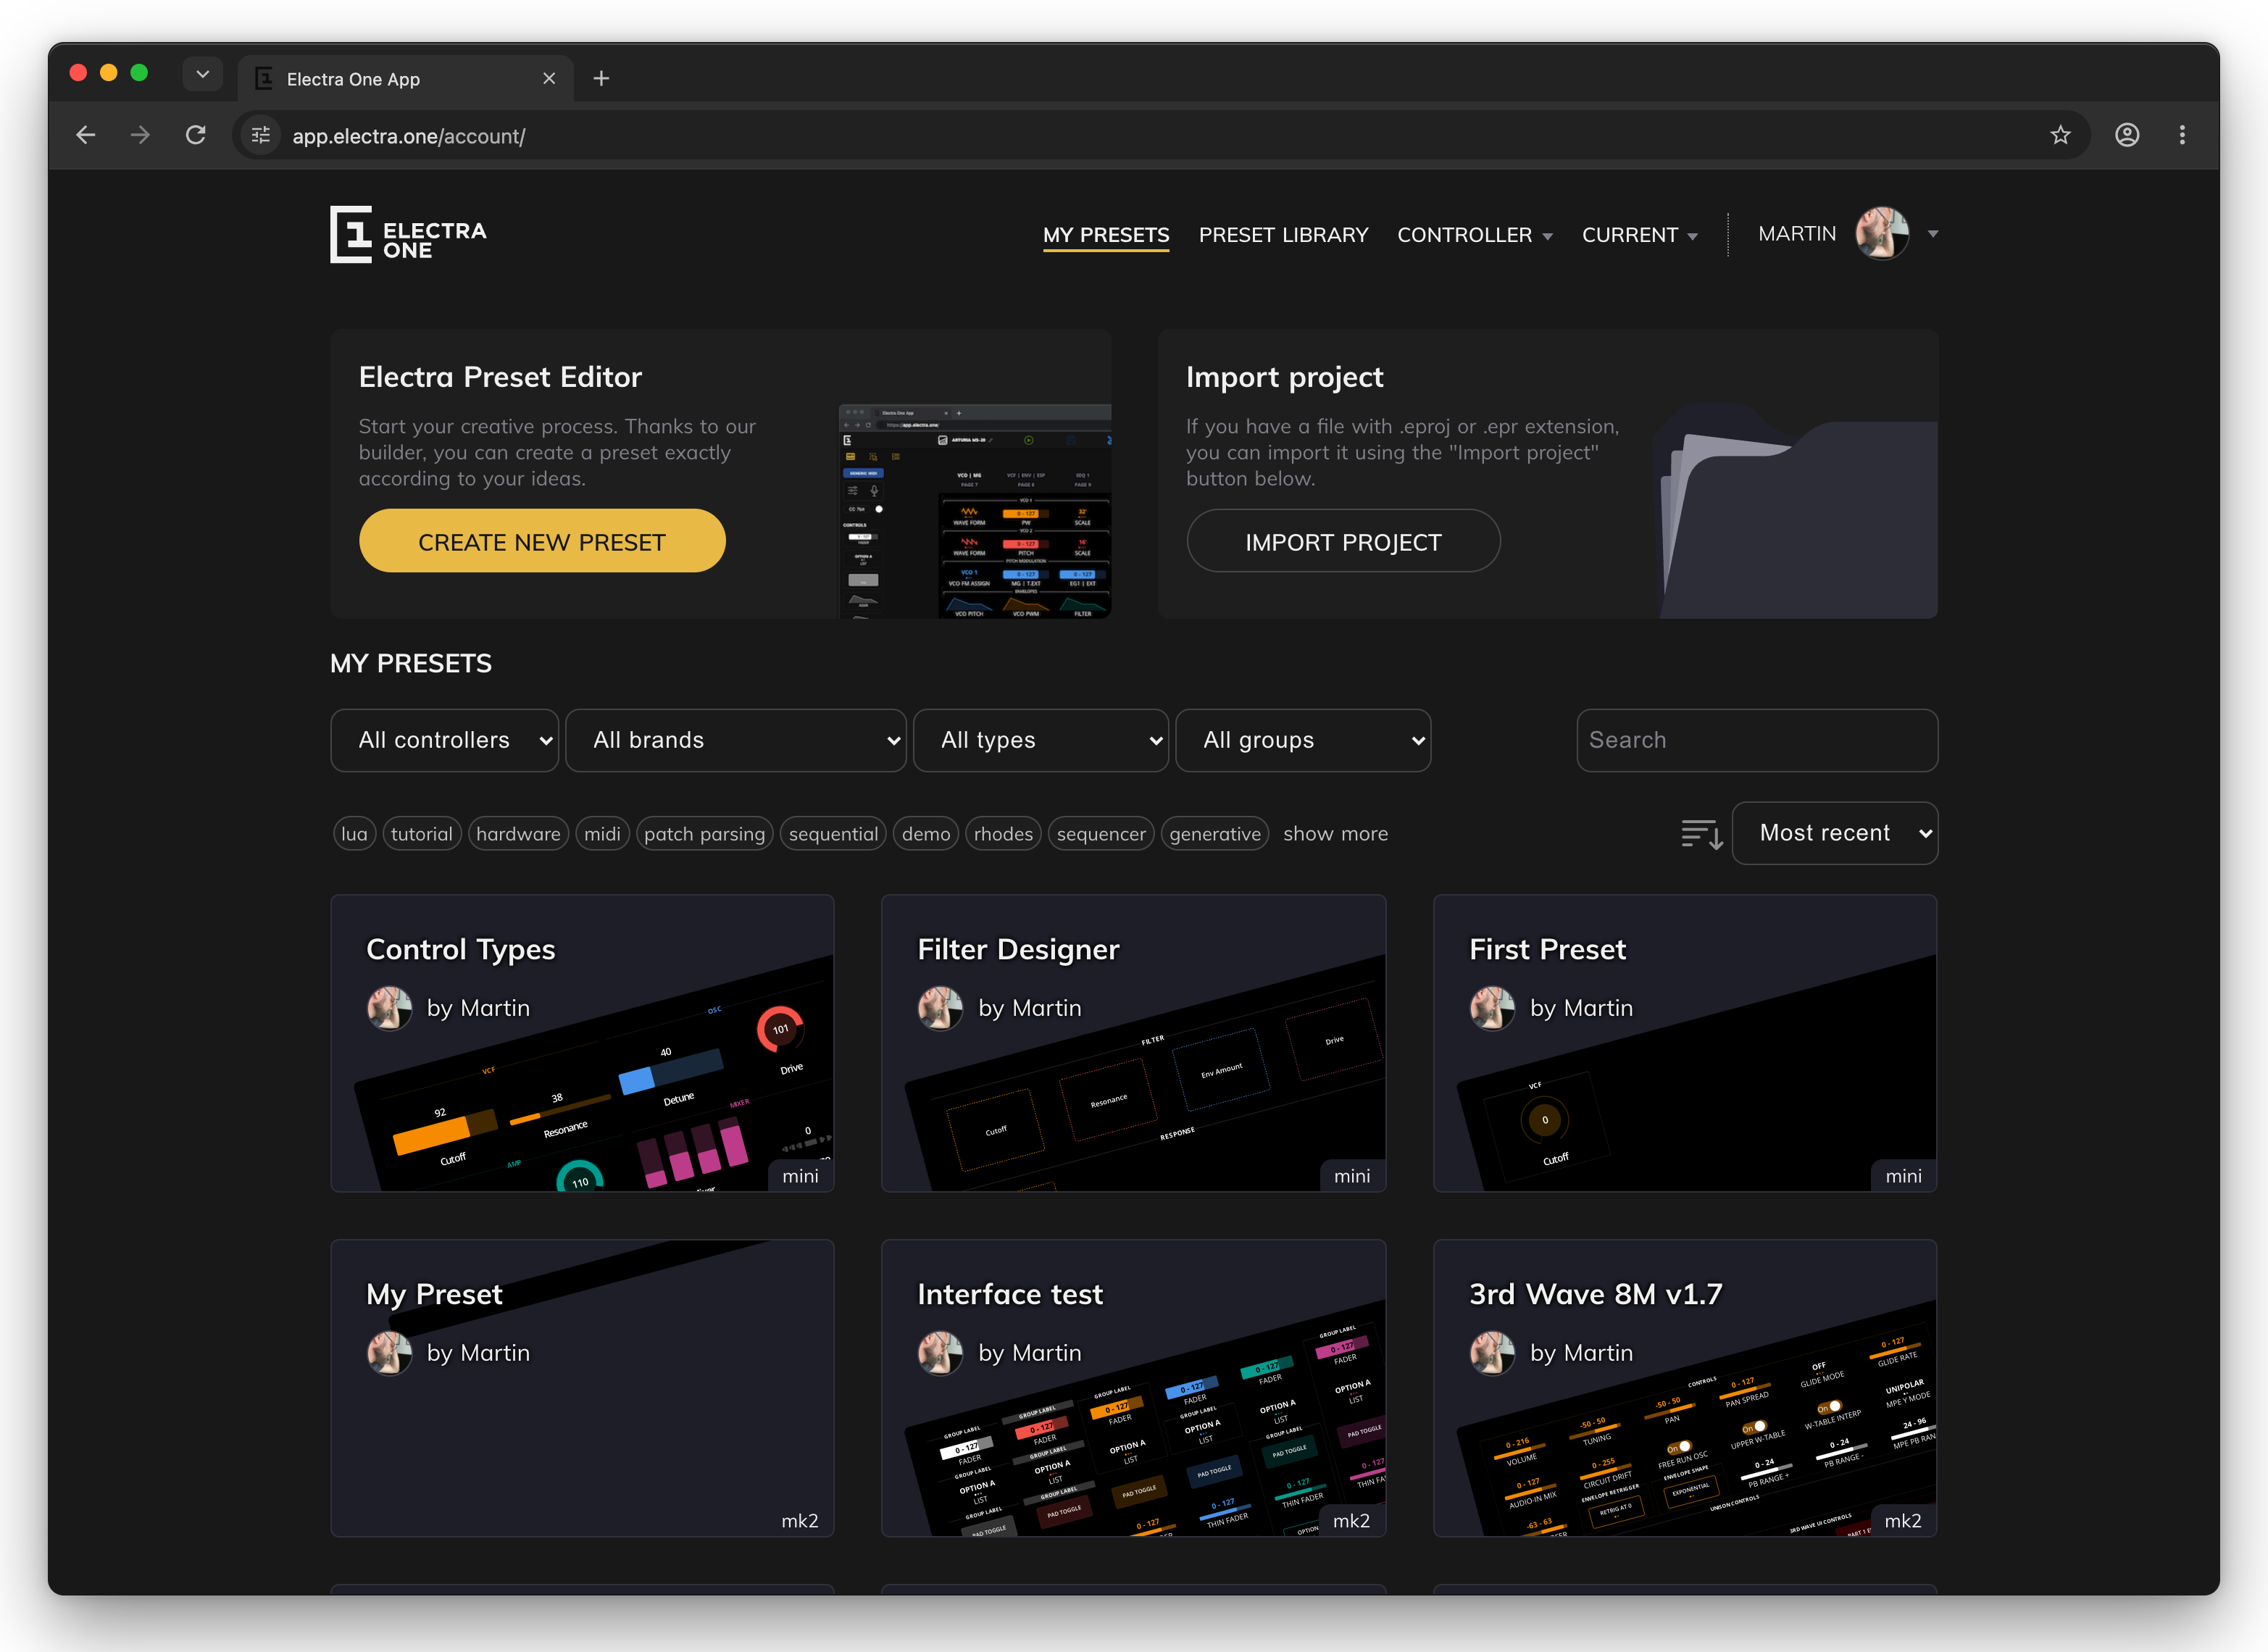
The two cards at the top add presets to the library:
CREATE NEW PRESETcreates an empty preset called "My Preset" for the connected controller's model and opens it in the Preset Editor.IMPORT PROJECTopens a file dialog. Choose a project file (.eproj) or a preset file (.epr). The preset appears in the list. A project file keeps the Lua script, a preset file does not have one. For presets you need to import Lua sources separately in the Preset editor.
A preset can also come from the controller. The current slot page has IMPORT TO MY PRESETS, which copies the preset and lua the controller is running into your library and converts it to a project.
Finding presets
The row under the cards filters the list. The same filters are on the preset library page.
| Filter | What it does |
|---|---|
All controllers | Shows only presets for the Mk1, the Mk2 or the Mini. |
All brands | Shows only presets for instruments of one brand. |
All types | Synthesizer, drum machine, FX, sequencer and so on. |
All groups | Hardware, software, MIDI processing or tutorial. |
Search | Type part of a preset's name and press Enter. |
| Tags | Click a tag to show only presets with it. Click more tags to narrow the list further, click a tag again to remove it. show more lists more tags. |
| Sort | Most recent, By owner, By name or By brand. Sorting by owner or by brand also groups the list under headings. |
The list shows 24 presets at first. SHOW MORE PRESETS at the bottom adds more.
The preset card
Each preset is a card with its name, its author and a picture of its first page. The picture is the controller screenshot the owner took, or a drawing of the first page if there is no screenshot. The corner of the picture names the models the preset is made for. A version number after the name, such as v1.2, means the preset has an official release.
- Click the card to open the preset detail page.
SEND TO ELECTRAappears when you point at the card while a controller is connected. It sends the preset to the controller, which loads it into the slot it is on now.
WARNING
SEND TO ELECTRA replaces the preset in the controller's current slot. If you want to keep that preset, switch the controller to an empty slot first, or import the preset into your library.
Preset library
The preset library lists the presets that Electra One users have made public. It works like My presets: the same filters, the same cards and the same SEND TO ELECTRA. Click a card to see the preset's description and pages, and to copy the preset into your own library.
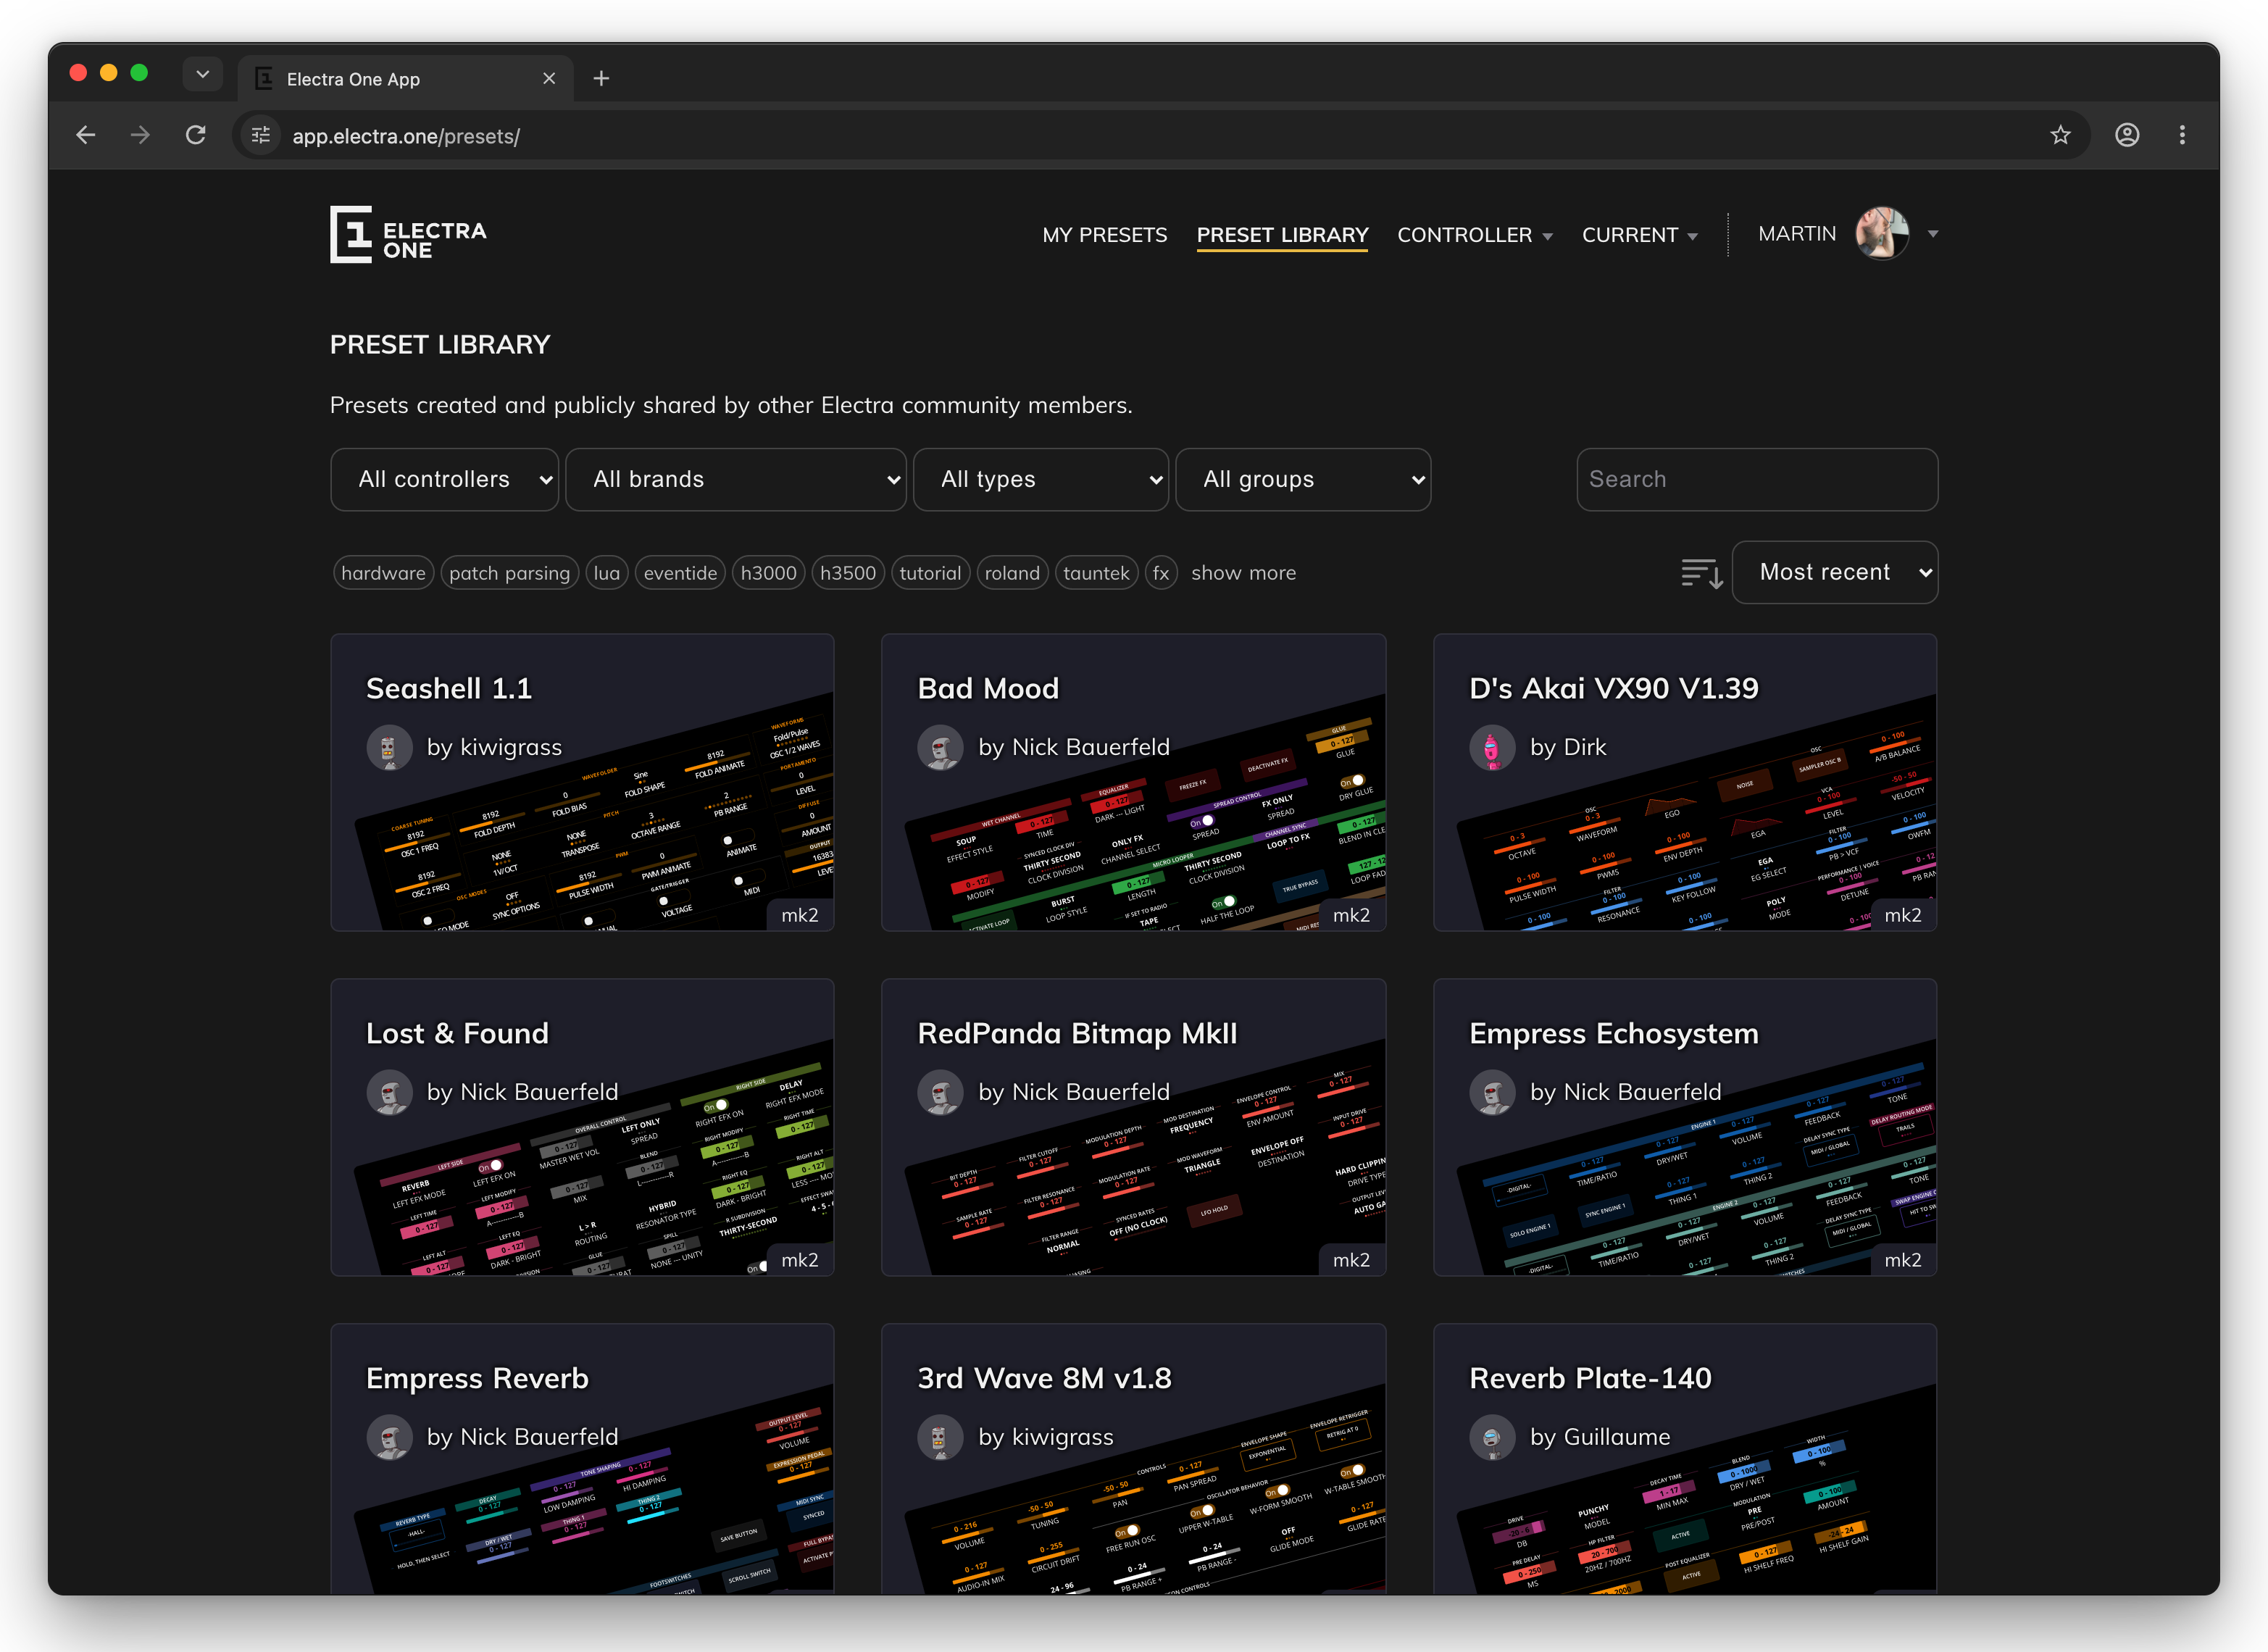
When the author of a preset has made an official release, the library gives you that release, not the version the author is working on. See Revisions and releases.
Preset detail
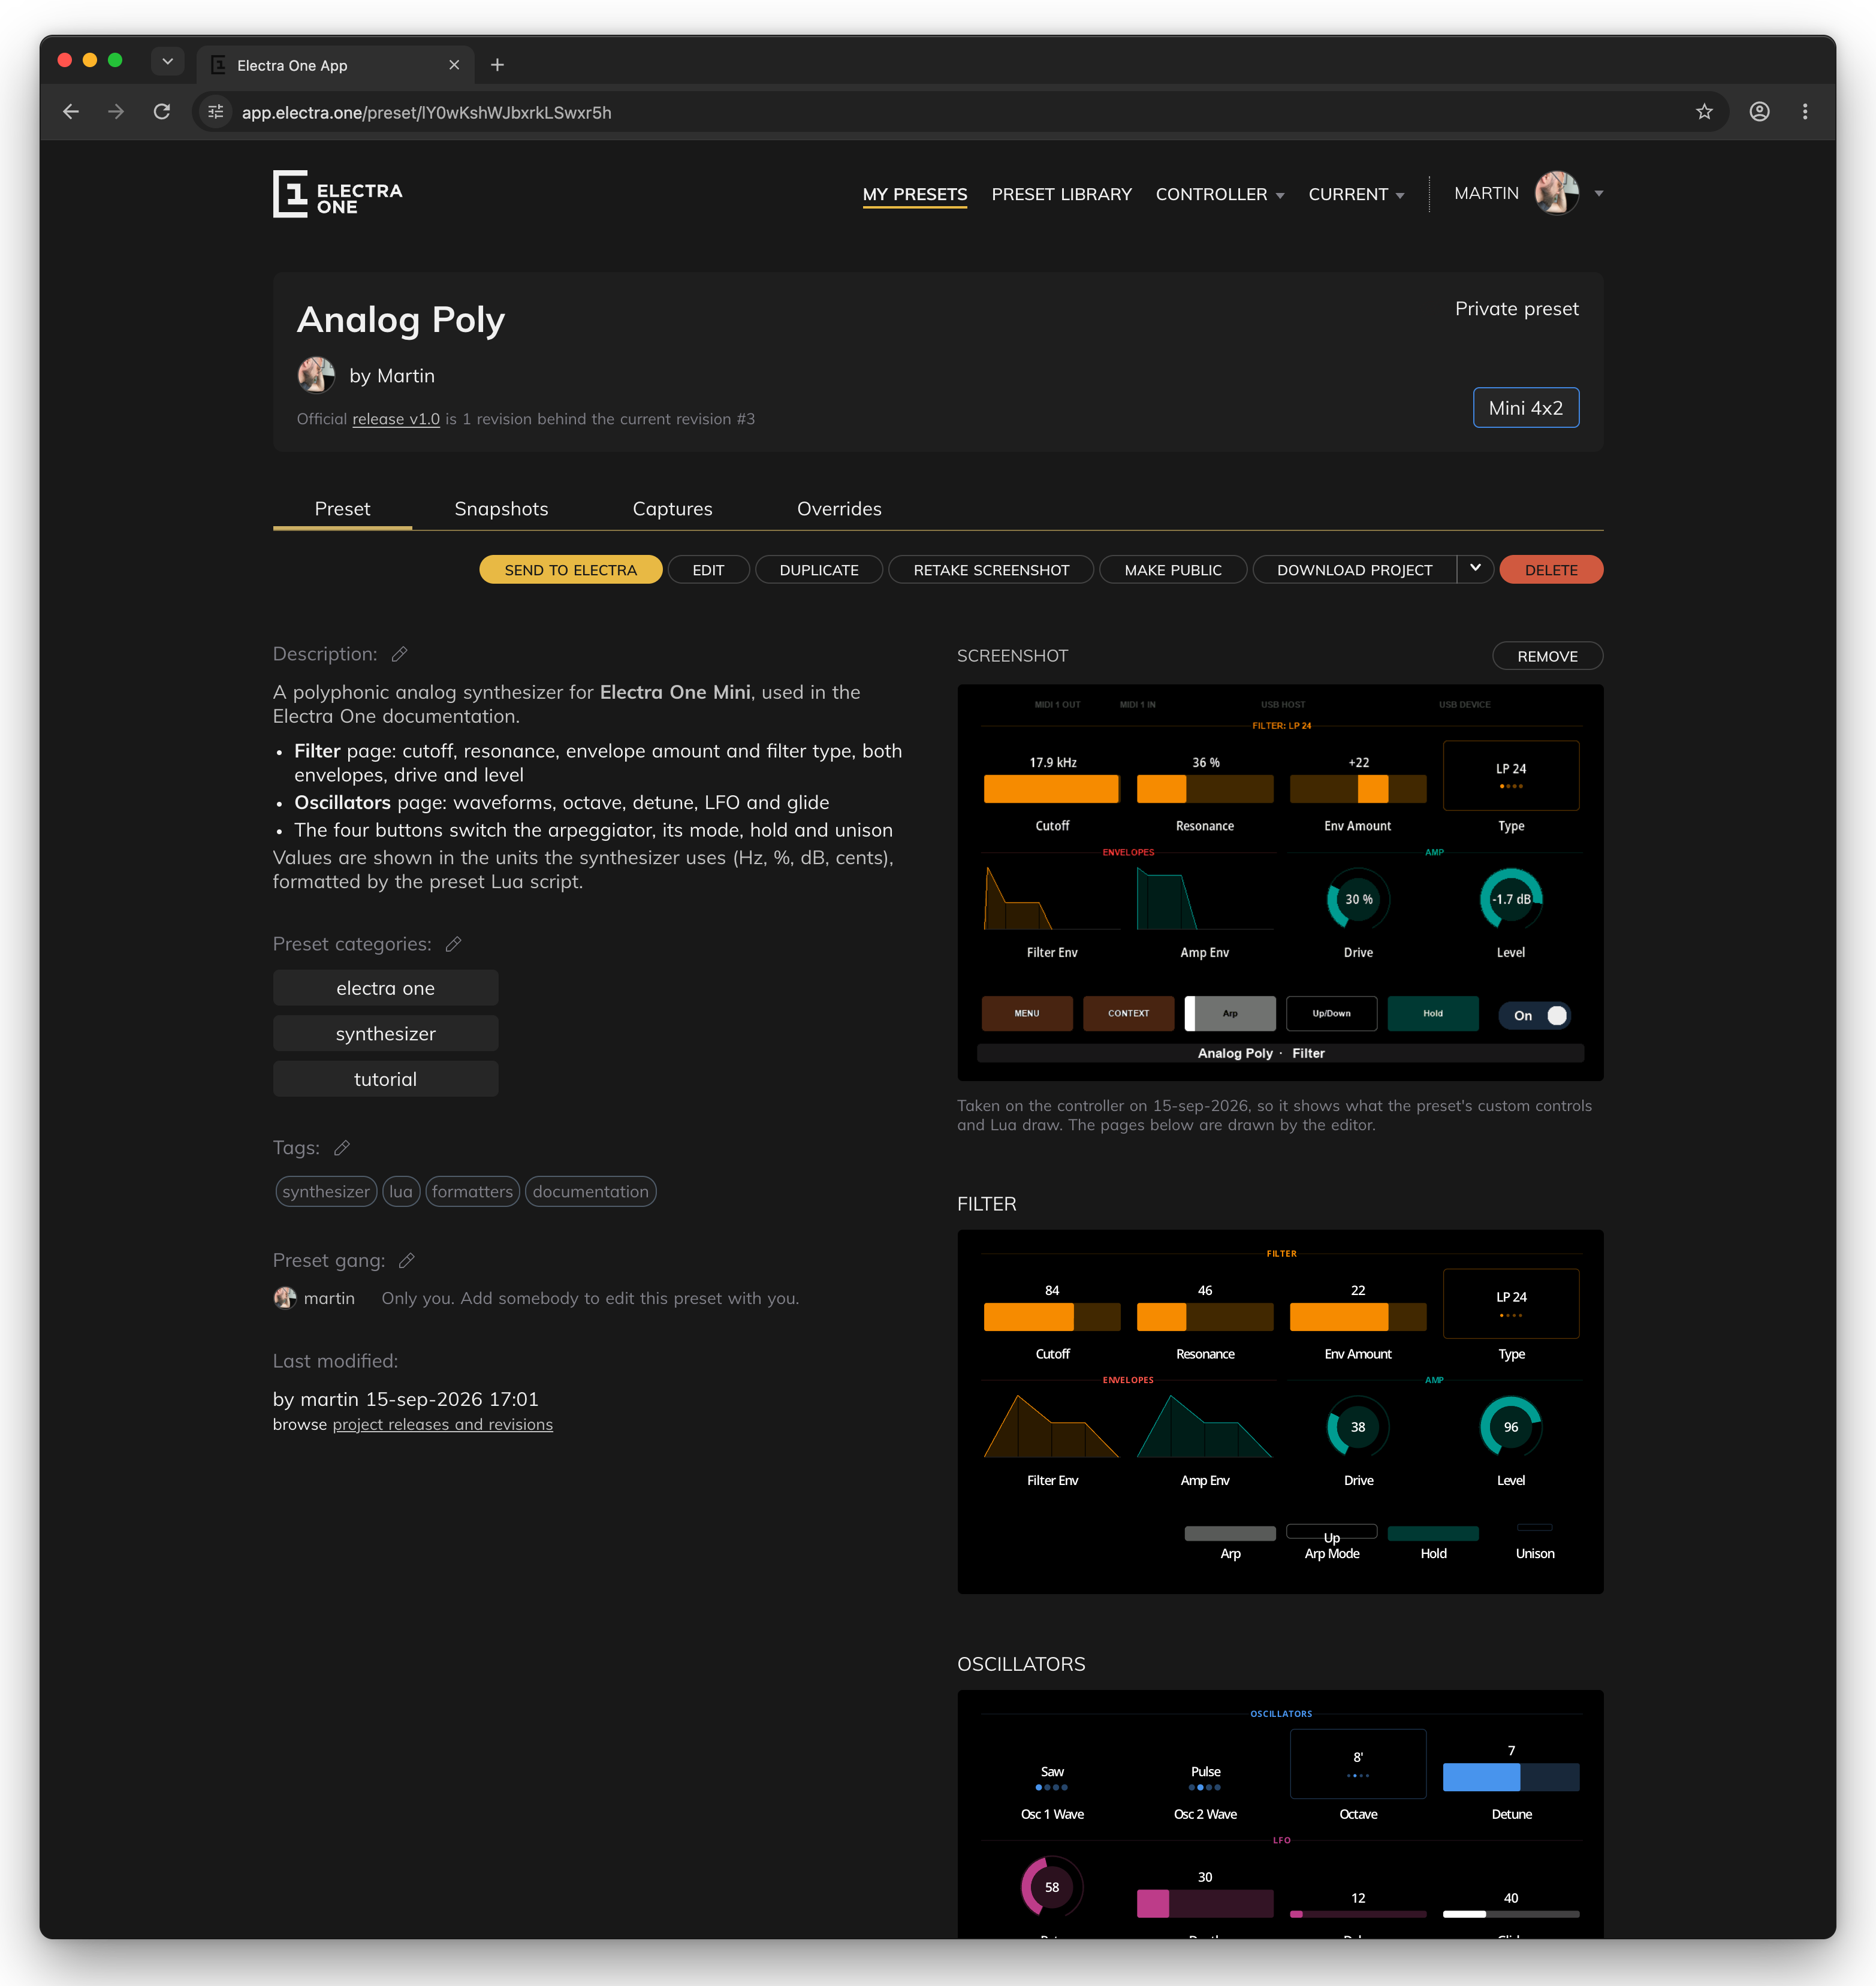
The preset detail page shows everything about one preset. It has four tabs: Preset, Snapshots, Captures and Overrides.
The header
- Name and author. When the page shows an official release, its version follows the name.
- Private preset / Public preset. Whether the preset is in the preset library.
- Release line. For the owner and the preset gang, a line under the author says how far the official release is behind the latest revision, for example "Official release v1.0 is 1 revision behind the current revision #3". Click the release to see it in the history.
- Layout buttons. One button for each layout the preset has, for example
Mk2 6x6orMini 4x2. Click one to draw the pages for that layout. If a controller of that model is connected, the application also makes it the active controller.
Buttons on the Preset tab
Which buttons you see depends on whether the preset is yours and whether a controller is connected.
| Button | Shown | What it does |
|---|---|---|
SEND TO ELECTRA | A controller is connected, and the page shows the layout for its model | Sends the preset to the controller's current slot and loads it. |
ELECTRA NOT CONNECTED | No controller is connected | Nothing. Connect a controller to send the preset. |
EDIT | You own the preset, or you are an editor in its gang | Opens the preset in the Preset Editor. |
DUPLICATE | You own the preset | Makes a private copy called "Clone of …" in your library. |
COPY TO YOUR PRESETS | The preset belongs to somebody else | Makes a private copy in your library. You can edit the copy. |
TAKE SCREENSHOT | You own the preset, and a controller of the right model is connected | Takes a picture of the controller's screen and uses it as the preset's picture. See The preset's picture. |
MAKE PUBLIC / MAKE PRIVATE | You own the preset | Adds the preset to the preset library, or takes it out. It happens at once. |
DOWNLOAD PROJECT | Signed in | Downloads the project file (.eproj), with the Lua script and the description. The arrow next to it offers Download preset mk2 and Download preset Mini instead, which download a preset file (.epr) for that model. |
DELETE | You own the preset | Asks for confirmation, then deletes the preset and its history from your account. |
A copy made with DUPLICATE or COPY TO YOUR PRESETS takes the preset and its description. It does not take the categories, tags, history, releases, screenshot or gang.
TIP
Deleting a preset removes it from your account only. The controller keeps its copy. To remove a preset from the controller, use the trash icon on the Preset slots tab.
Description, categories and tags
The left column describes the preset. The owner and the gang's editors see a pencil next to each heading.
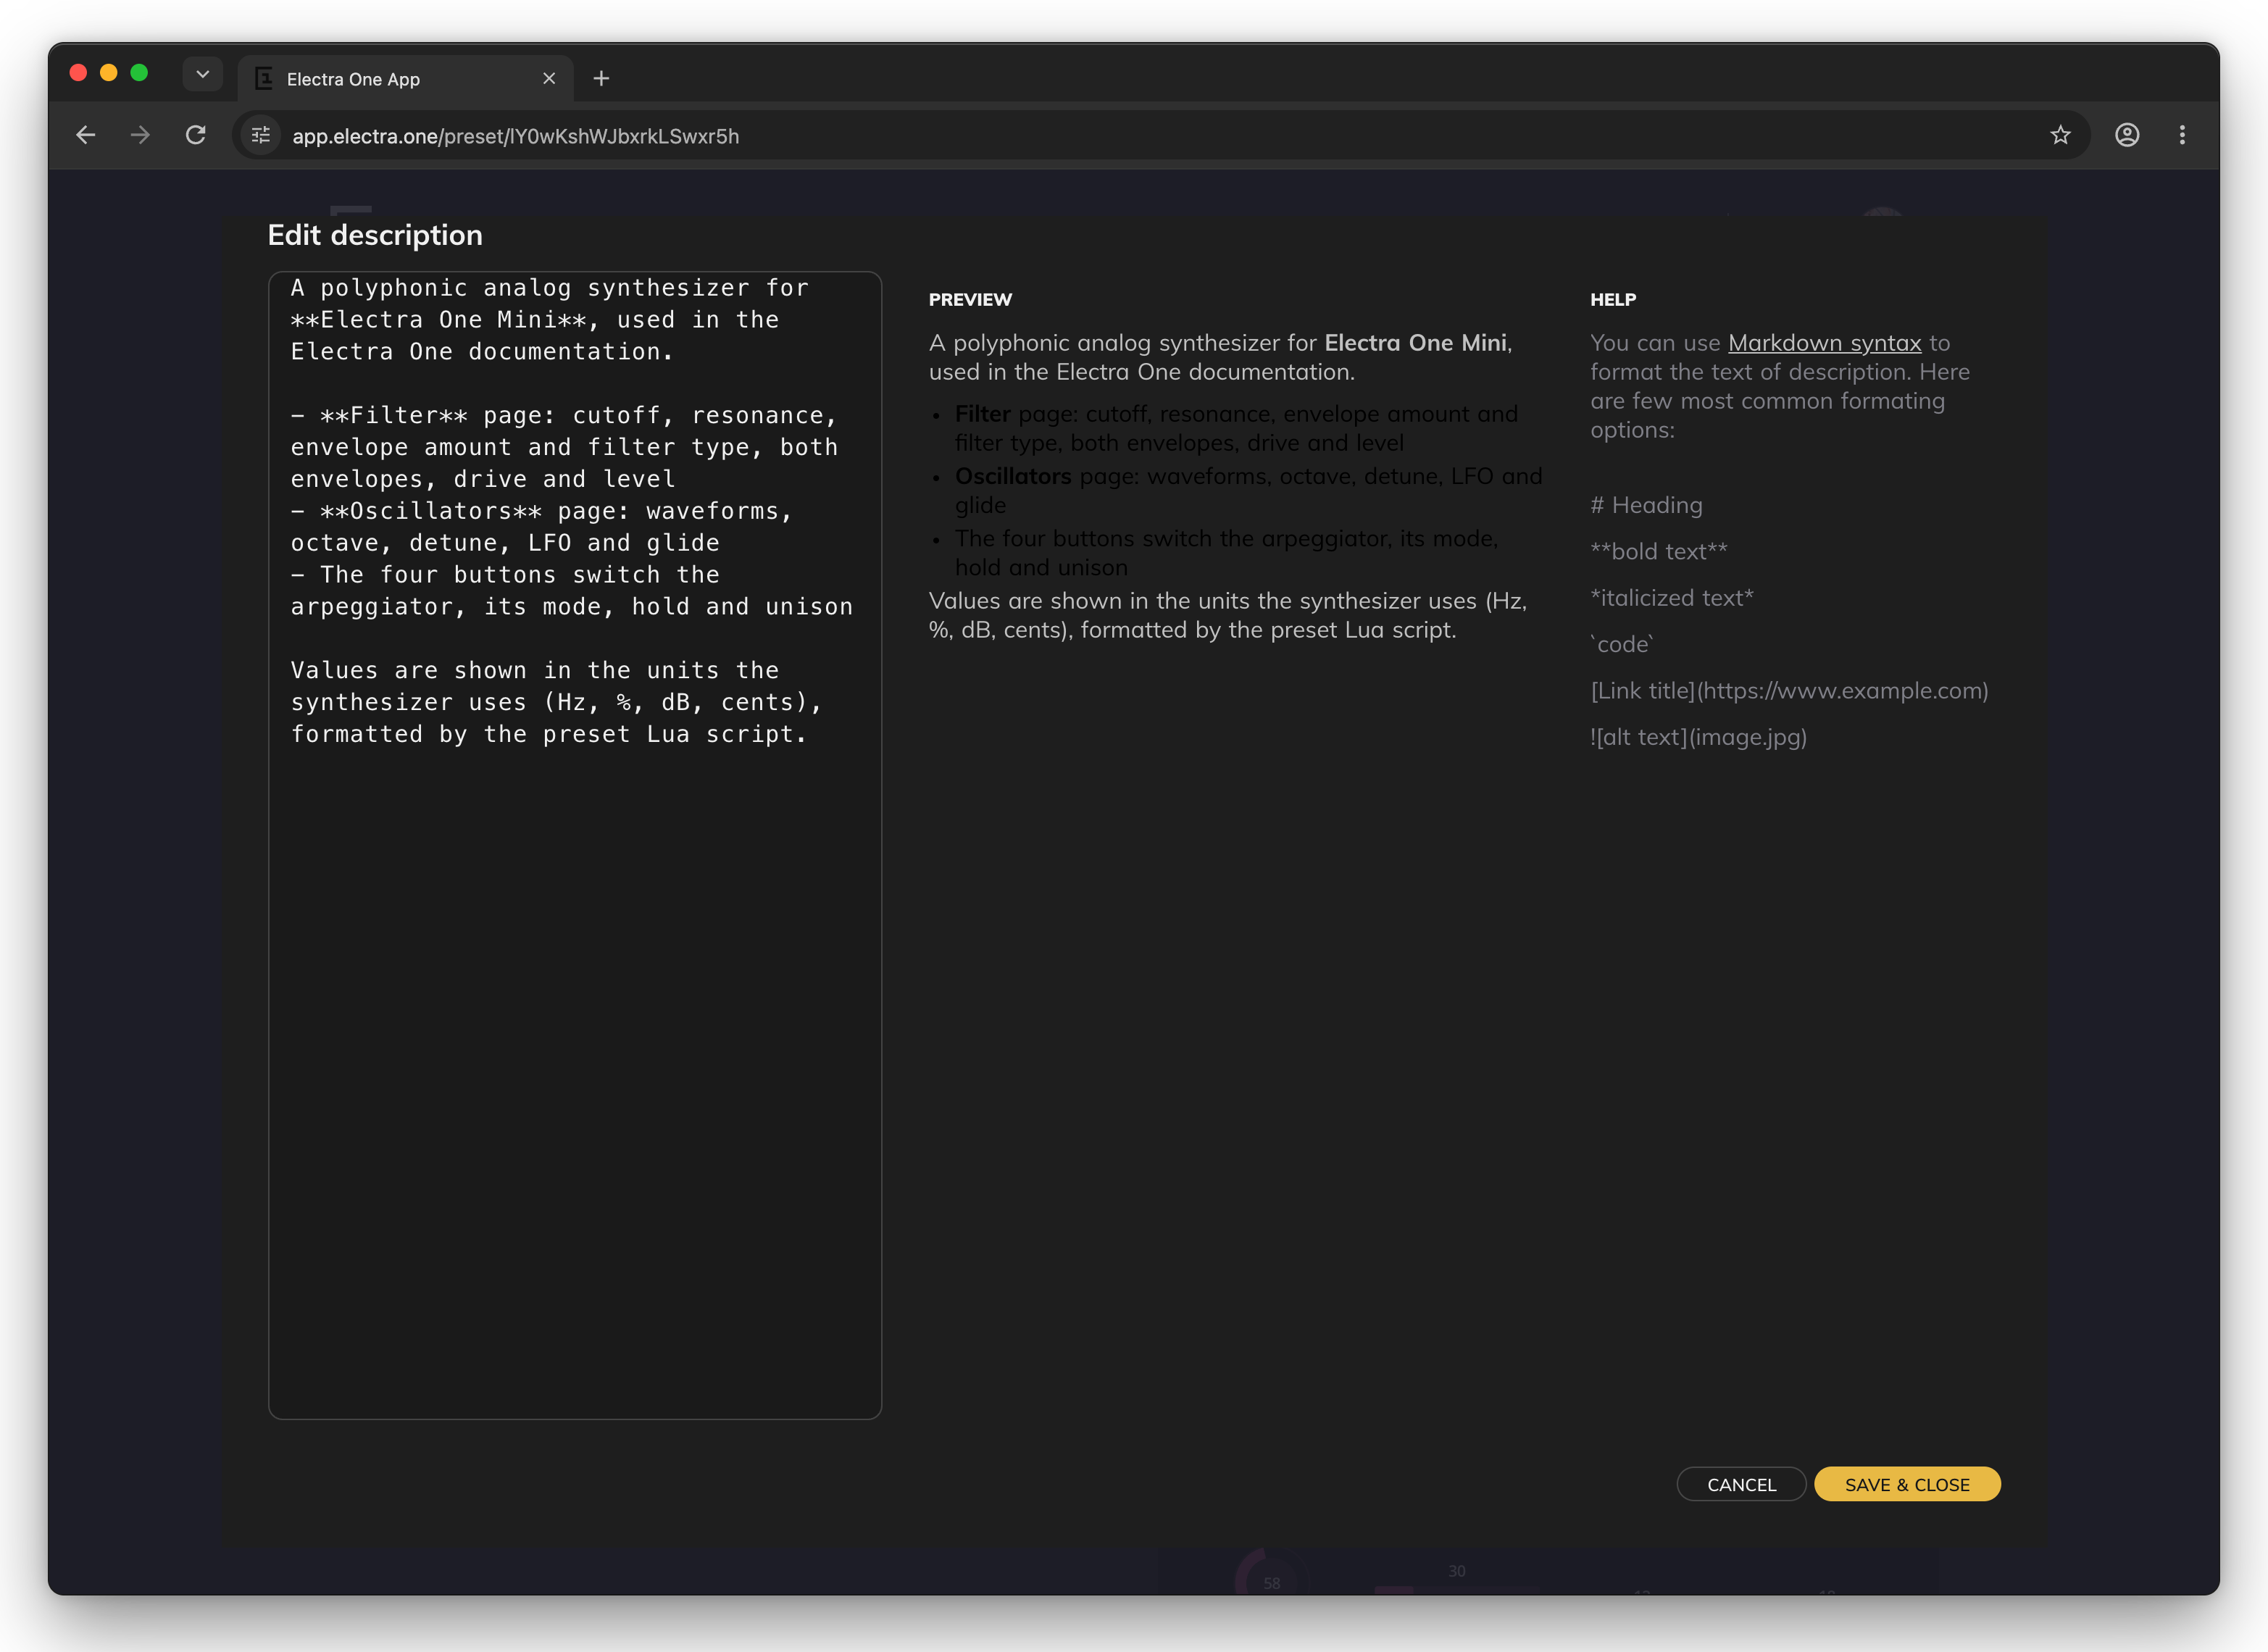
- Description. The pencil opens the description editor. Write on the left, and the middle column shows the result. The description uses Markdown, and the Help column lists the common formatting.
SAVE & CLOSEsaves it,CANCELcloses the editor without saving. - Preset categories. The pencil opens three lists: brand, type and group. Each choice is saved when you make it.
DONEcloses the lists. - Tags. The pencil opens a field for tags. Type a tag and press Enter to add it, click the cross on a tag to remove it. Each change is saved at once.
DONEcloses the field.
Categories and tags are what the filters on My presets and the preset library use, so they help other people find a public preset.
Last modified shows who saved the preset last, and when. Under it, the link project releases and revisions opens the preset's history.
Preset gang
A preset gang lets the owner invite other Electra One users to work on a preset together, as editors who can change it or viewers who can only open it. The gang is shown to its members only. It is a beta feature with quite some potential ahead.
The preset's picture
The picture on the preset cards is normally the drawing of the preset's first page, which the application generates from the preset itself. Nothing needs to be done for it. It is accurate for most presets, because it shows the controls as the preset defines them.
Taking a screenshot is optional. It replaces the drawing with a picture taken on the controller, which shows what the controller really draws. That matters for presets the drawing cannot represent well: presets with custom controls, presets whose Lua script rearranges or hides controls while they run, or presets that draw on the screen themselves. For an ordinary preset the generated drawing is fine, and there is no reason to take one.
To take a screenshot, send the preset to the controller, open the page you want to show, and click TAKE SCREENSHOT on the Preset tab. If the controller shows a different preset, the application asks whether to use the picture anyway. When the preset has a screenshot, the right column starts with the SCREENSHOT panel that shows it. RETAKE SCREENSHOT replaces the picture, and REMOVE in the panel deletes it, after which the cards show the drawing of the first page again.
Under the panel, the page draws every page of the preset with its name.
Snapshots
The Snapshots tab manages the snapshots of the preset. The controller keeps the snapshots, not your account, so the tab needs a connected controller. It shows the snapshots the controller has for this preset, whichever slot the preset is in.
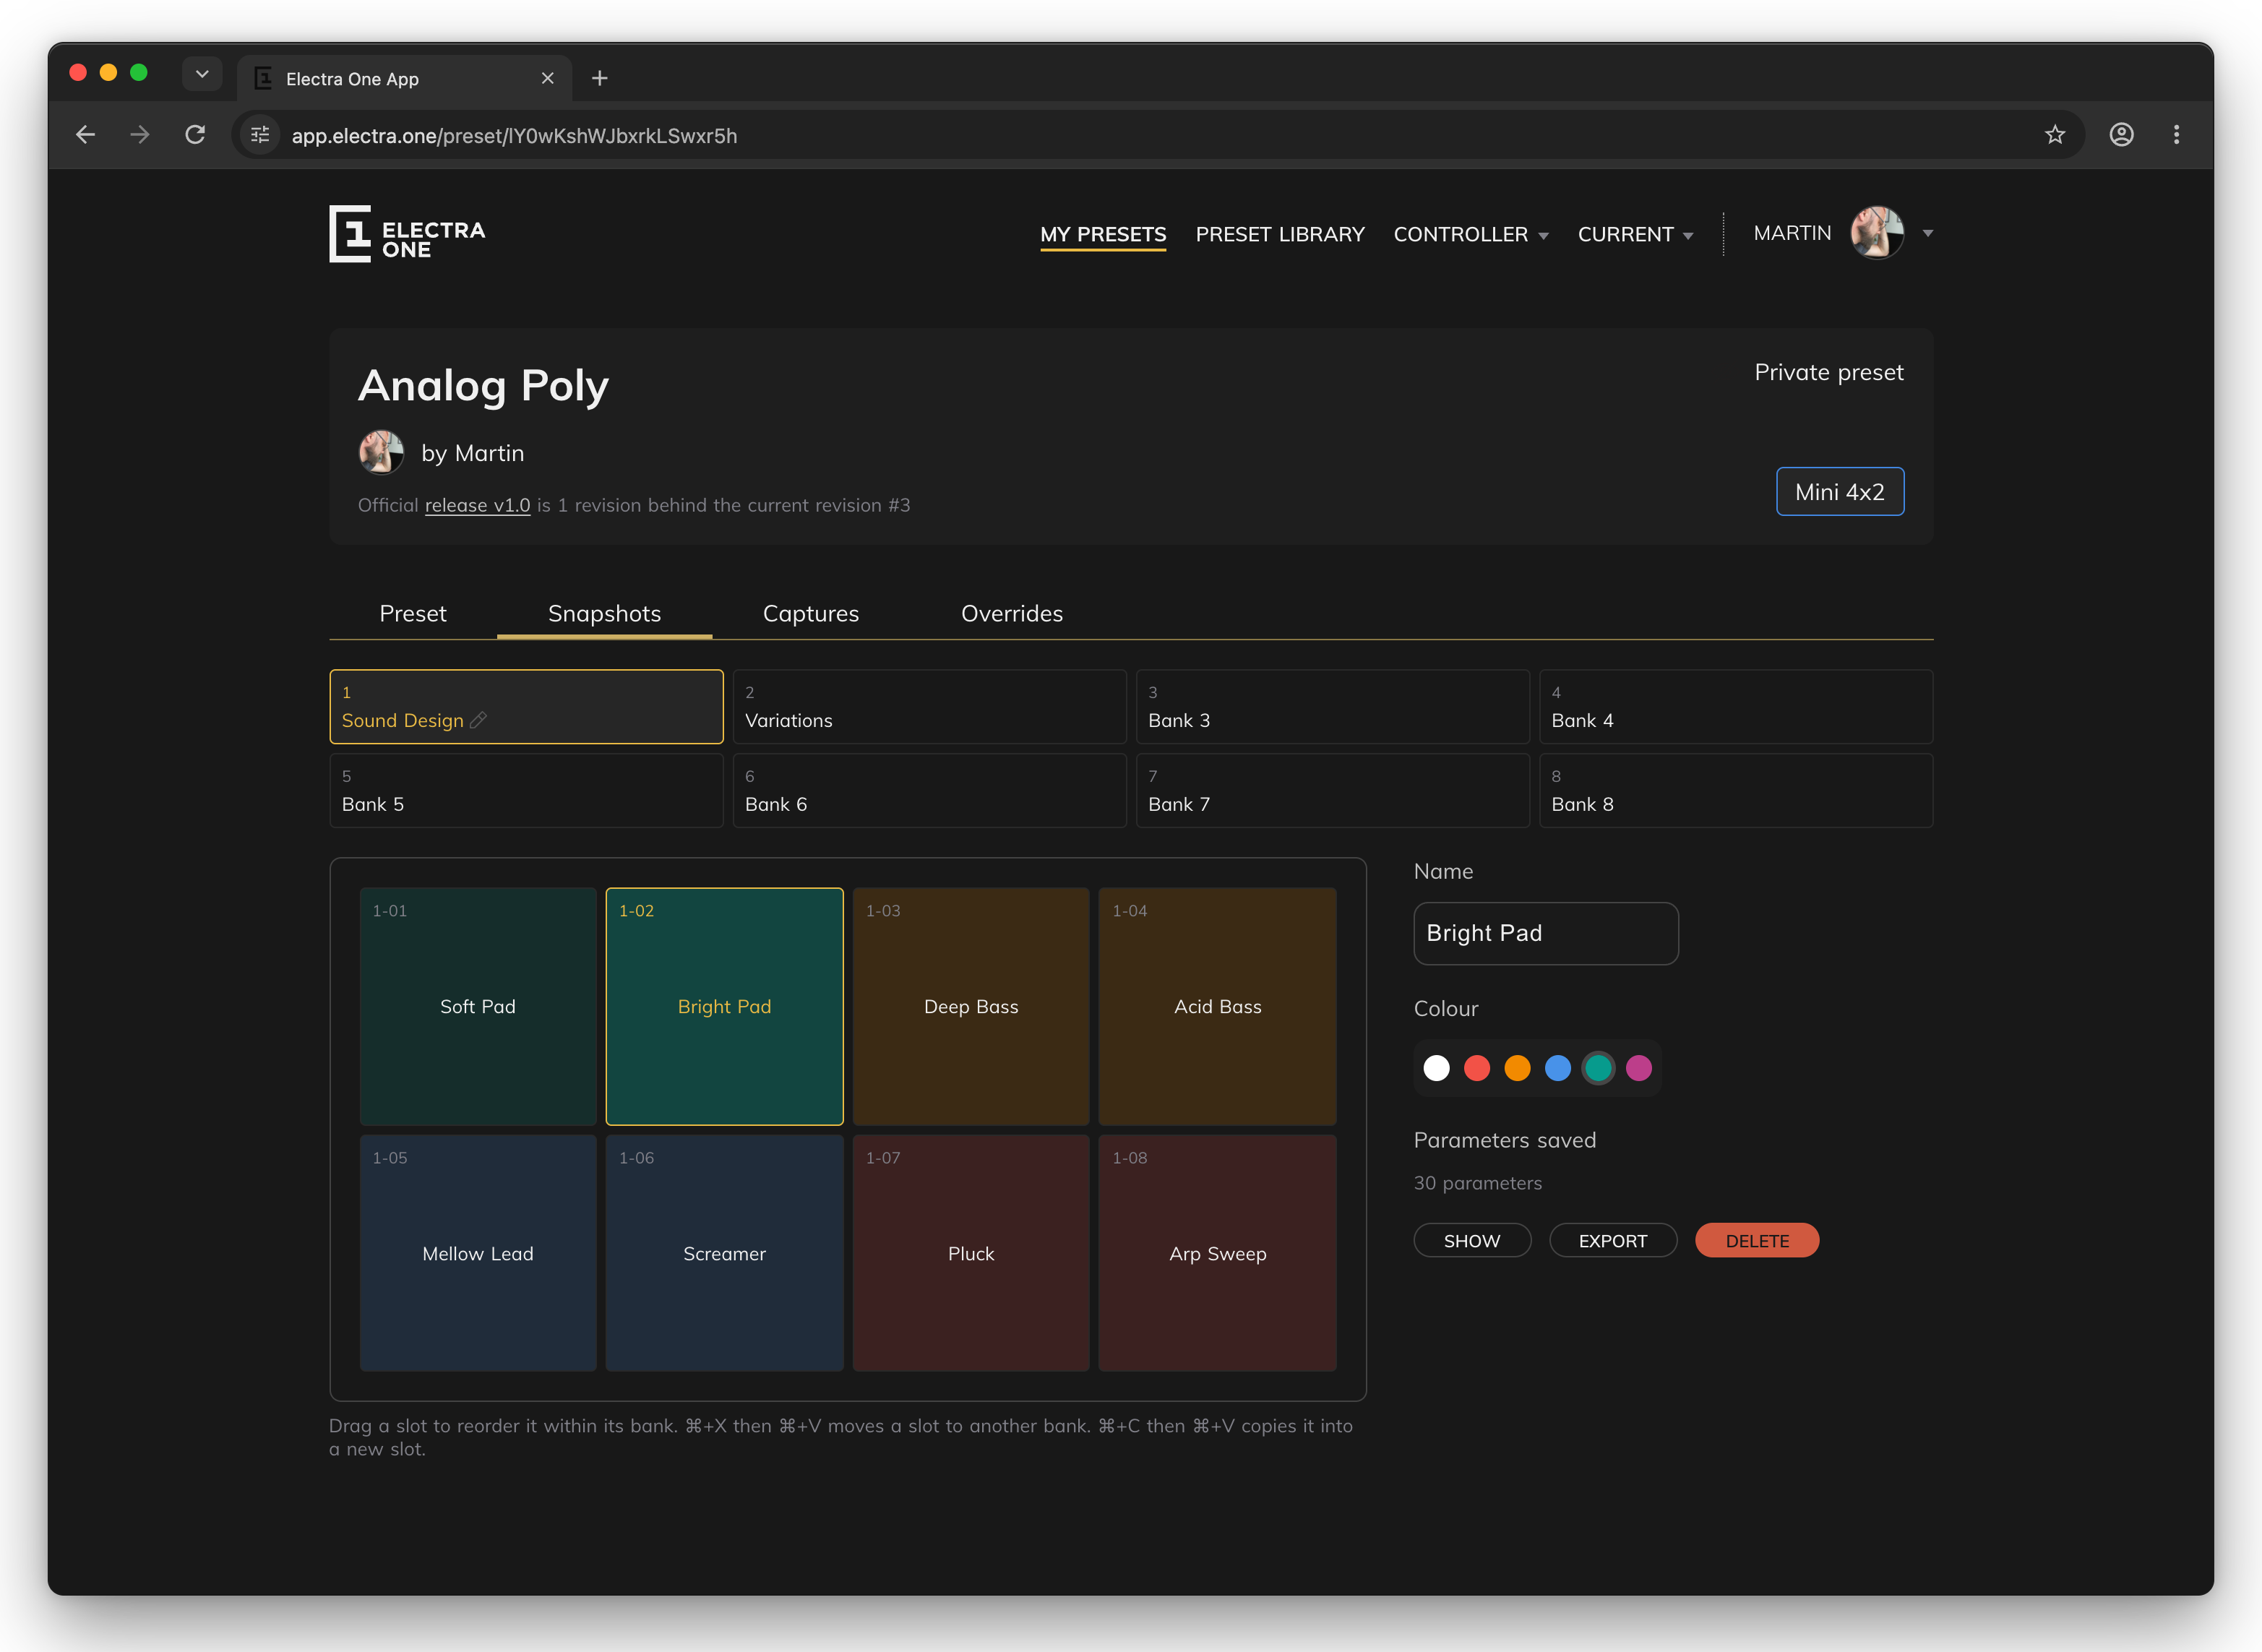
Banks. The row at the top shows the banks. Click a bank to show its slots. The bank you are in has a pencil: click it to rename the bank, and press Enter to save the name. A bank name can have up to 20 characters. Clear the name to return to "Bank 1", "Bank 2" and so on.
Slots. Click a slot to select it. The panel on the right shows its details. You can rearrange snapshots:
- Drag a snapshot onto another slot in the same bank to move it there. If the slot is taken, the two snapshots swap places.
- ⌘X / Ctrl+X, select another slot, even in another bank, and ⌘V / Ctrl+V moves the snapshot there.
- ⌘C / Ctrl+C, select another slot and ⌘V / Ctrl+V copies it. Pasting onto a slot that holds a snapshot asks before overwriting it.
The detail panel of a snapshot has:
- Name and Colour. After a change,
APPLYsaves it to the controller andREVERTgoes back. If you select another slot before applying, the application asks whether to apply or discard the change. - Parameters saved with the number of values the snapshot holds.
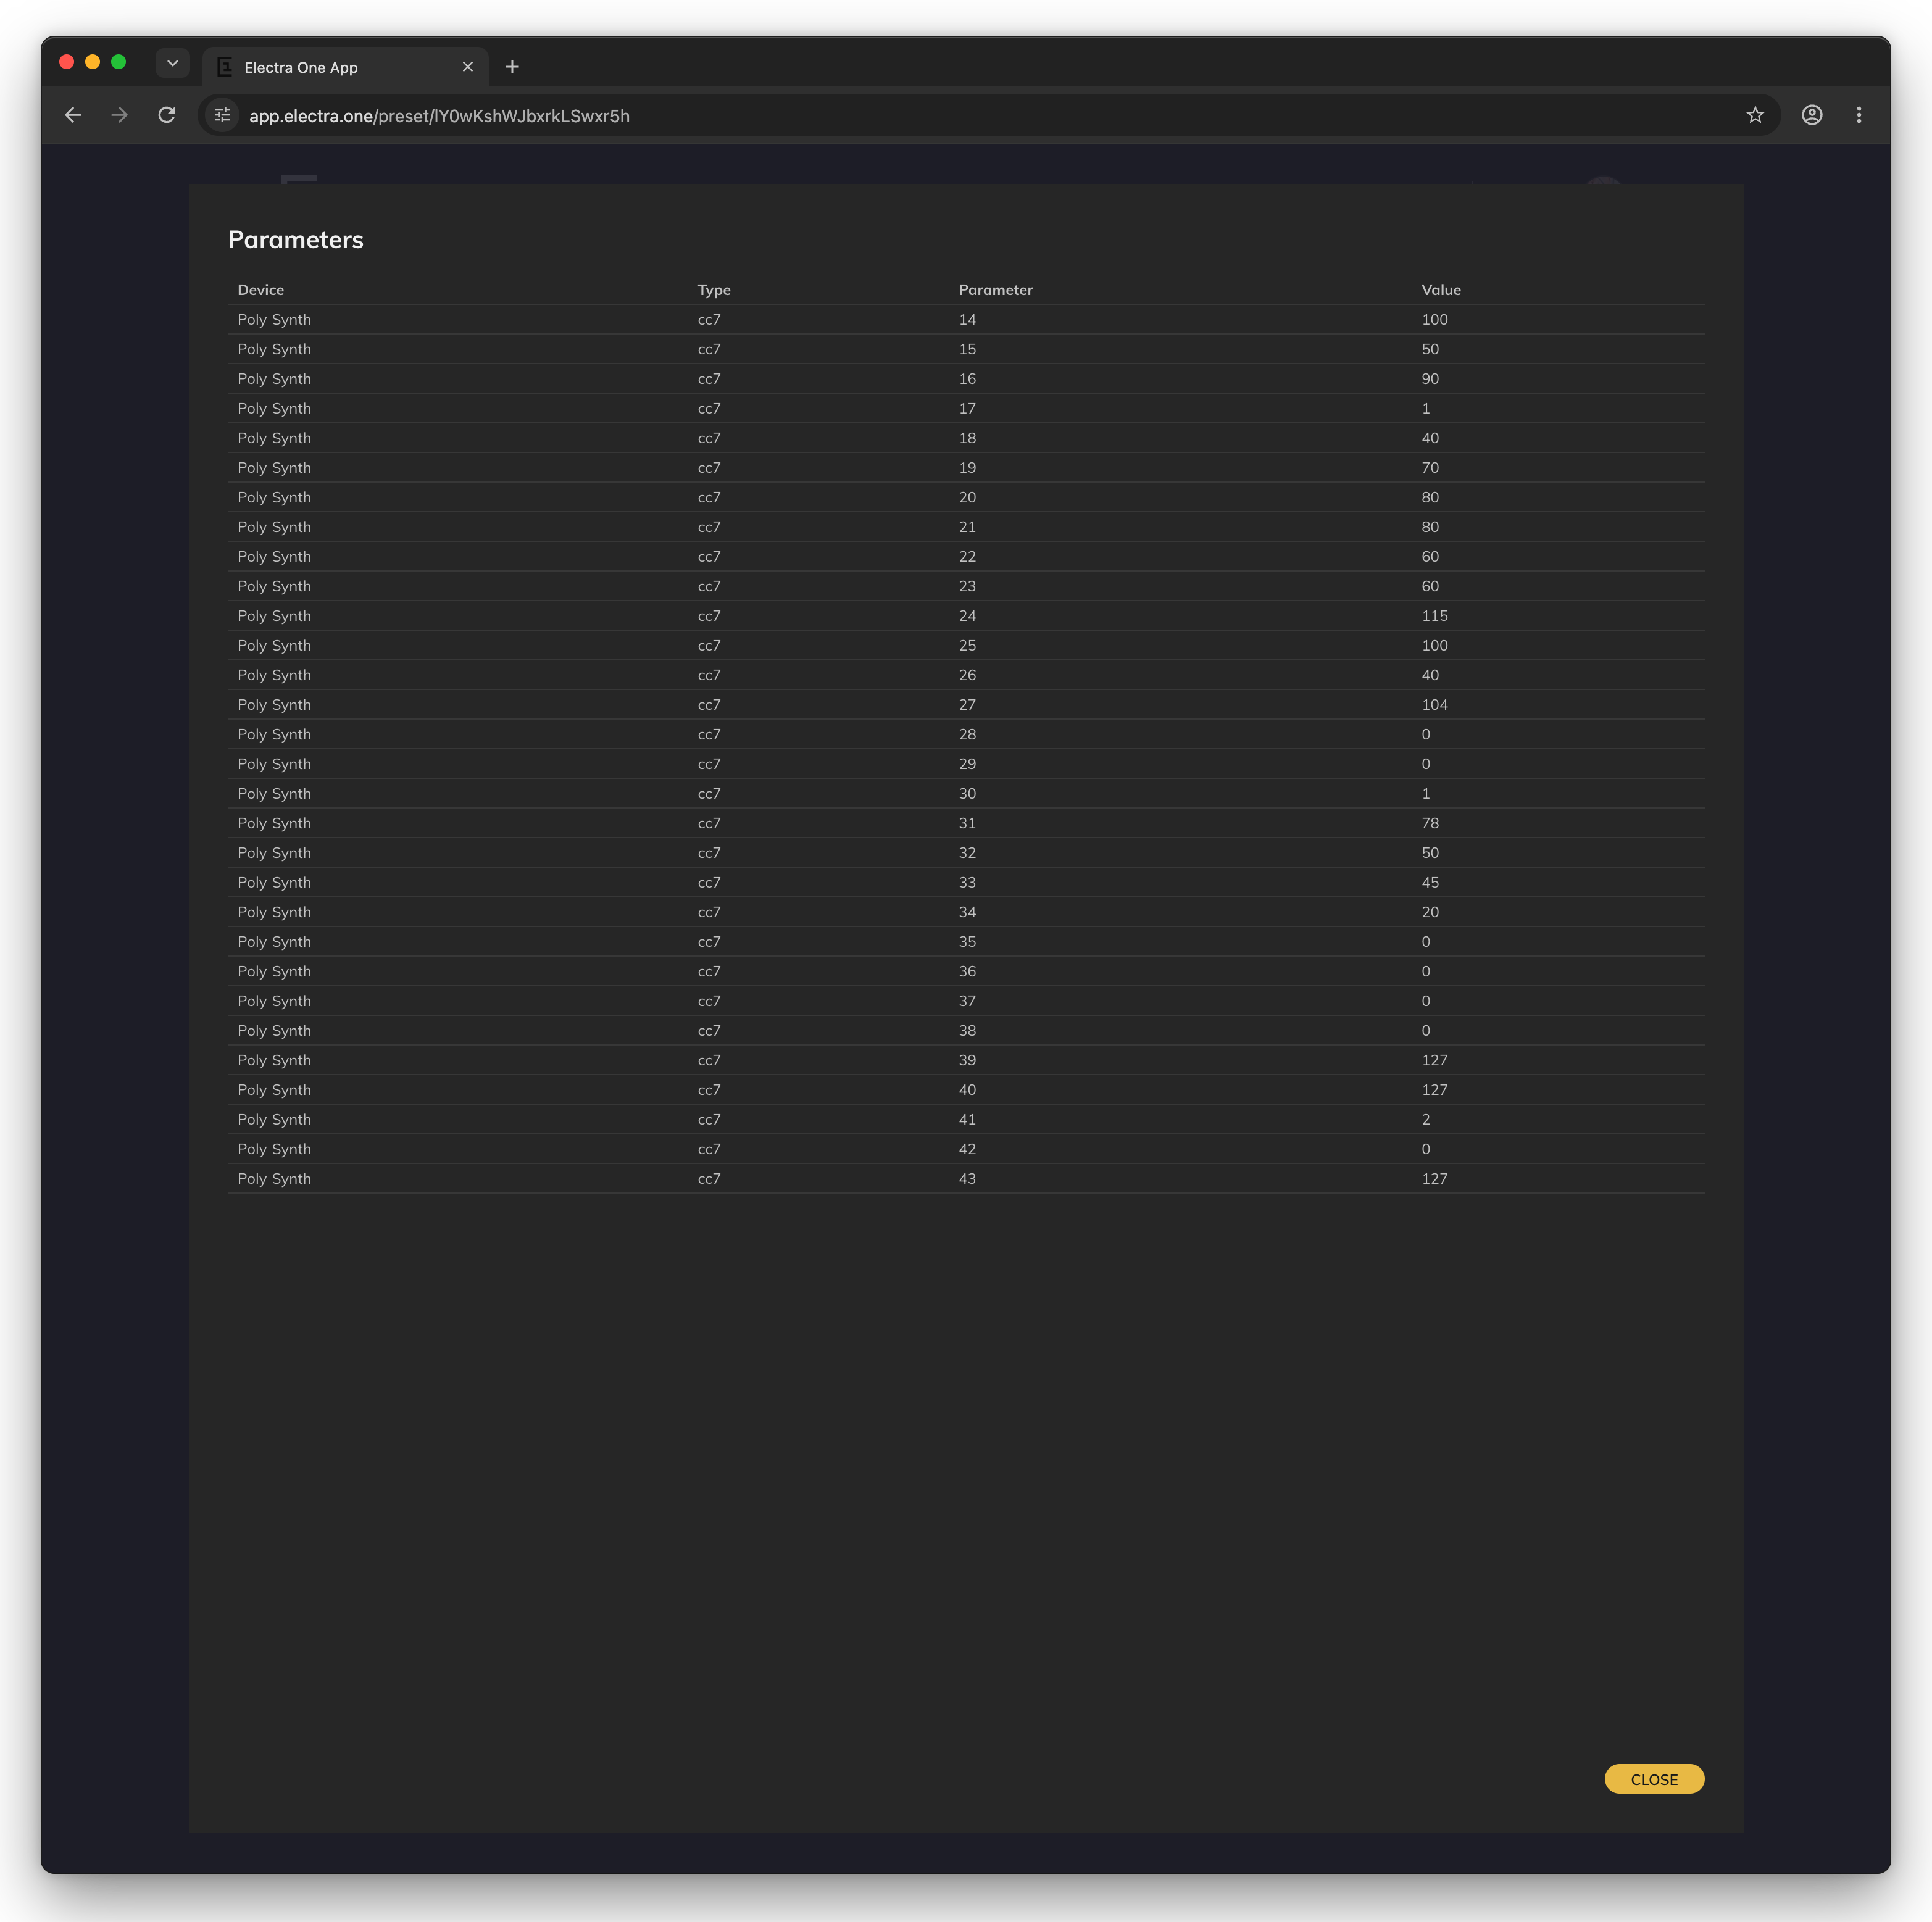
SHOWlists them: device, message type, parameter number and value. EXPORTdownloads the snapshot as a file (.esnap).DELETEasks for confirmation and deletes the snapshot from the controller.
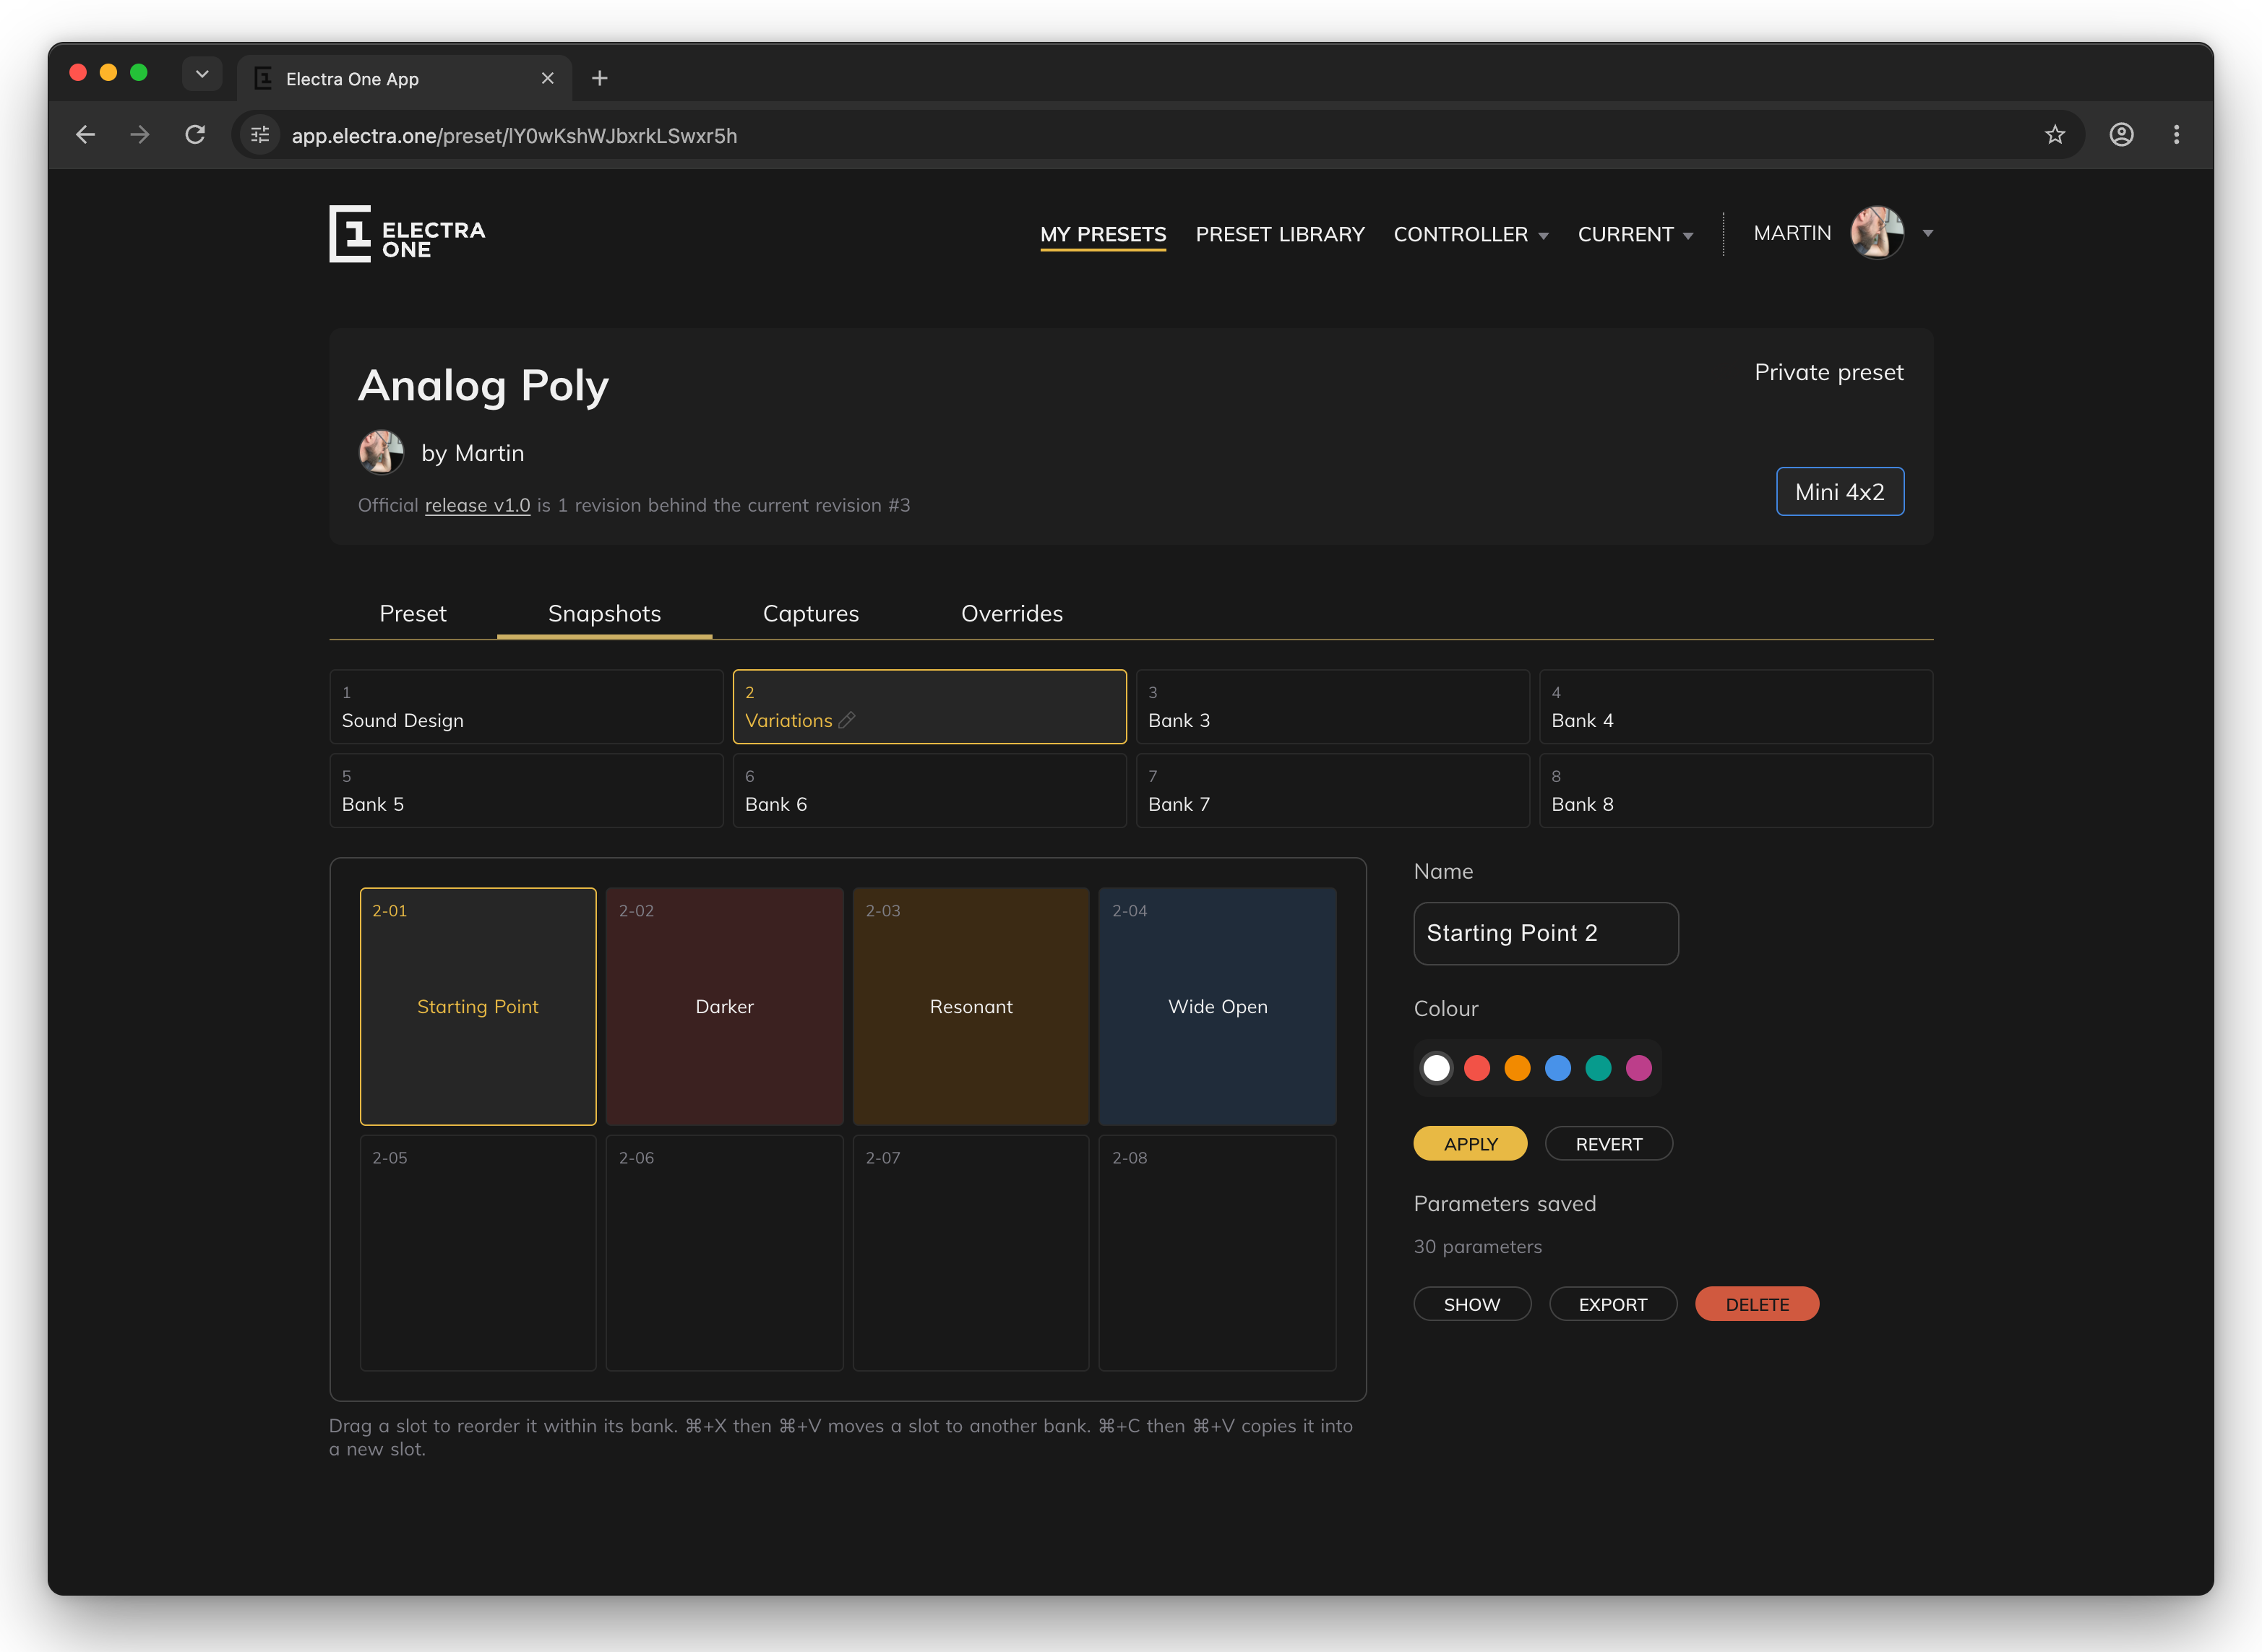
An empty slot shows IMPORT TO SLOT. Choose a snapshot file (.esnap) and it is written into that slot. With EXPORT and IMPORT TO SLOT you can copy a snapshot to another controller, or keep a sound you like as a file.
Captures
The Captures tab manages the captures of the preset in the same way: banks, slots, dragging, cut, copy and paste all work as on the Snapshots tab, and it also needs a connected controller.
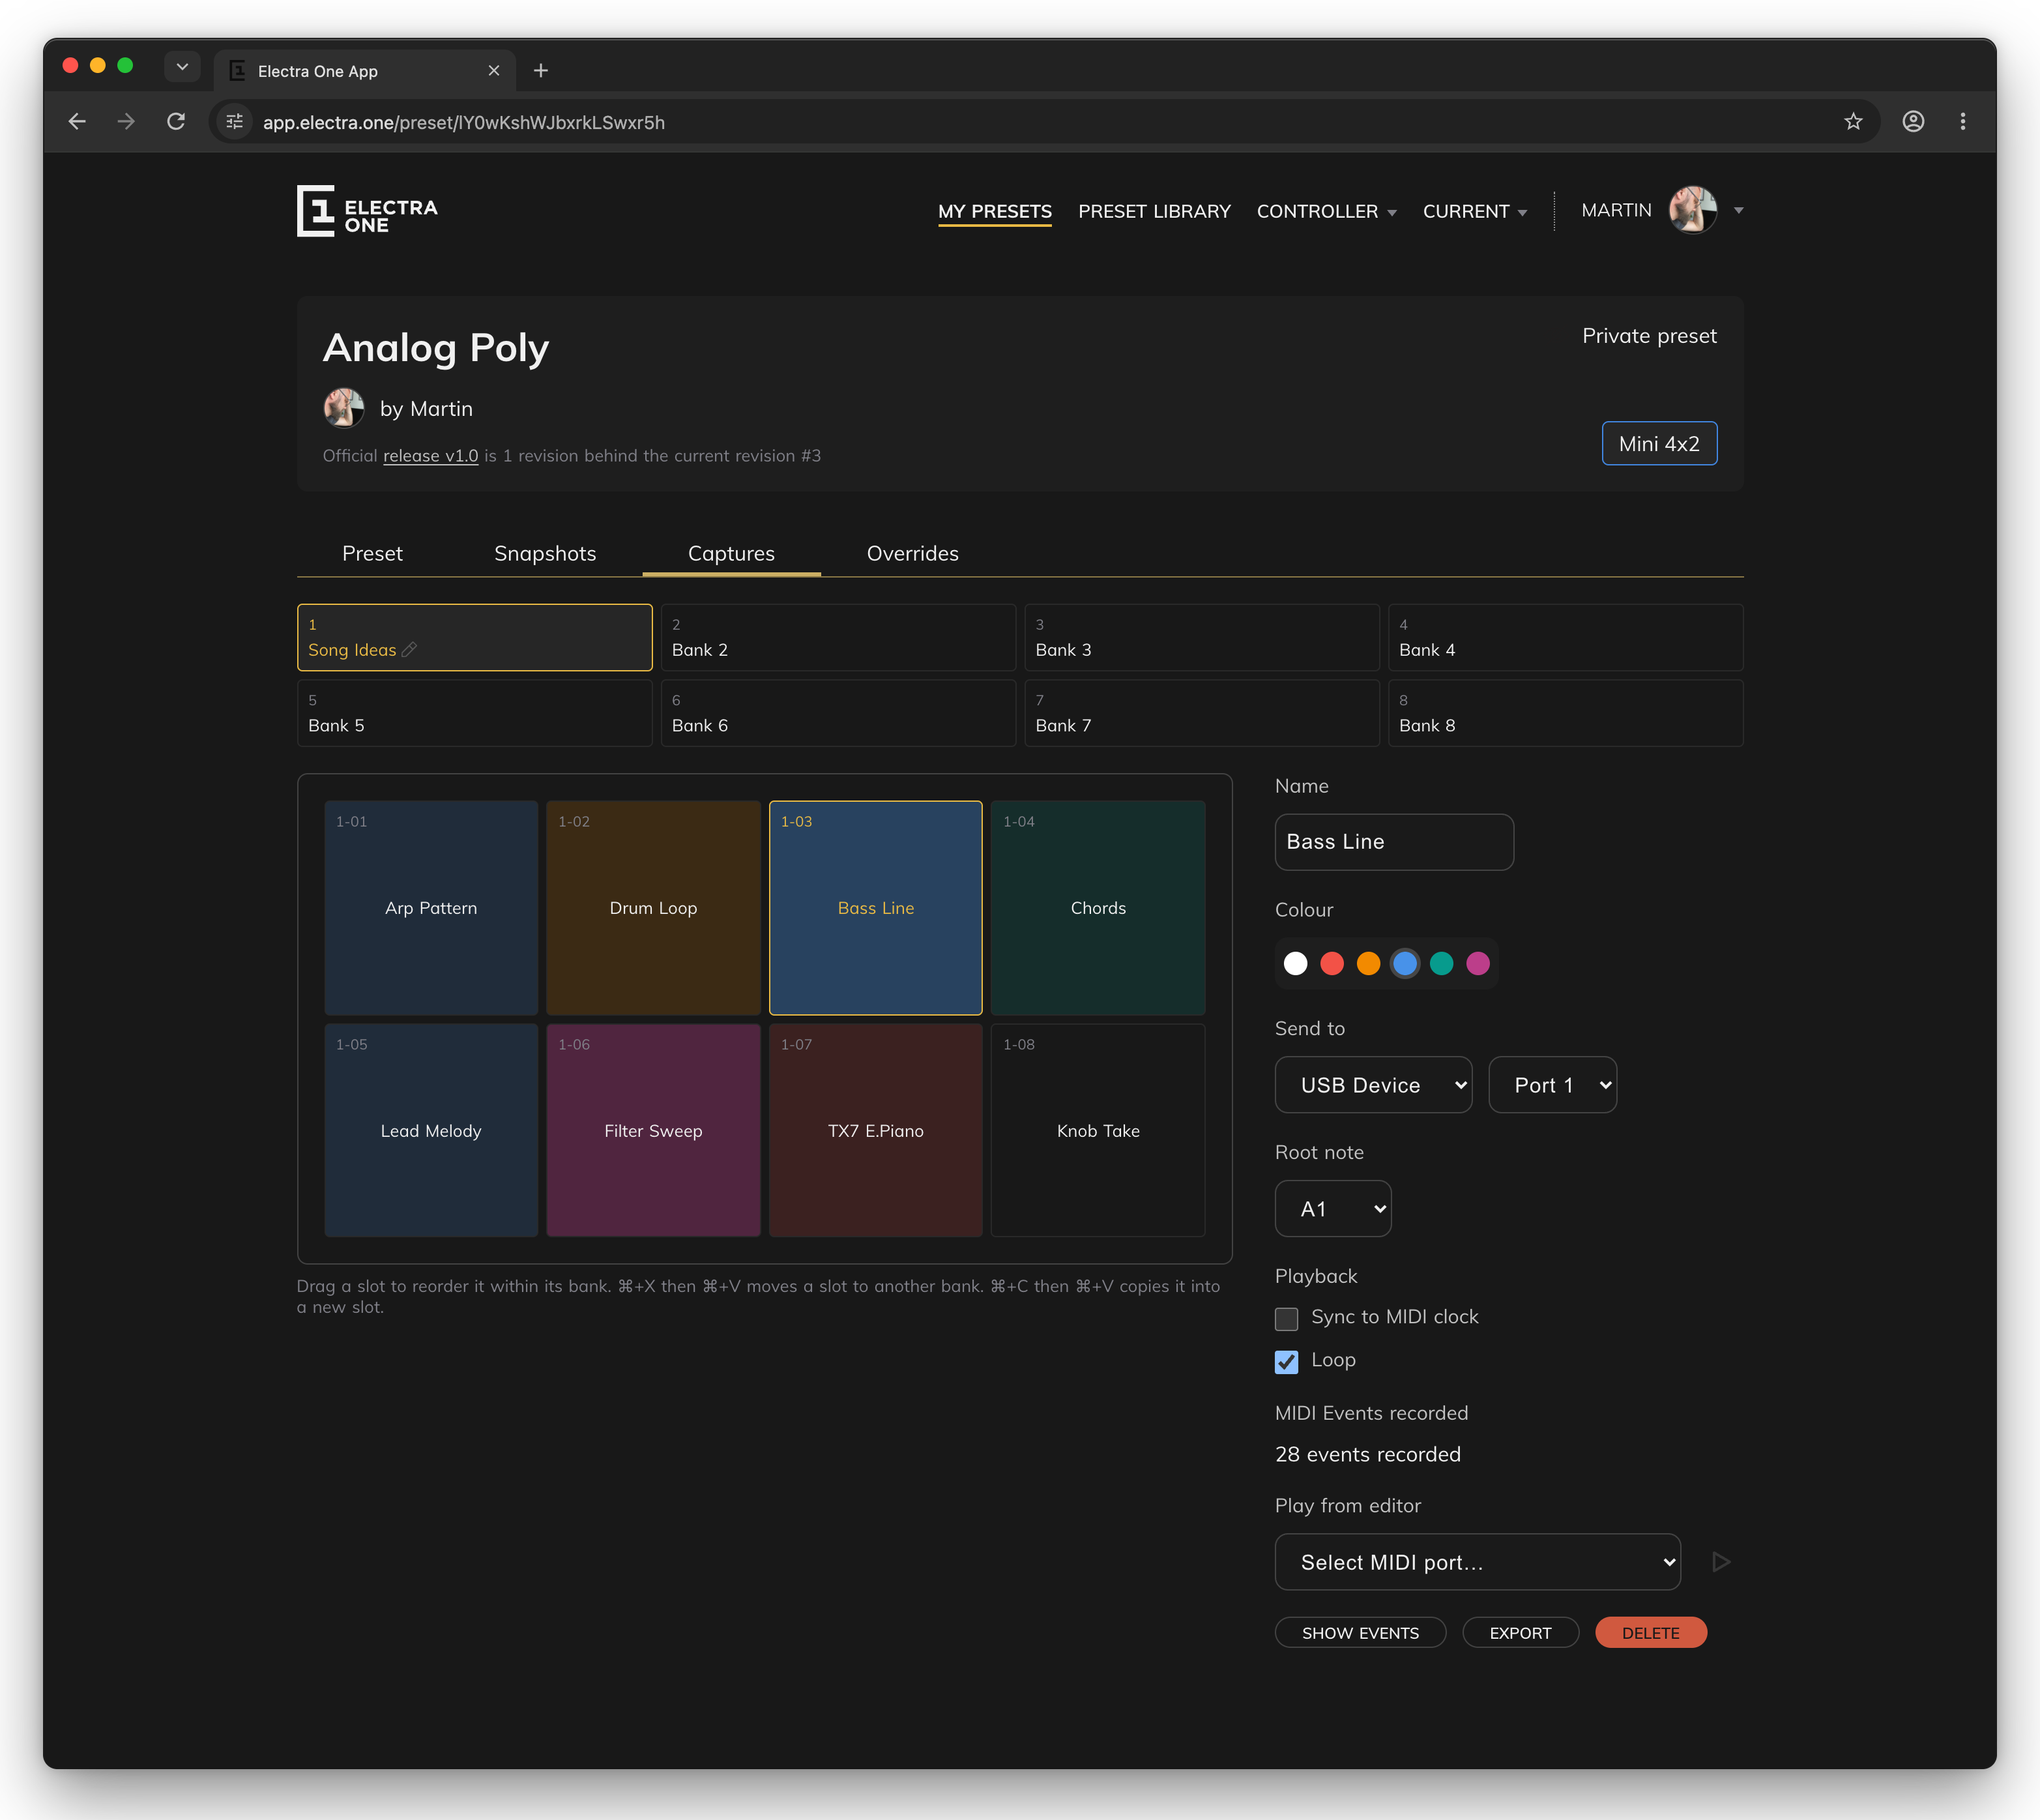
The detail panel of a capture has more settings:
- Name and Colour.
- Send to. The interface (
USB Device,USB Host,MIDI IOorAll interfaces) and port (Port 1,Port 2orCtrl) the capture plays to. - Root note. The key the capture was recorded in, used when transposing.
- Playback.
Sync to MIDI clockmakes the capture follow the MIDI clock of another device.Loopplays it again from the start when it ends. APPLYandREVERT, as for snapshots.- MIDI Events recorded with the number of events.
SHOW EVENTSlists them with their times. - Play from editor. Choose one of the computer's MIDI outputs and click the play button. The capture plays from the browser, not from the controller, so you can listen to it on an instrument connected to the computer. The button stops it again.
EXPORTdownloads the capture as a Standard MIDI File (.mid), which a DAW or MIDI editor can open.DELETEasks for confirmation and deletes the capture from the controller.
An empty slot shows IMPORT TO SLOT. Choose a MIDI file (.mid) from the computer, and it is written into the slot as a capture.
Overrides
The Overrides tab changes the port, channel and interfaces that the preset's devices use on your controller, without changing the preset. It is explained in Device overrides.
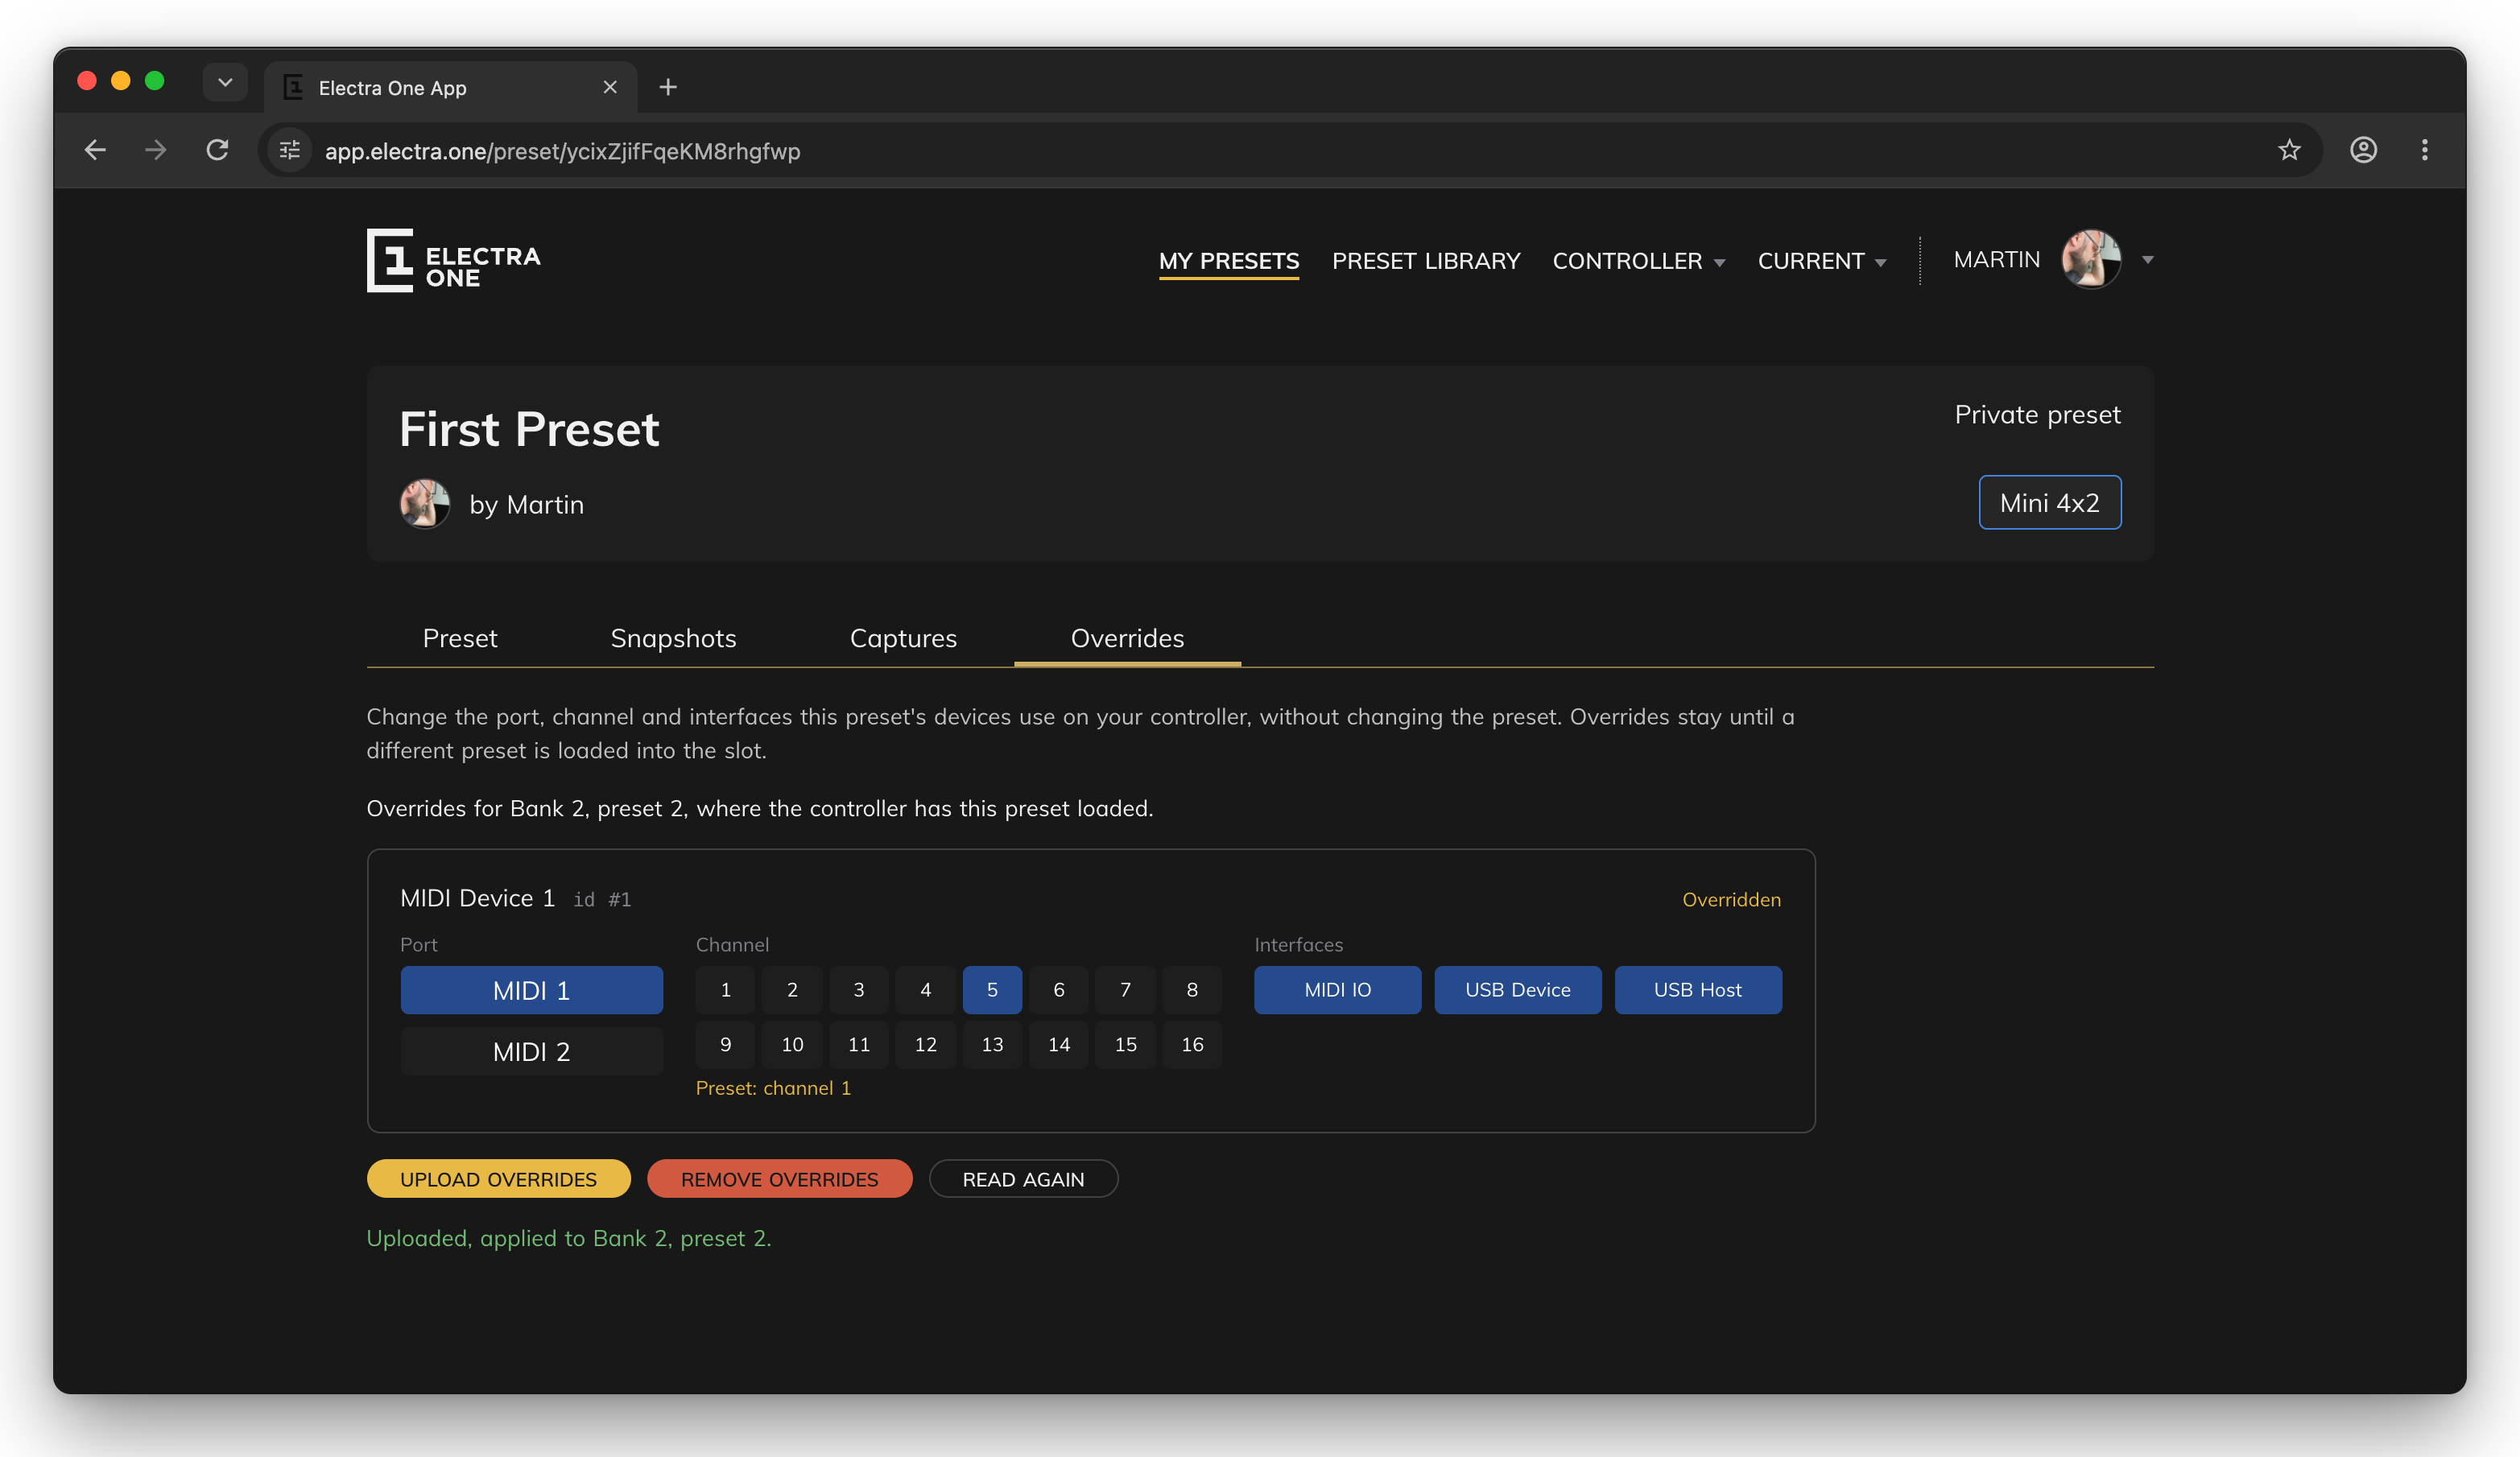
The tab works on the controller's current slot, and only when that slot holds this preset. The line above the devices says which slot it is, or what to do first. Each device the preset sends to has a row with Port, Channel and Interfaces. A changed value is marked Overridden, and the preset's own value is shown under it.
UPLOAD OVERRIDESsends the changes to the controller. They take effect at once.REMOVE OVERRIDESdeletes the overrides from the controller. Click it a second time to confirm. The preset is loaded again with its own settings.READ AGAINreads the overrides from the controller again.
Revisions and releases
Every preset in your account keeps a history. The history lets you go back to an earlier version, and releases let you decide which version other people get.
Revisions
A revision is a saved version of the preset. When you save a preset in the Preset Editor, the editor asks for a short description of the change:
- Save with a description, and the application records a new revision with that description.
- Save with an empty description, and the preset is saved, but no revision is recorded.
The application also records a revision by itself when you close the editor with unsaved changes, and when you send a changed preset to the controller from the editor. Those revisions are described as "Saved automatically".
Releases
A release is a revision you have marked with a version number, such as 1.0 or 1.1, a short description and release notes. It works like a firmware release: at some point you decide that a version is finished and tested, give it a number, and write down what is in it.
One release can be the official release. It decides what other people get when the preset is public:
- Everybody outside the preset's gang gets the official release. That is what the preset library shows, what
SEND TO ELECTRAsends, whatCOPY TO YOUR PRESETScopies and what the downloads contain. The cards show its version after the name. - You, and the members of the preset's gang, always work on the latest version.
This is what makes releases useful:
- You can work on a public preset without disturbing its users. Save as often as you like. People using the preset keep the version you released until you release a new one and make it official.
- Users know what they have. The version number on the card and the release notes tell them what changed, and whether it is worth sending the new version to their controller.
- You can go back. If a new release has a problem, make the previous release official again, and everybody gets the older version at once.
A preset without an official release, or a private preset, gives everybody who can see it the latest version.
TIP
After making a release official, your later saves are not seen in the preset library until you release again. When a change should reach users, mark the new revision as a release and make it official.
The history page
Open the history with the project releases and revisions link on the Preset tab. Back to project returns to the preset.
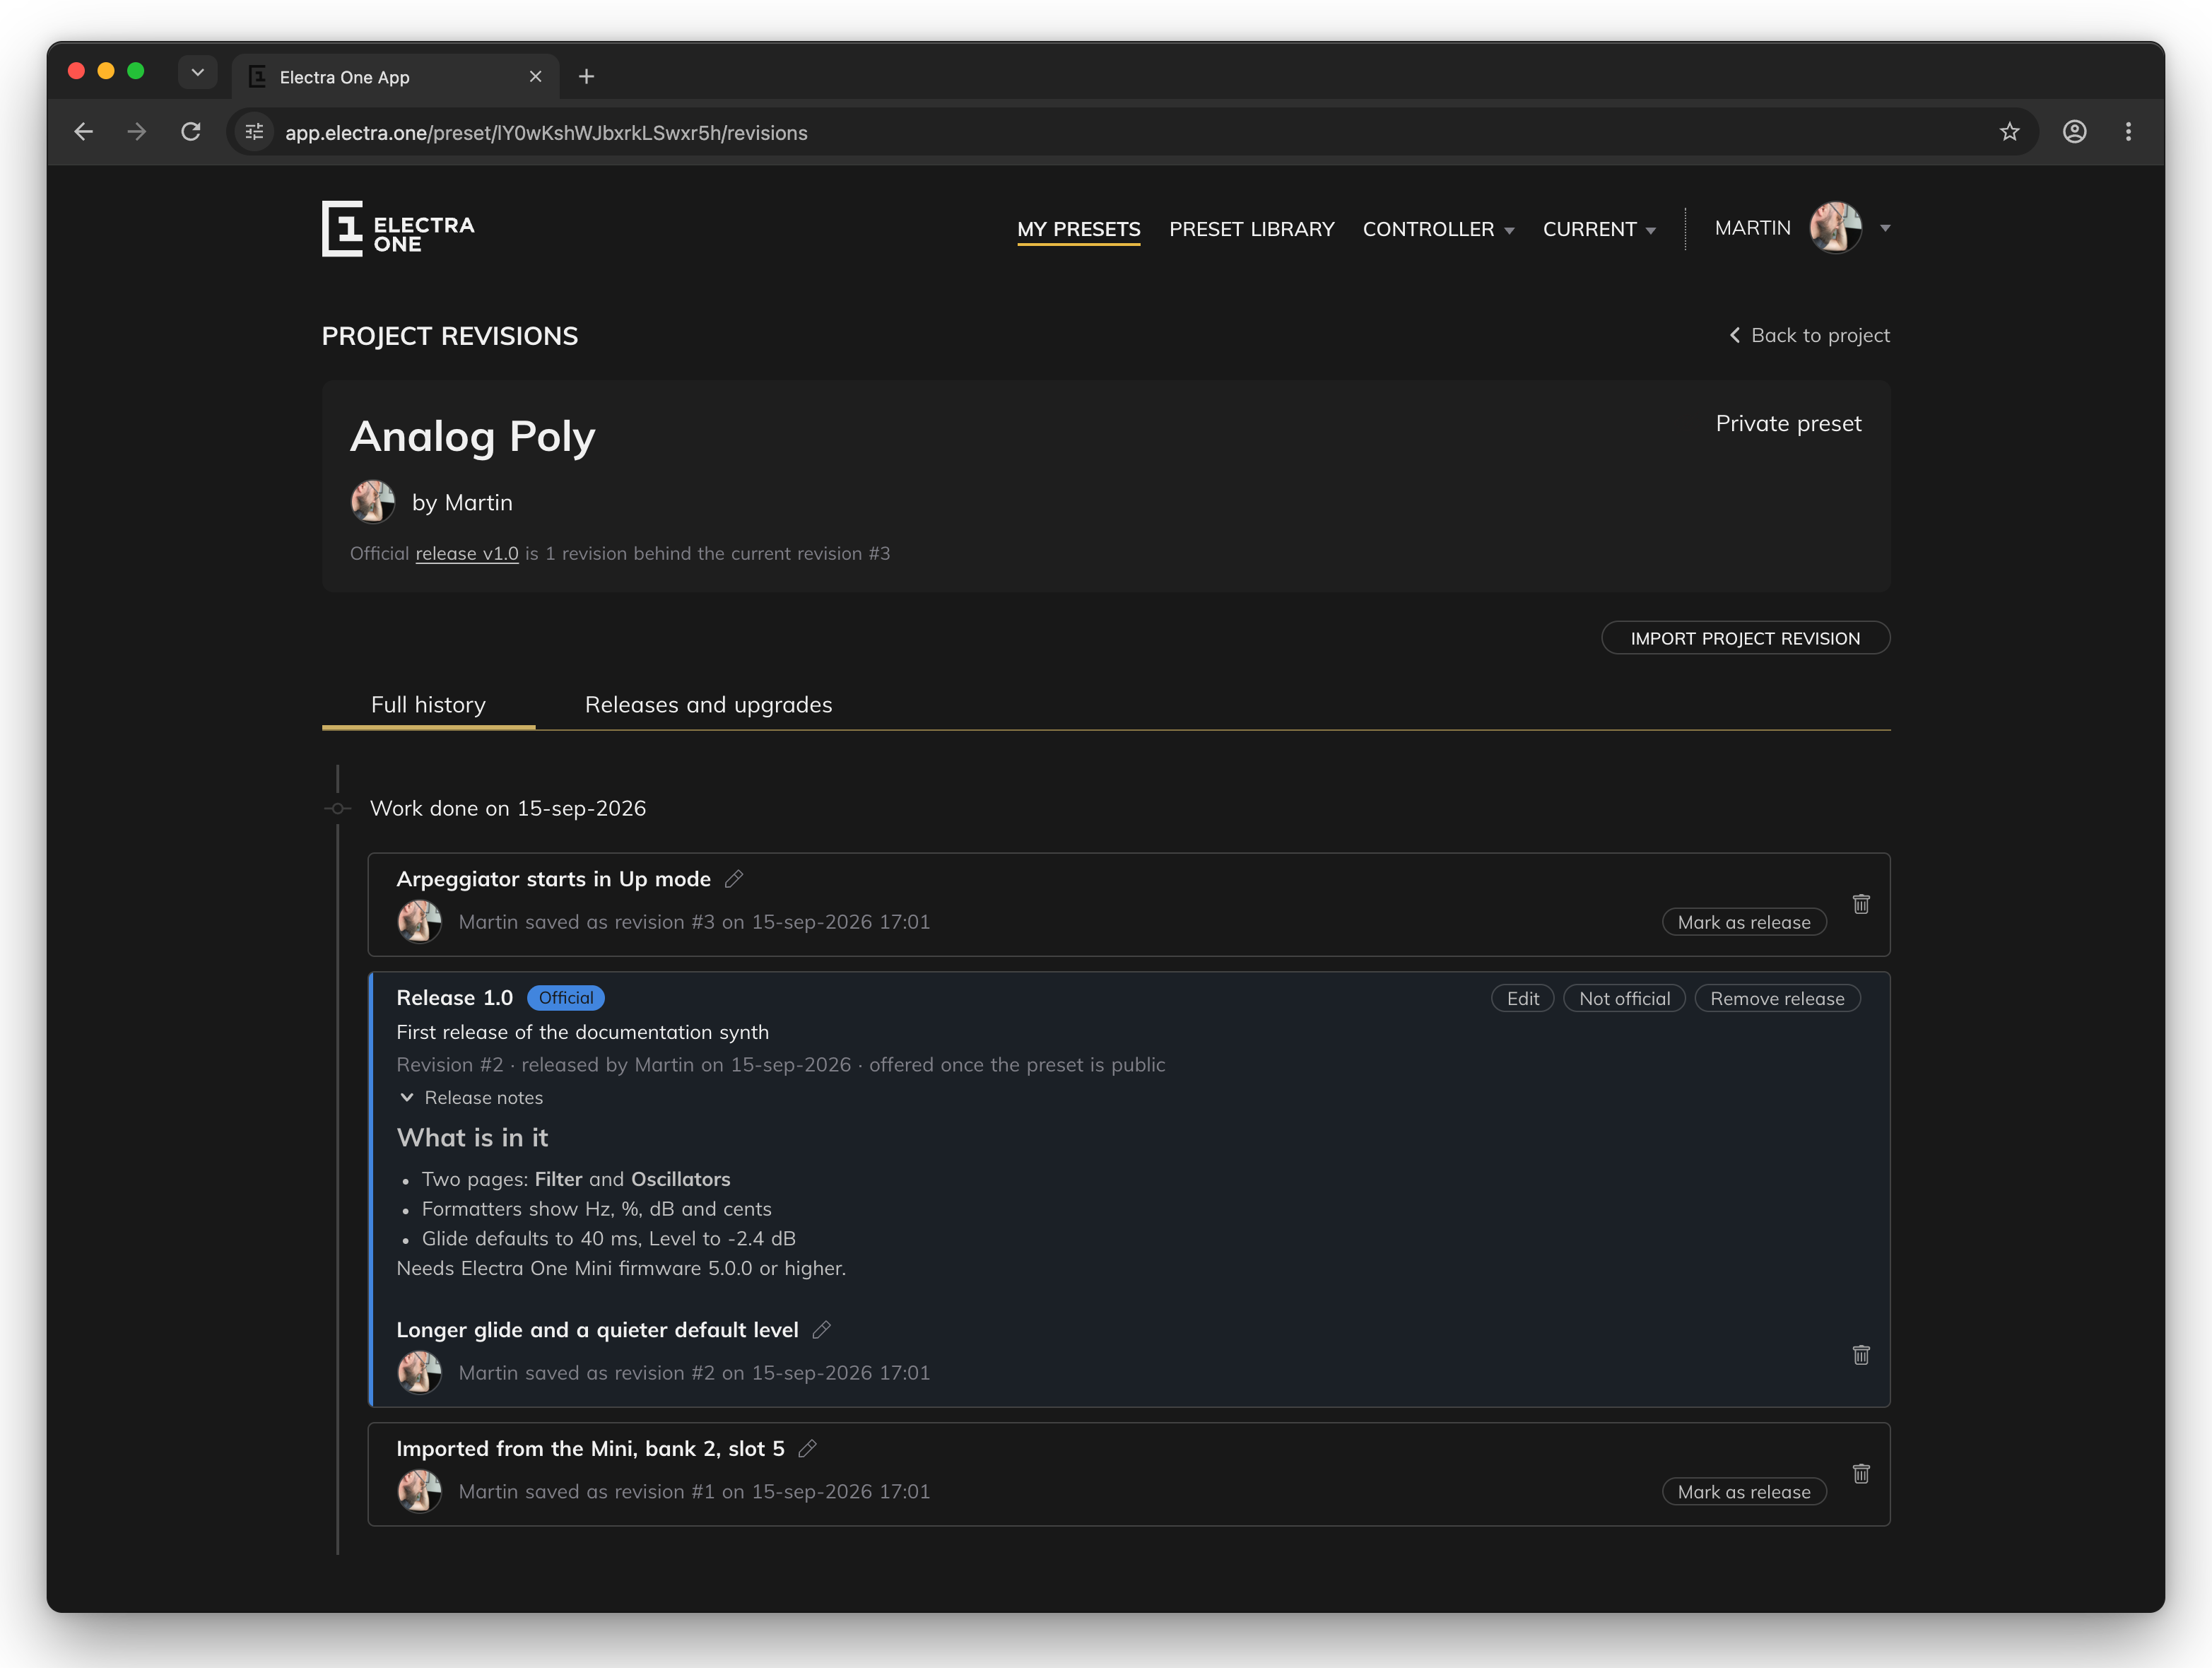
The page has two tabs. Full history lists every revision, newest first, grouped by the day the work was done. Releases and upgrades lists only the releases and the preset format upgrades.
Each revision shows its description, who saved it and when:
- The pencil after the description lets you change the description. Click outside the field to save it.
Mark as releaseopens the release dialog for this revision.- The trash icon deletes the revision. Deleting the latest revision turns the preset back into the revision before it. Both are confirmed first. The only revision of a preset cannot be deleted.
- Clicking the revision opens the revision page.
A release is shown as a highlighted block with its version, an Official badge when it is the official release, its short description and its release notes:
Editopens the release dialog to change the version, description or notes.Make officialmakes this the official release.Not officialstops offering it, so everybody gets the latest version again.Remove releaseremoves the release. The revision stays in the history.
Only the owner can make a release official or change the official release.
A format upgrade entry marks the point where the preset was converted to a newer preset format. Controllers with older firmware may not load the preset after that point. The entry says which firmware is needed.
IMPORT PROJECT REVISION, above the tabs, is for the owner. It reads a project or preset file from the computer, makes it the preset's latest version and records it as a revision called "Imported revision". Use it to bring back a version you downloaded earlier, or to put work done in a copy back into the original preset.
The release dialog
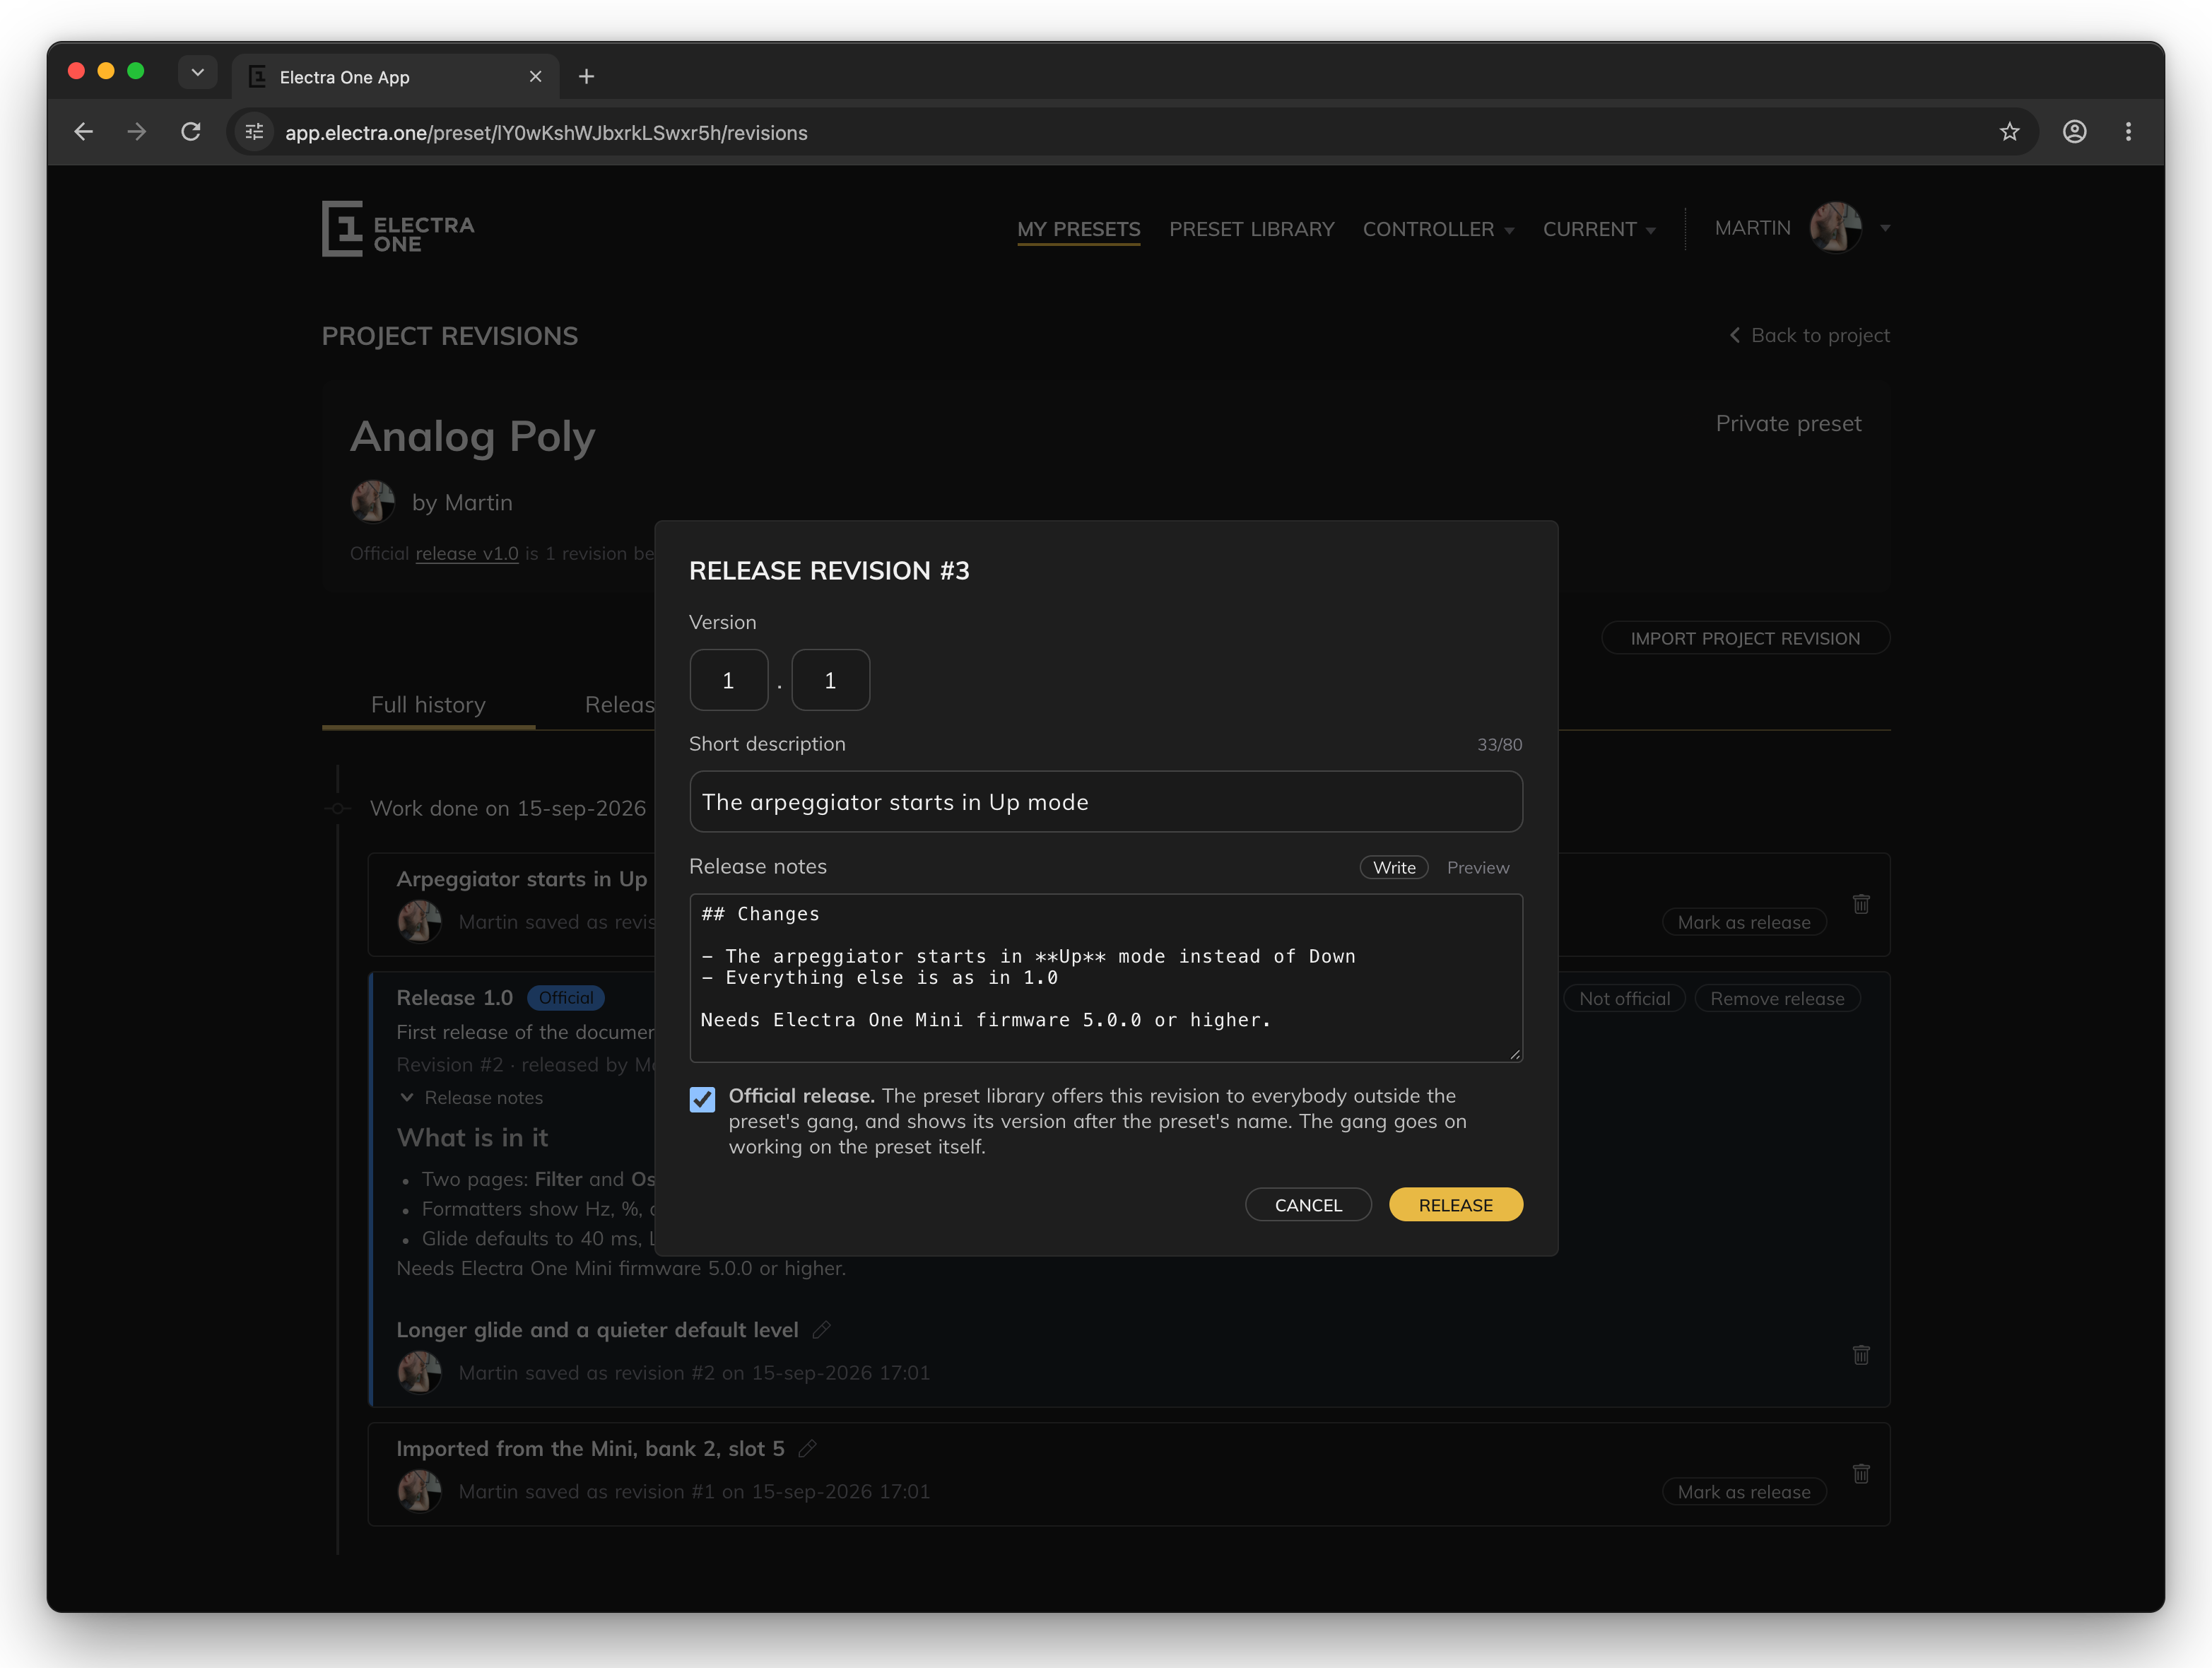
- Version. A major and a minor number. The dialog suggests the next free version. Each release needs its own version, and a later revision needs a higher version than an earlier one.
- Short description. Up to 80 characters.
- Release notes. Markdown.
WriteandPreviewswitch between the text and how it looks. - Official release. Makes this release the official one straight away.
RELEASEsaves the release,CANCELcloses the dialog.
A revision detail
The revision page shows one revision: its description, when it was saved, its release if it has one, and its pages.
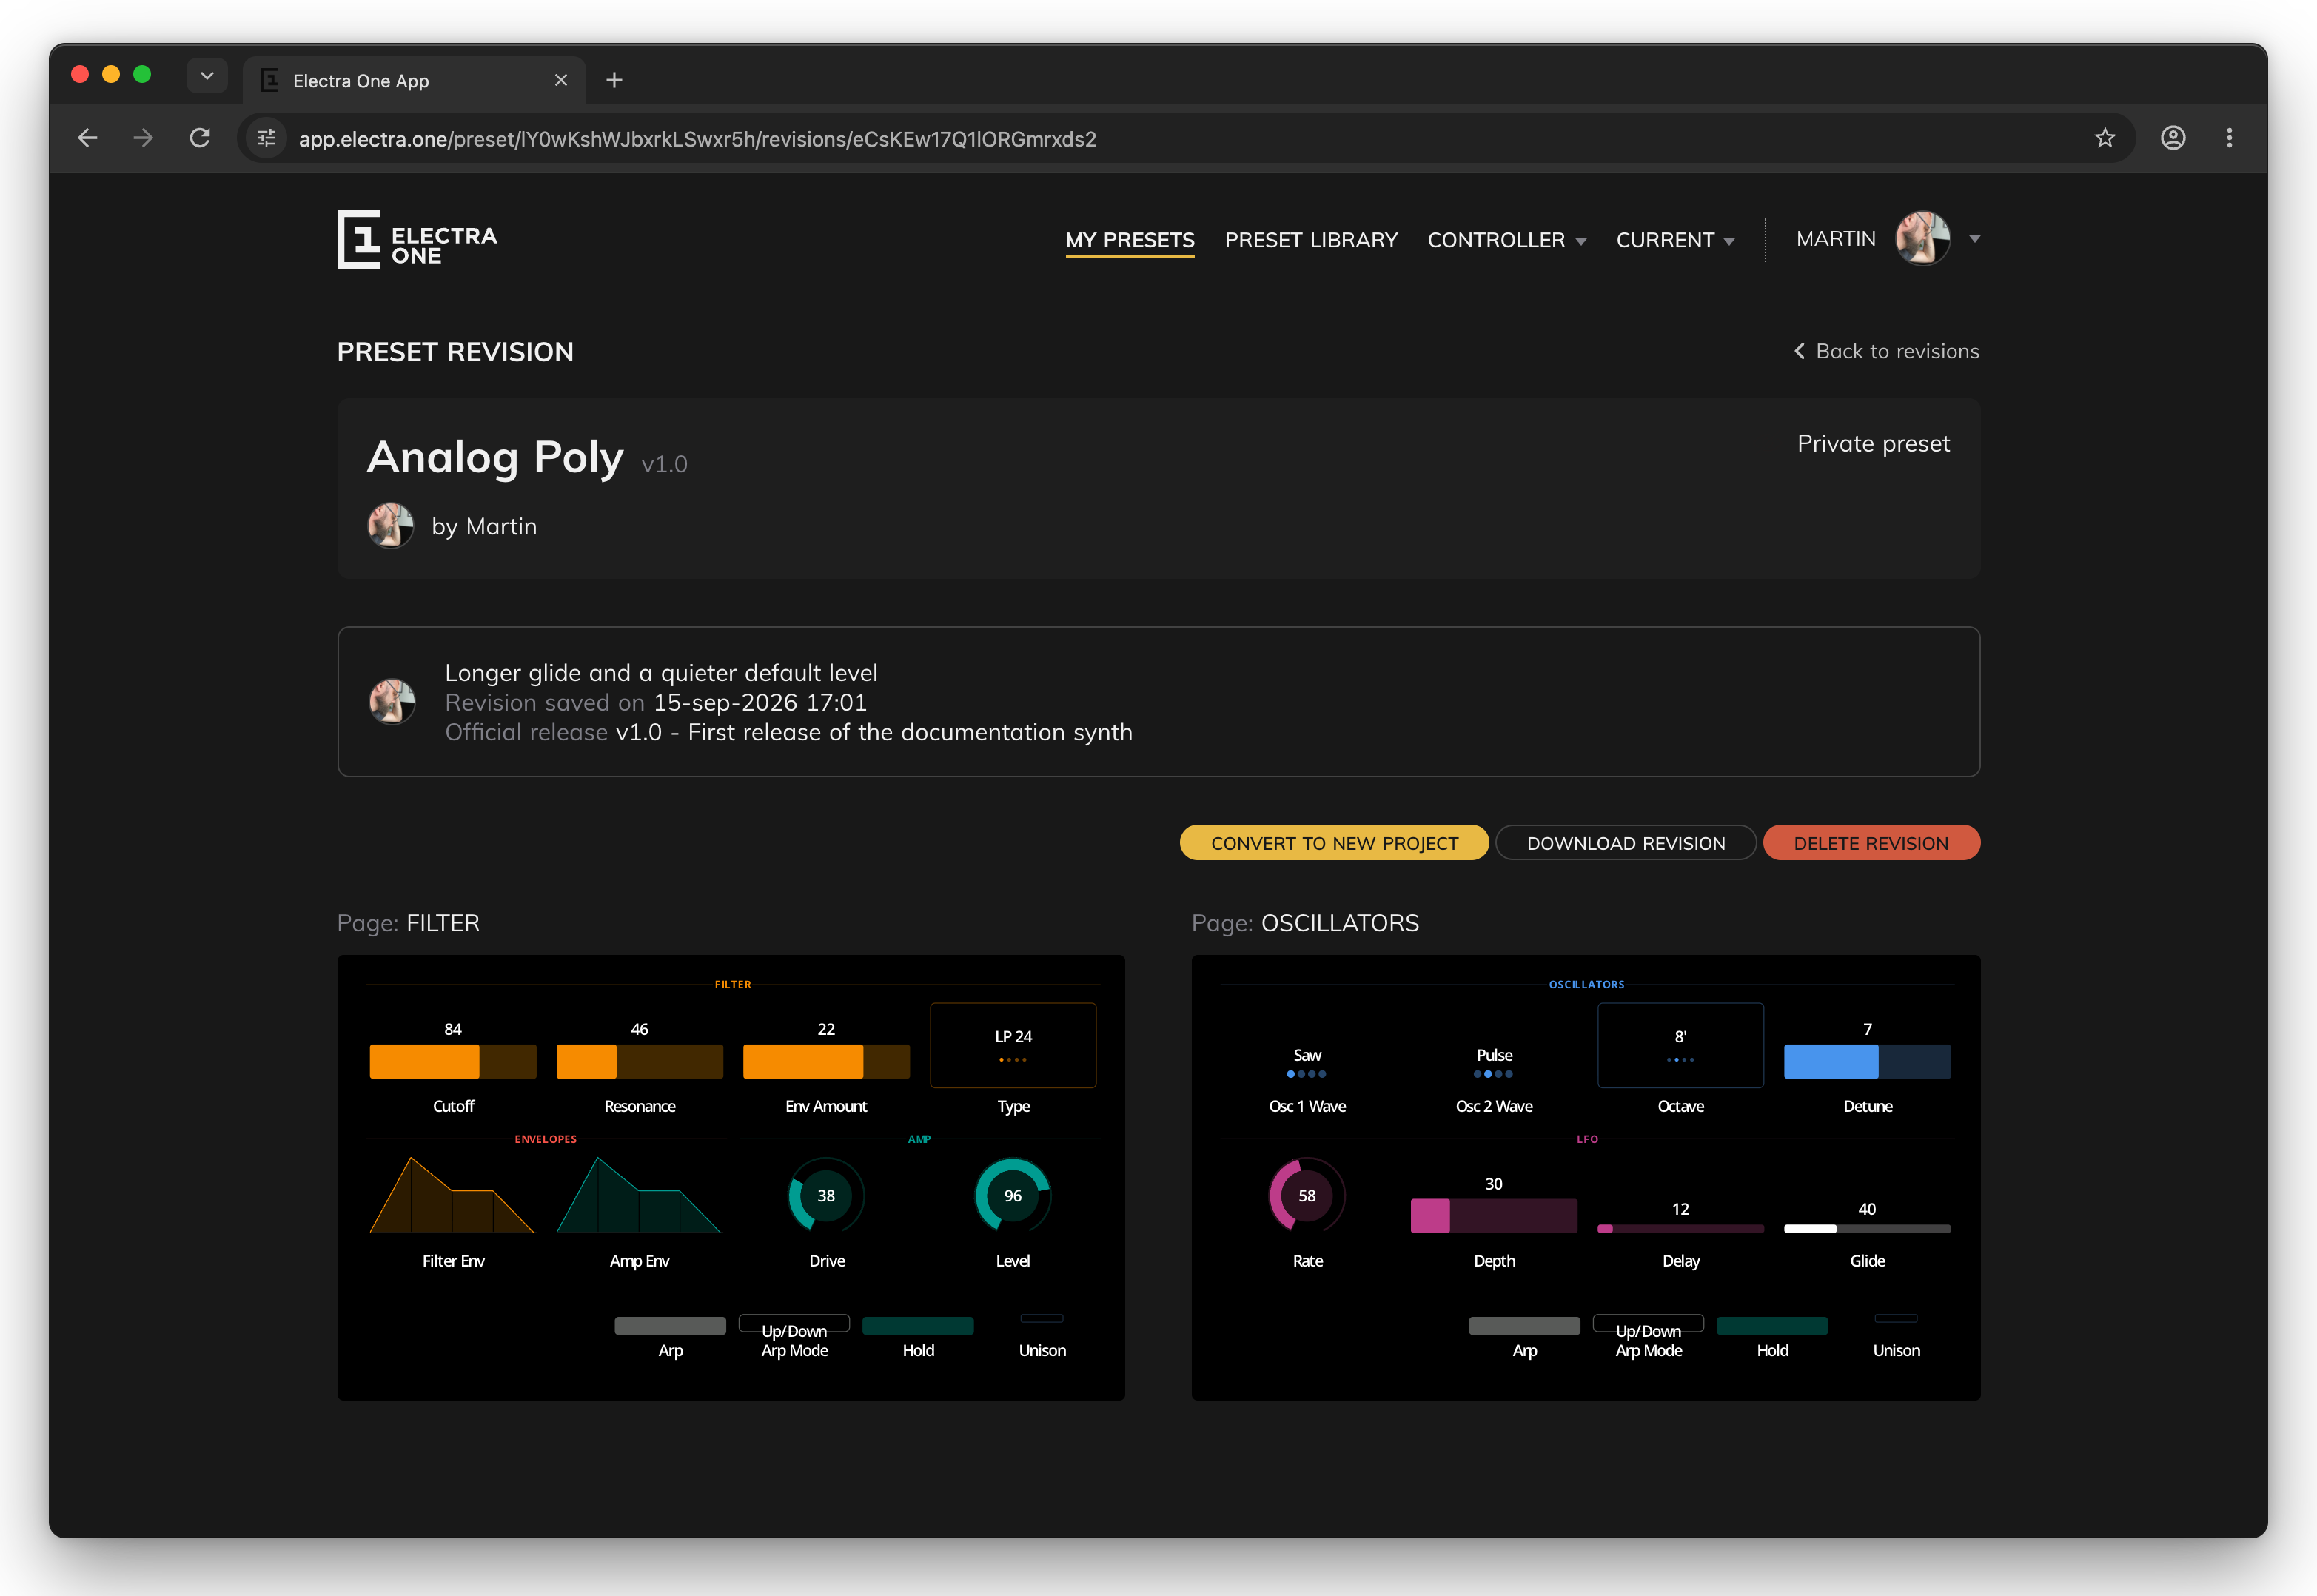
CONVERT TO NEW PROJECTcreates a new preset in your library from this revision, called "Revision #n of …". Use it to try a different direction from an older version without changing the original preset.DOWNLOAD REVISIONdownloads the revision as a project file.DELETE REVISIONdeletes the revision, as the trash icon does on the history page.
Controllers
The Controller page manages the controllers connected to the computer. Open it with CONTROLLER in the top bar, or with Controller settings in the controller menu.
Several controllers
The application can work with several Electra One controllers connected at the same time, for example a Mk2 and a Mini. It recognises each controller by its serial number and remembers it.
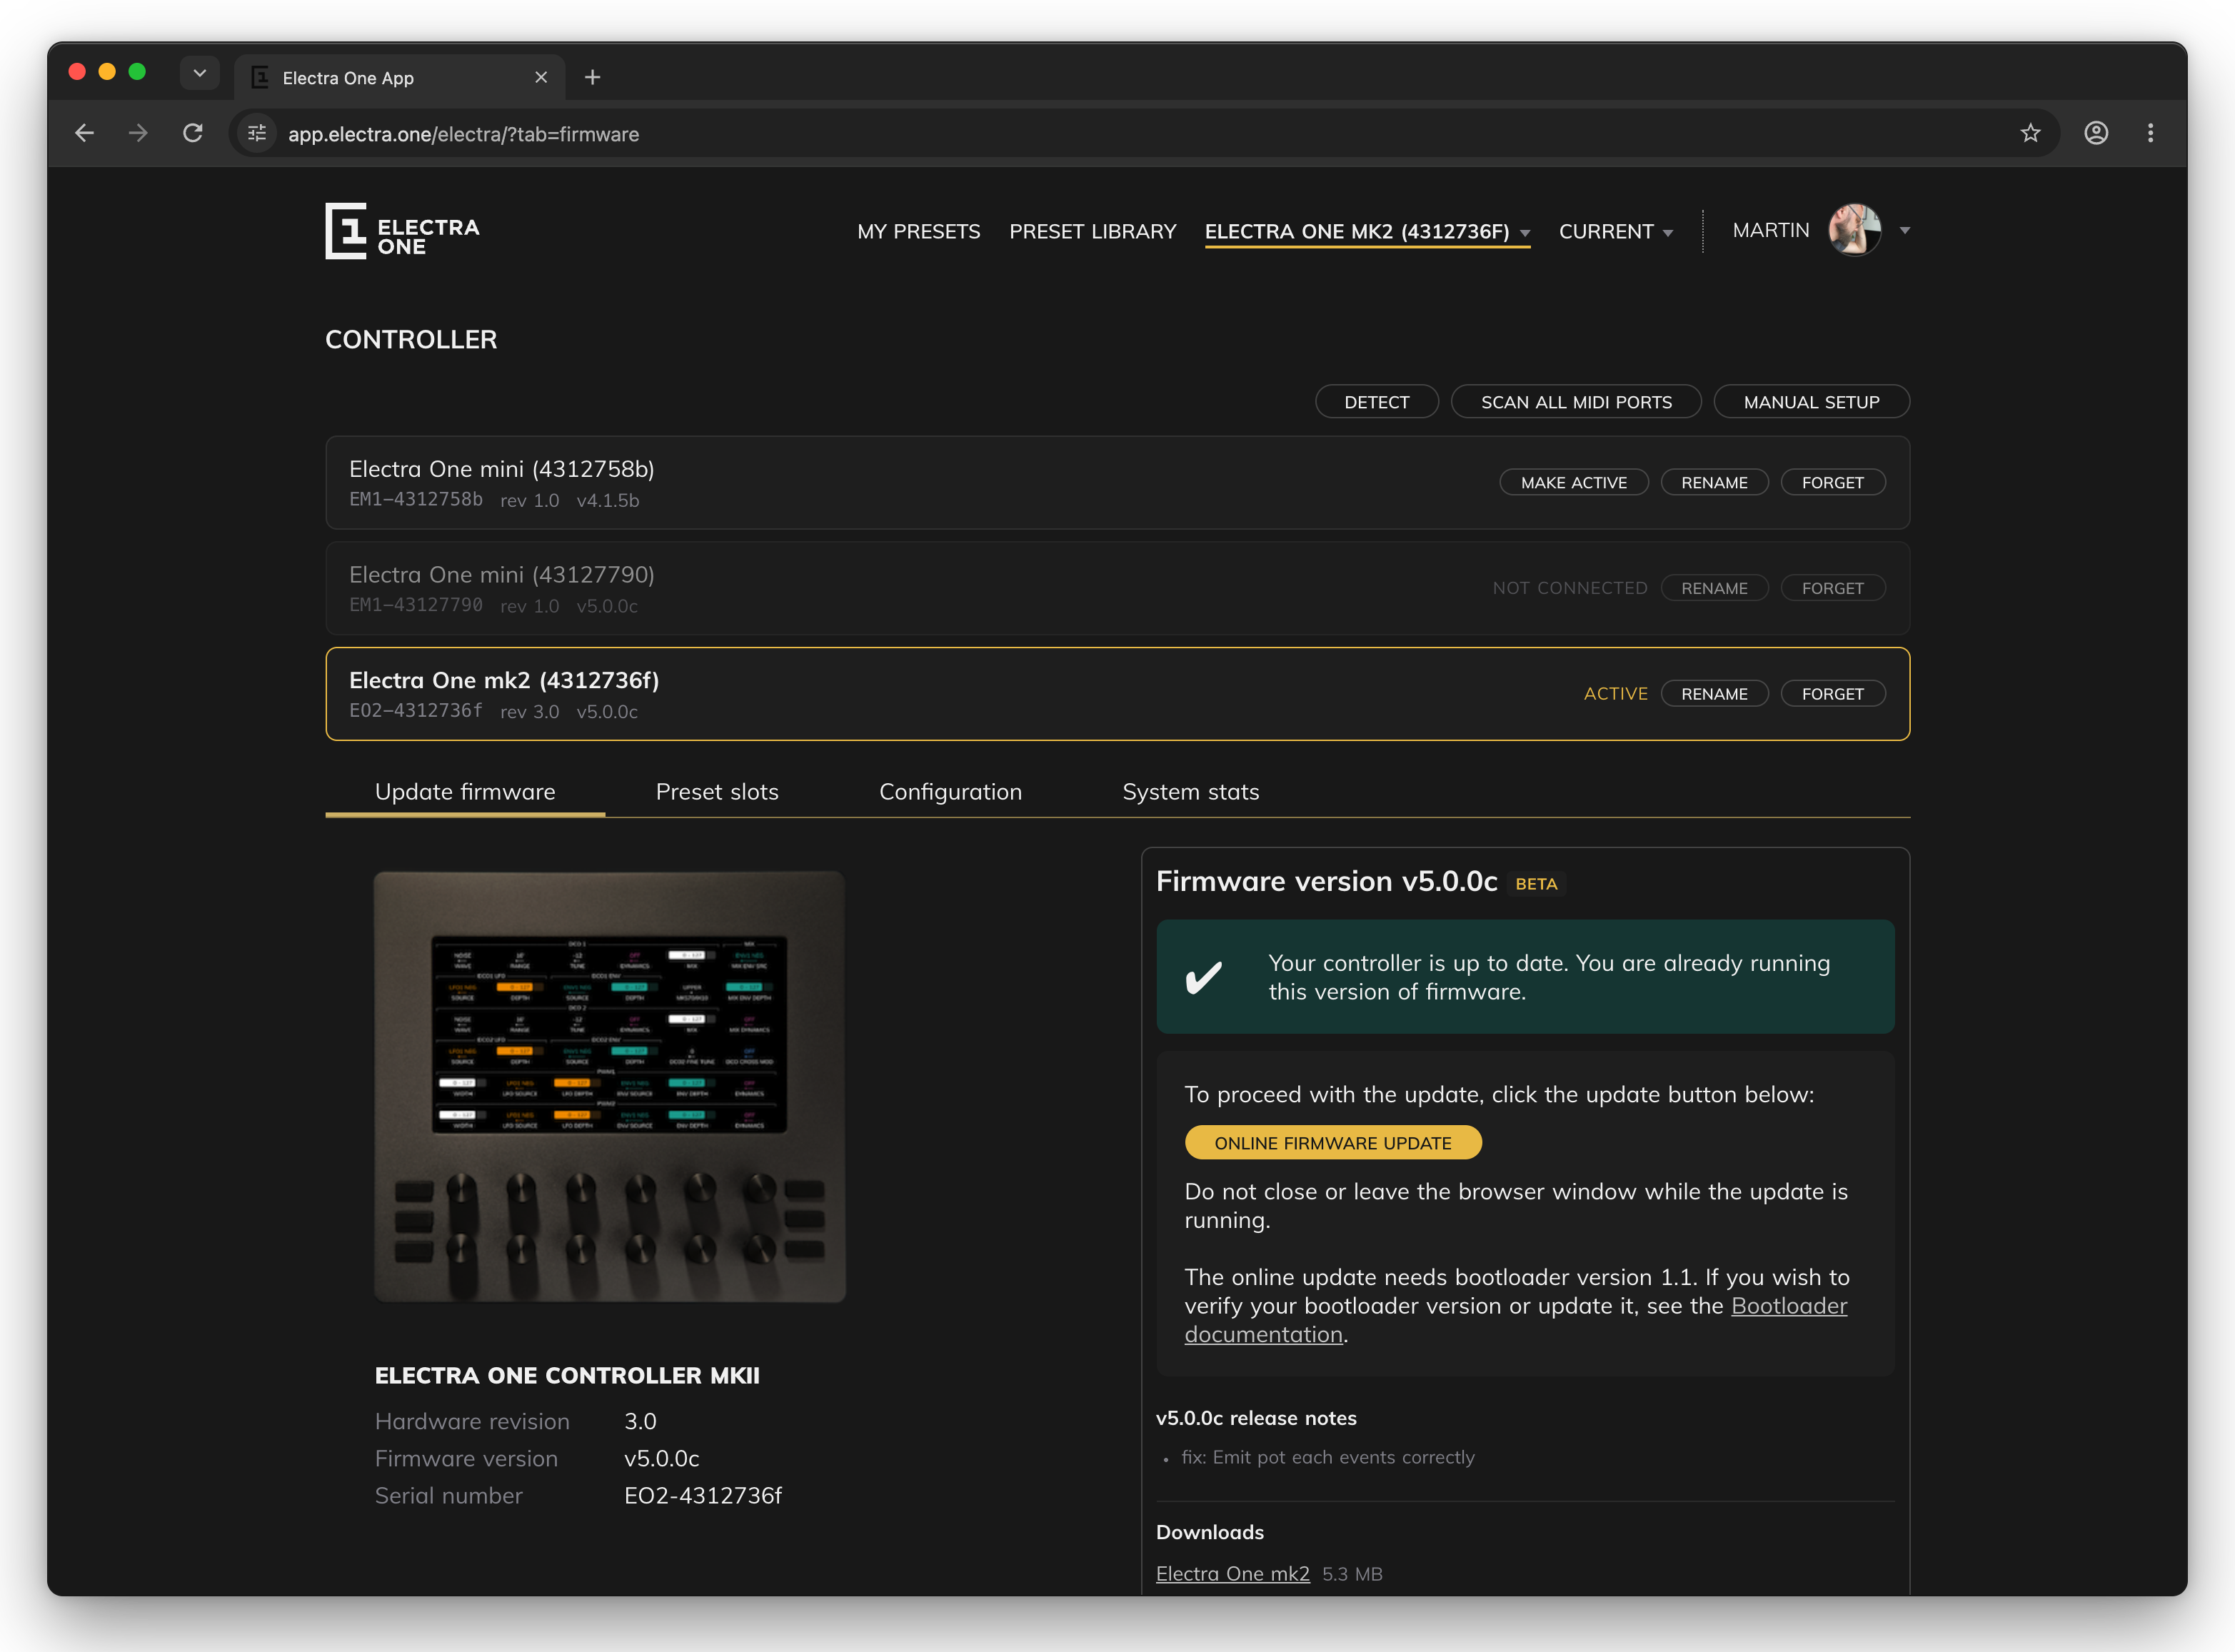
At any time, one controller is active. The whole application works with the active controller: SEND TO ELECTRA, the Snapshots and Captures tabs, the current slot page and every tab of this page. Switch between the controllers in the controller menu, or with MAKE ACTIVE on this page. The application remembers your choice. Clicking a layout button on a preset page also switches to a connected controller of that model.
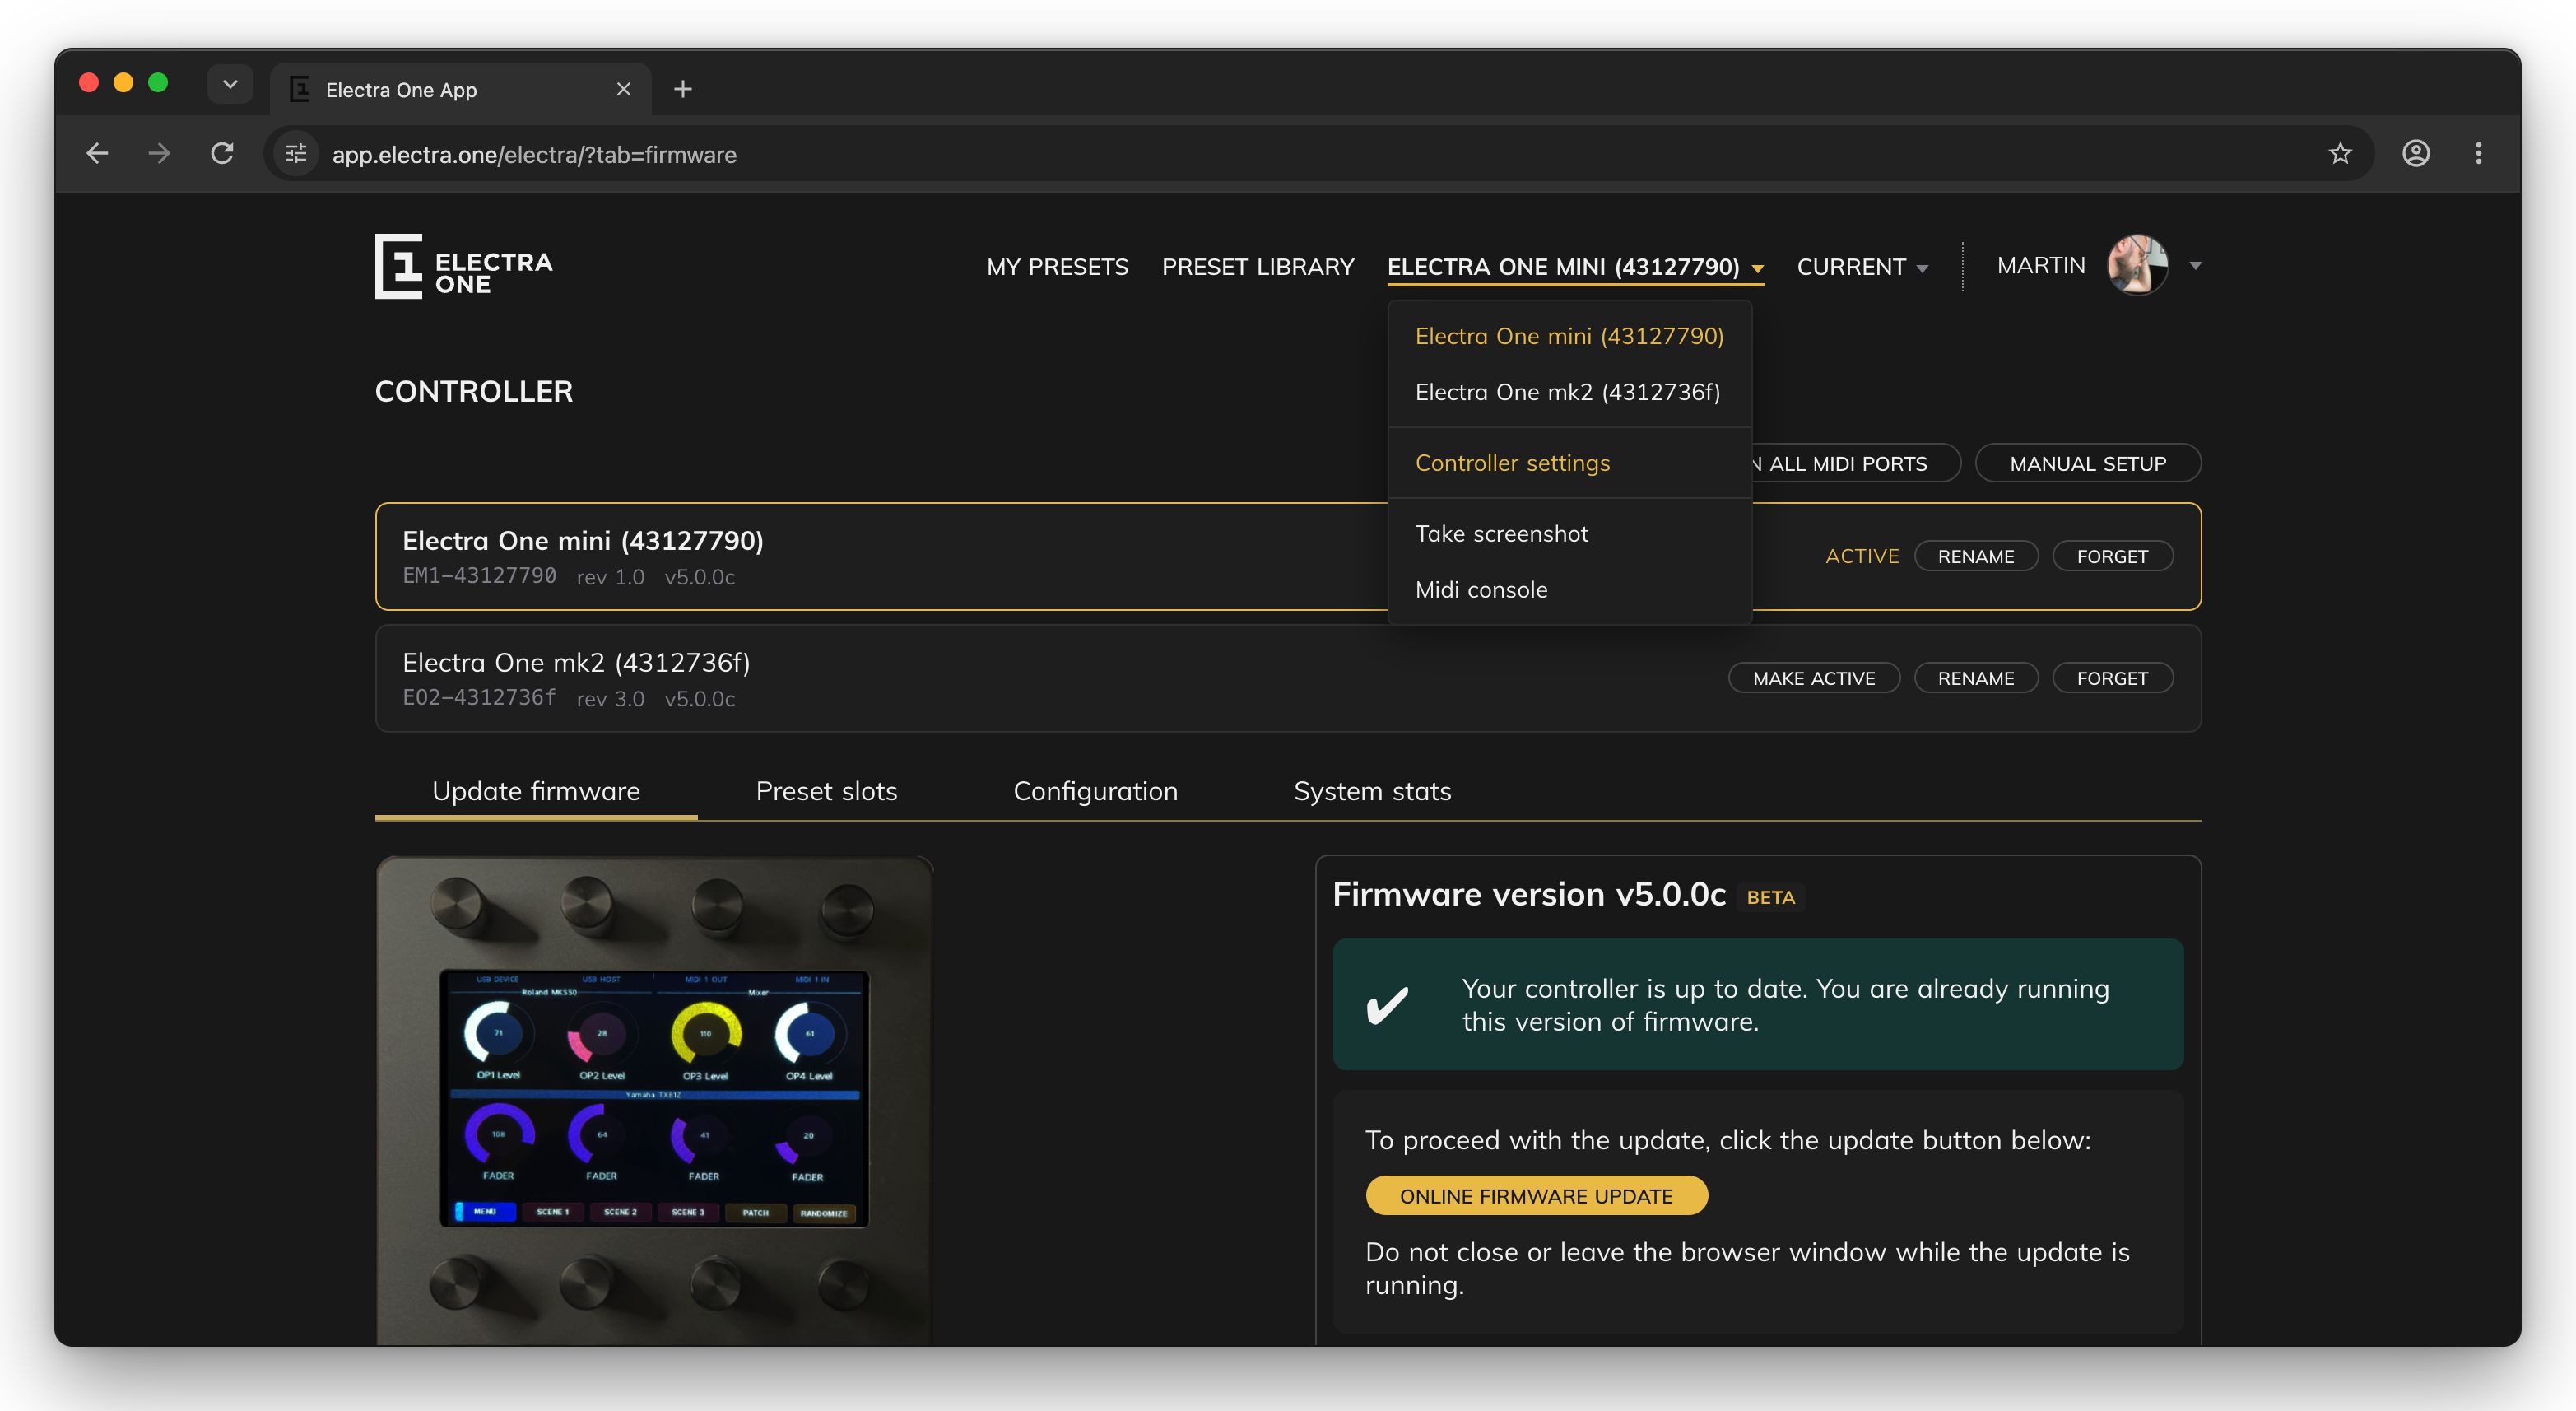
The buttons at the top look for controllers:
DETECTlooks for controllers on the MIDI ports that belong to an Electra One, and on the ports where a controller was found before. A controller connected over USB is found without clicking it.SCAN ALL MIDI PORTSasks every MIDI output of the computer whether an Electra One is there. Use it when a controller is connected through a MIDI interface or another device.MANUAL SETUPopens a form for a controller behind a MIDI router. Choose the Output port that leads to the controller and, if needed, the Input port its answers come from, then clickLOOK FOR A CONTROLLER.CLOSEcloses the form.
Each controller has a card with its name, serial number, hardware revision and firmware version:
ACTIVEmarks the active controller.MAKE ACTIVEmakes a connected controller the active one.NOT CONNECTEDmeans the controller is known but does not answer now.RENAMElets you give the controller a name, such as "Studio Mini". Press Enter to save it or Esc to cancel. The name is also shown in the controller menu.FORGETremoves the controller from the list. A controller connected over USB comes back the next time it is detected.
Under the cards are four tabs for the active controller: Update firmware, Preset slots, Configuration and System stats.
Update firmware
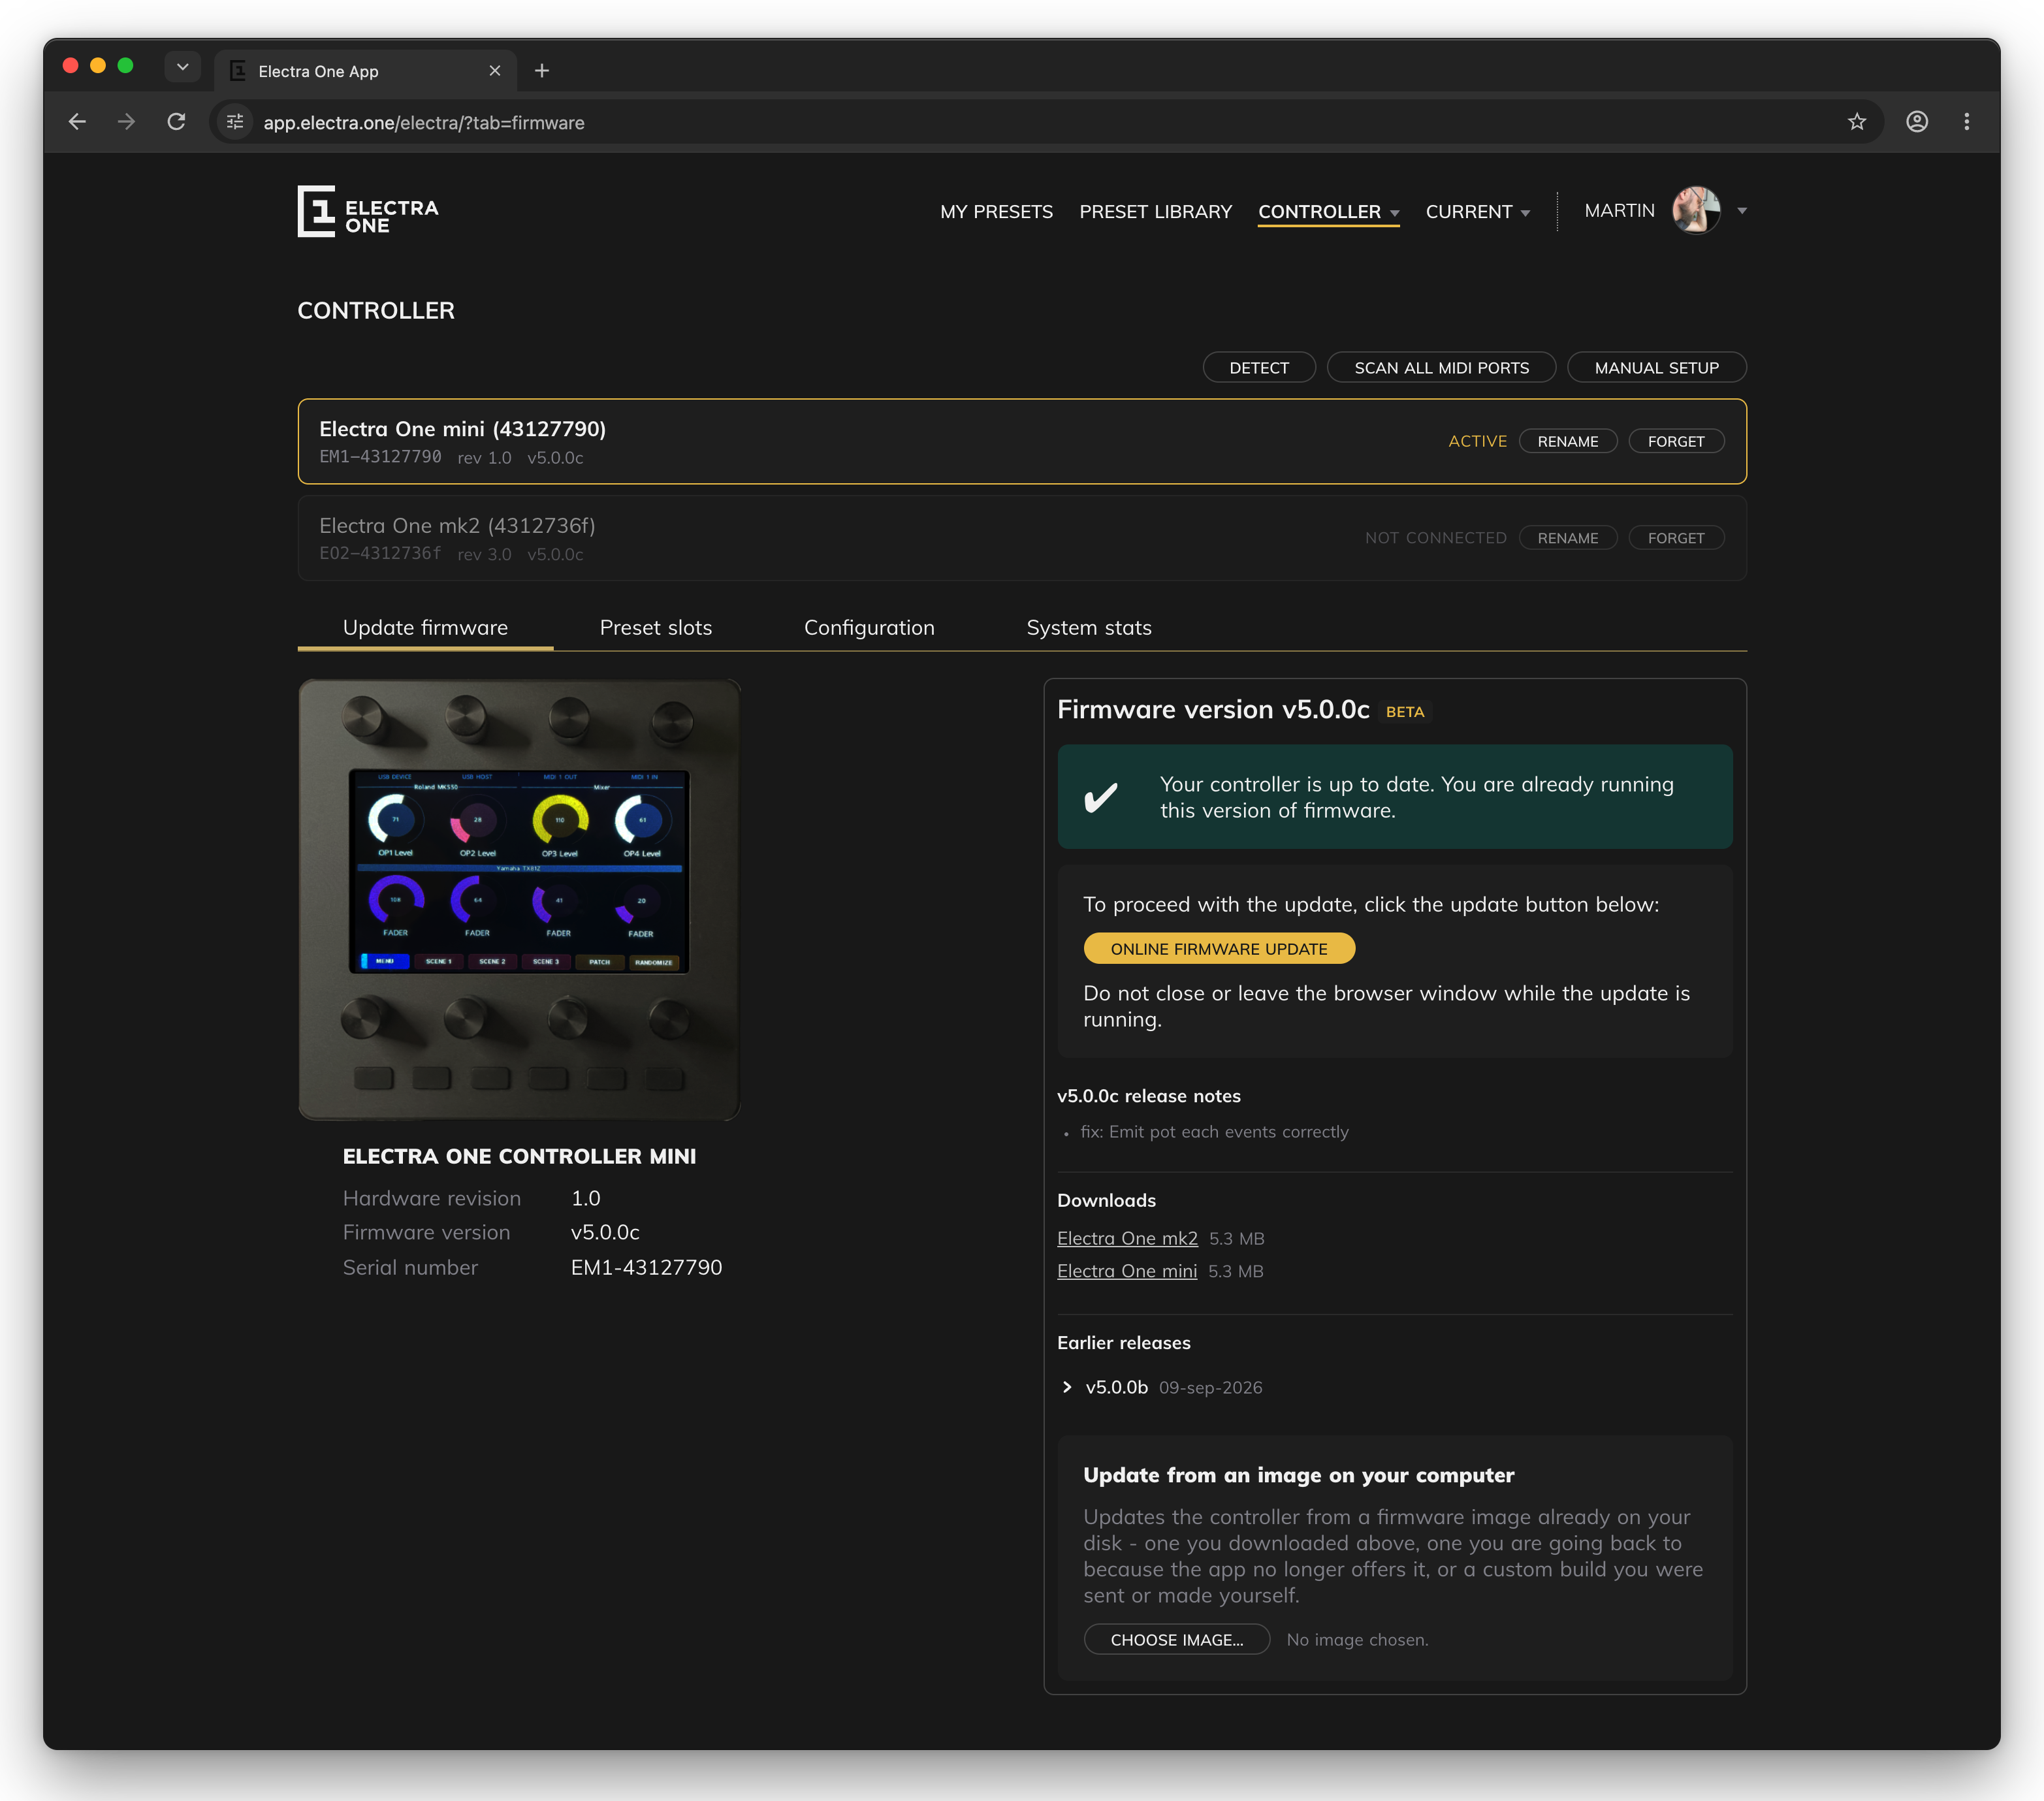
The left side shows the controller: its model, hardware revision, firmware version and serial number. The right side shows the latest firmware for that model:
- A status line says whether the controller needs this firmware or already runs it.
ONLINE FIRMWARE UPDATEsends the firmware to the controller over MIDI and installs it. A progress bar shows how far it is. Do not disconnect the controller or close the browser until the controller has restarted. On the Mk2, the online update needs bootloader 1.1 or newer.- Release notes list what the firmware changes.
- Downloads has the firmware files for each model, for updating from the bootloader.
- Earlier releases lists the previous firmware versions with their notes and downloads.
- Update from an image on your computer installs a firmware file you already have.
CHOOSE IMAGE…selects the file (.srec). The application checks it, andUPDATE FROM THIS IMAGEinstalls it. Make sure the file is meant for this model.
When the controller does not start normally, update it from the bootloader. See Firmware update for the Mk2 and Firmware update for the Mini.
Preset slots
Preset slots are the places on the controller where presets are kept. The Mk2 has 6 banks of 12 slots, the Mini 5 banks of 8 slots. The tab shows every bank with its name and colour, and every slot in it, laid out as the controller lays them out. A slot without a preset reads "unused".
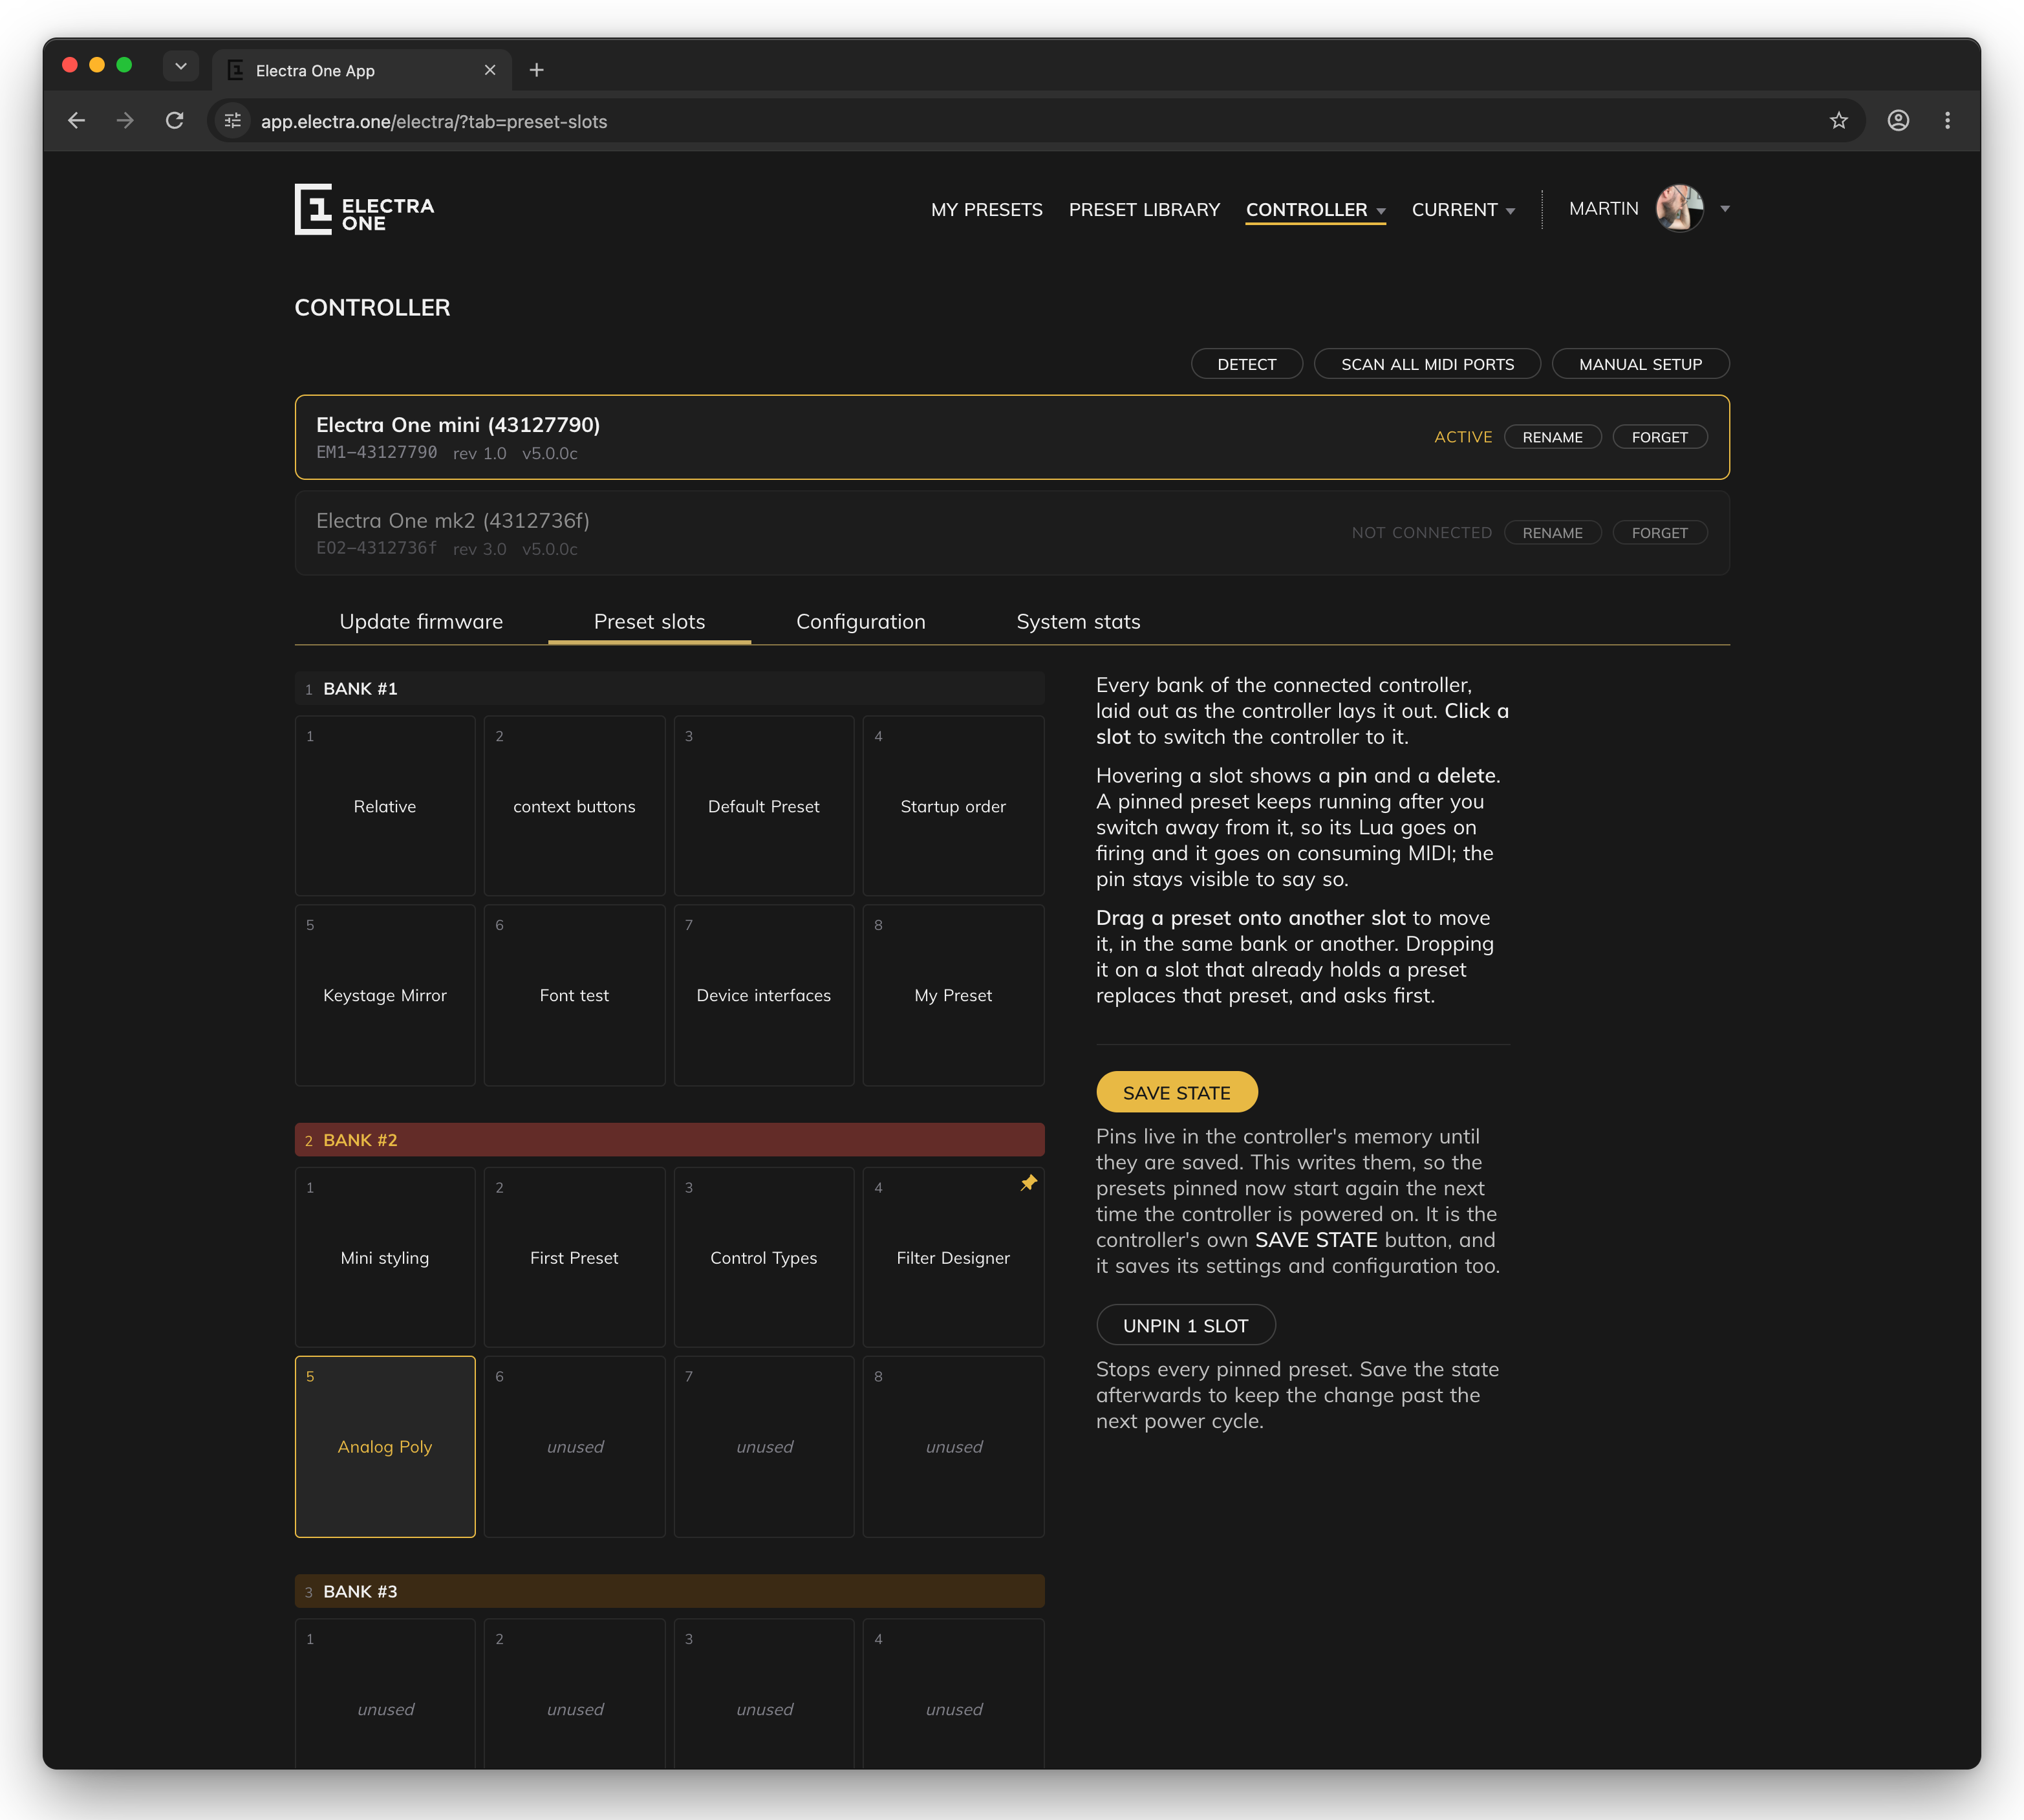
- Click a slot to switch the controller to it.
- The pin appears in the top corner when you point at a slot. A pinned preset keeps running after you switch to another preset: its Lua script keeps working and it keeps receiving MIDI, without being on the screen. A pinned slot keeps showing its pin, so you can see what is running.
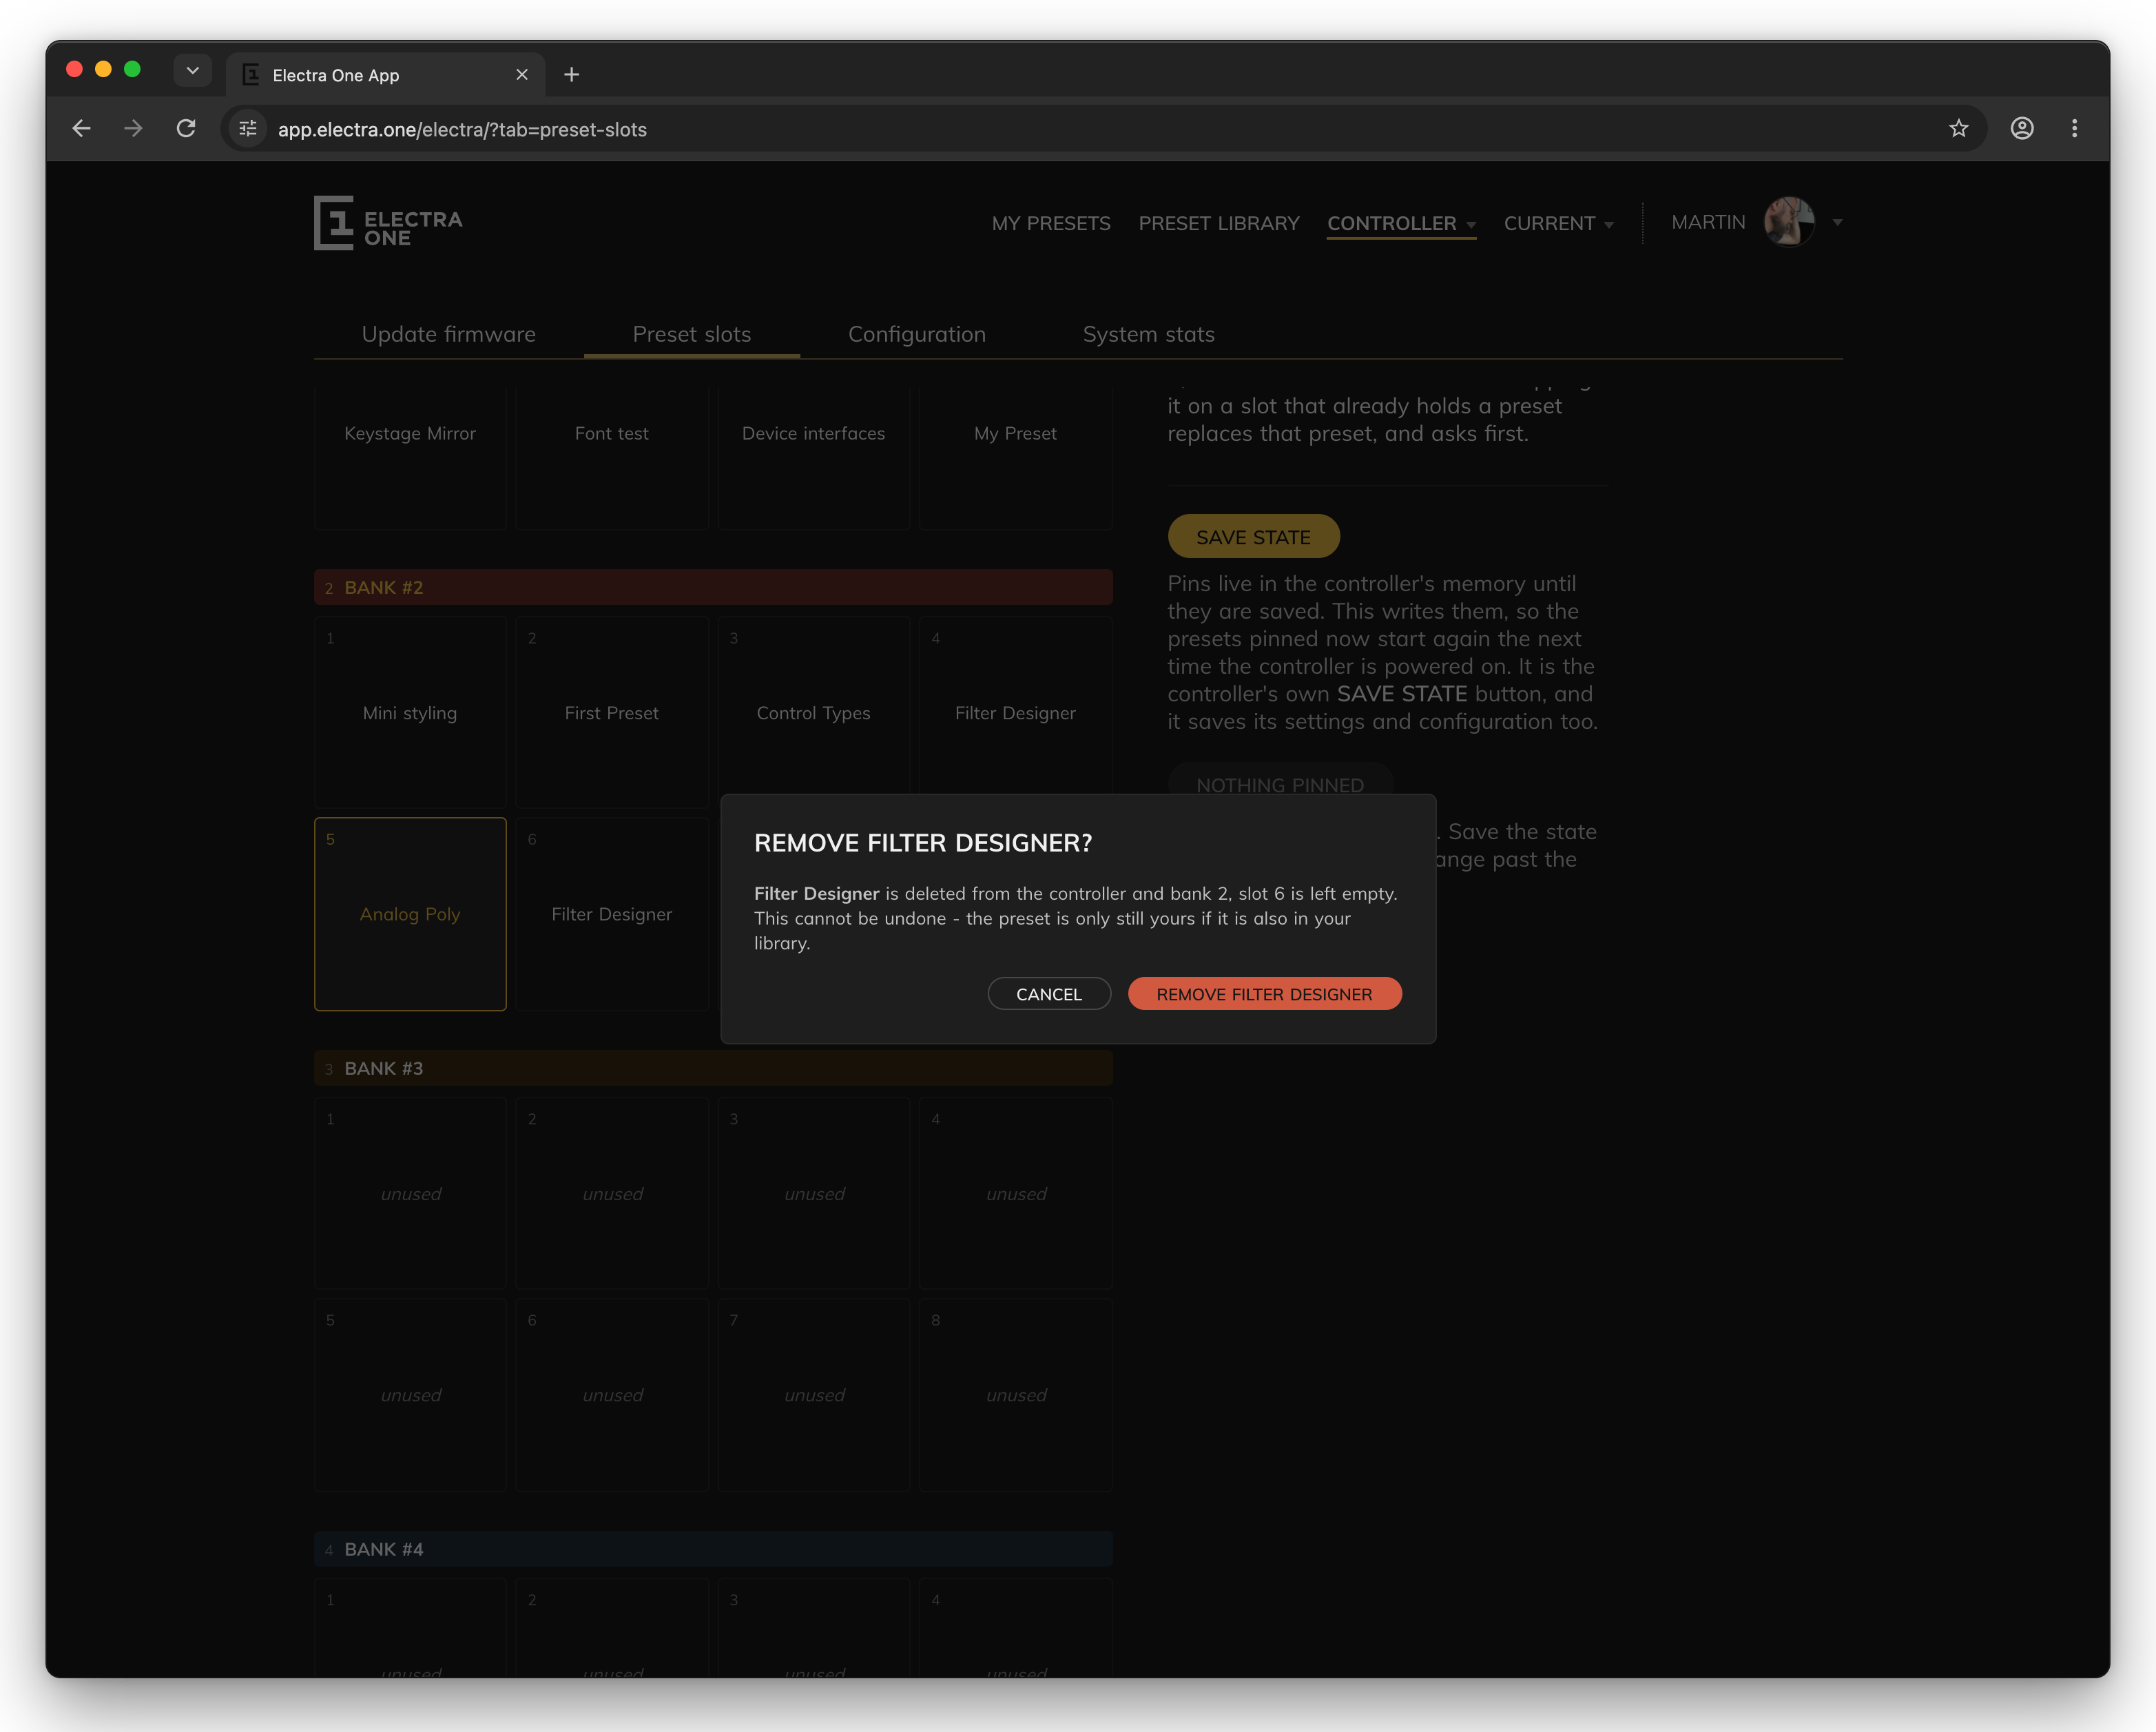
- The trash icon appears in the bottom corner. It asks for confirmation and then deletes the preset from the controller.
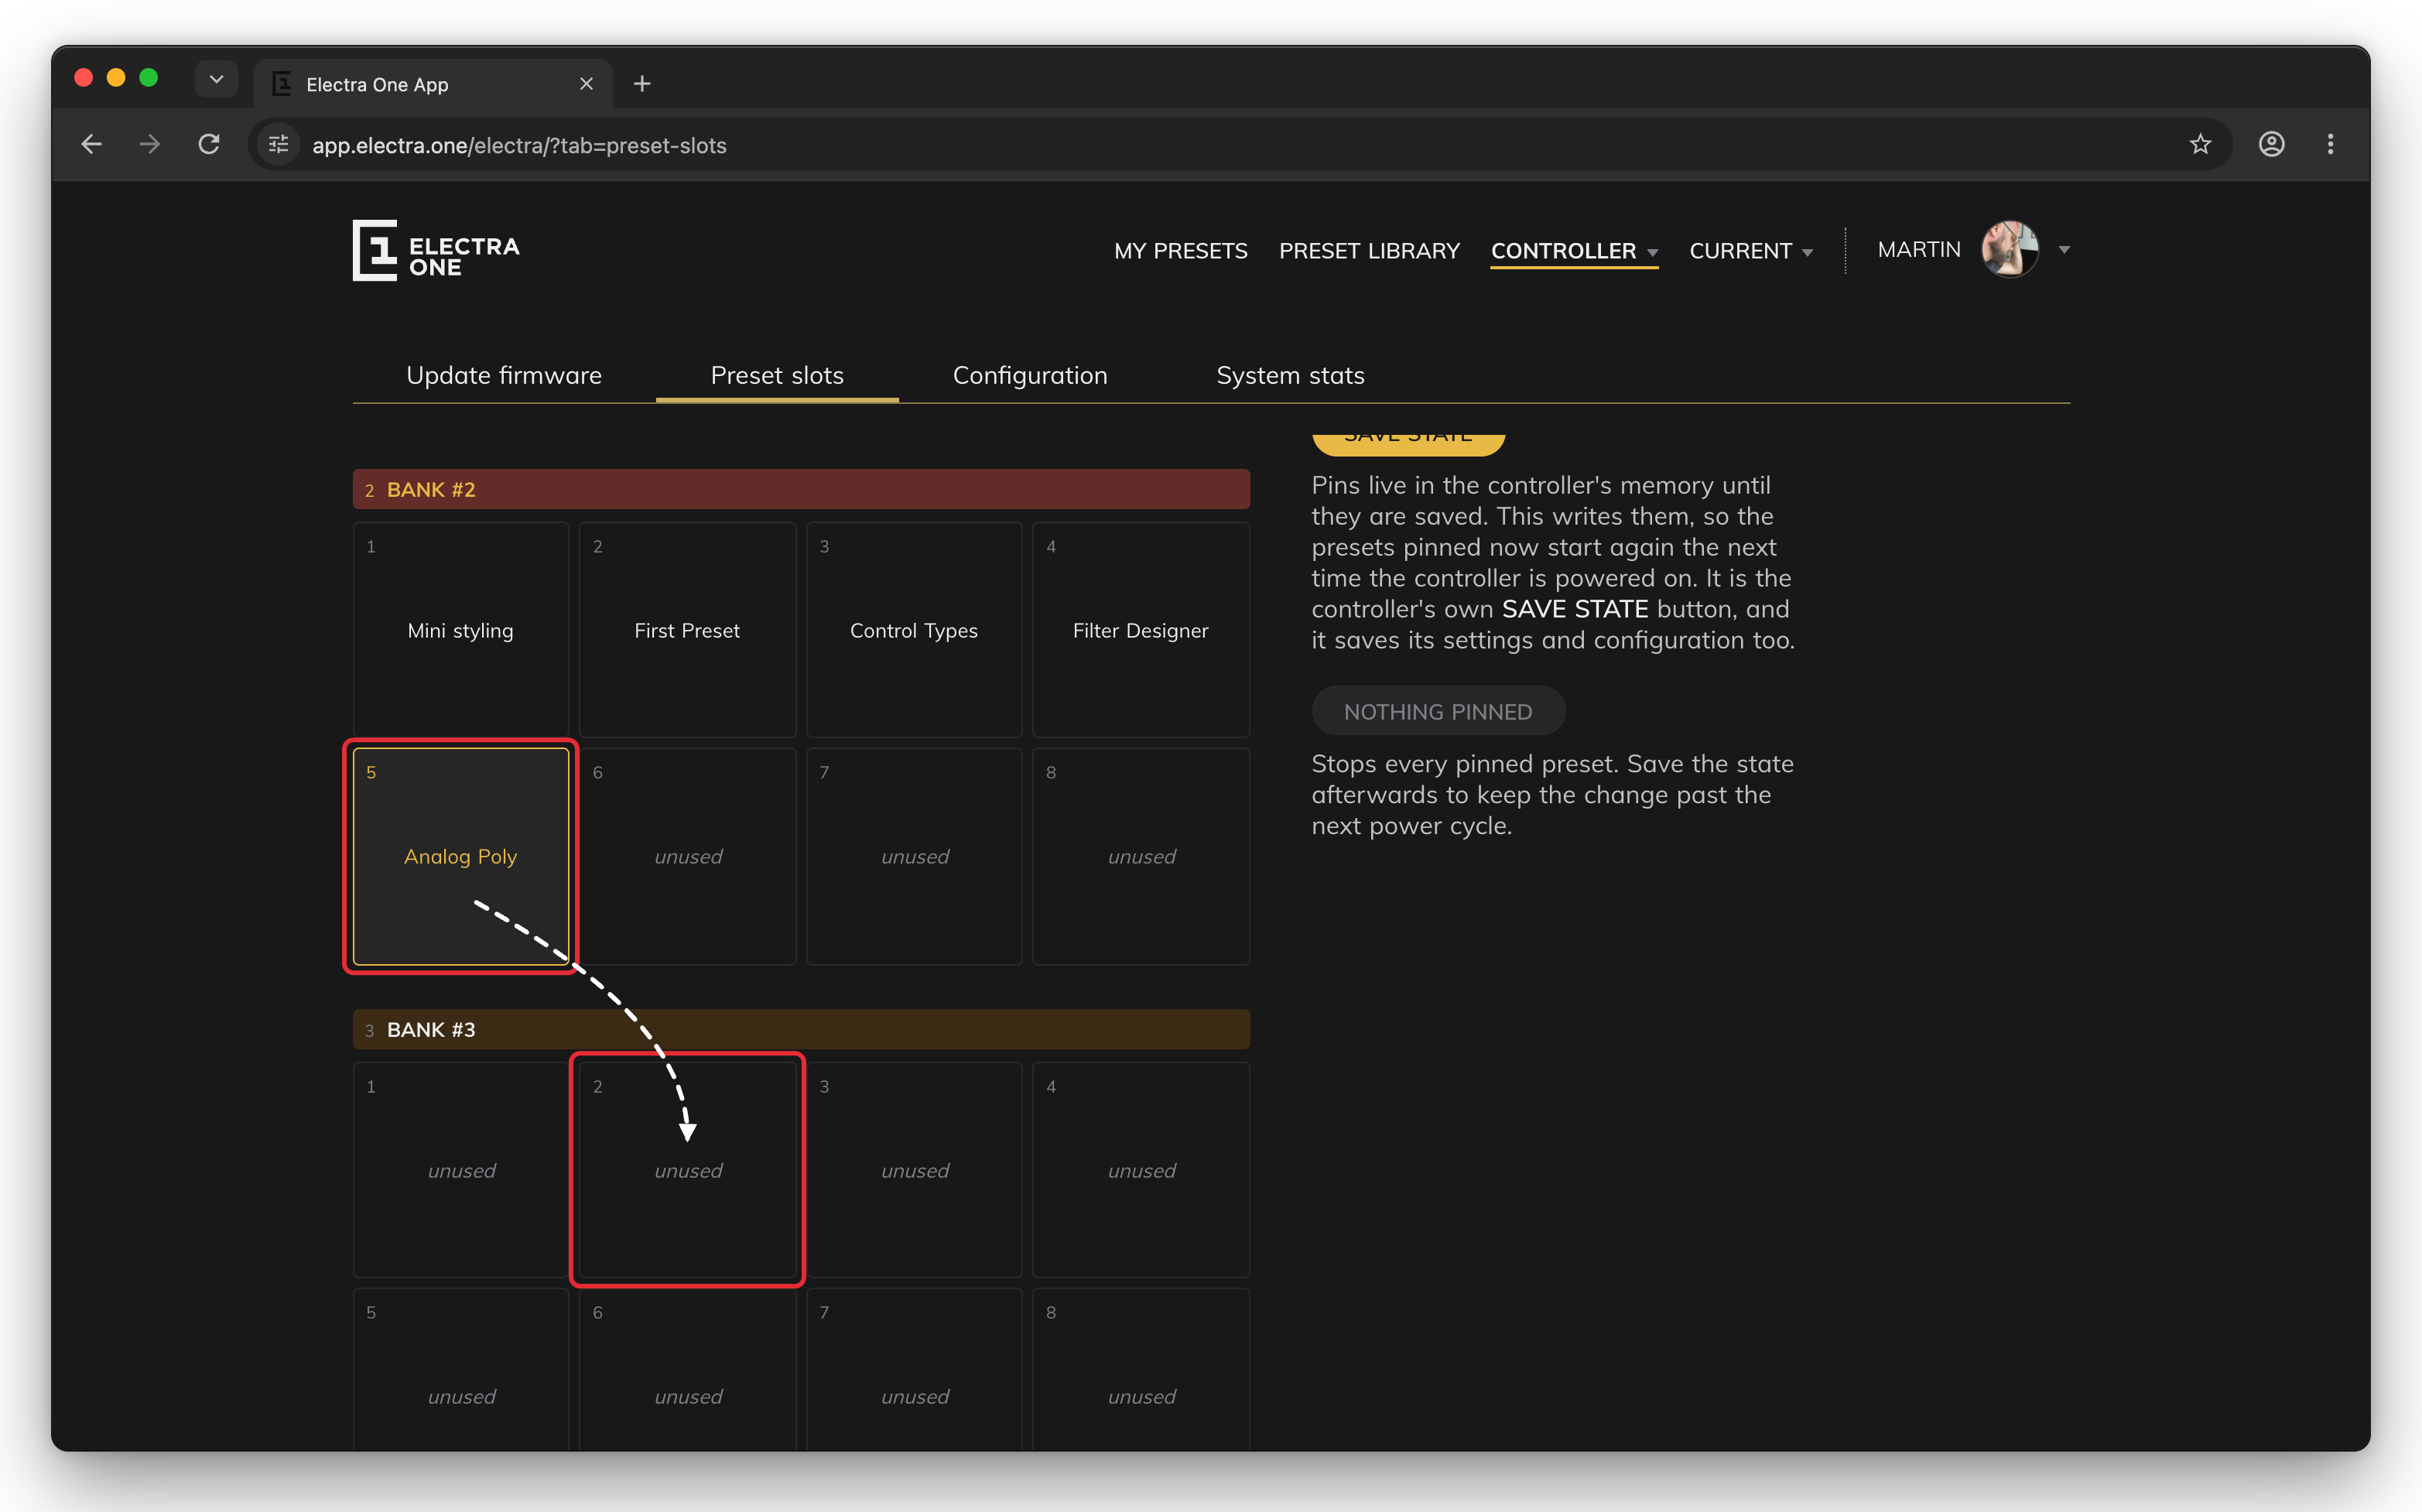
Drag a preset onto another slot to move it, in the same bank or into another bank. Dropping it on an empty slot moves it. Dropping it on a slot that holds a preset asks first, because that preset is deleted. The move copies every file of the slot, be it preset JSON, preset Lua, router Lua, overrides, and so on, and a progress panel shows how far it is: keep the controller connected until it finishes. A pinned slot at either end of the move is unpinned, because a pin belongs to the slot, not to the preset in it.
Next to the banks are two buttons for the whole controller:
SAVE STATEstores the pins on the controller, so the pinned presets start again the next time it is switched on. It is the same as the controller's ownSAVE STATE, and it saves the controller's settings and configuration as well. Pins that are not saved are gone after the controller is switched off.UNPIN ALLstops every pinned preset. The button says how many slots are pinned. It does not save the state, so clickSAVE STATEafterwards if the change should last.
Configuration
The Configuration tab holds the controller's settings. They belong to the controller, not to a preset, and they apply to every preset. The Mk2 has the same settings on its own Settings screen, with a few different names. The Mini keeps only its System window on the controller and is set up here. The application reads the configuration from the controller when the tab opens, so the tab needs a connected controller.
The sections are listed on the left. Click one to show it. What you change is kept in the browser until you click APPLY CHANGES, which becomes available after the first change and sends the whole configuration to the controller. The new settings apply at once. The controller does not restart, and leaving the page without applying throws the changes away.
| Section | What it sets |
|---|---|
| User Interface | How control sets are switched and shown, what a double tap or a hold on a control does, and whether the controller keeps the values you set. Mk2 only. |
| Preset Banks | The name and colour of each preset bank. |
| Remote Knobs | The knobs of another MIDI controller that move Electra One's controls, and where their values are sent back. |
| MIDI Control | MIDI messages that run the controller's own functions: switching pages and presets, opening windows and so on. |
| Buttons | What the hardware buttons do. |
| Router | The routes that pass MIDI messages between the interfaces, and whether presets may run router scripts. |
| USB Host | Which of Electra One's ports a USB MIDI device on the USB host port uses. |
User Interface
The User Interface section is shown for the Mk2. The Mini has no control sets and no touch screen gestures, so the section is not shown for it.
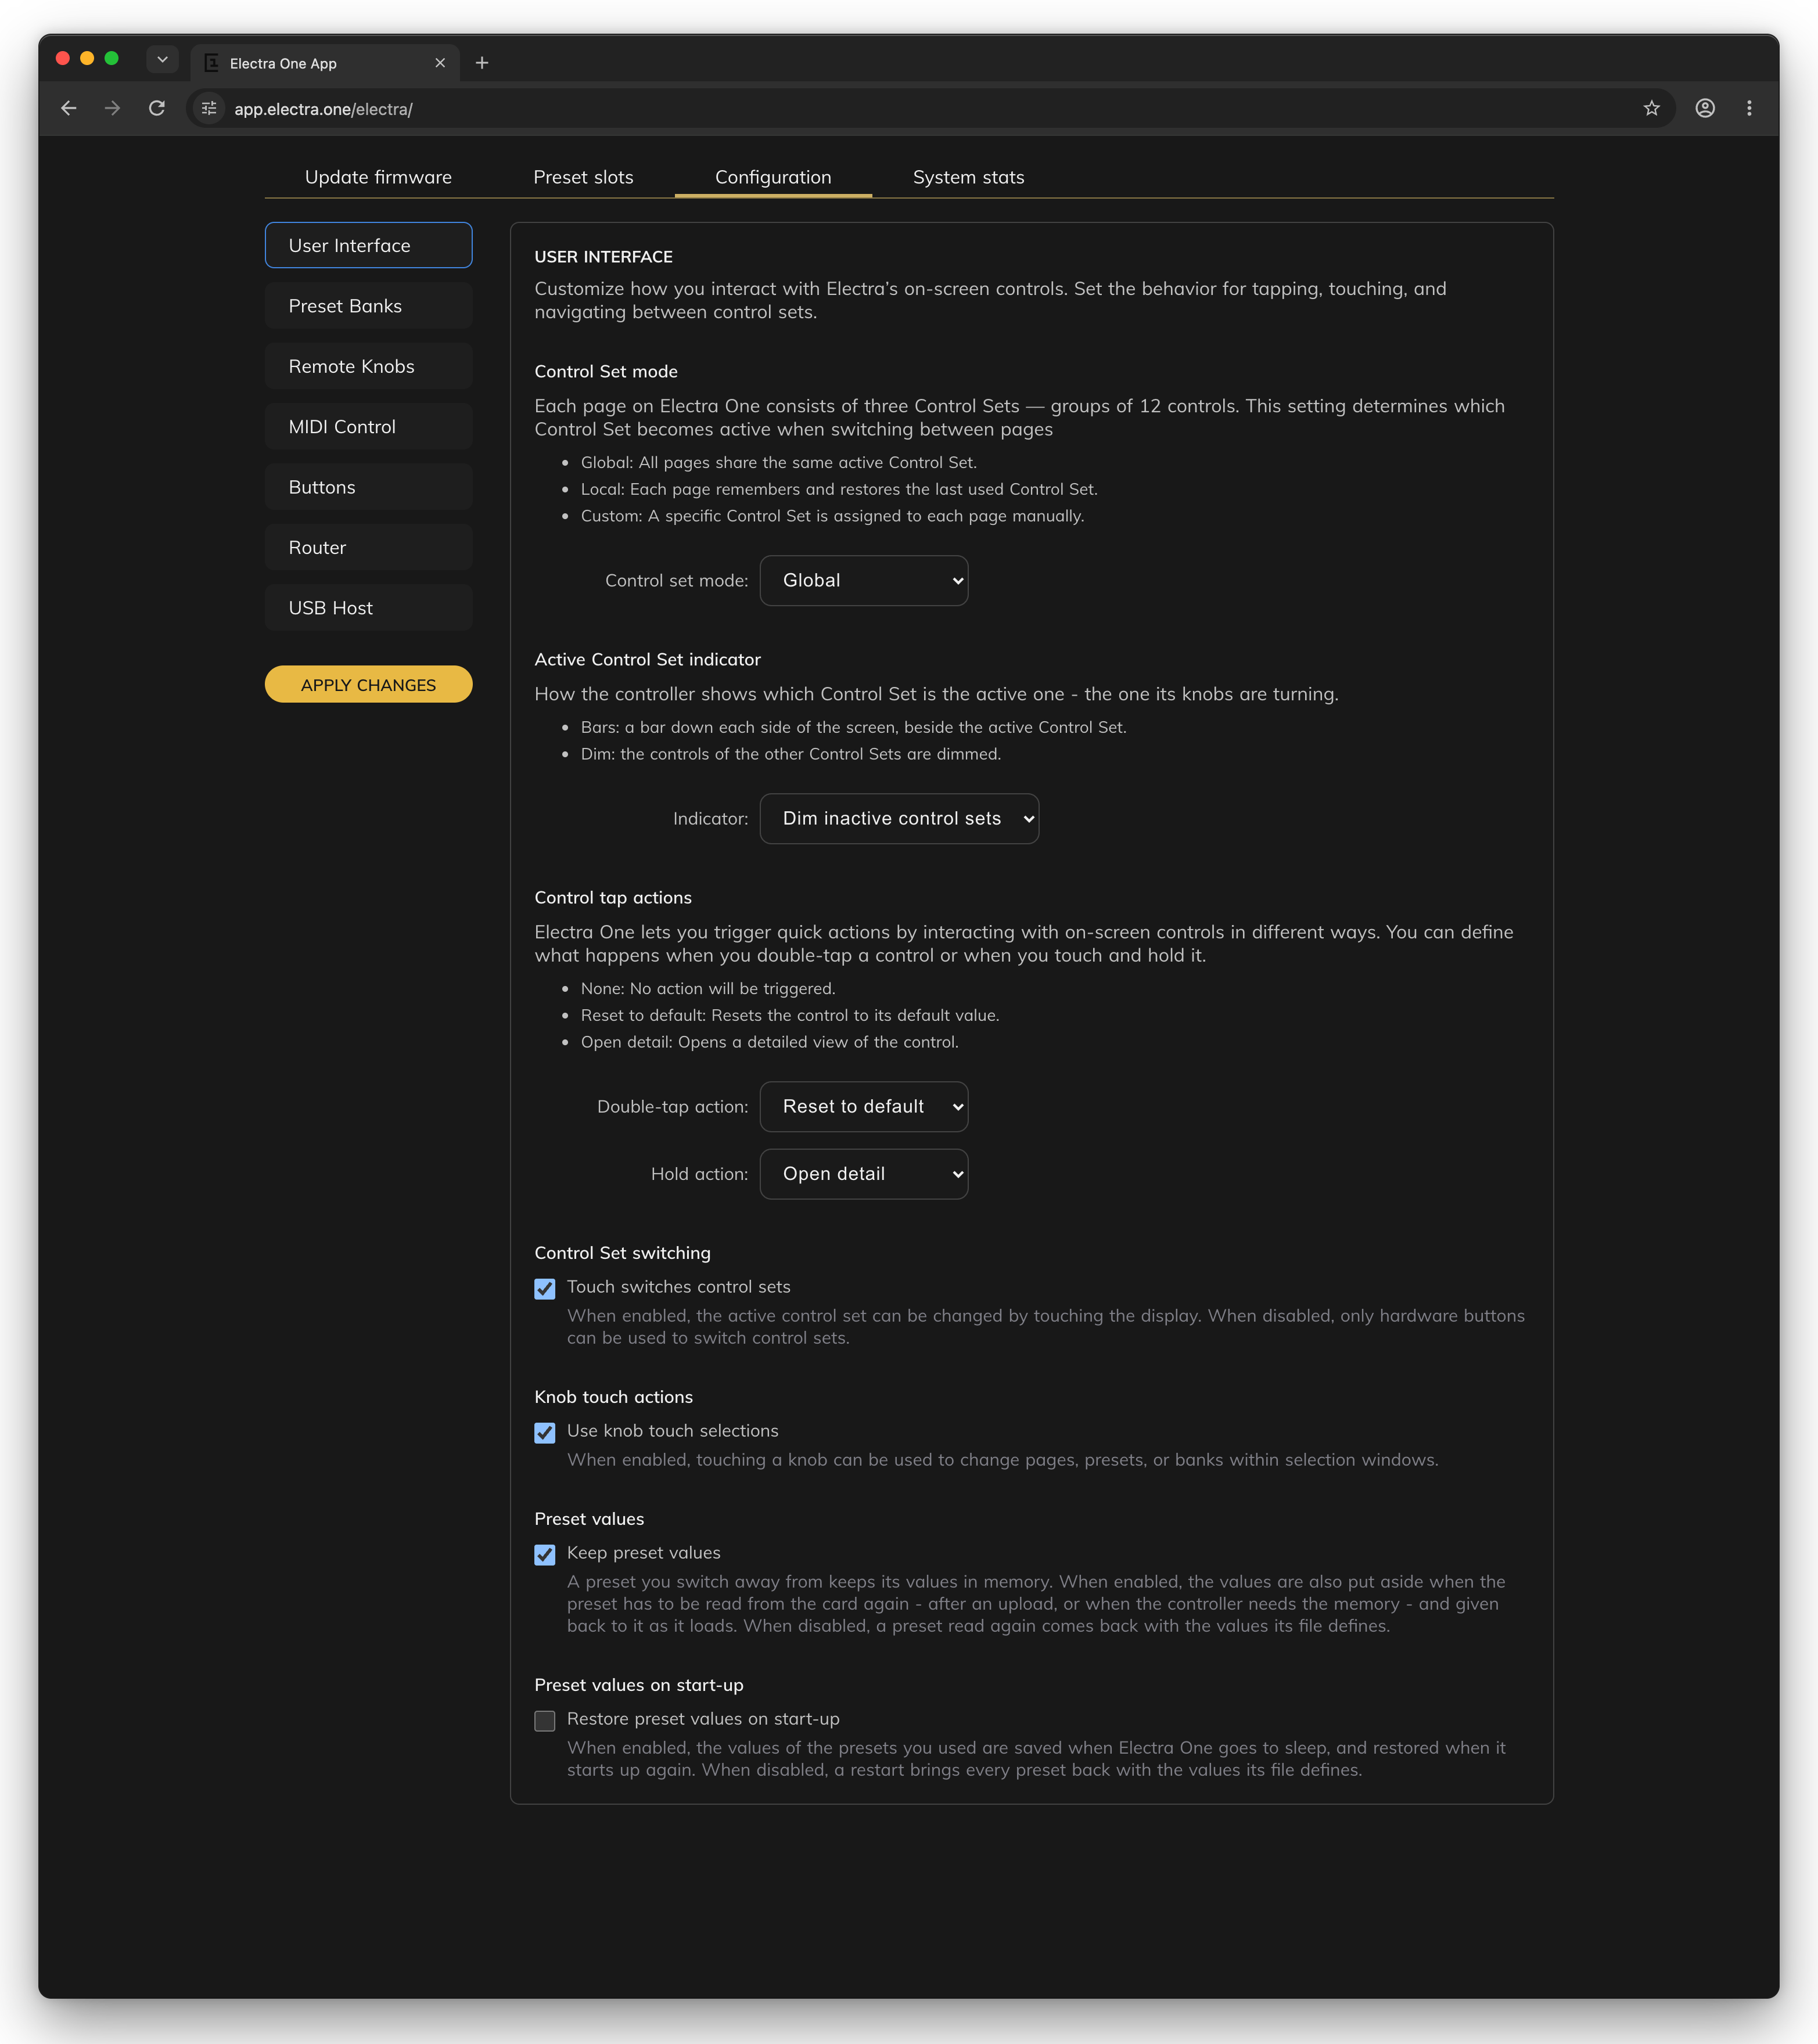
- Control set mode decides which of the three control sets of a page is active after you switch pages.
Globalkeeps the same control set on every page.Localgives every page its own, which it remembers.Customuses the control set the preset sets as the default of each page, or the first one. - Indicator chooses how the controller shows the active control set.
Barsdraws a bar down each side of the screen beside it.Dim inactive control setsdims the other two instead. On the controller the same choice is theDim inactive control setsswitch. - Double-tap action and Hold action are what a double tap or a touch and hold on a control does:
None,Reset to default, which sets the control to its default value, orOpen detail, which opens its detail window. - Touch switches control sets: with it on, touching a control on the screen makes its control set the active one. With it off, only the buttons switch control sets.
- Use knob touch selections: with it on, touching a knob makes the choice in the selection windows, such as preset and page selection. On the controller it is called
Knob touch selections. - Keep preset values and Restore preset values on start-up decide whether a preset comes back with the values you set on it. They exist only here, and they are explained next.
The settings are described from the controller's side in Interface of the Mk2 chapter.
Keeping preset values
When you turn a knob, the new value lives in the controller's memory. It is not written into the preset: the preset file keeps the values it was made with. A preset you switch away from stays in memory with the values you set, so switching back and forth loses nothing on its own. What loses them is the preset being read from the card again — after a restart, after you upload it from the app, or when the controller needs the memory for something else.
Two settings in the User Interface section decide what happens then. Both are off unless you turn them on, and with both off a preset read again comes back with the values its file defines.
- Keep preset values covers a preset being read again while the controller is running. With it on, the values it had are put aside first and given back to it as it loads.
- Restore preset values on start-up covers switching the controller off. With it on, the values of the presets you used are saved when Electra One goes to sleep, and read back when it starts up again.
The two work independently. Turning on only the second one means the controller starts up where it left off, while a preset read again during the session comes back as its file defines it.
Both need the preset to have a project id, which the Preset Editor gives every preset it saves. The values are kept under that id, which is what stops a preset uploaded over a slot inheriting the values of the one it replaced.
Neither setting changes the preset file, and neither is a snapshot. A snapshot is a set of values you name and keep on purpose, and it is the right tool for sounds you want to come back to. These settings only decide whether the values you happen to have set are remembered.
Preset Banks
The Preset Banks section names and colours the banks of the preset slots. The Mk2 has six banks of twelve presets, the Mini five banks of eight.
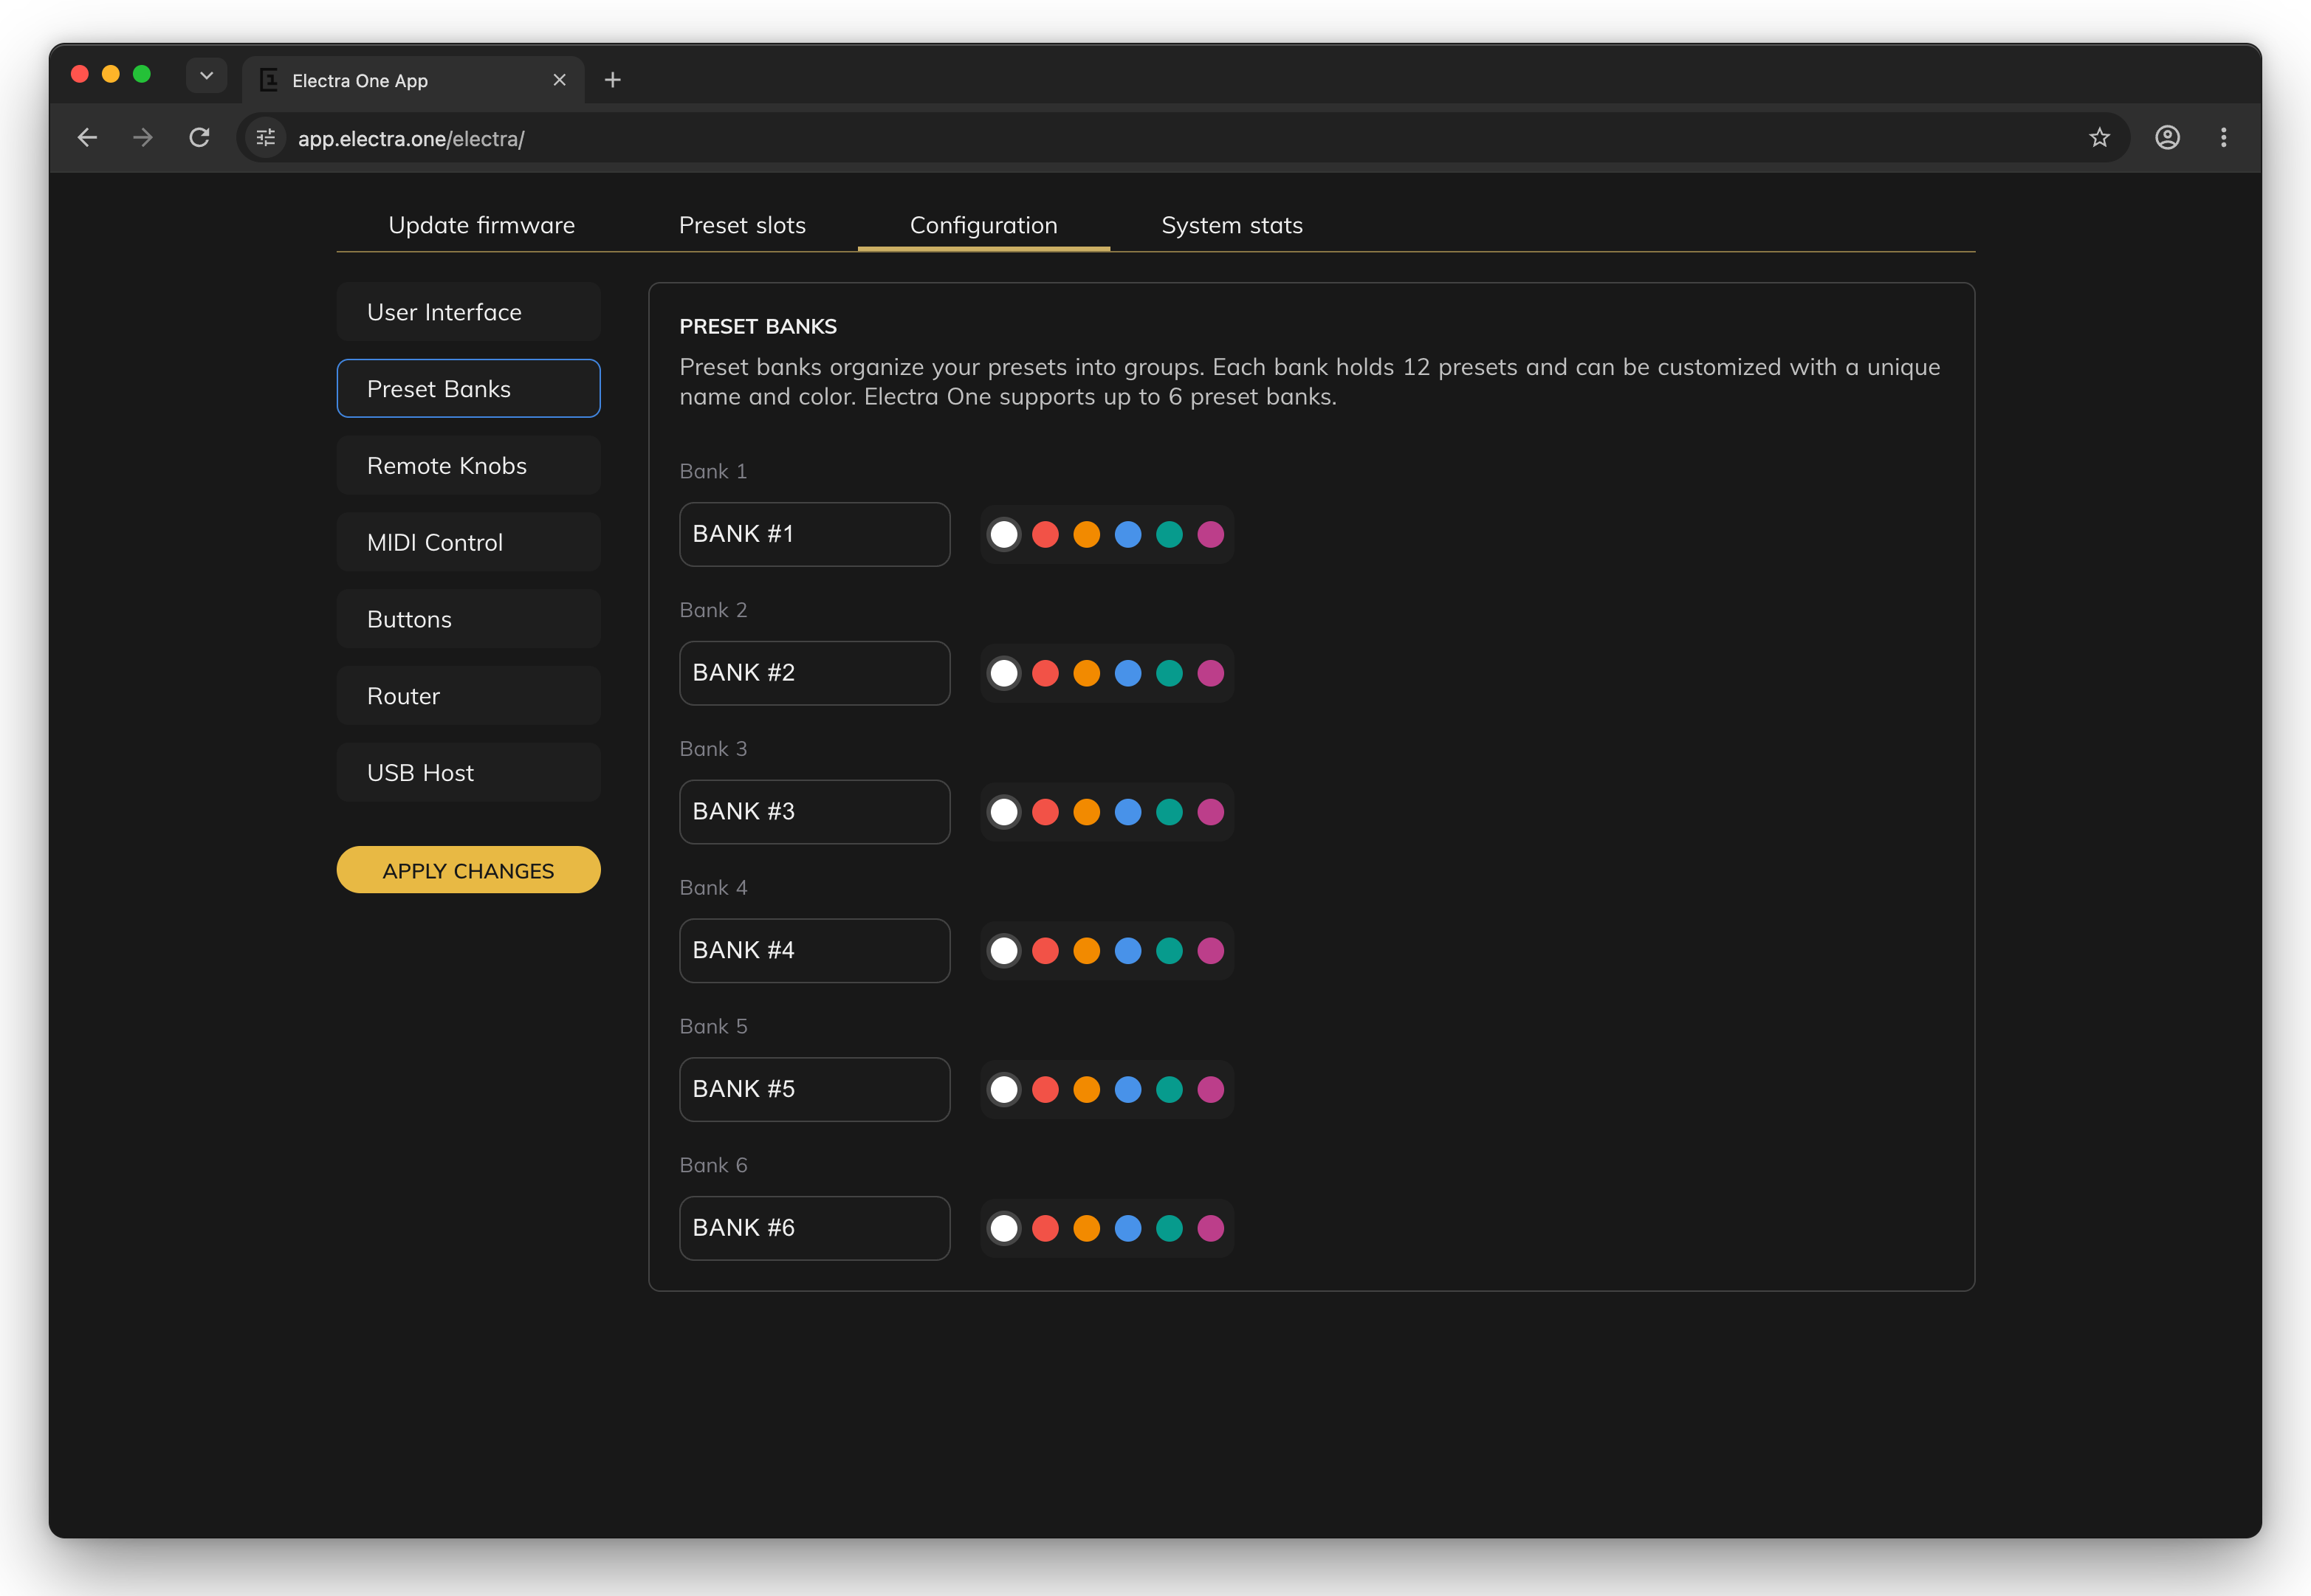
- The name is typed into the field. It is shown on the bank buttons of the controller's preset selection and on the Preset slots tab.
- The colour is one of the six dots after the name: white, red, orange, blue, green and purple. The bank buttons and the preset slots are drawn in it.
The banks start out as BANK #1 to BANK #6 in those colours, in that order.
Remote Knobs
Remote knobs let the knobs, faders or pads of another MIDI controller, or a DAW, move the controls of Electra One, and send the values back when a control moves on Electra One. The idea is explained in Remote knobs, and what happens when a fader and a control disagree in Remote knobs of The Concept of Control. This section sets the mappings that belong to the controller. A preset can carry a remote map of its own, made on the Surface tab of the Preset Editor, and while such a preset is loaded its map is used instead.
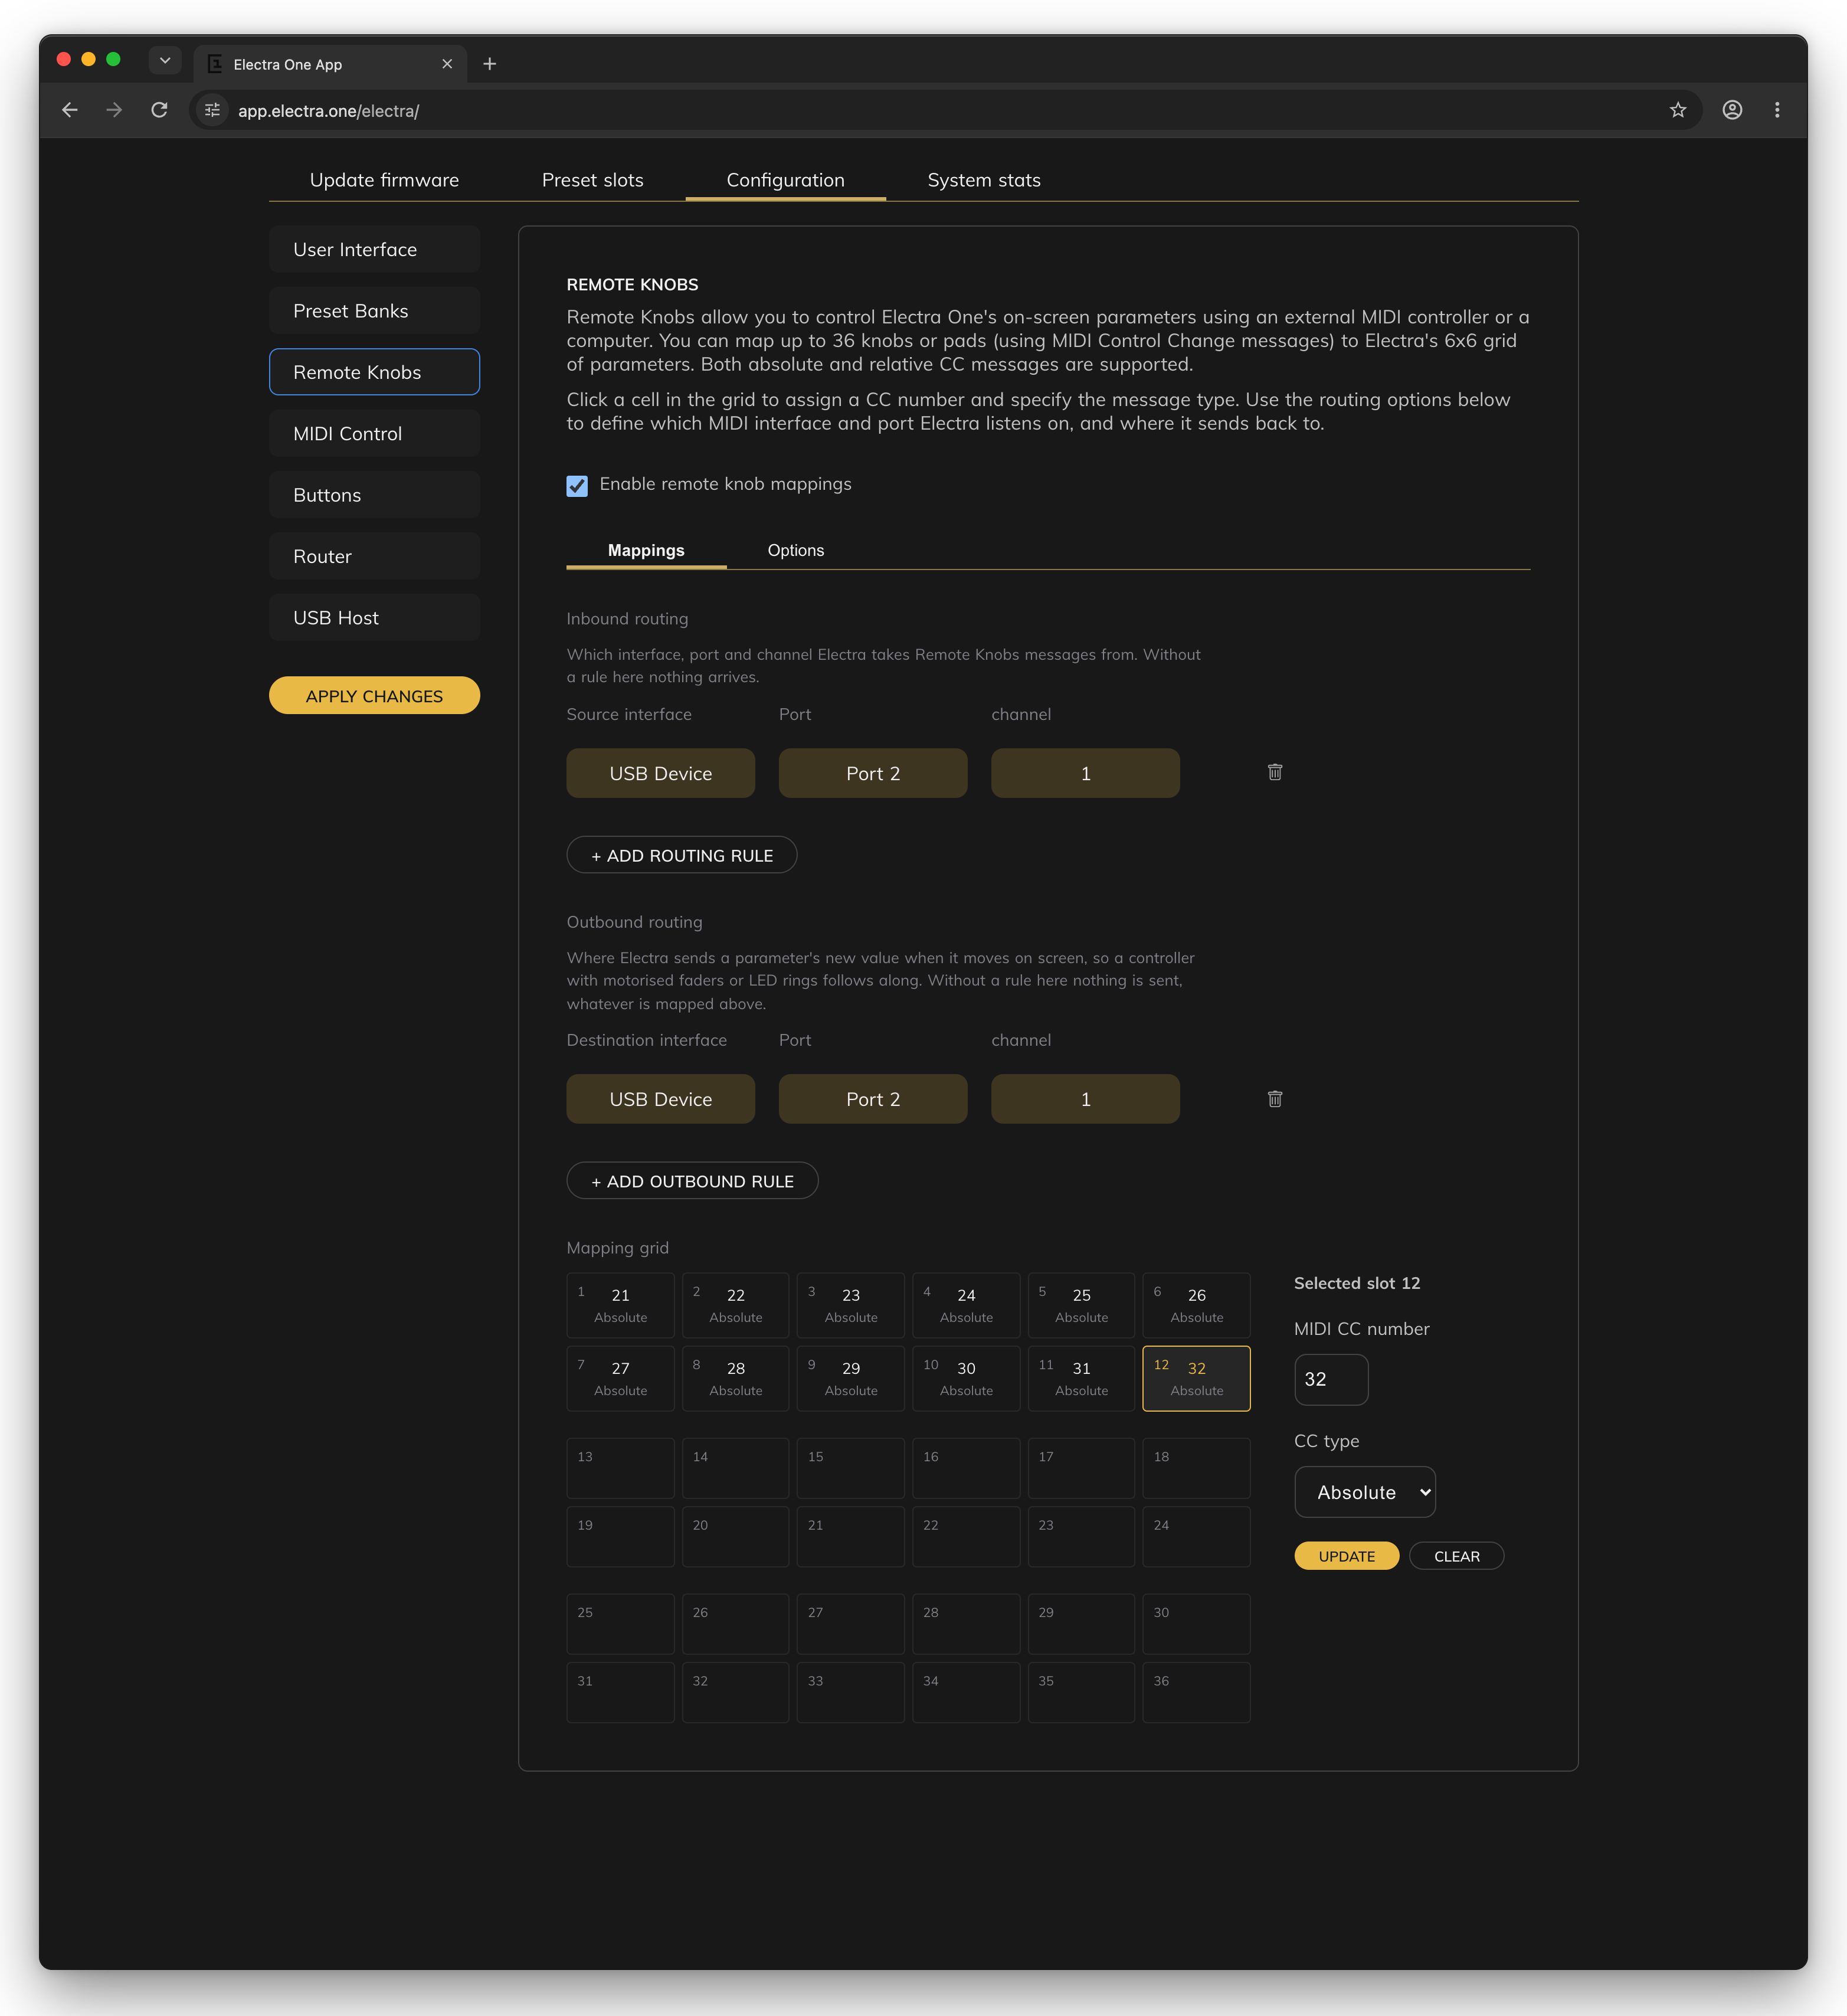
- Enable remote knob mappings switches the mappings of this section on and off. A preset's own remote map works either way.
- The Mappings tab has the routing and the grid:
- Inbound routing lists the rules for where the remote knobs listen: a source interface (
USB Host,USB DeviceorMIDI IO), a port and a channel, or all channels.+ ADD ROUTING RULEadds one, the bin icon removes one. Without a rule, nothing arrives. On the Mk2, these rules are theREMOTEcolumn of the controller's Router screen. - Outbound routing lists where the values of the controls are sent back when they move on Electra One: a destination interface, port and channel.
+ ADD OUTBOUND RULEadds one. Without a rule, nothing is sent. A controller with motorised faders or LED rings needs it to follow along, and a DAW records the movements from it. - Mapping grid has one cell for each knob slot, a position of one of Electra One's own knobs. The Mk2 has 36: the first two rows are the twelve knobs in control set 1, the next two control set 2, and the last two control set 3. The Mini has its eight knobs and, in a row under them, its four buttons. Click a cell, type the MIDI CC number the knob sends, choose the CC type,
Absolutefor faders and knobs that send a position orRelativefor endless encoders that send steps, and clickUPDATE.CLEARremoves the mapping. A mapped cell shows its number and type. A slot moves whatever control is at that position on the page you are looking at.
- Inbound routing lists the rules for where the remote knobs listen: a source interface (
- The Options tab has the settings for absolute faders:
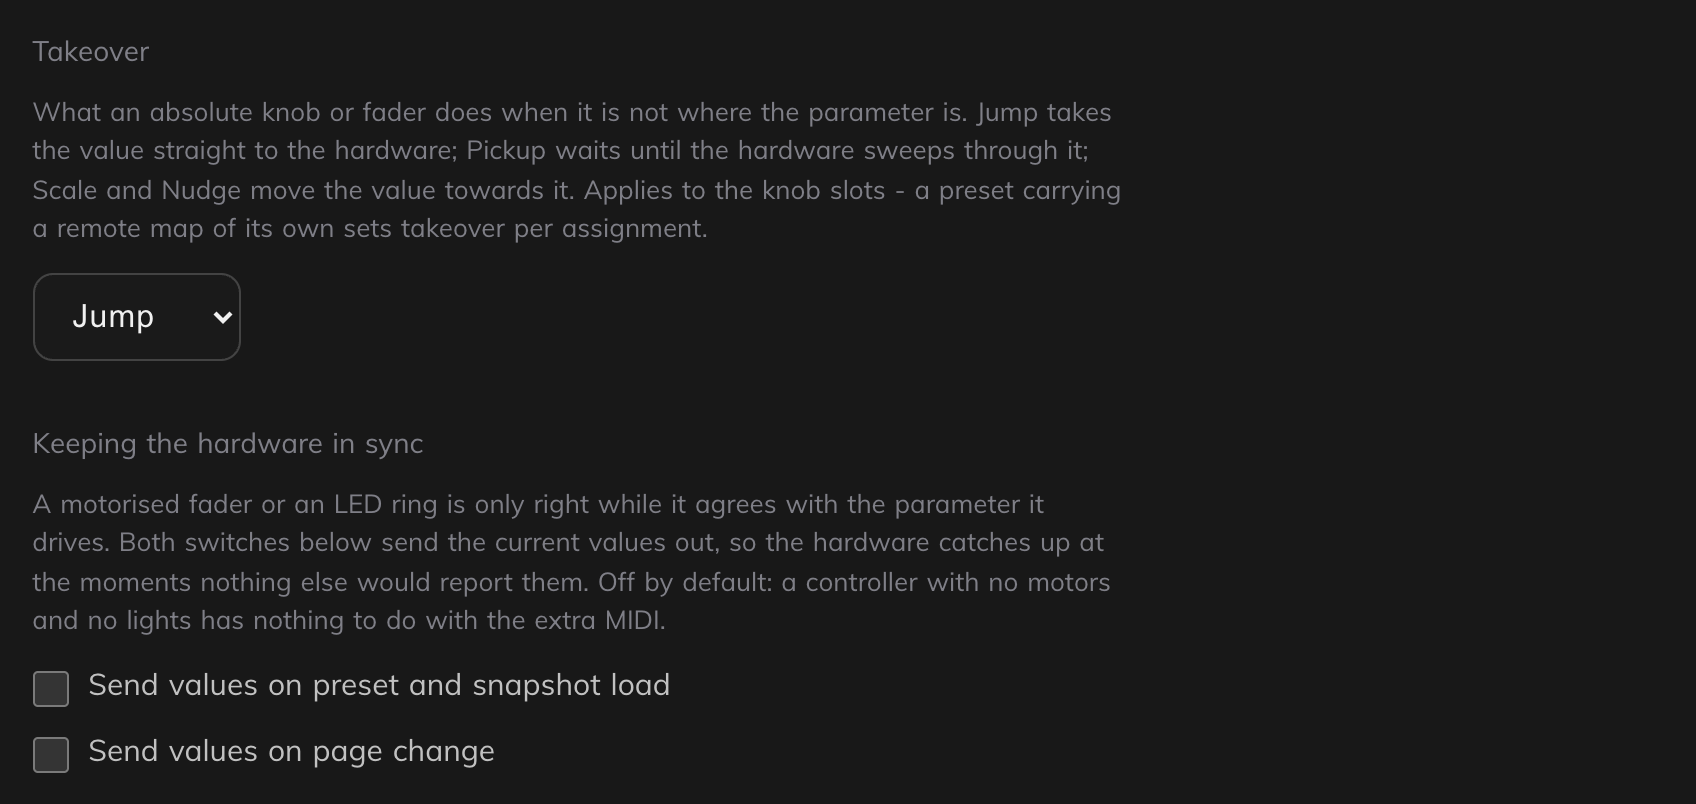
- Takeover decides what an absolute knob or fader does when it is not where the control is:
Jumptakes the value straight to the fader,Pickupwaits until the fader sweeps through the value, andScaleandNudgemove the value towards the fader. - Send values on preset and snapshot load and Send values on page change send the current values to the outbound destination at those moments, so a motorised fader or an LED ring shows the right value after a change nothing else would report. Both are off unless you turn them on.
On the Mk2, the same slots can be learned on the controller, in Remote Knobs of its Settings screen. The Mini's slots are described in Remote Knobs.
MIDI Control
MIDI Control runs a function of the controller when a MIDI message of your choice arrives: a footswitch turns the page, the pads of a small controller open the SNAPSHOTS window, a button in the DAW sends the patch request. It is explained in MIDI Control.
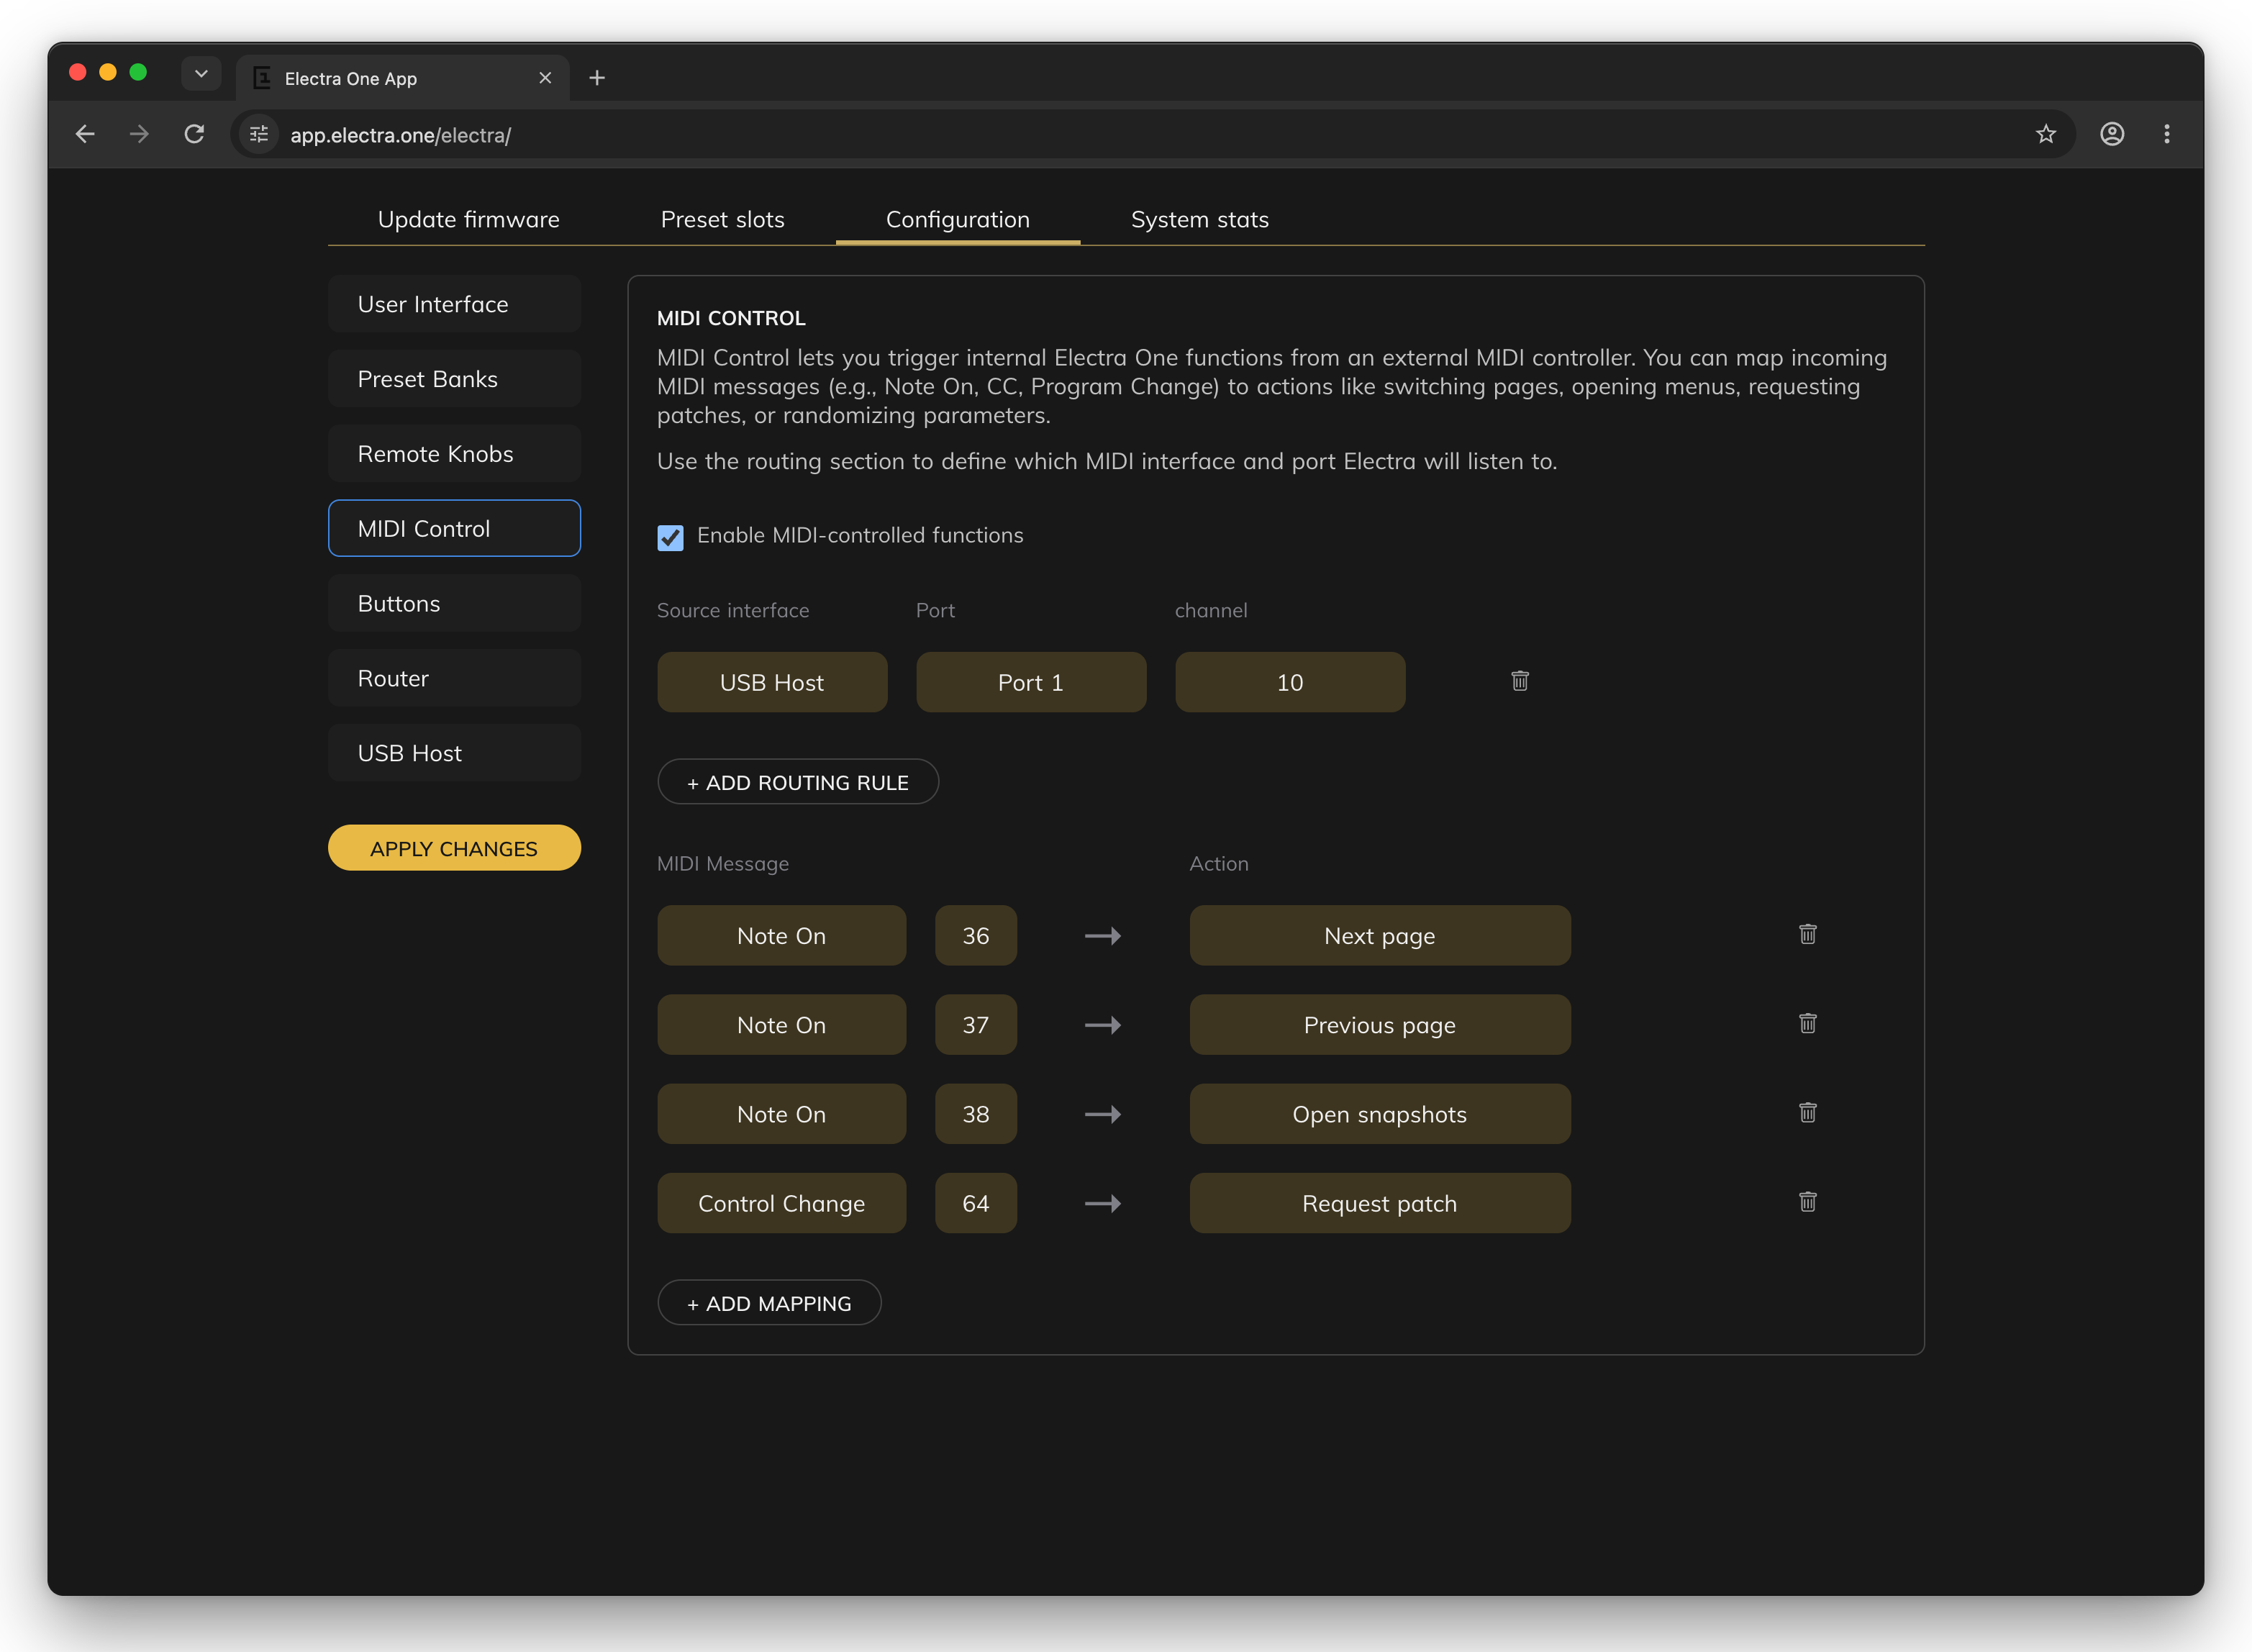
- Enable MIDI-controlled functions switches MIDI Control on and off. It is off until you turn it on, so mappings do nothing on a new controller until you do.
- The routing rules say where MIDI Control listens: a source interface, a port and a channel, or all channels.
+ ADD ROUTING RULEadds one. Without a rule nothing arrives. On the Mk2, these rules are theCTRLcolumn of the controller's Router screen. - The mappings connect one message to one action.
+ ADD MAPPINGopens a row: choose the MIDI Message,Note On,Note Off,Control ChangeorProgram Change, type its number, choose the Action and clickSave.Switch to pageandSwitch to presetask for the page or the preset number as well. The bin icon removes a mapping.
The actions are the functions of the controller: opening its windows, closing a window, switching control sets, pages and presets, the performance page, low sensitivity and alt mode, the patch request, the detail window and the default value of the touched control, setting every control to its default or a random value, and showing or hiding the row of page buttons. The Mk2's list is in The actions, and the shorter list the app offers for the Mini in MIDI Control.
A message that matches a mapping is used by MIDI Control and does not reach the preset, and neither does the Note Off of a key whose Note On ran an action. Every other message on the route reaches the preset as usual. A Control Change mapping runs its action for every value it receives, so a footswitch that sends 127 when pressed and 0 when released runs it twice.
The CTRL port of the USB Device interface works without any mapping: Program Changes switch presets and snapshots, Control Changes morph snapshots and notes start captures. See The CTRL port.
Buttons
The Buttons section sets what the hardware buttons do. The section differs between the two models.
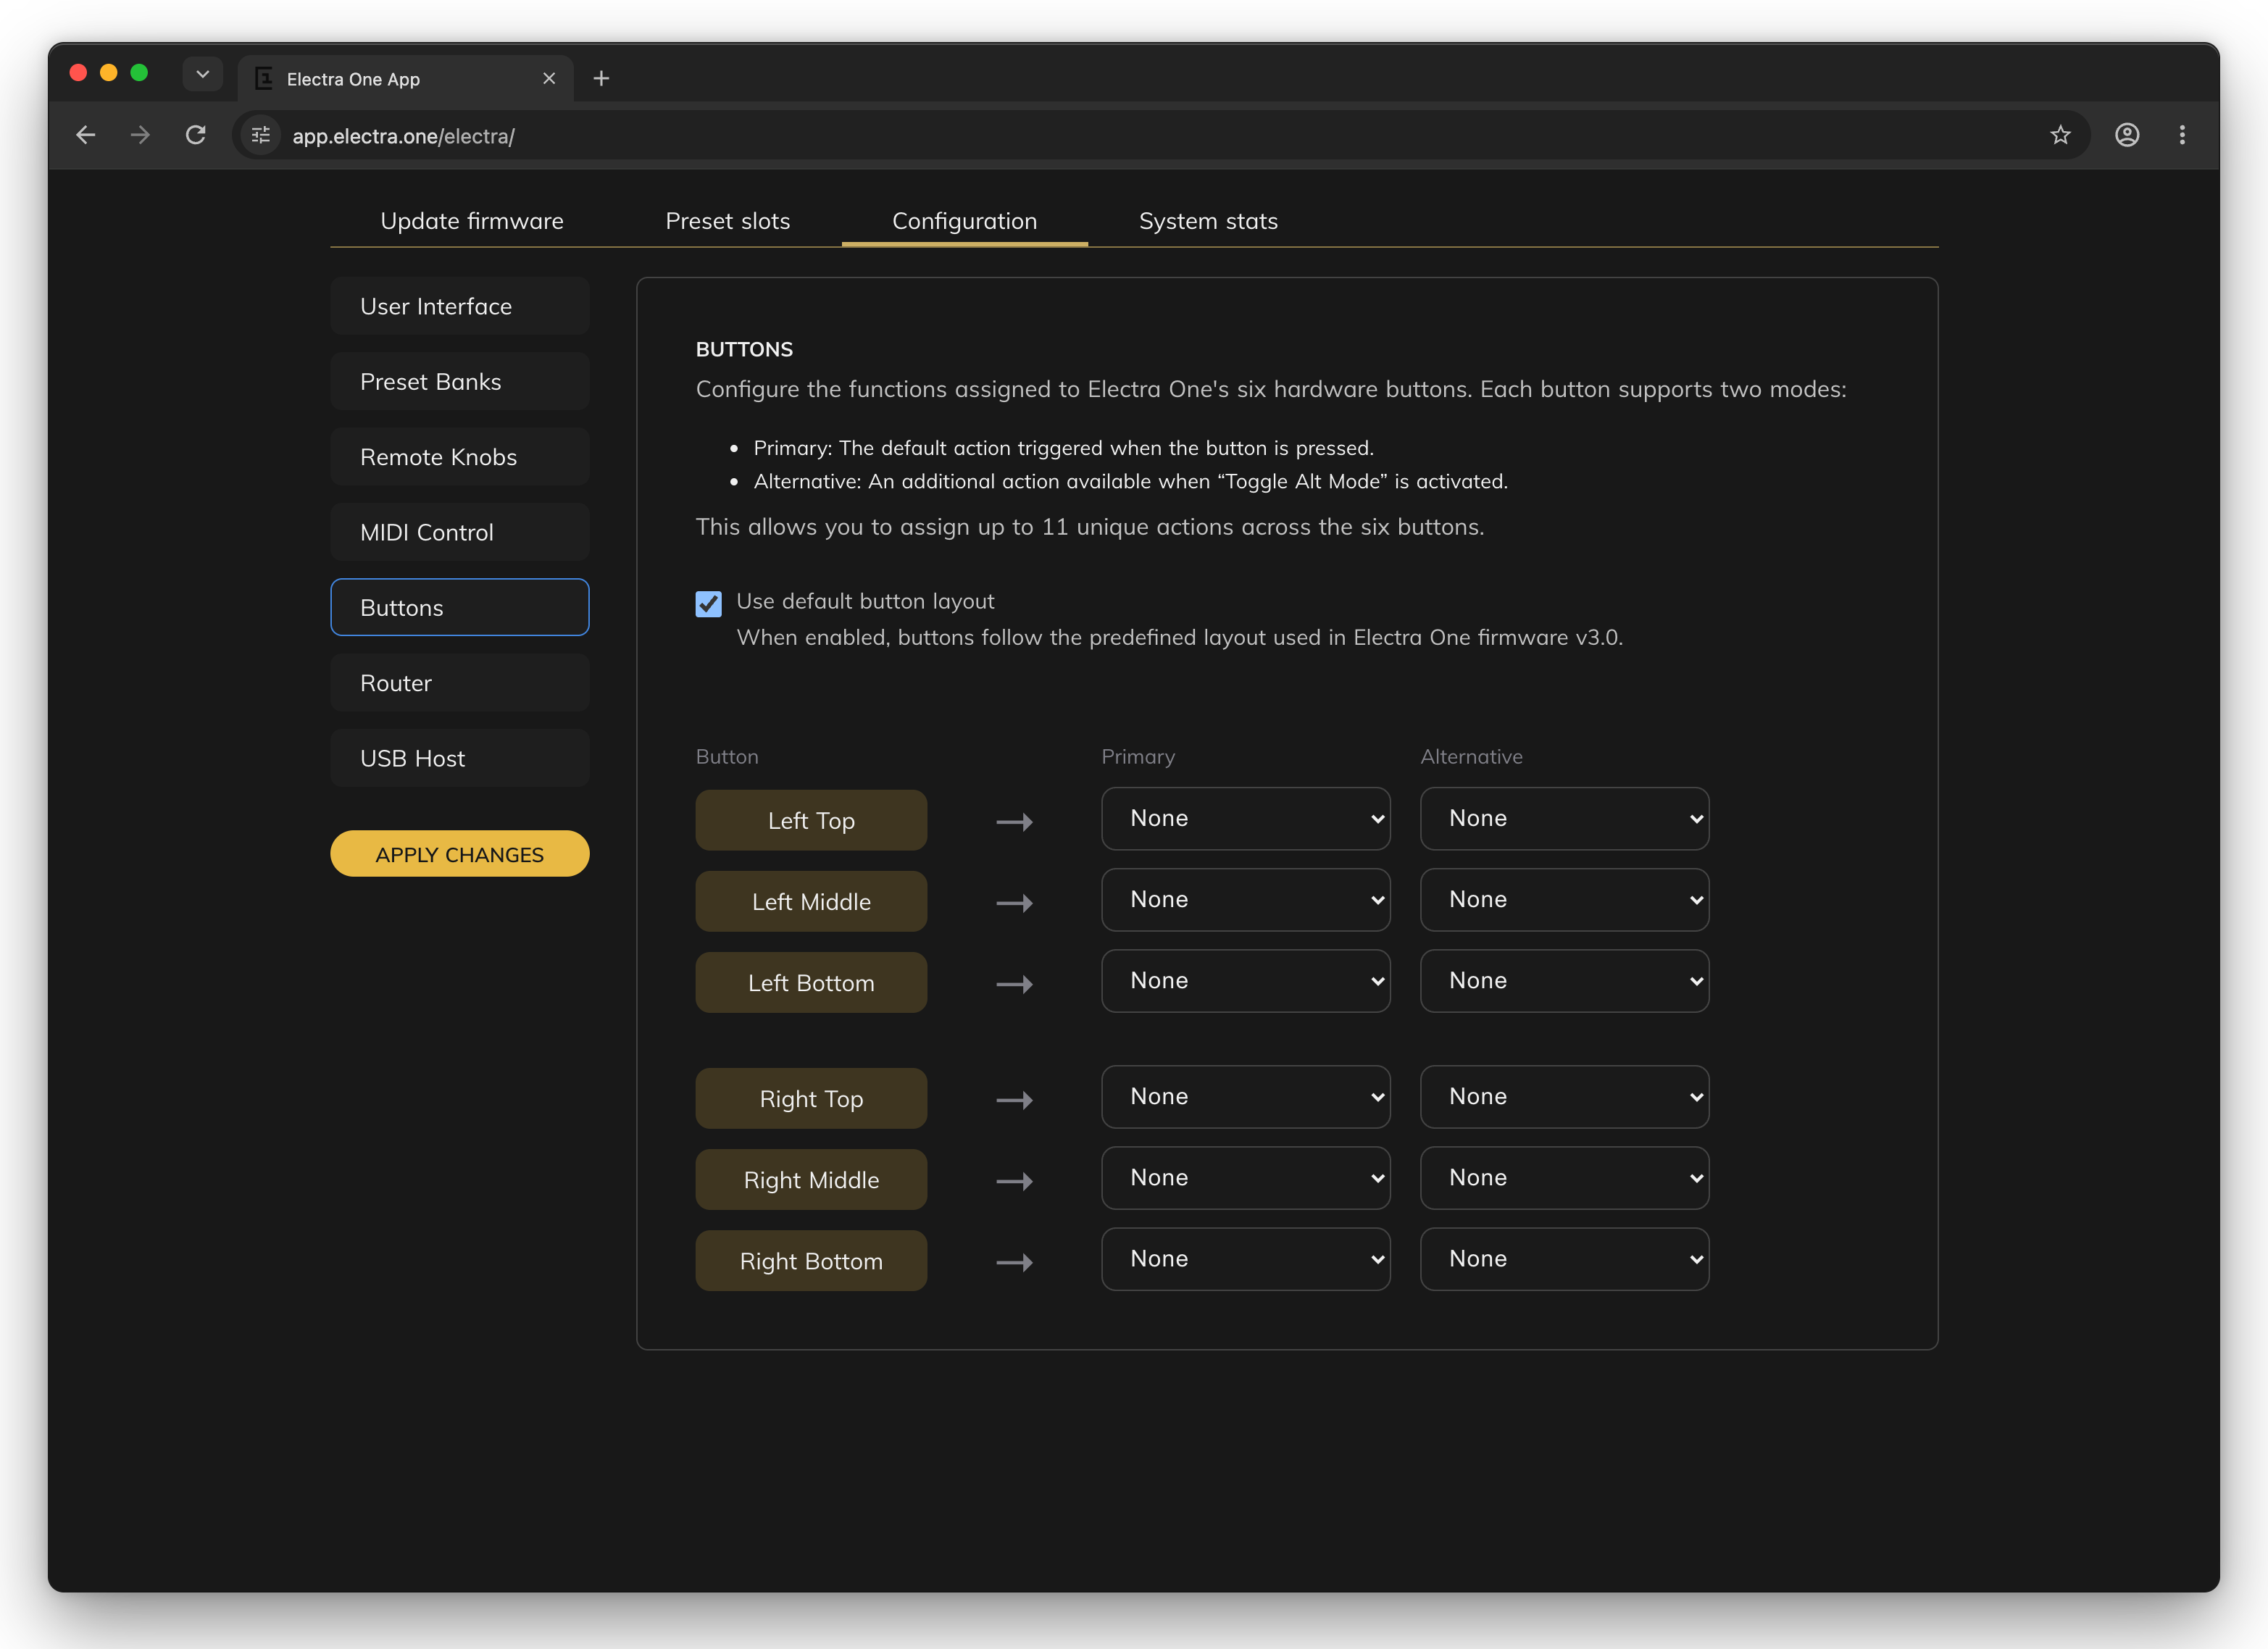
On the Mk2, the six buttons are Left Top, Left Middle, Left Bottom, Right Top, Right Middle and Right Bottom. Each has two actions:
- Primary is what the button does when you press it.
- Alternative is what it does while alt mode is on. Alt mode is switched with the
Toggle alt modeaction, given to one of the buttons or to a MIDI Control mapping. On a button it is momentary, like a shift key: the other buttons do their Alternative actions for as long as you hold it. A MIDI Control mapping flips it and it stays where it is put.
Use default button layout is on to start with, and while it is on the buttons follow the factory layout: control set 1, 2 and 3 on the left, and the patch request, the SNAPSHOTS window and page selection on the right. Switch it off to use the actions you choose here. Switching it on again does not delete them. On the controller the same switch is called Use customized buttons and works the other way round.
The actions are the ones of MIDI Control, without those that need a number or act on a window. They are listed in Buttons of the Mk2 chapter. A preset can override the buttons for its own slot with Assign Buttons in the Preset Menu, and the override wins over this section.
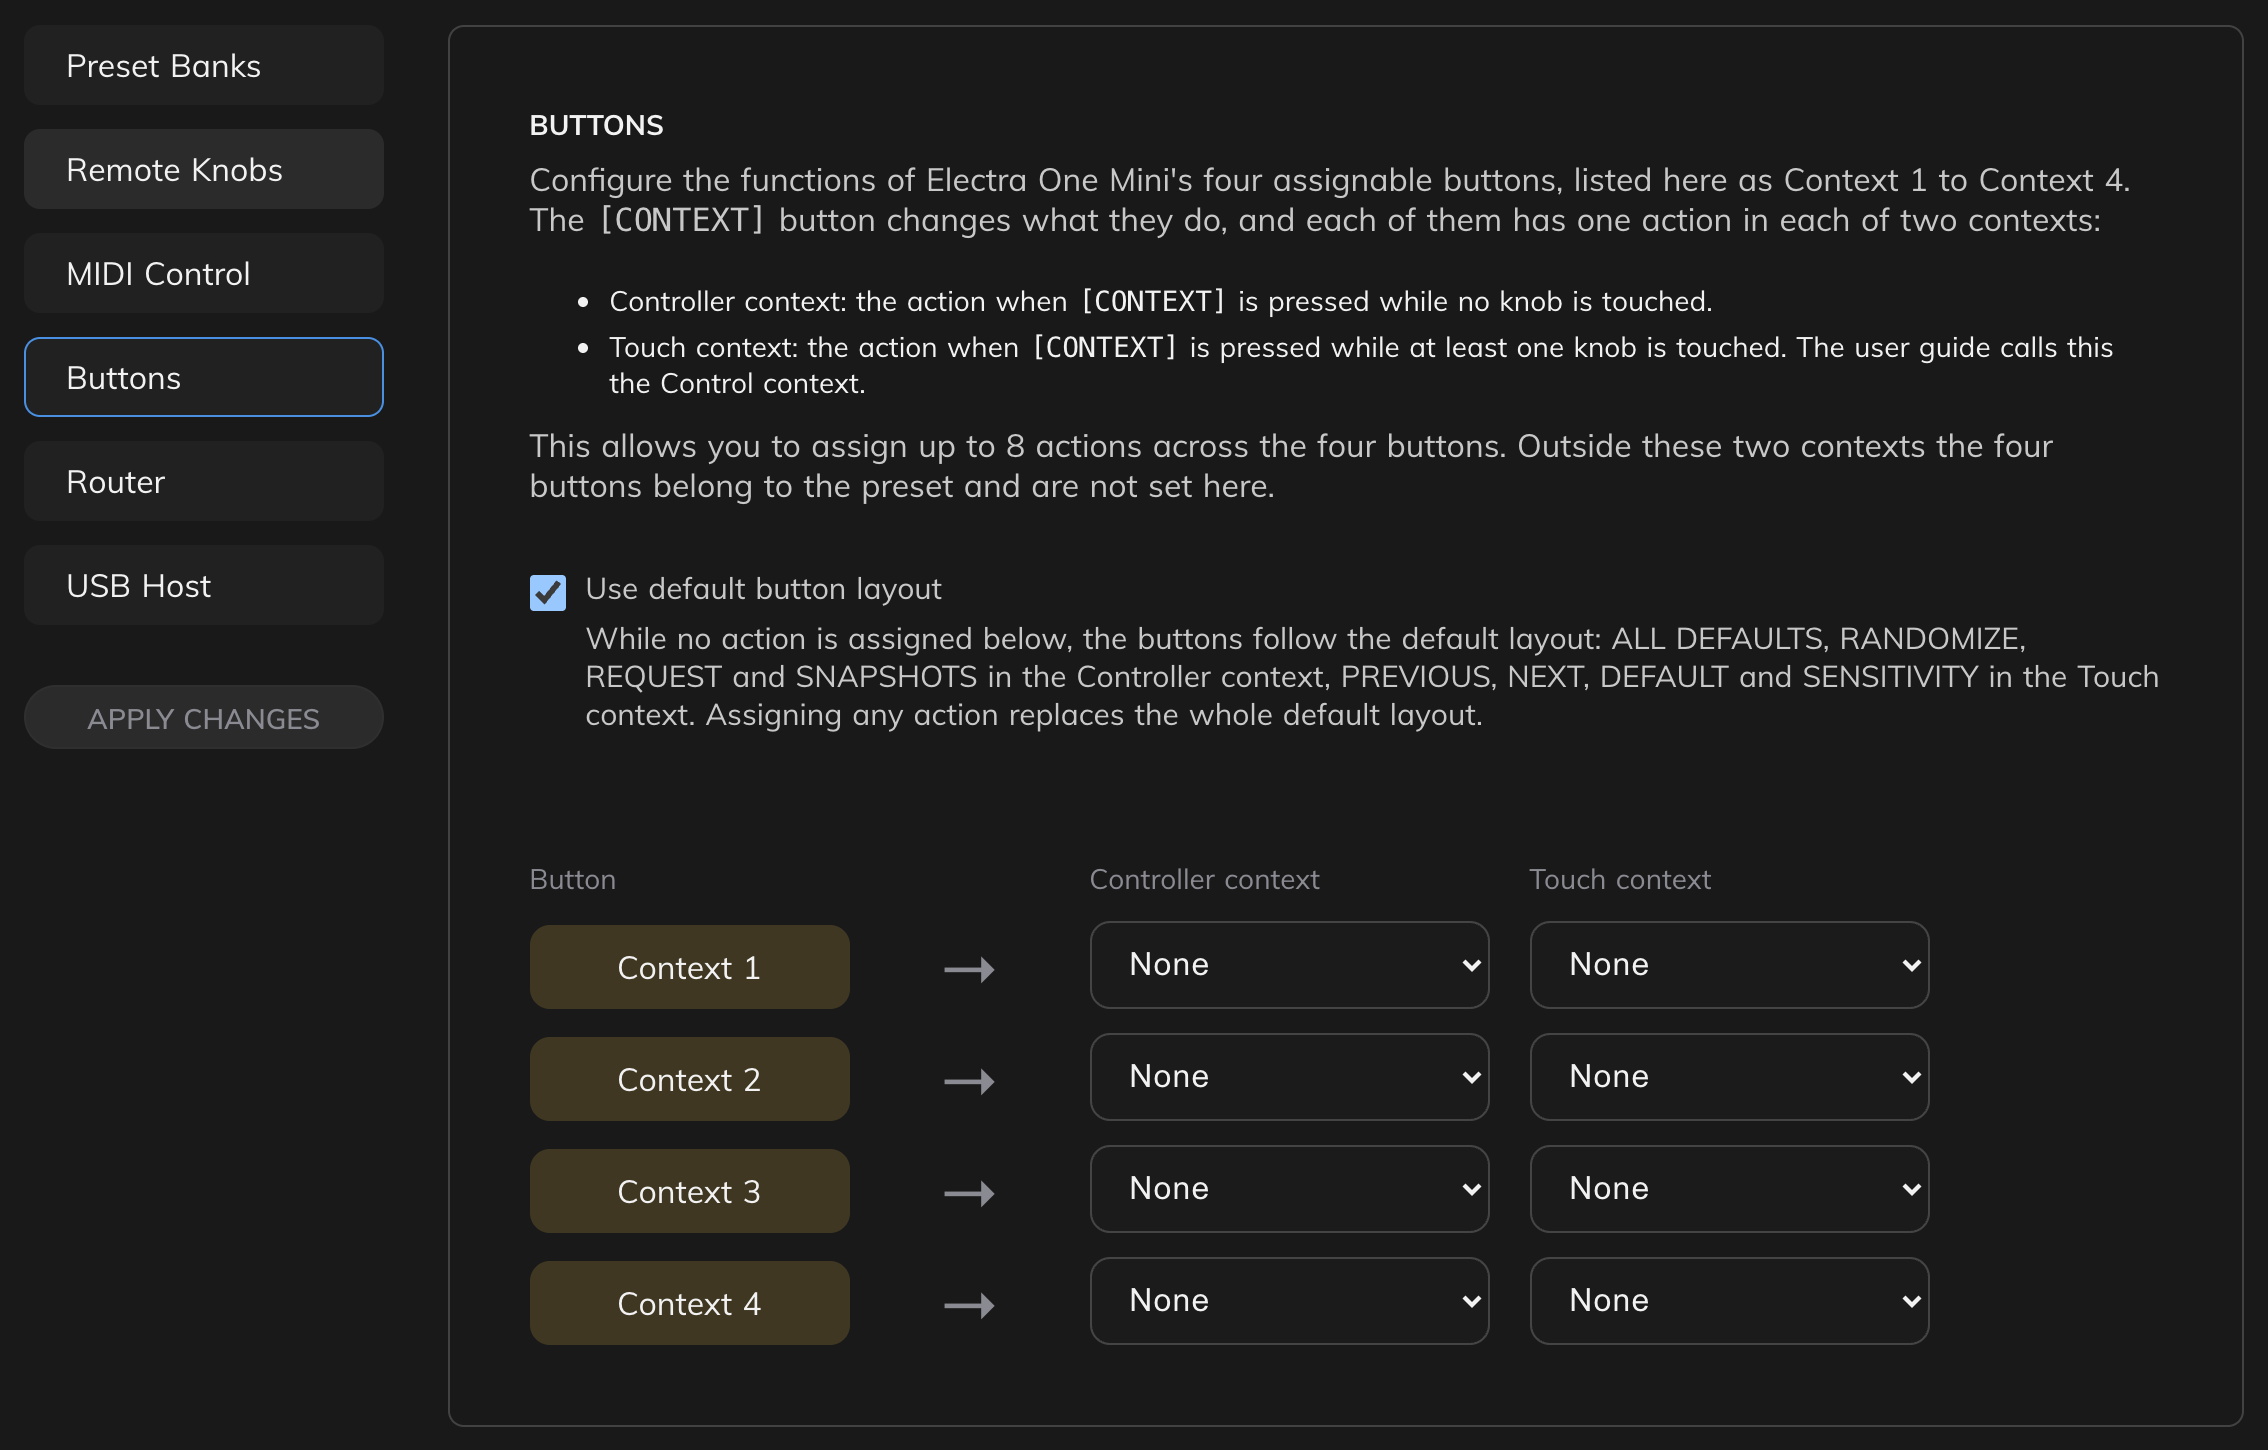
On the Mini, the four buttons belong to the preset's controls while a page is shown; they are set in the Preset Editor. This section sets what they do when [CONTEXT] is pressed. Context 1 to Context 4 are [BUTTON 1] to [BUTTON 4]. Controller context is the action when [CONTEXT] is pressed on its own, Touch context the action when it is pressed while a knob is touched. Use default button layout keeps the factory actions, ALL DEFAULTS, RANDOMIZE, REQUEST and SNAPSHOTS in the controller context and PREVIOUS, NEXT, DEFAULT and SENSITIVITY in the touch context. Choosing any action replaces the whole layout, and the buttons left at None do nothing. See Buttons of the Mini chapter.
Router
The router passes MIDI messages between Electra One's interfaces: the USB Device port, which is your computer, the USB Host port and the MIDI sockets. How it works, and what a preset's router script can do, is explained in Router.
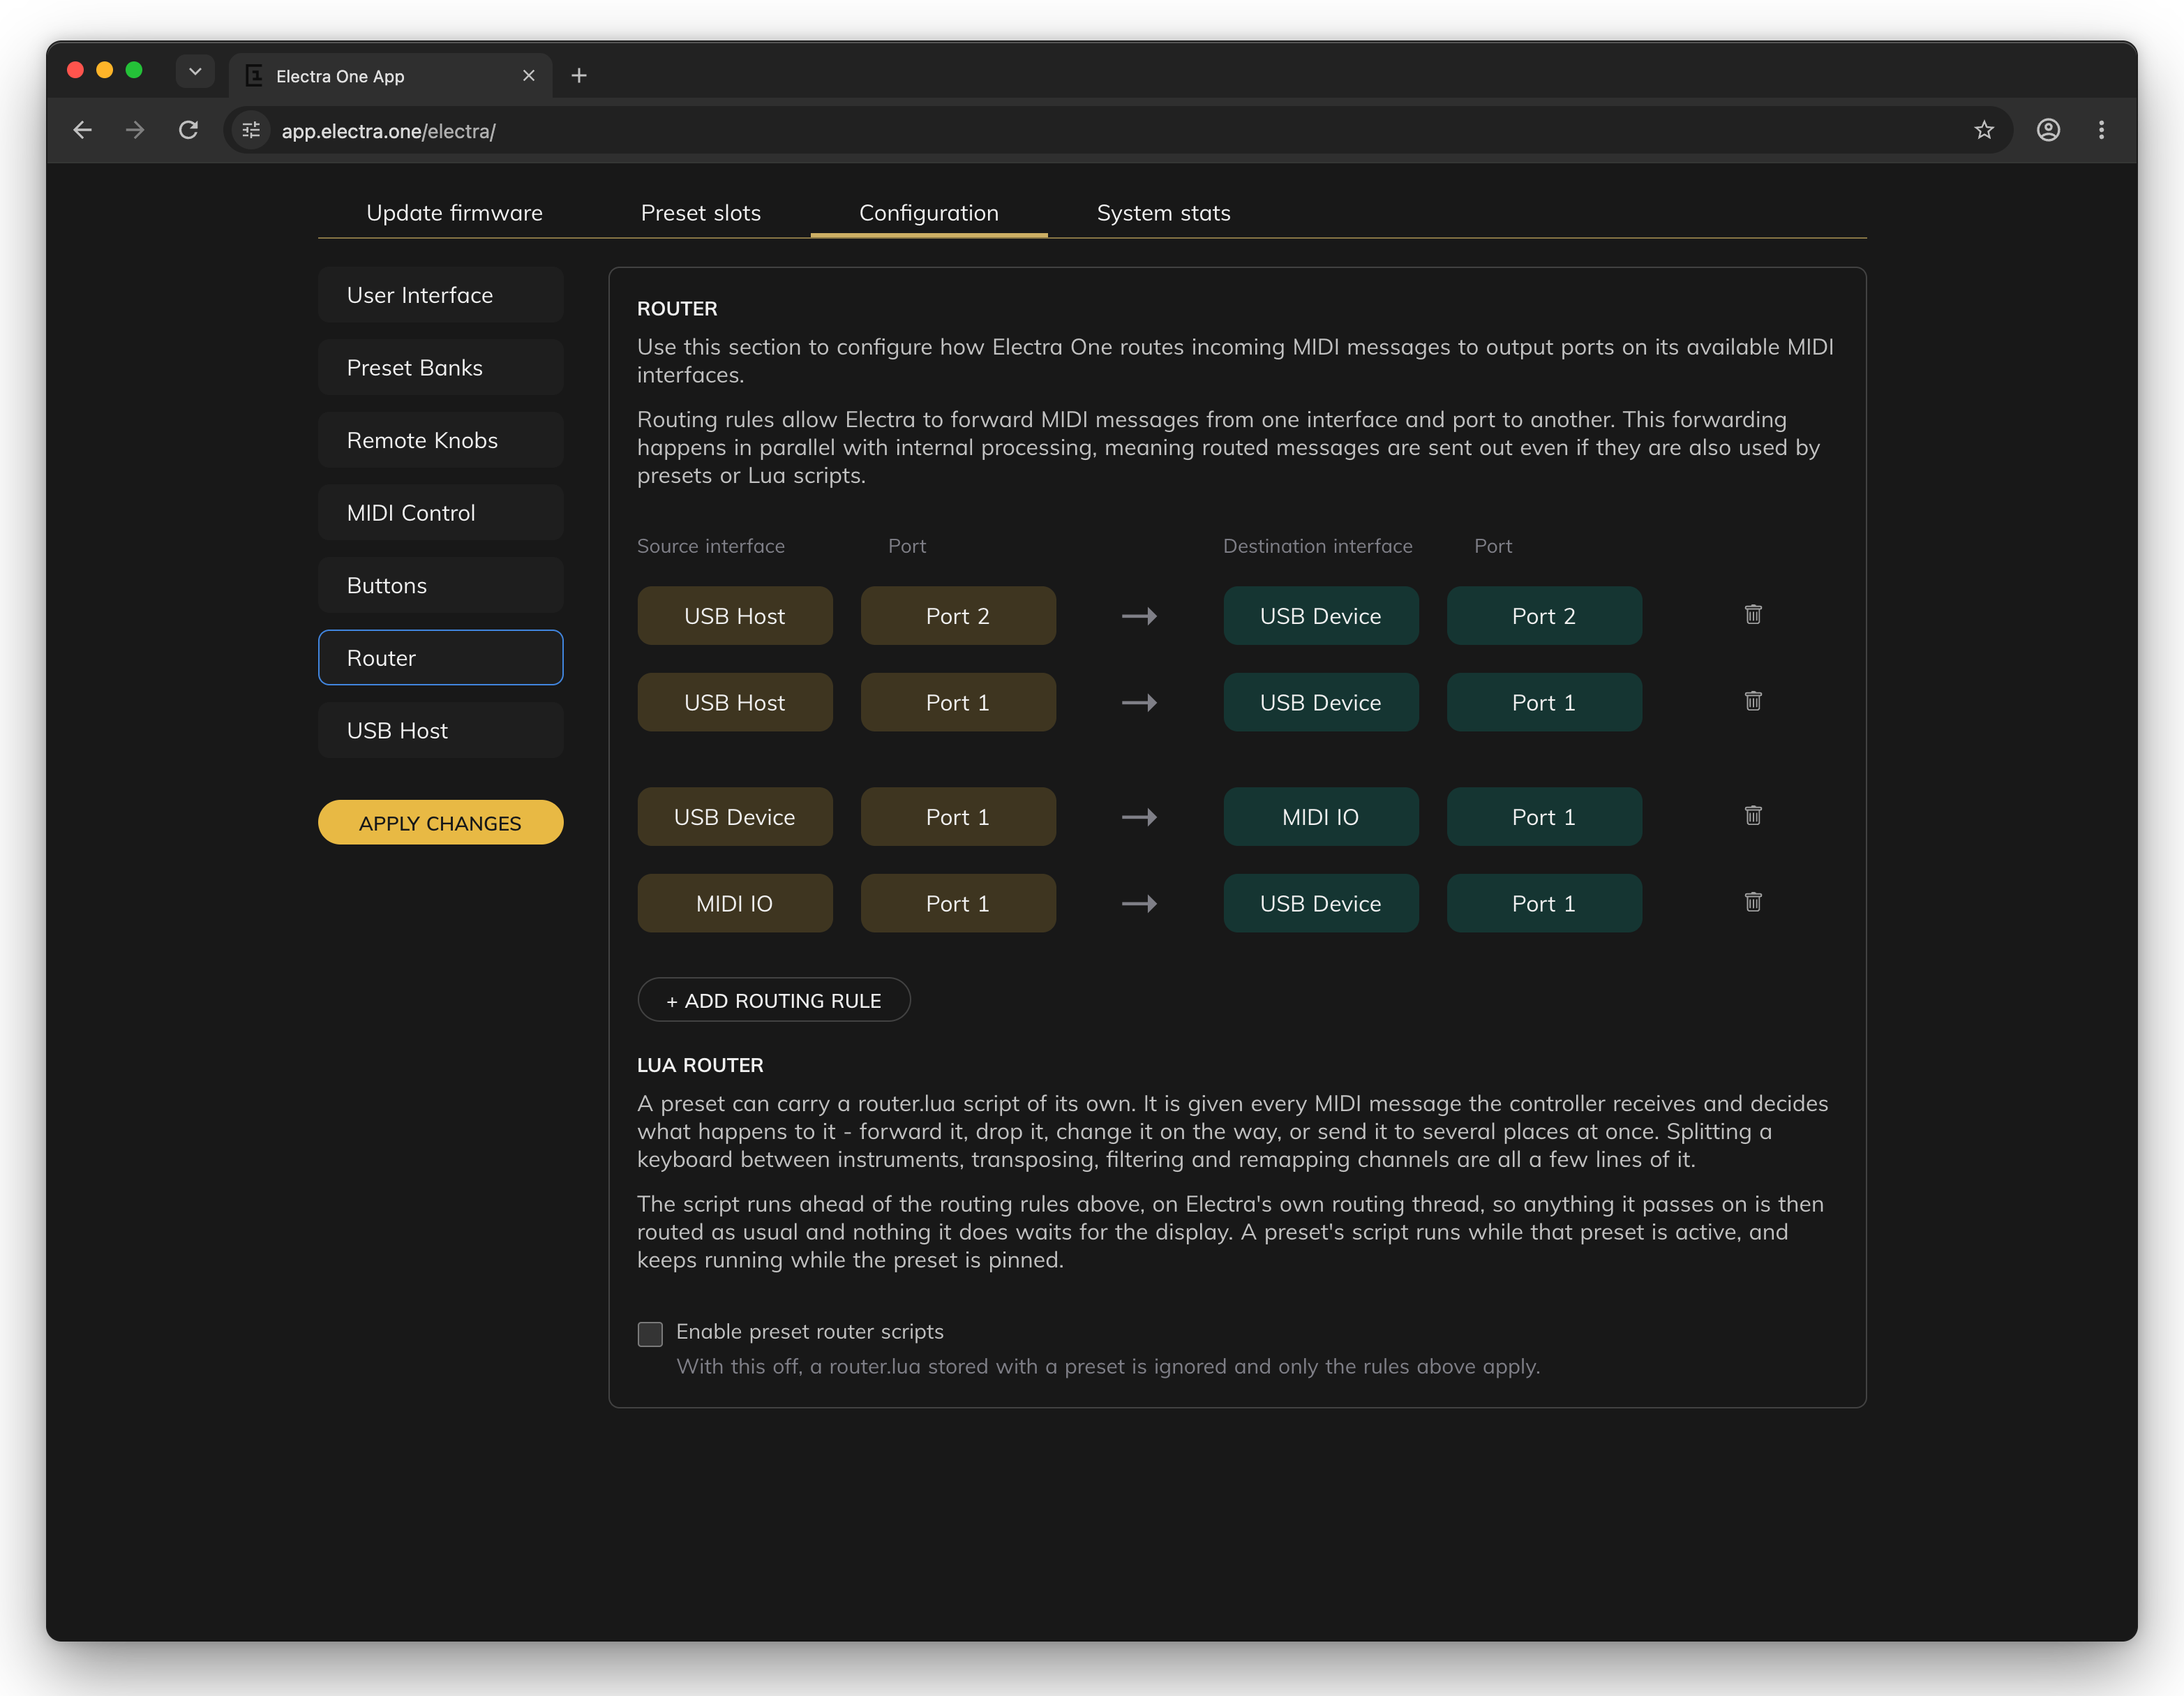
- Each routing rule takes the messages that arrive on a source interface and port, and sends them out of a destination interface and port. The interfaces are
USB Host,USB DeviceandMIDI IO, each withPort 1andPort 2. A rule forwards every message unchanged, on every channel, and the preset receives the messages as well.+ ADD ROUTING RULEadds a rule, the bin icon removes one. The Mini has one pair of MIDI sockets, so on the Mini a rule toMIDI IOalways sends toPort 1. - The rules that send messages to the remote knobs and to MIDI Control are not here. They are the routing rules of the Remote Knobs and MIDI Control sections.
- Enable preset router scripts, under Lua router, allows a preset to run the
router.luascript stored with it. The script sees every message the controller receives and decides what happens to it, before the rules above. It is off until you turn it on, and while it is off a router script in a preset slot is ignored and only the rules apply. There is nothing for this switch on the controller.
On the Mk2, the same rules are the grid of the controller's Router screen.
USB Host
The USB Host section decides which of Electra One's ports a USB MIDI device on the USB host port uses, so that presets and routes can tell two devices apart, and so that a pad controller can drive Electra One itself.
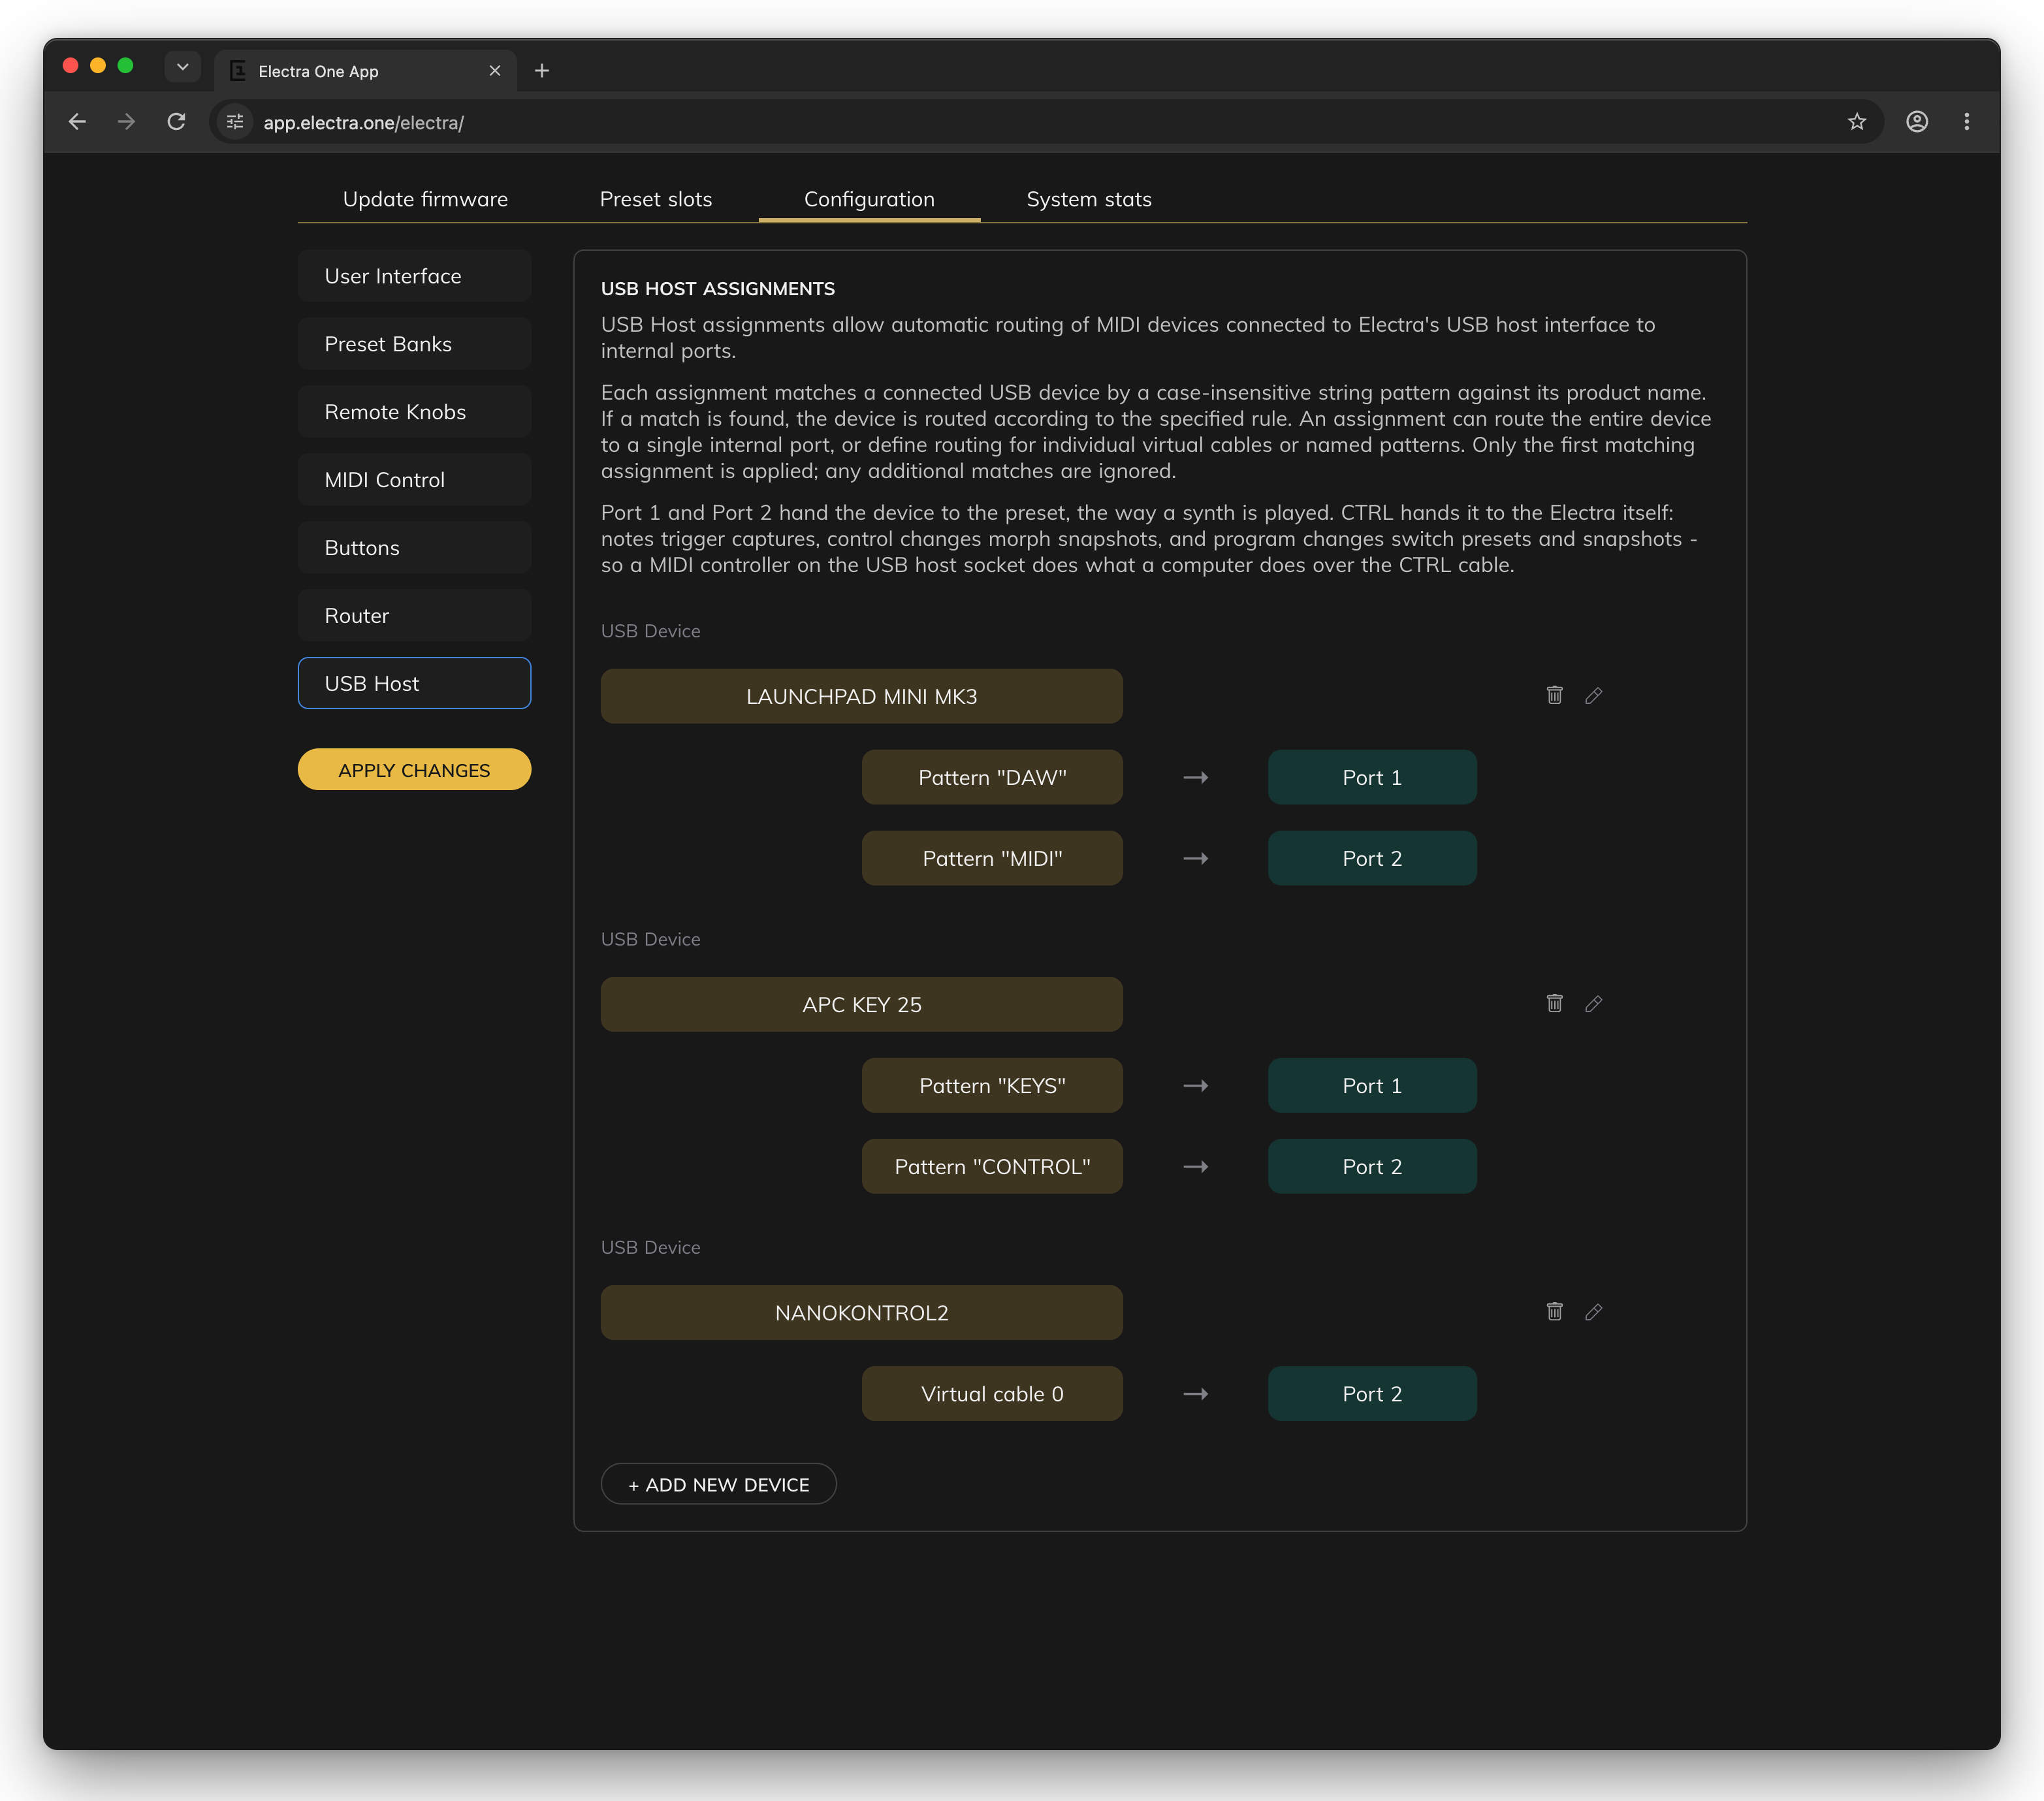
+ ADD NEW DEVICEadds an assignment: a device name pattern and a port. The assignment matches a device whose product name, the name the controller's status bar shows, contains the pattern. Upper and lower case do not matter. The port isPort 1orPort 2, which hand the device's messages to the preset the way an instrument's messages arrive, orCTRL, which hands them to the controller itself as if they came from the computer's CTRL port: notes start captures, Control Changes morph snapshots, and Program Changes switch presets and snapshots.- The pencil icon opens an assignment for editing. There you change the pattern, choose the port of each line, and use
+ ADD DEVICE PORTto give a part of the device its own port: type the number of one of the device's virtual cables, counted from 0, or a pattern that matches the name of one of its ports. A device with lines like that uses only the cables and ports the lines name.Donecloses the editing. - The bin icon deletes an assignment.
Only the first assignment that matches a device is used, and a device that no assignment matches uses Port 1. Assignments apply when the device is plugged in, so a device that is already connected is unplugged and connected again after APPLY CHANGES.
On the Mk2, the ports of the connected devices can also be assigned on the controller, in its USB Host window, and SAVE DEVICE ASSIGNMENTS there writes the same list.
System stats
The System stats tab reads figures about the controller's load, latency and memory. They help you find out whether a preset asks too much of the controller, and what is wrong when something feels slow.
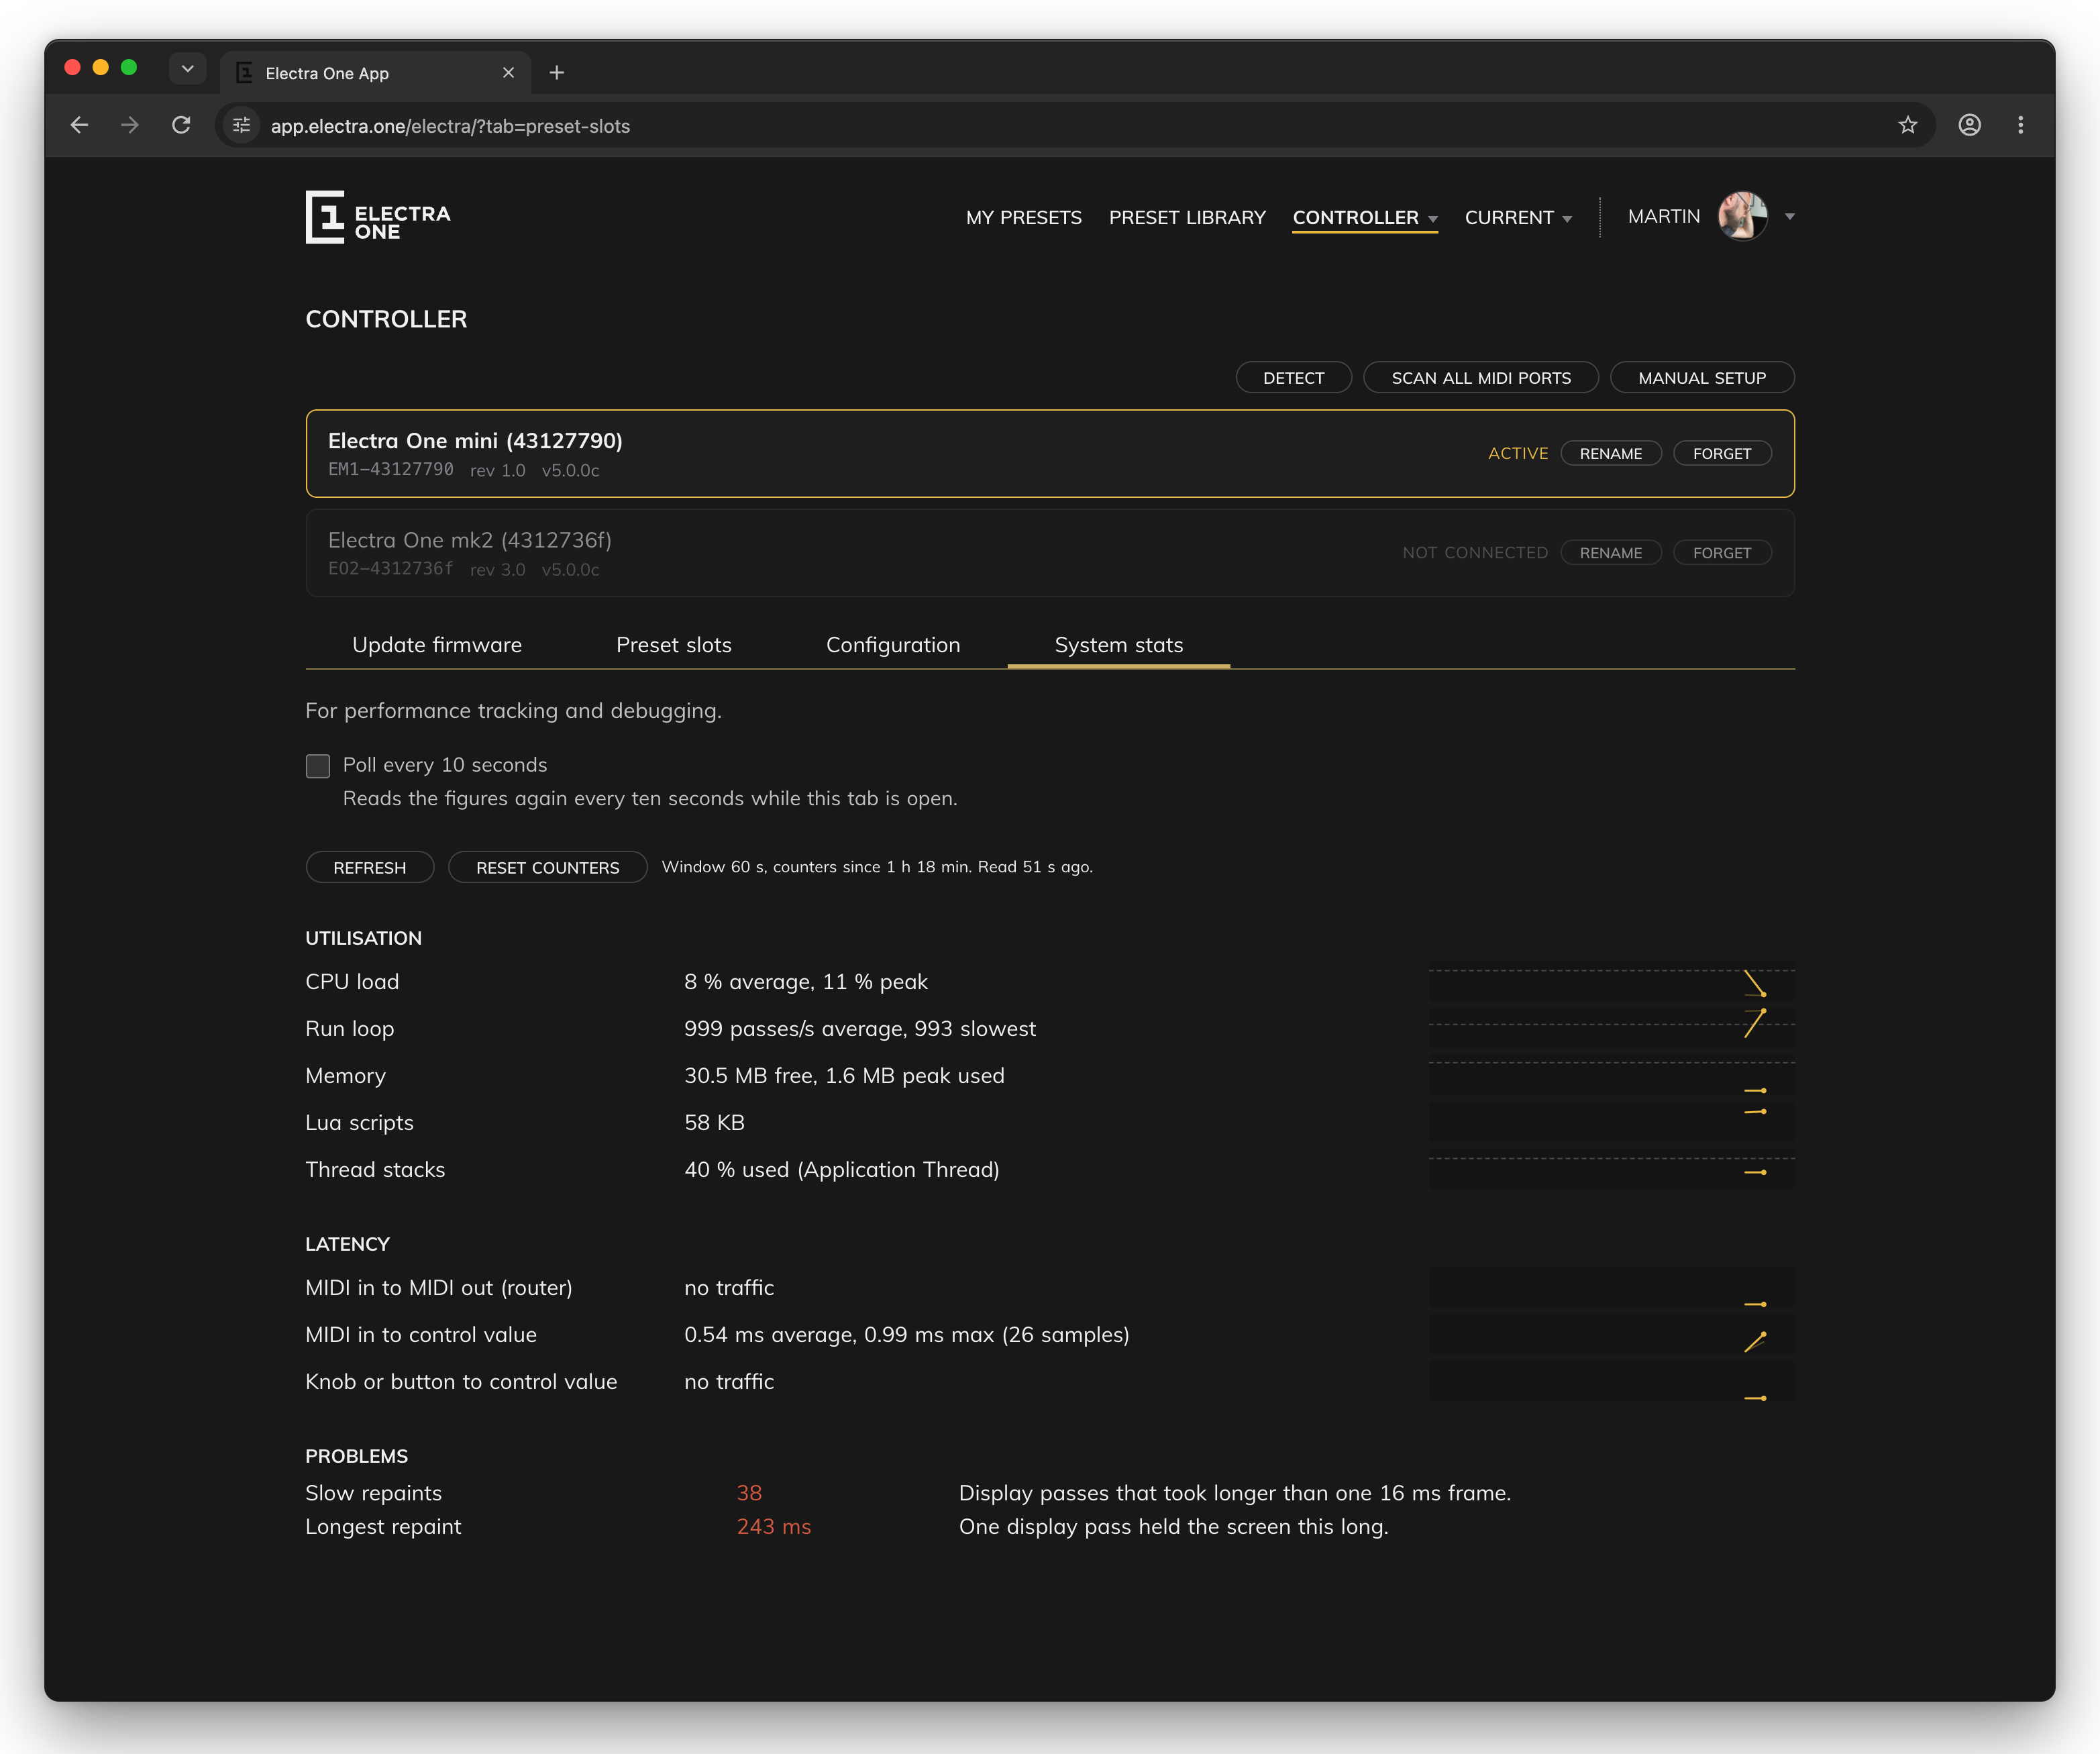
Poll every 10 secondsreads the figures again every ten seconds while the tab is open.REFRESHreads them once.RESET COUNTERSsets the problem counters back to zero, so you can see what happens from now on.- The line next to the buttons says how long the figures cover and when they were read.
Each figure has a small chart on the right with its last ten minutes.
Utilisation
| Figure | What it means |
|---|---|
| CPU load | How busy the processor was over the last minute, on average and in the busiest second. |
| Run loop | How many times per second the controller's main loop ran. About 1000 is healthy. A much lower number means something holds it up. |
| Memory | Free memory, and the most memory that was in use at one time. |
| Lua scripts | How much memory the Lua scripts of the running presets use. |
| Thread stacks | How full the stack of the busiest part of the firmware is. |
Latency is the time between a cause and its effect, in milliseconds, as an average and the longest time, with the number of measurements. "no traffic" means nothing happened to measure.
| Figure | What it measures |
|---|---|
| MIDI in to MIDI out (router) | From a message arriving to the router sending it on. |
| MIDI in to control value | From a message arriving to the control on screen taking its value. |
| Knob or button to control value | From turning a knob or pressing a button to the control taking its value. |
Problems lists only the counters that are above zero since the counters were last reset. With no problems, it says "None since the counters were reset".
| Problem | What it means |
|---|---|
| Timer ticks skipped | A preset's timer.onTick function takes longer than the timer period. |
| Timer callback errors | A preset's timer function stopped with a Lua error. |
| Scripts stopped by force | A Lua script ran too long and was stopped. |
| MIDI out dropped | An output could not send for 250 ms, for example because the computer did not read from the USB port. |
| MIDI in dropped | USB MIDI arrived faster than the controller could take it. |
| DIN transmit timeouts | The MIDI IO port could not send its bytes in time. |
| MIDI callbacks shed | MIDI arrived faster than a preset's Lua MIDI functions could handle it. |
| Parameter updates dropped | Incoming values arrived faster than the controls could show them, for longer than 250 ms. |
| Remote knob events dropped | A remote controller sent faster than the controller could handle. |
| Router packets dropped | A preset's router script could not keep up with the MIDI it receives. |
| Slow repaints | Screen updates that took longer than one frame (16 ms). |
| Longest repaint | Shown when one screen update took over 100 ms. |
| Timer load | Shown when a timer function takes over half of the time. |
| Thread stack nearly full | Shown when a stack is 90 % full or more. |
| Queue nearly full | Shown when one of the controller's message queues was 80 % full or more. At 100 %, messages are dropped. |
The current slot
The CURRENT menu
CURRENT in the top bar is the fastest way to switch presets on the active controller.
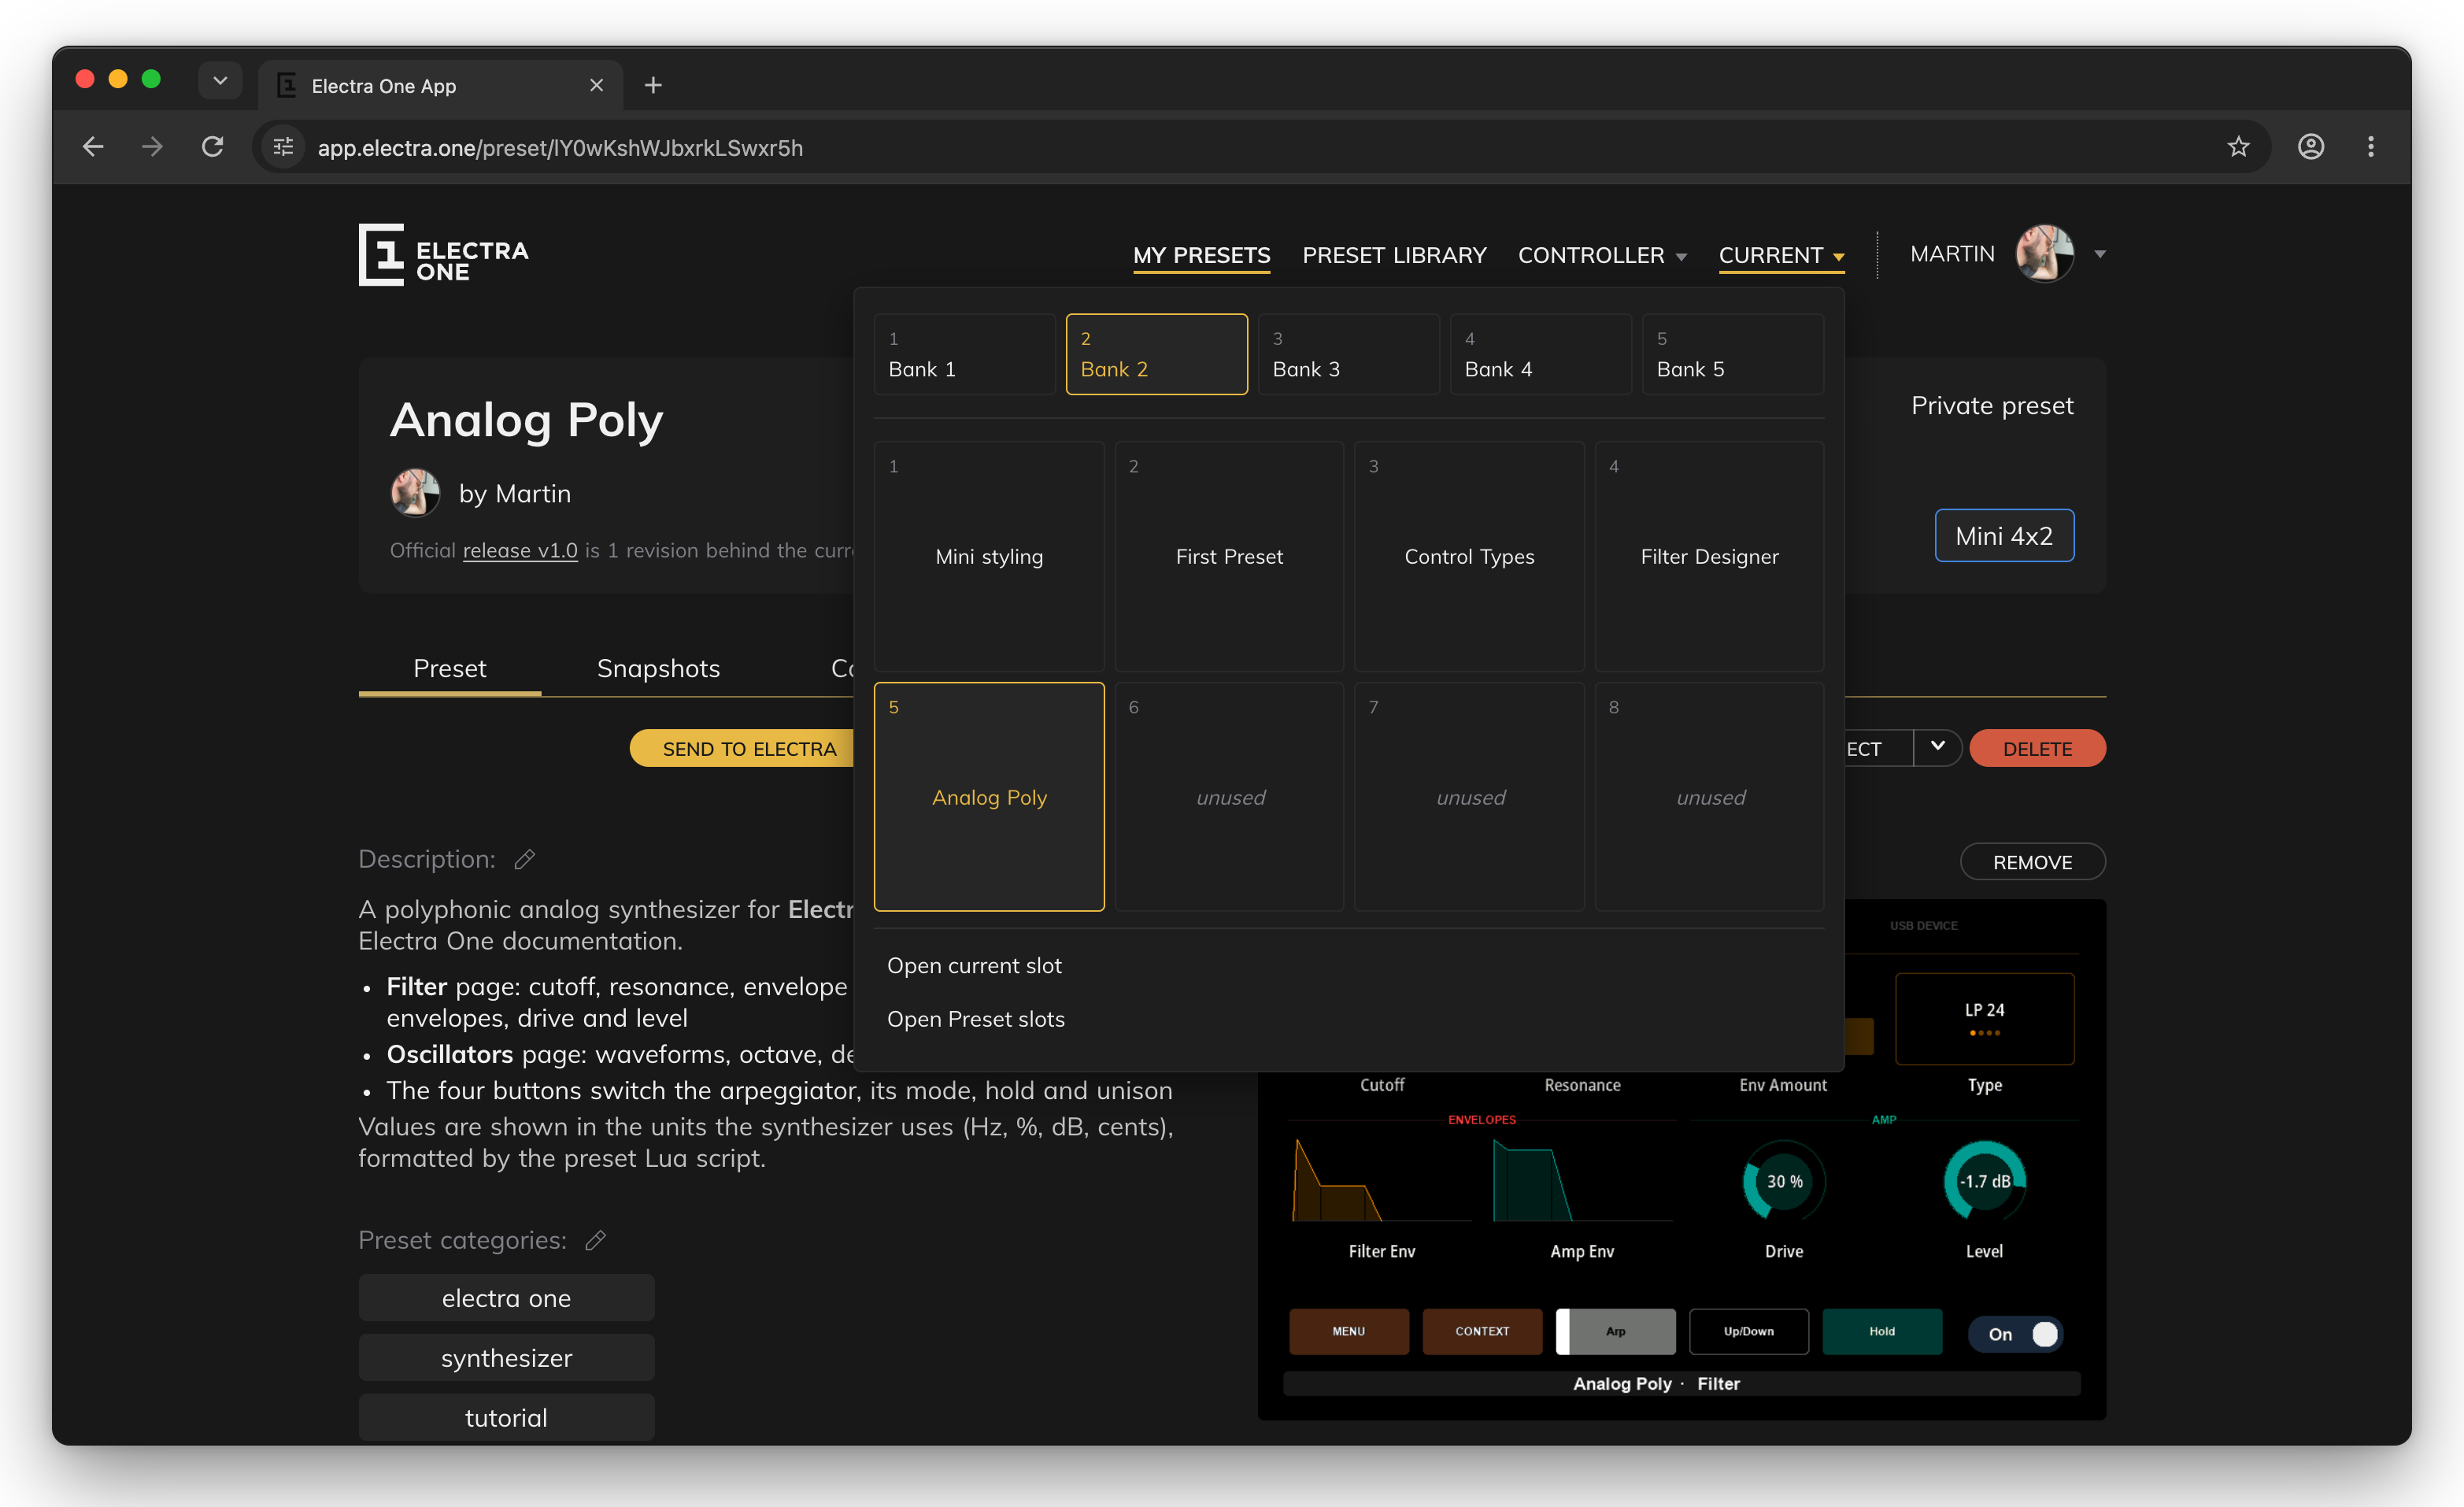
- Click a bank at the top to show its presets. This does not change the controller's bank.
- Click a preset to switch the controller to it. A pinned preset shows its pin.
Open current slotopens the page described below.Open Preset slotsopens the Preset slots tab.
The current slot page
The current slot page shows the files of the slot the controller is on. It follows the controller: when you switch presets, on the controller or in the application, the page shows the new slot. It is the place to import, back up, restore and edit what is in a slot.
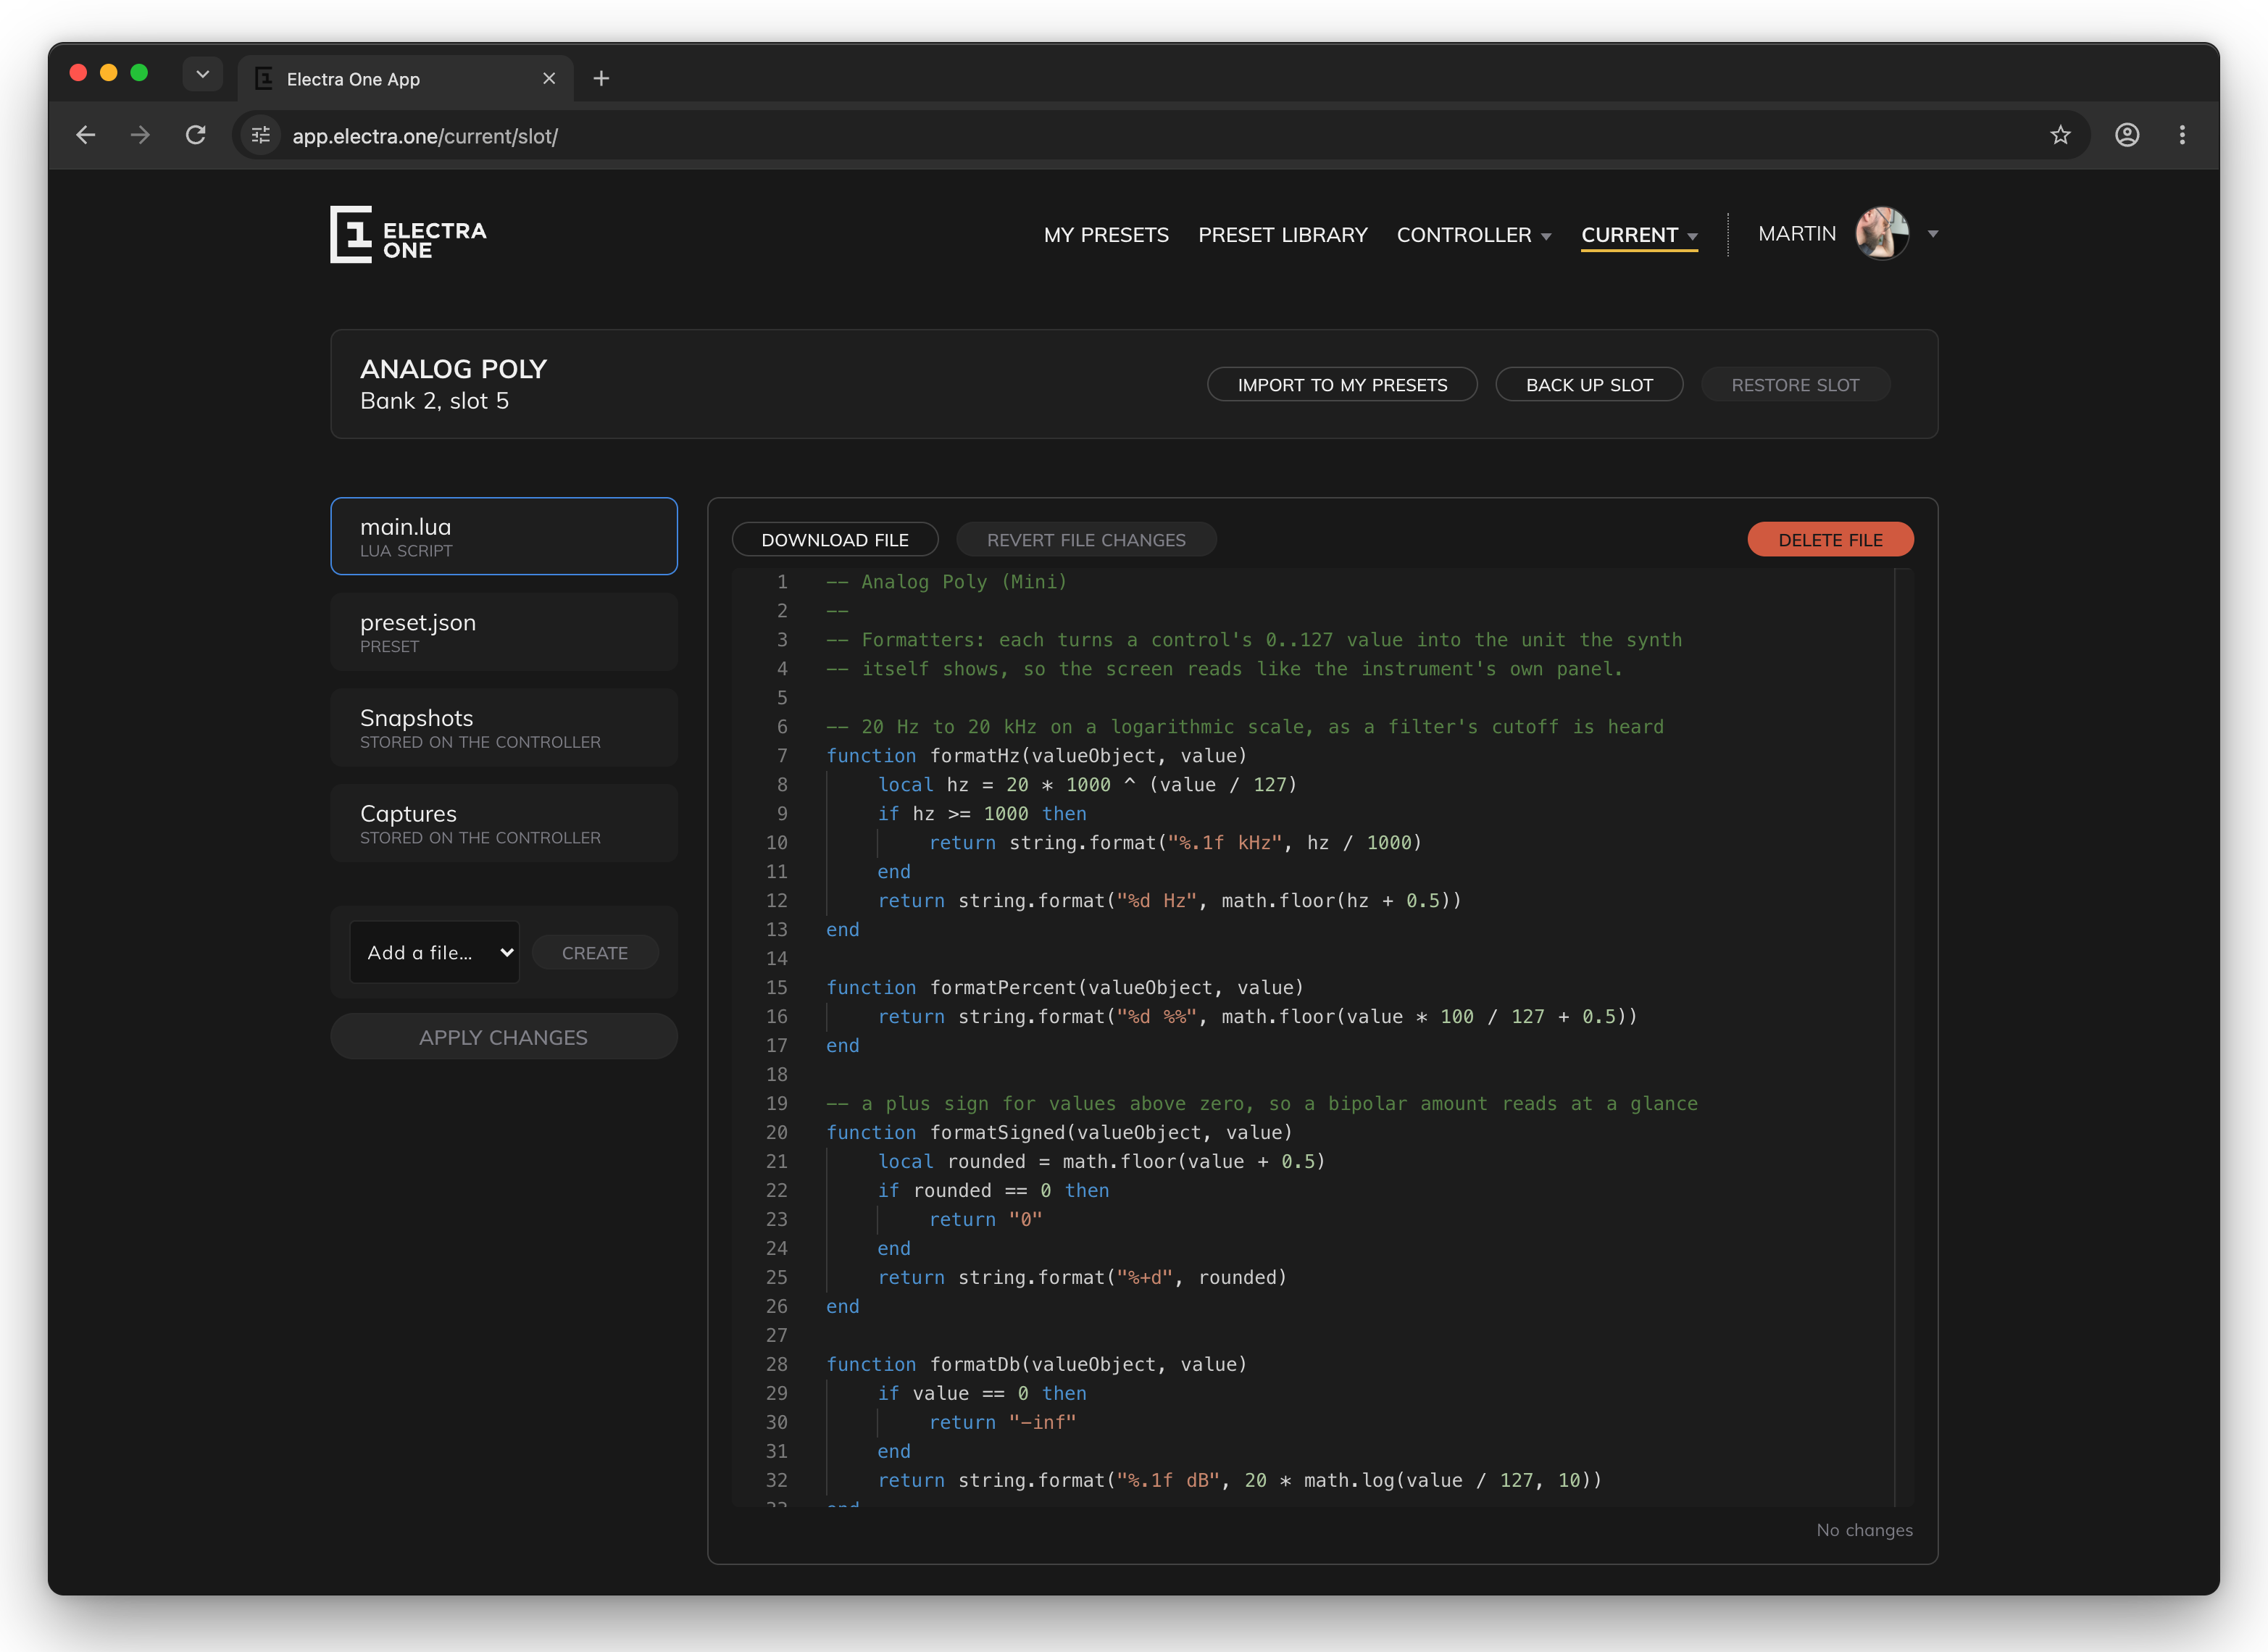
The header names the preset and the slot, and has three buttons:
IMPORT TO MY PRESETScopies the preset from the controller into your library, with its Lua script and router script. Use it for presets you have on the controller but not in your account.BACK UP SLOTdownloads every file of the slot as one backup file (.eslot).RESTORE SLOTwrites a backup file into the slot and loads the preset. It works only on an empty slot, so switch to an empty slot first. A backup restored into another slot or onto another controller of the same model is a copy of the original slot.
The column on the left lists the slot's files, with their type:
| File | What it is |
|---|---|
preset.json | The preset: its pages, controls and devices. |
main.lua | The preset's Lua script. |
router.lua | The preset's router script. |
overrides.json | The device overrides. |
performance.json | The layout of the preset's performance page. |
remoteMap.json | The preset's remote map for remote knobs in static mode. |
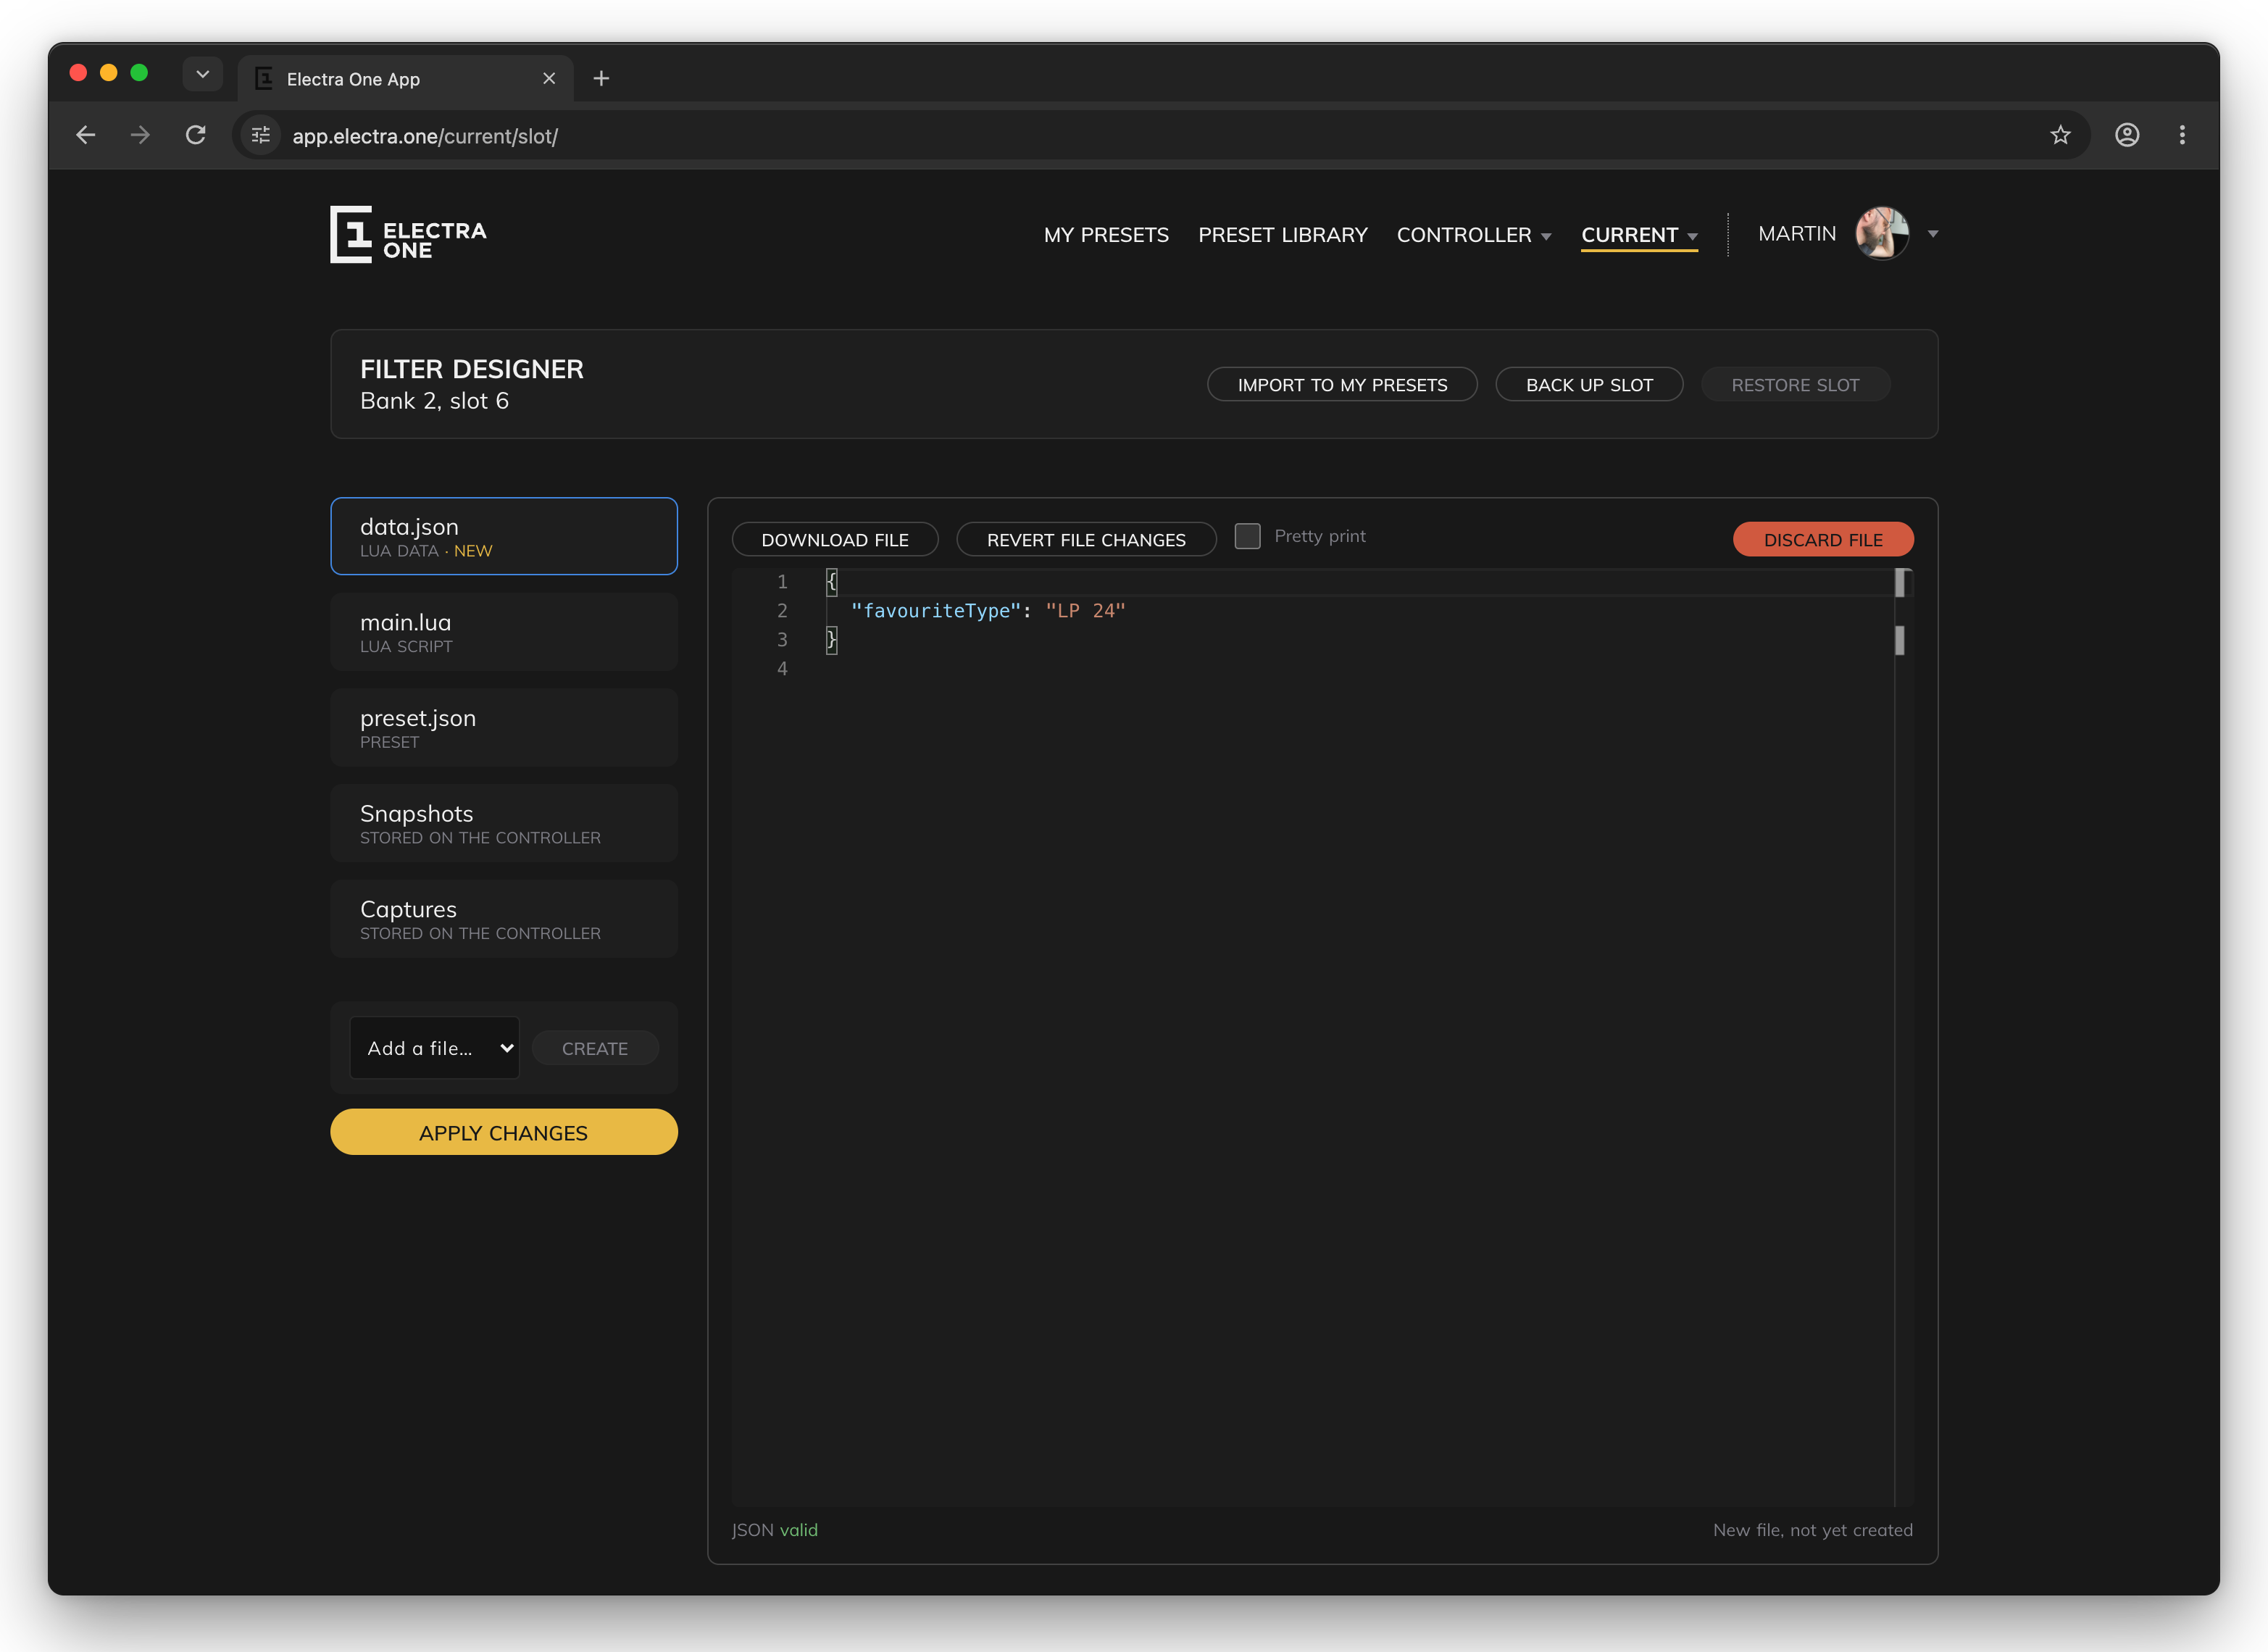
data.json | Data the preset's Lua script has stored. |
Other .lua files | Lua modules the script uses. |
Snapshots and Captures at the bottom of the list open the preset's snapshots and captures.
Editing the files
Click a file to open it in the editor on the right. Above the editor:
DOWNLOAD FILEsaves the file to the computer.REVERT FILE CHANGESforgets your changes to the file.Pretty print(JSON files) lays the file out with indentation.DELETE FILEasks for confirmation and deletes the file from the slot. For a new file that has not been written yet, the button isDISCARD FILE.
The line under the editor says whether a JSON file is valid, and whether the file has changes.
To add a file, choose its type in Add a file… and click CREATE. The list offers only the file types the slot does not have yet. The new file is marked "new" until it is written.
Edited and new files are not written to the controller one by one. APPLY CHANGES writes all of them, then loads the preset again, so you see the result at once. It is not available while a JSON file has an error.
WARNING
The files are what the controller runs. A mistake in preset.json can stop the preset from loading. Back up the slot before editing its files, so you can restore it.
Backing up snapshots and captures
Click Snapshots or Captures in the file list to see all the snapshots or captures the controller has for the preset in this slot. Click a row to open the same detail panel as on the preset page.
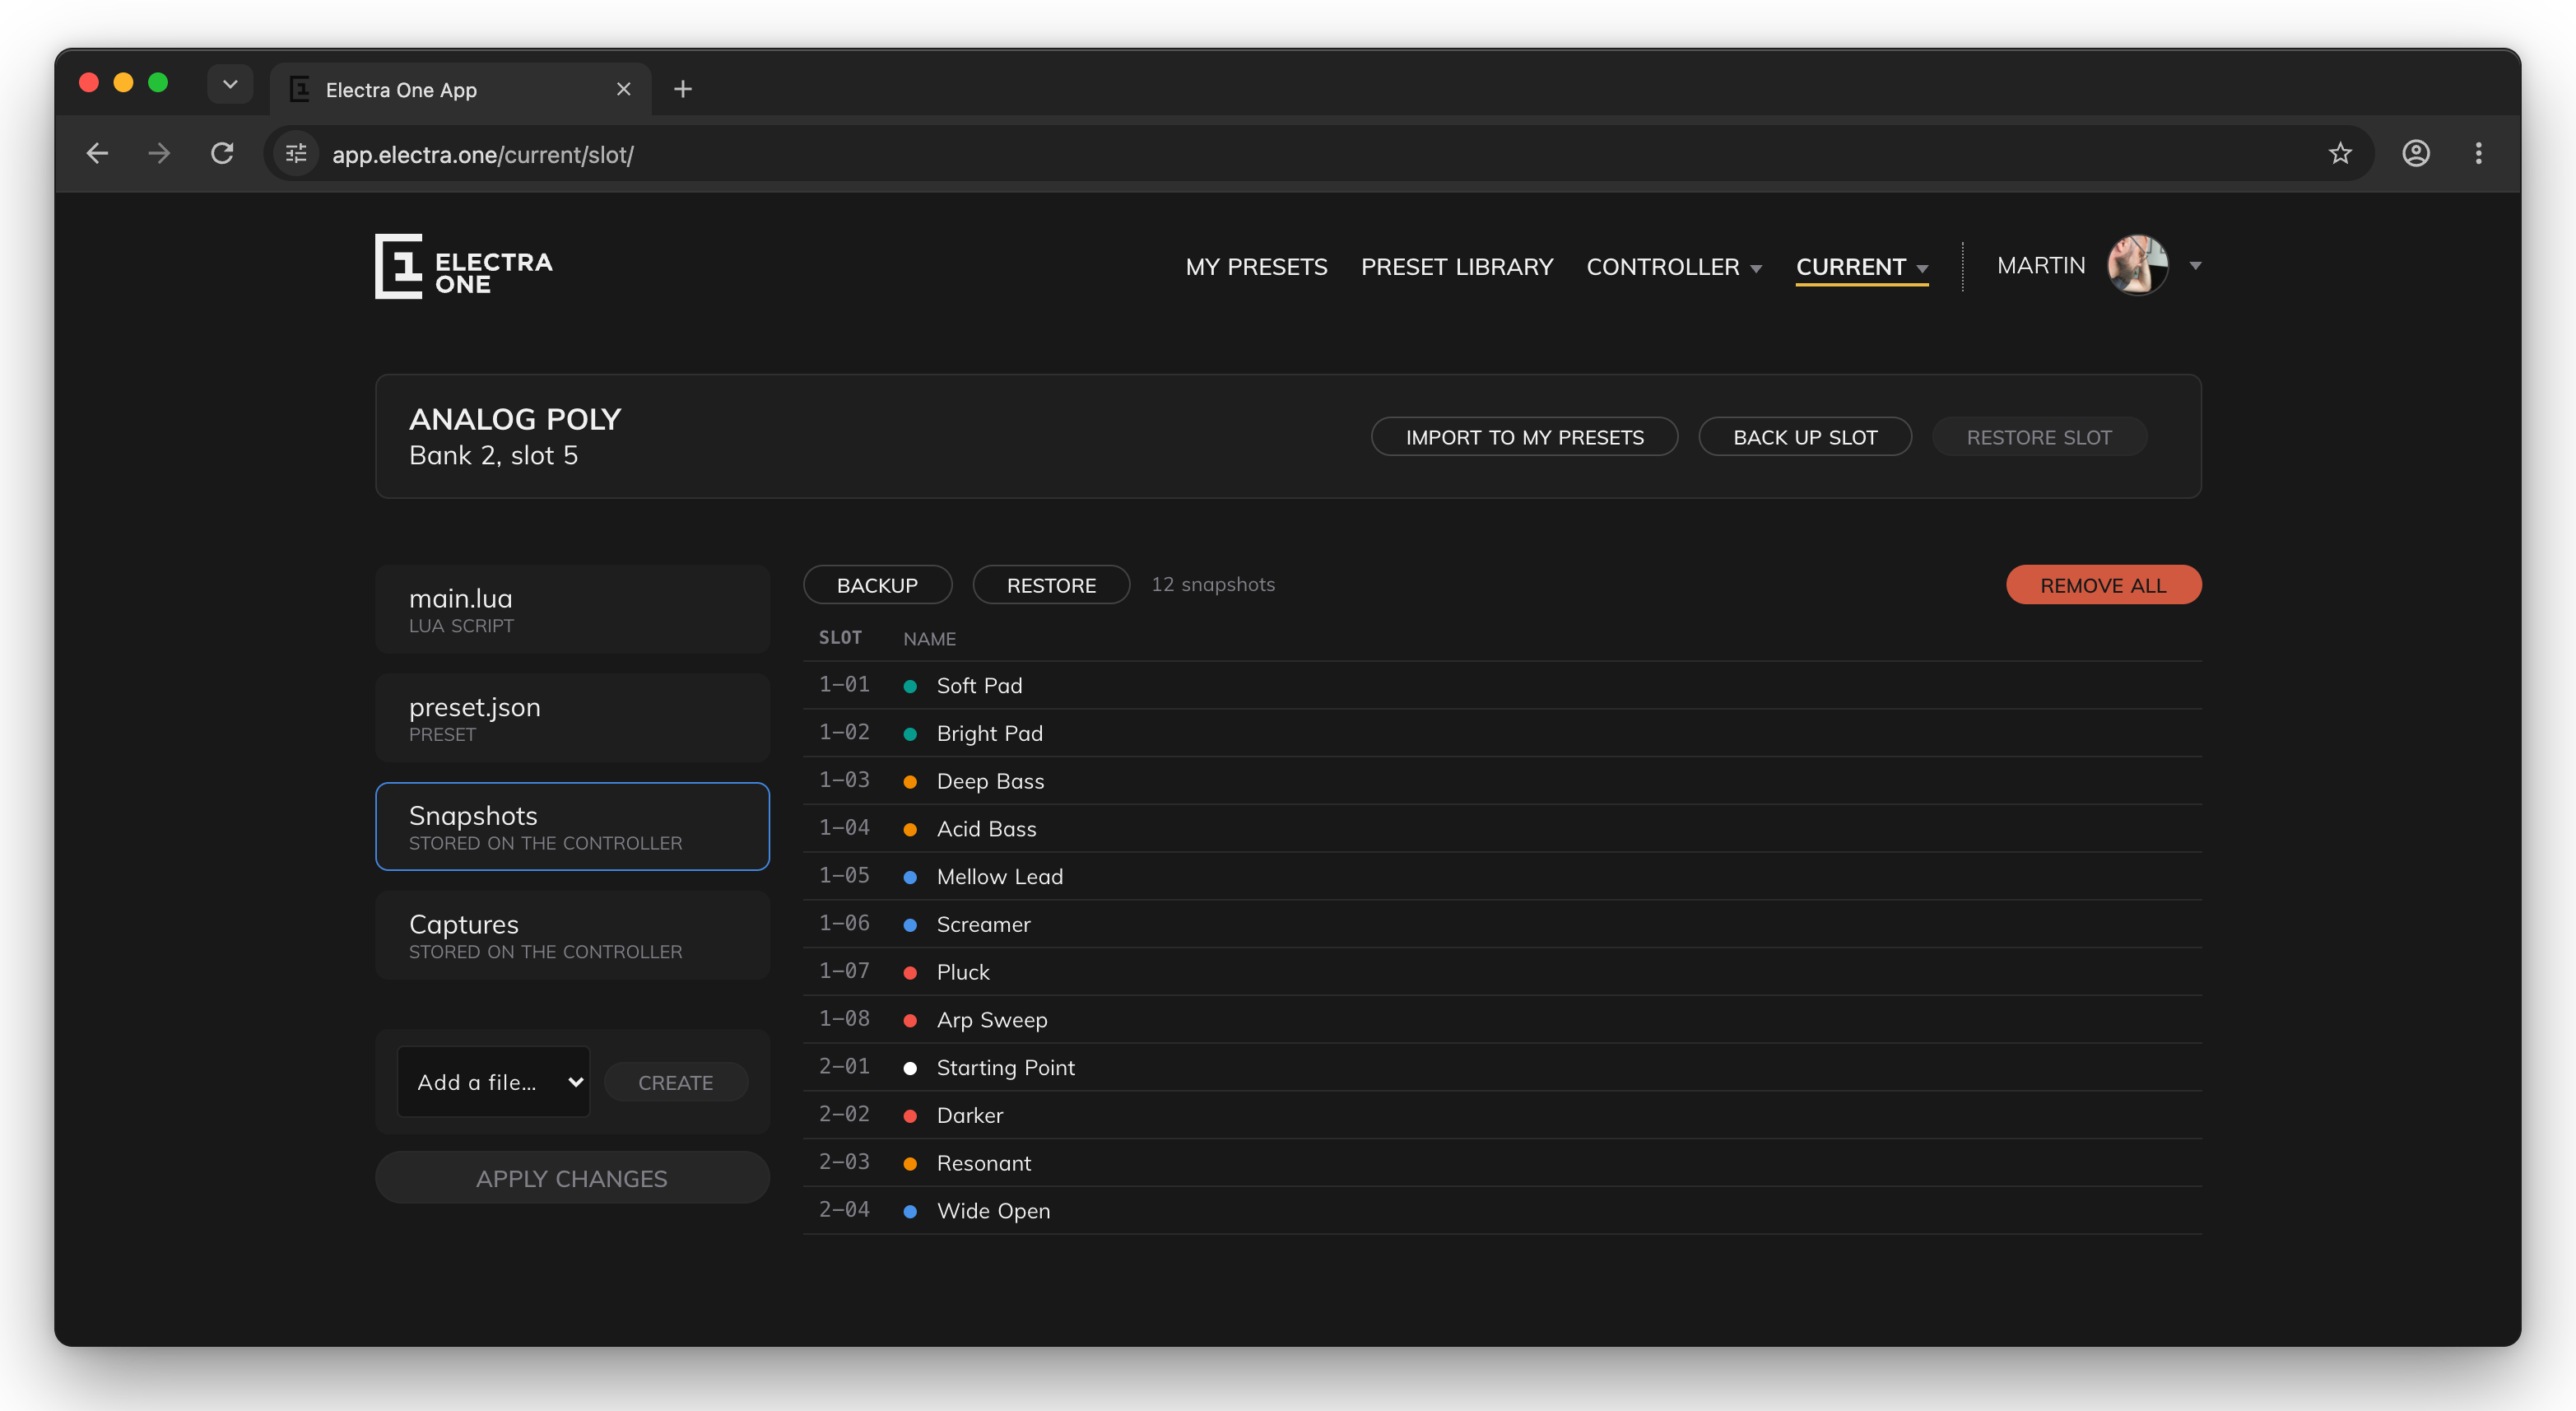
BACKUPdownloads all of them as one file (.esnapsfor snapshots,.ecapturesfor captures).RESTOREwrites the entries of such a file back to the controller. Entries for slots the model does not have, for example a Mk2 bank restored on a Mini, are skipped with a warning.REMOVE ALLasks for confirmation and deletes all the snapshots or captures of the preset from the controller.
A slot backup does not include snapshots and captures. To keep everything of a preset, back up the slot, the snapshots and the captures.
Screenshots
Take screenshot in the controller menu takes a picture of the active controller's screen. A new window opens, and after a few seconds it shows the picture with its size.
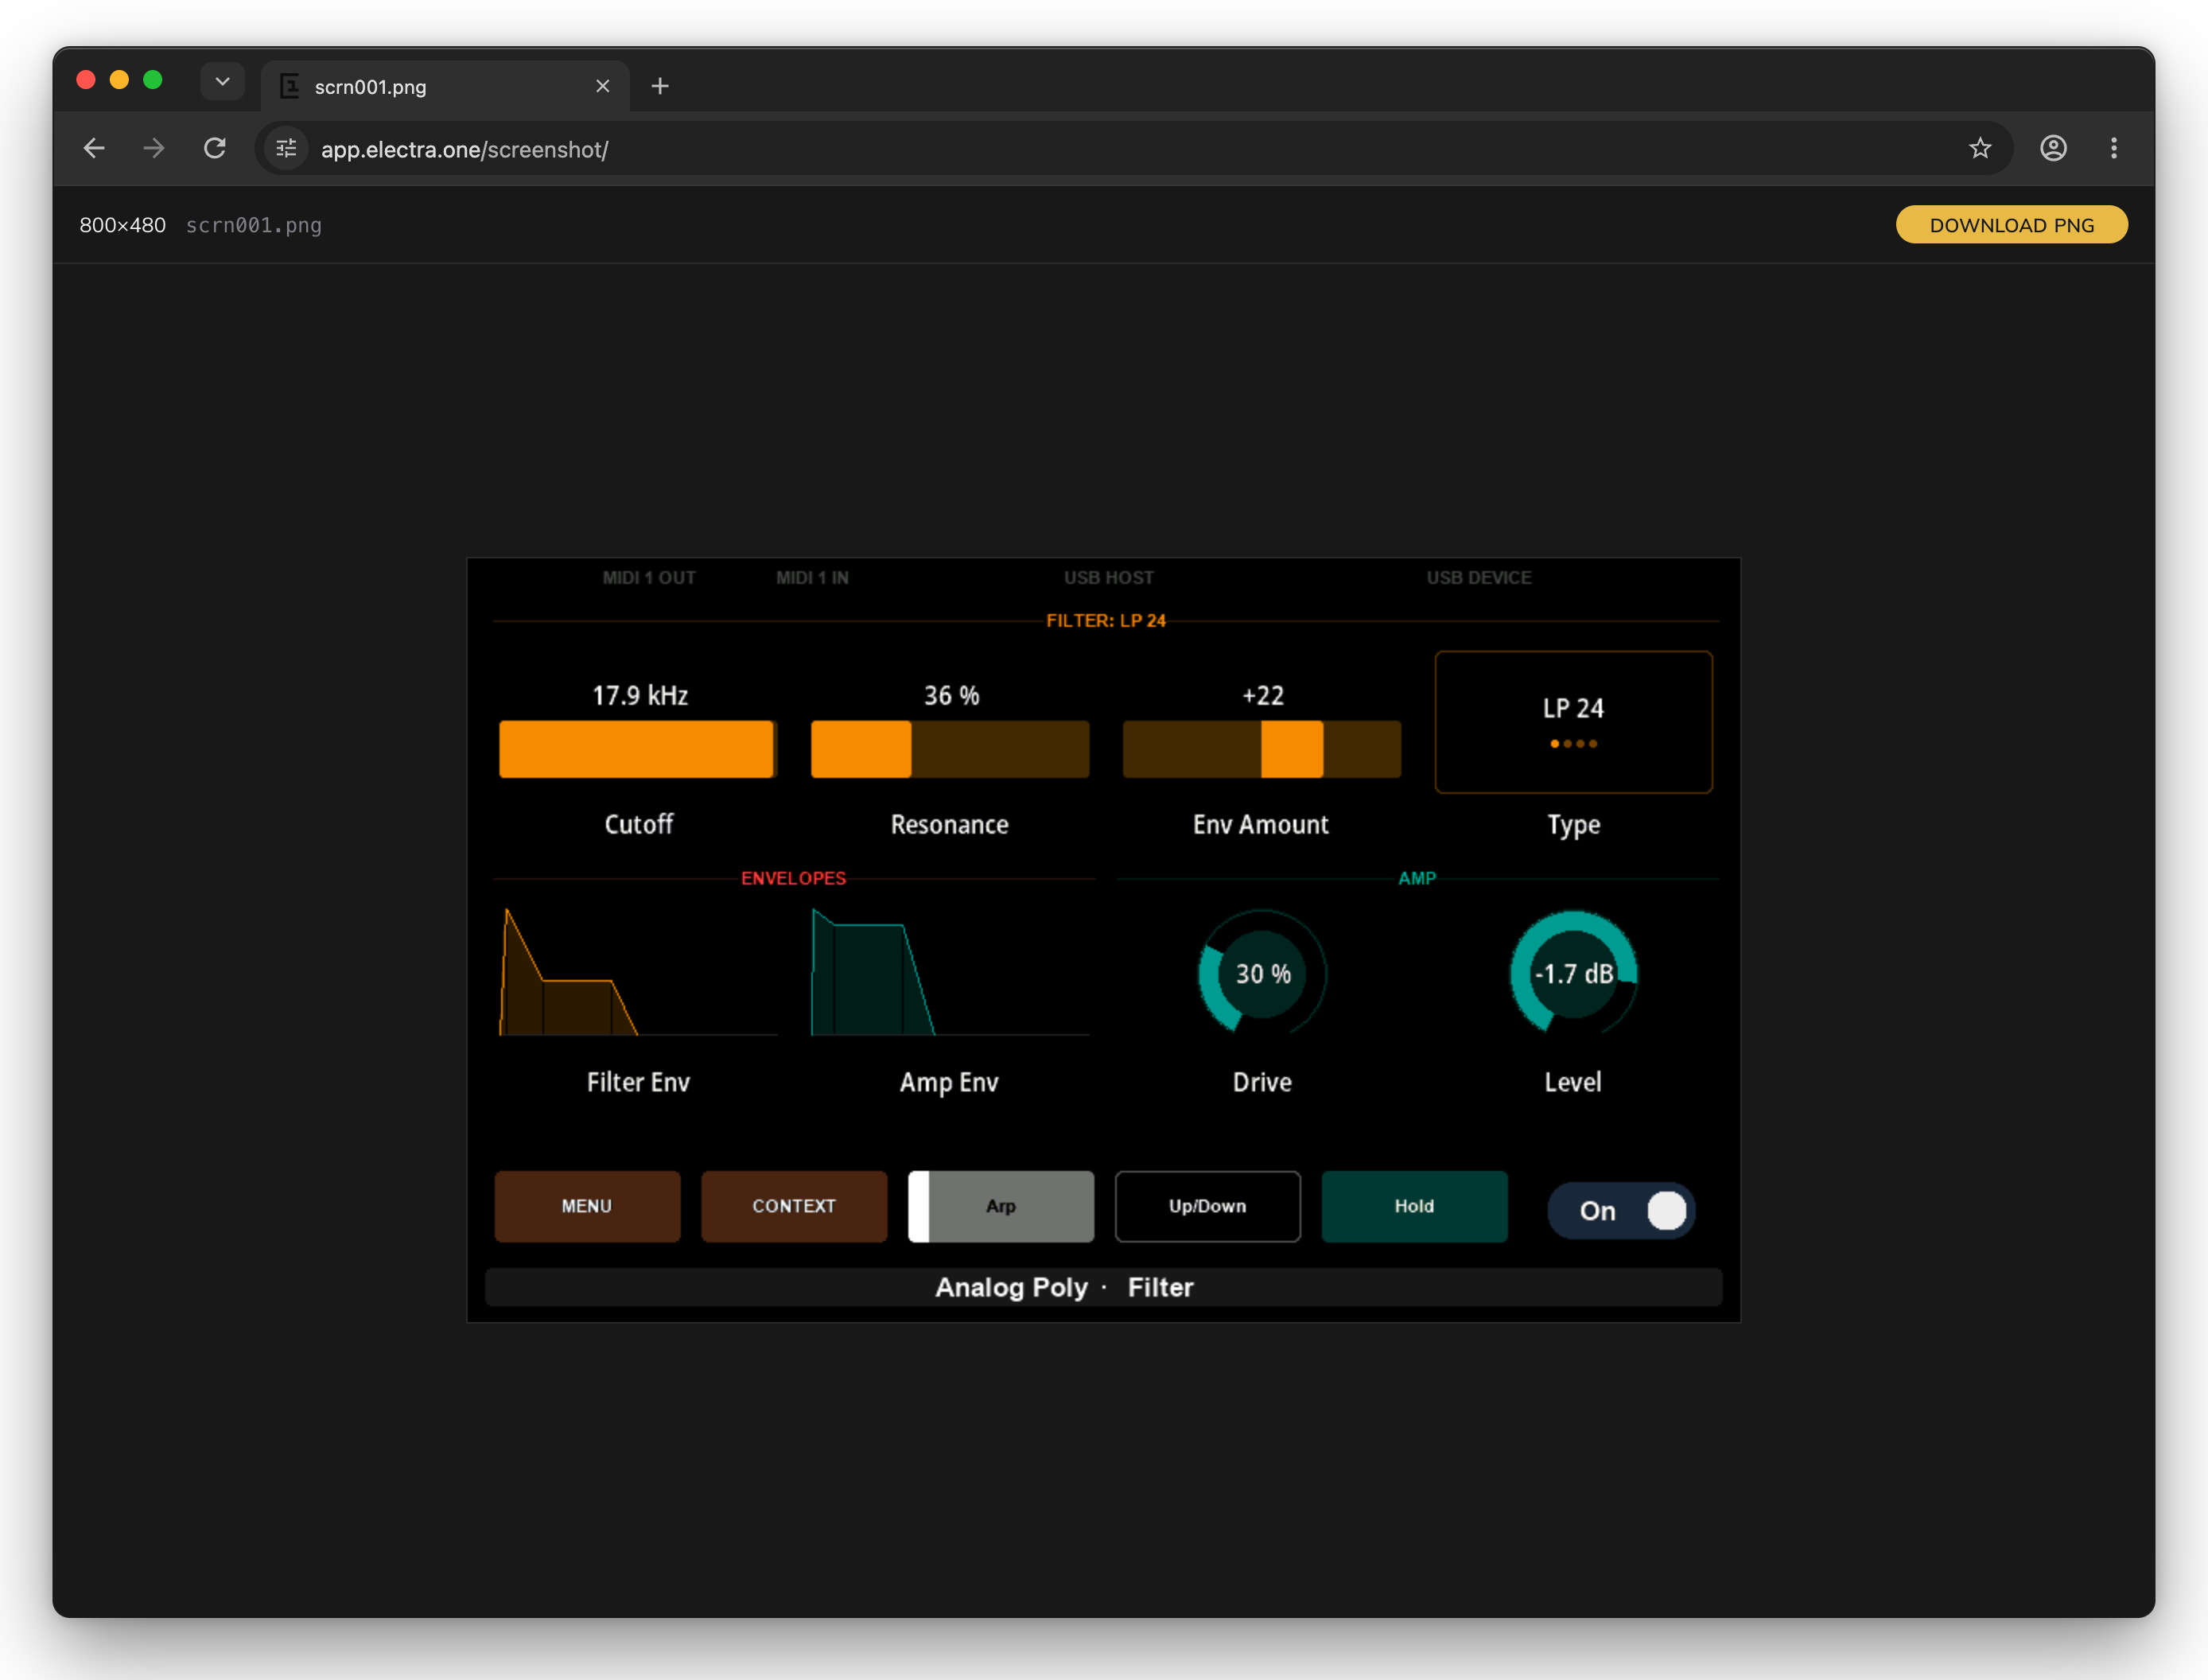
DOWNLOAD PNG saves the picture to the computer. Use screenshots to show a preset to other people, or to document a setup.
A screenshot taken this way is only saved to your computer. To make a picture the preset's picture in the preset lists, use TAKE SCREENSHOT on the preset detail page.
MIDI console
Midi console in the controller menu opens the MIDI console in its own window. It lists the MIDI messages that arrive on the input ports you choose, with the time, the port, the raw bytes and a readable description of each message.
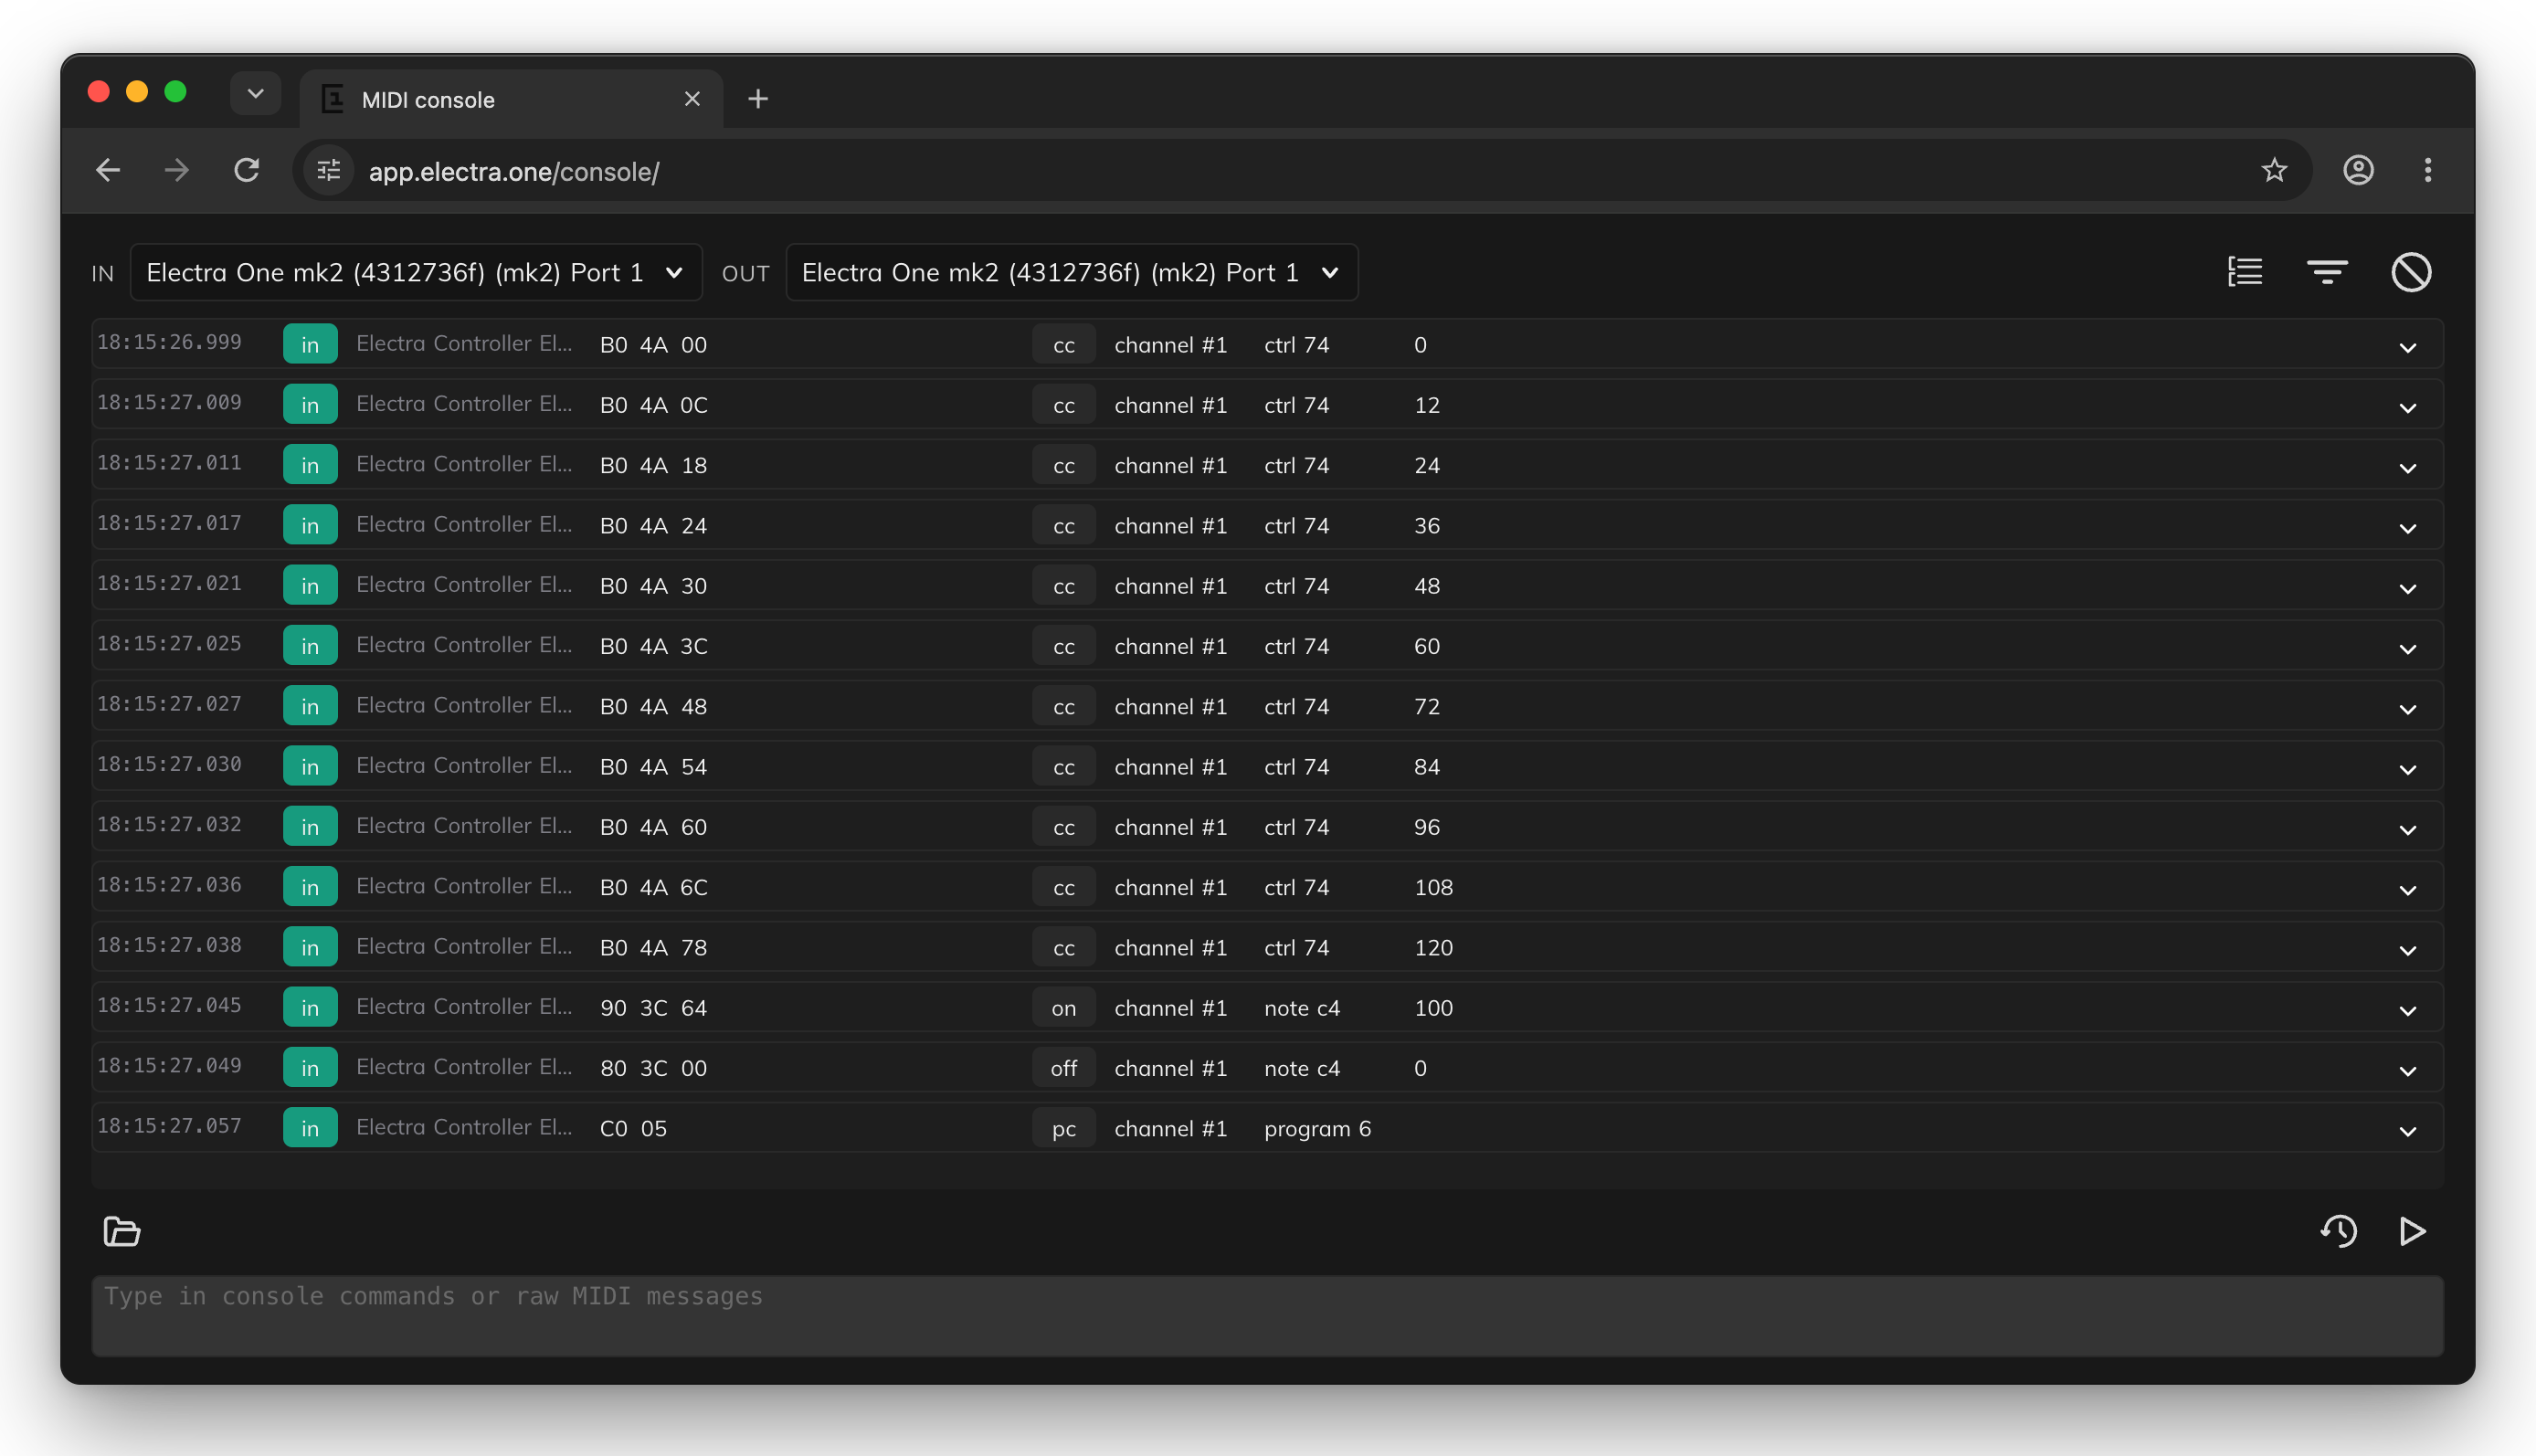
INchooses the input ports to watch,OUTthe output port to send to.- The buttons on the right prepare an export of selected messages, filter the messages and clear the list.
- The field at the bottom sends raw MIDI messages or console commands to the output port.
The console only listens and sends. It does not change which controller the application works with.
Your profile
Click your name in the top bar to open the user menu. The picture next to your name comes from Gravatar, the service that links a picture to an email address.
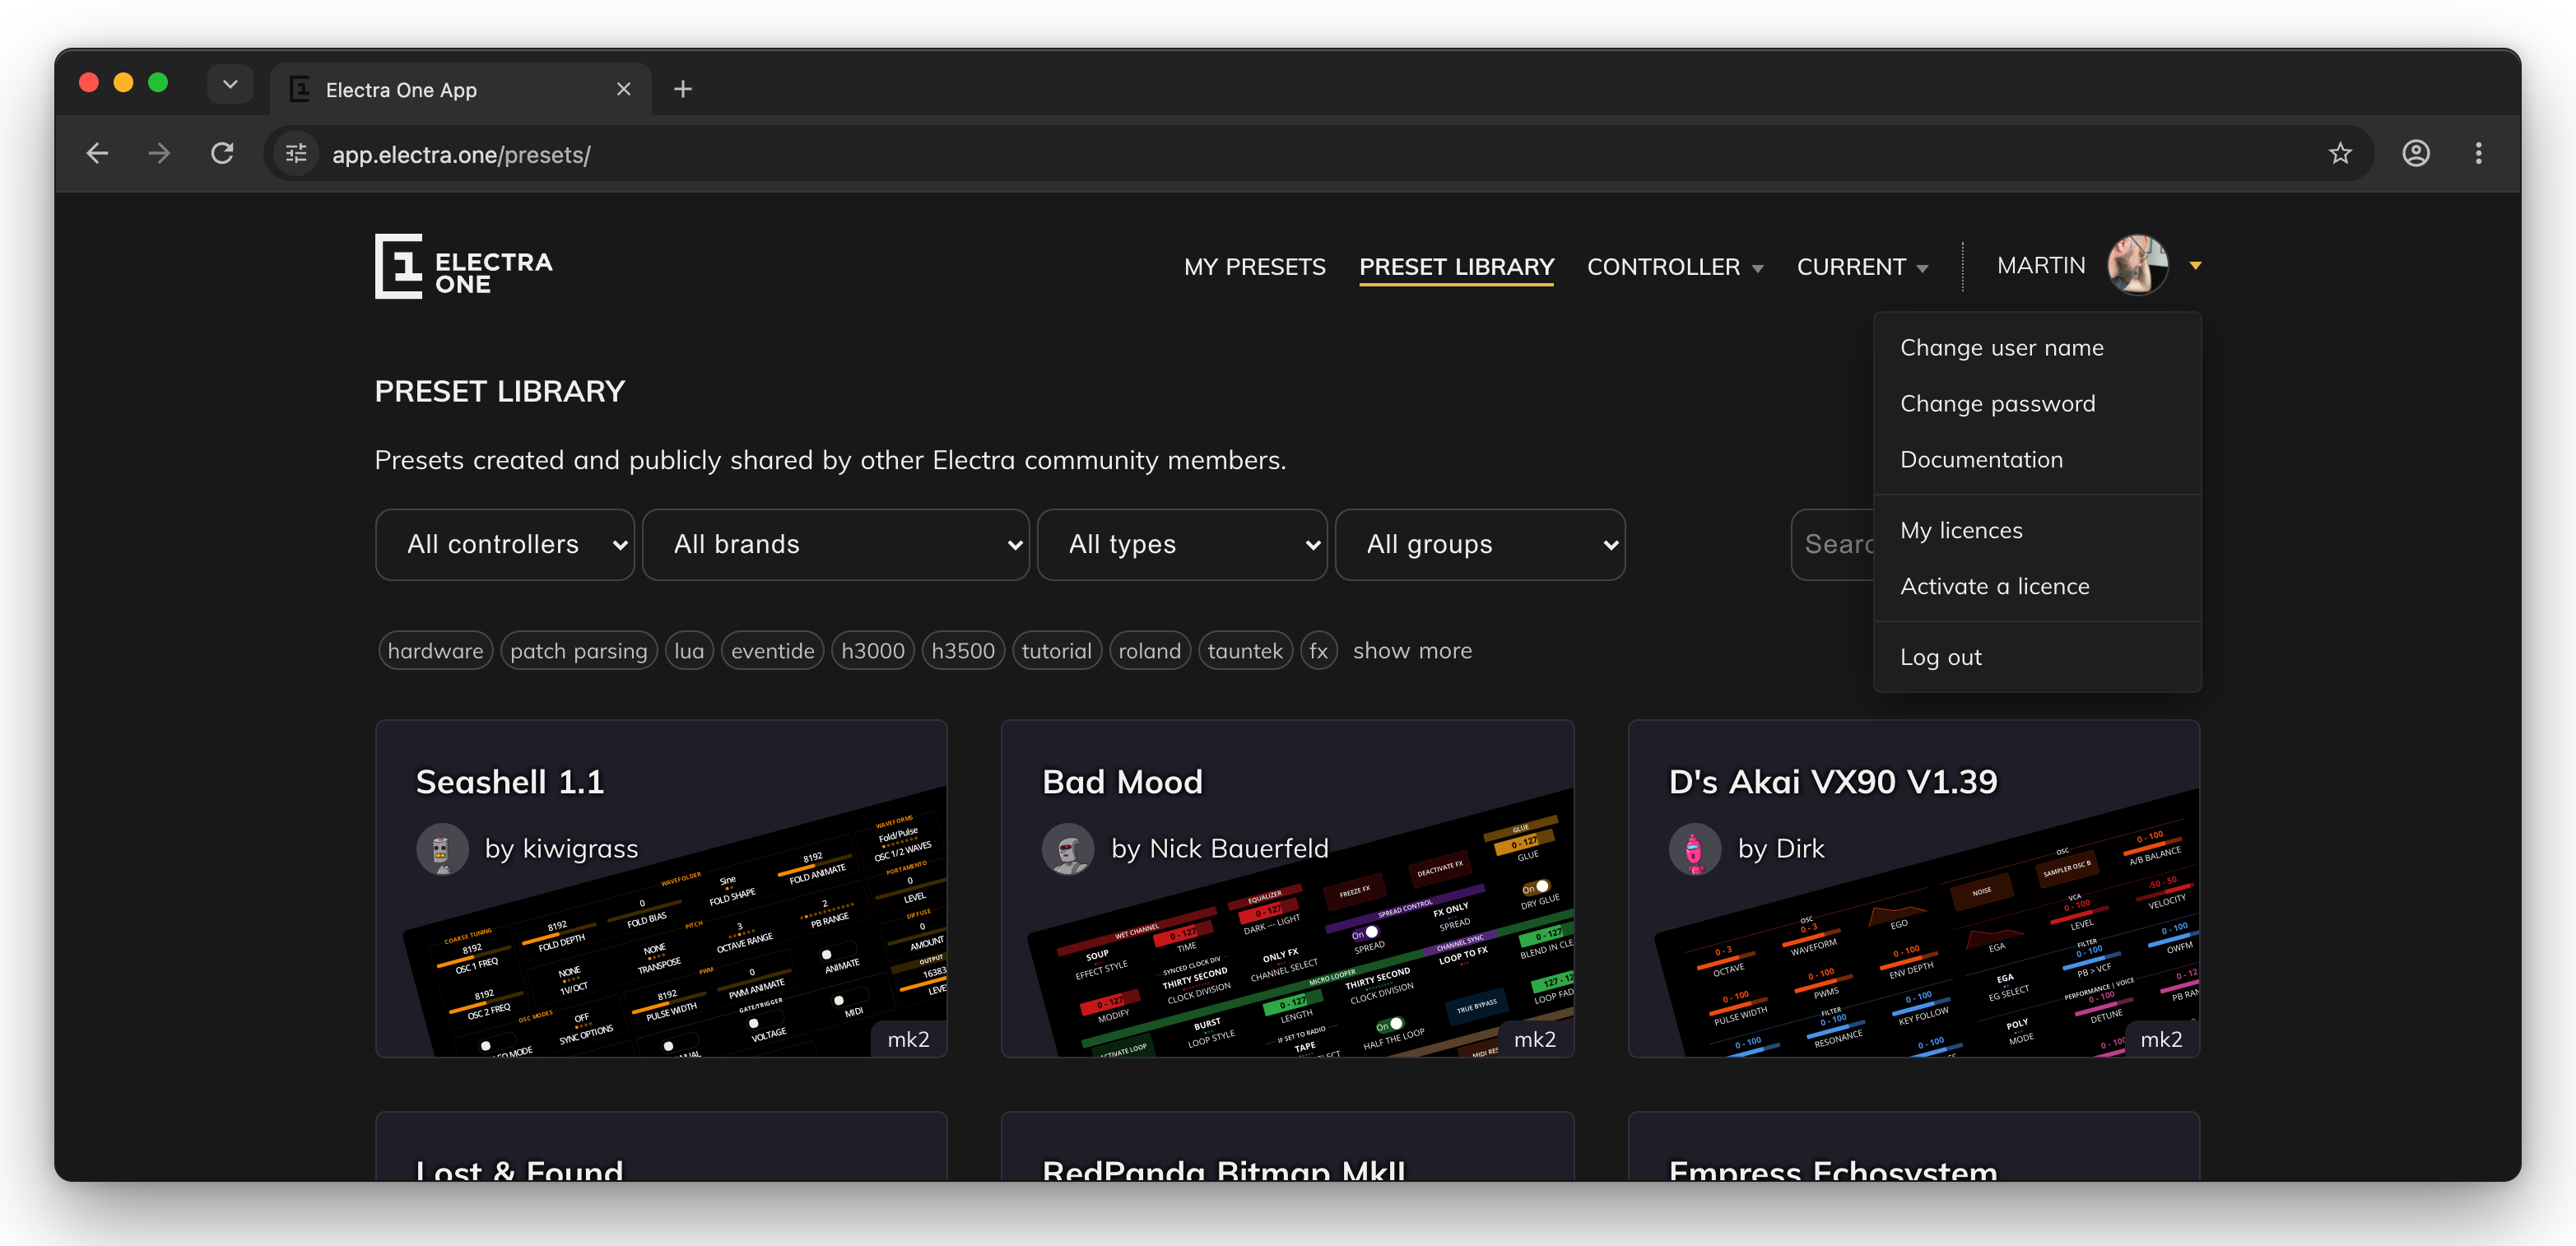
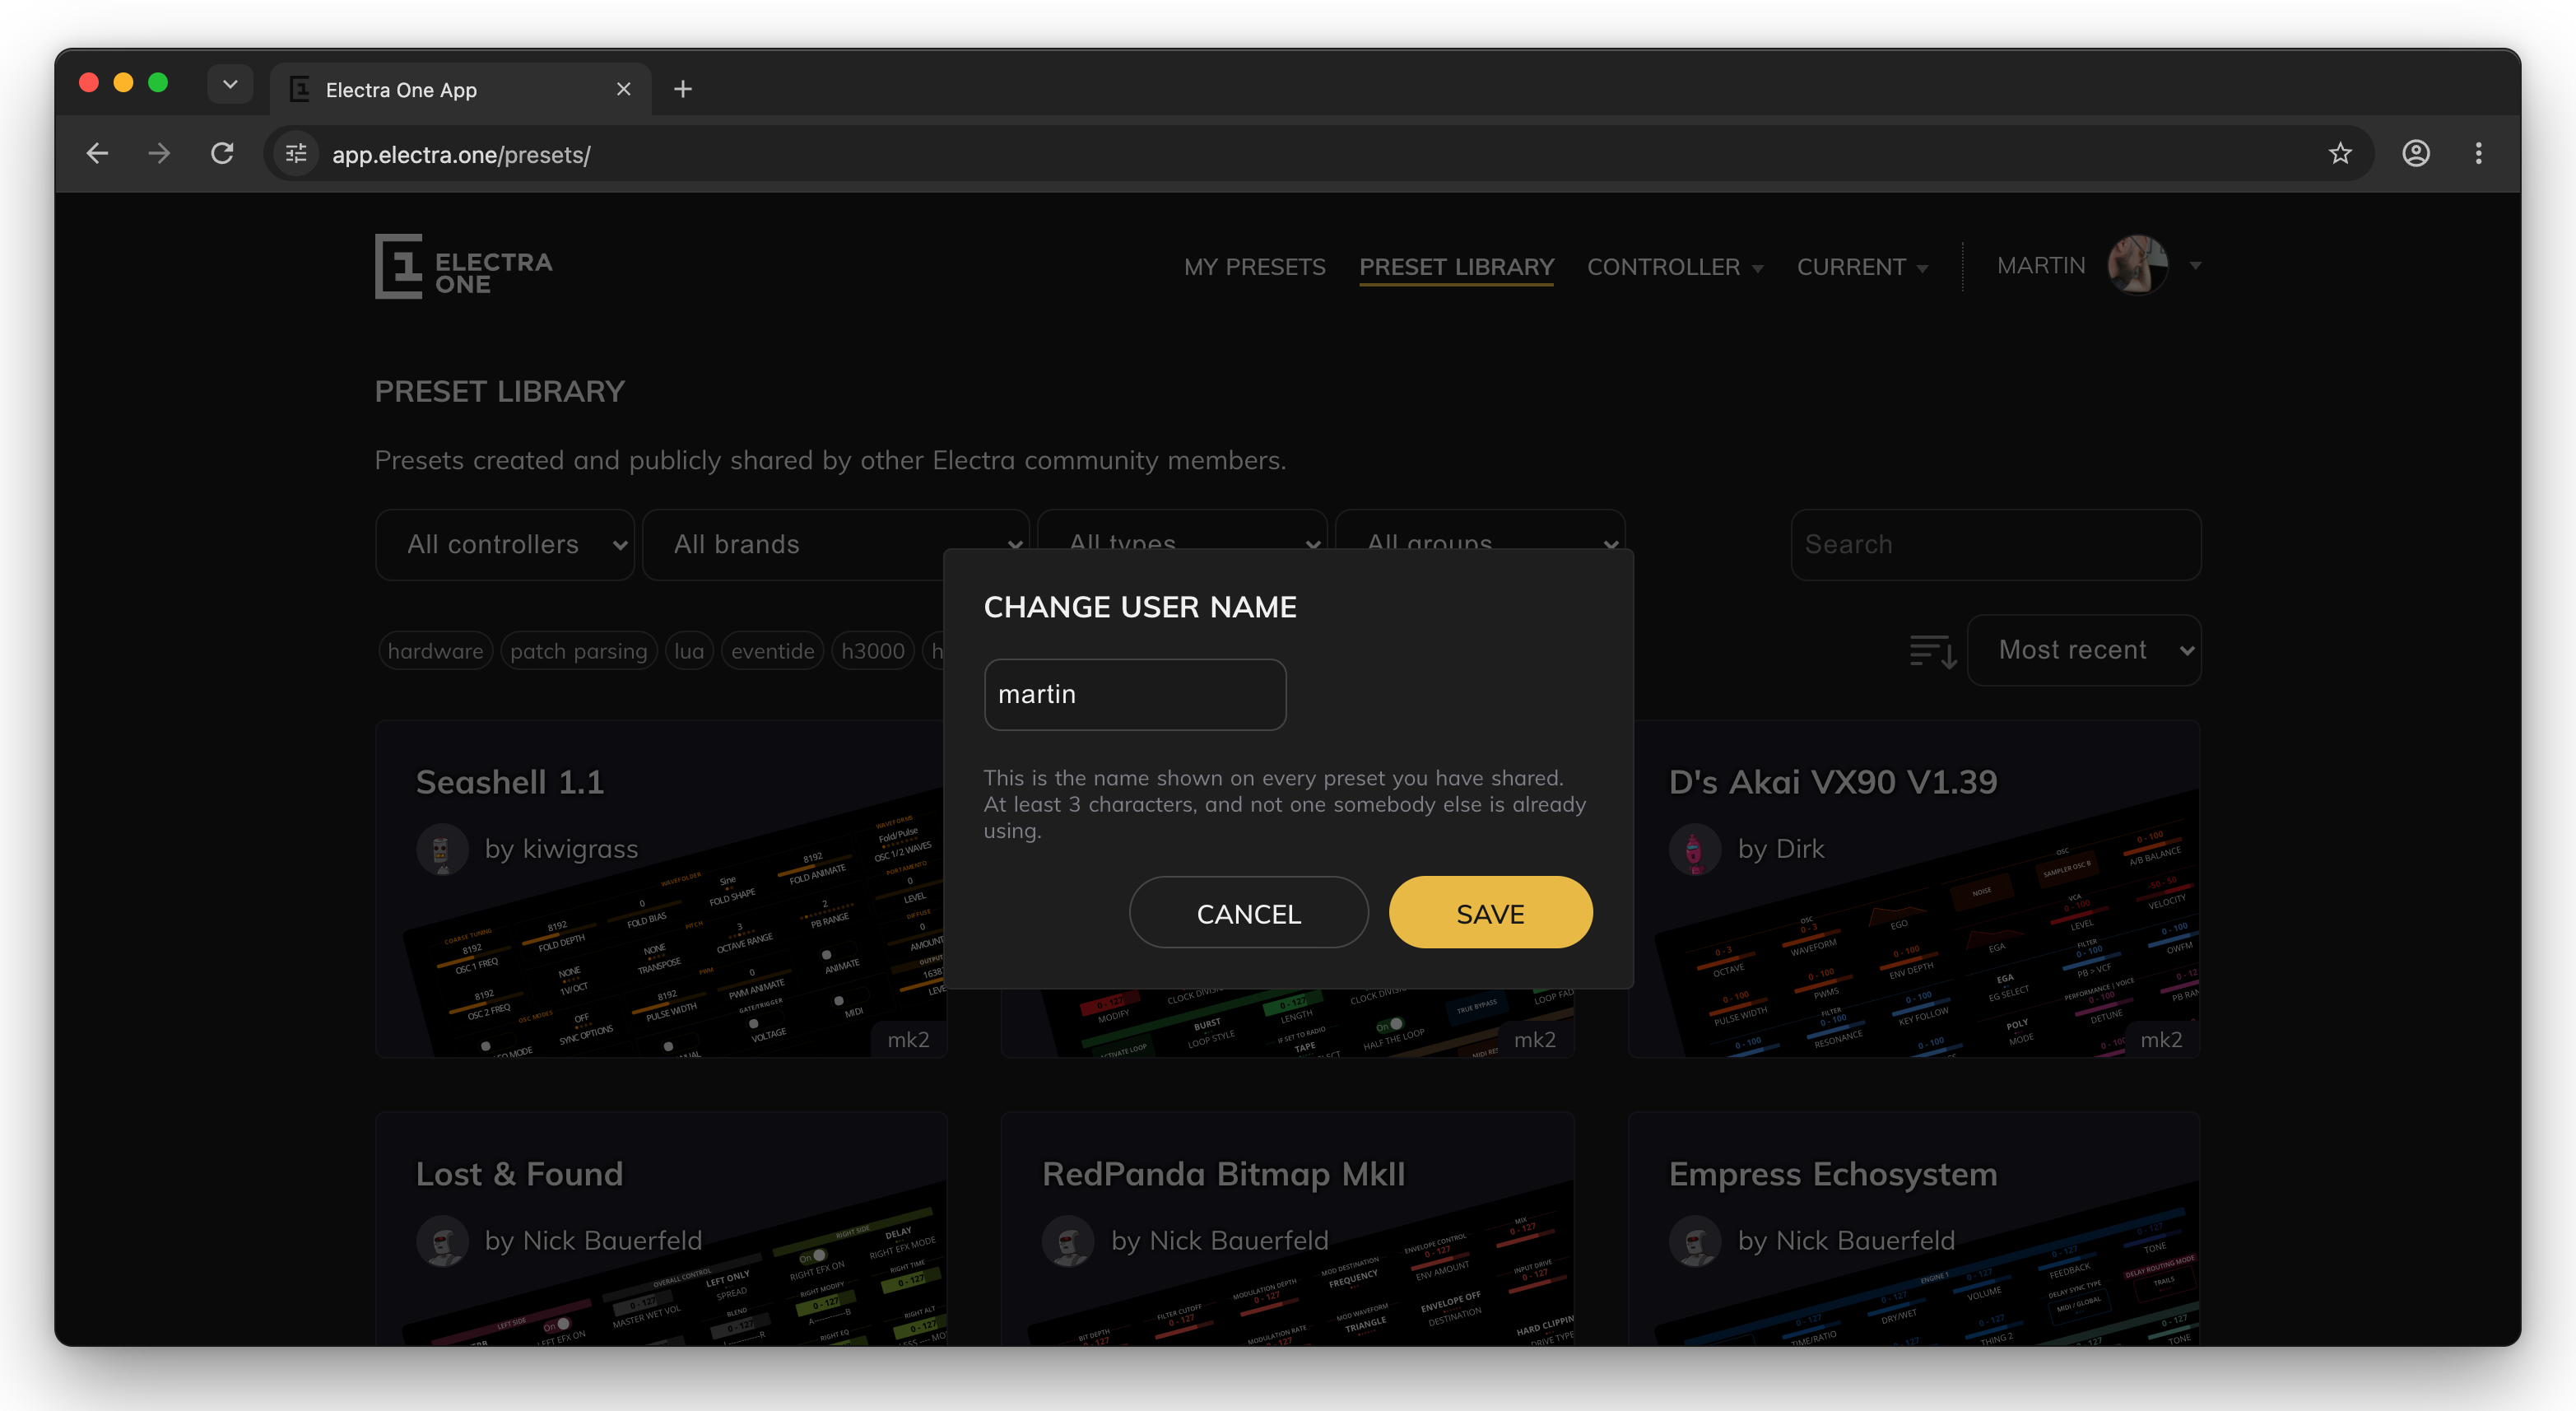
- Change user name. The user name is shown on every preset you share. It must have at least 3 characters, and nobody else may use it already.
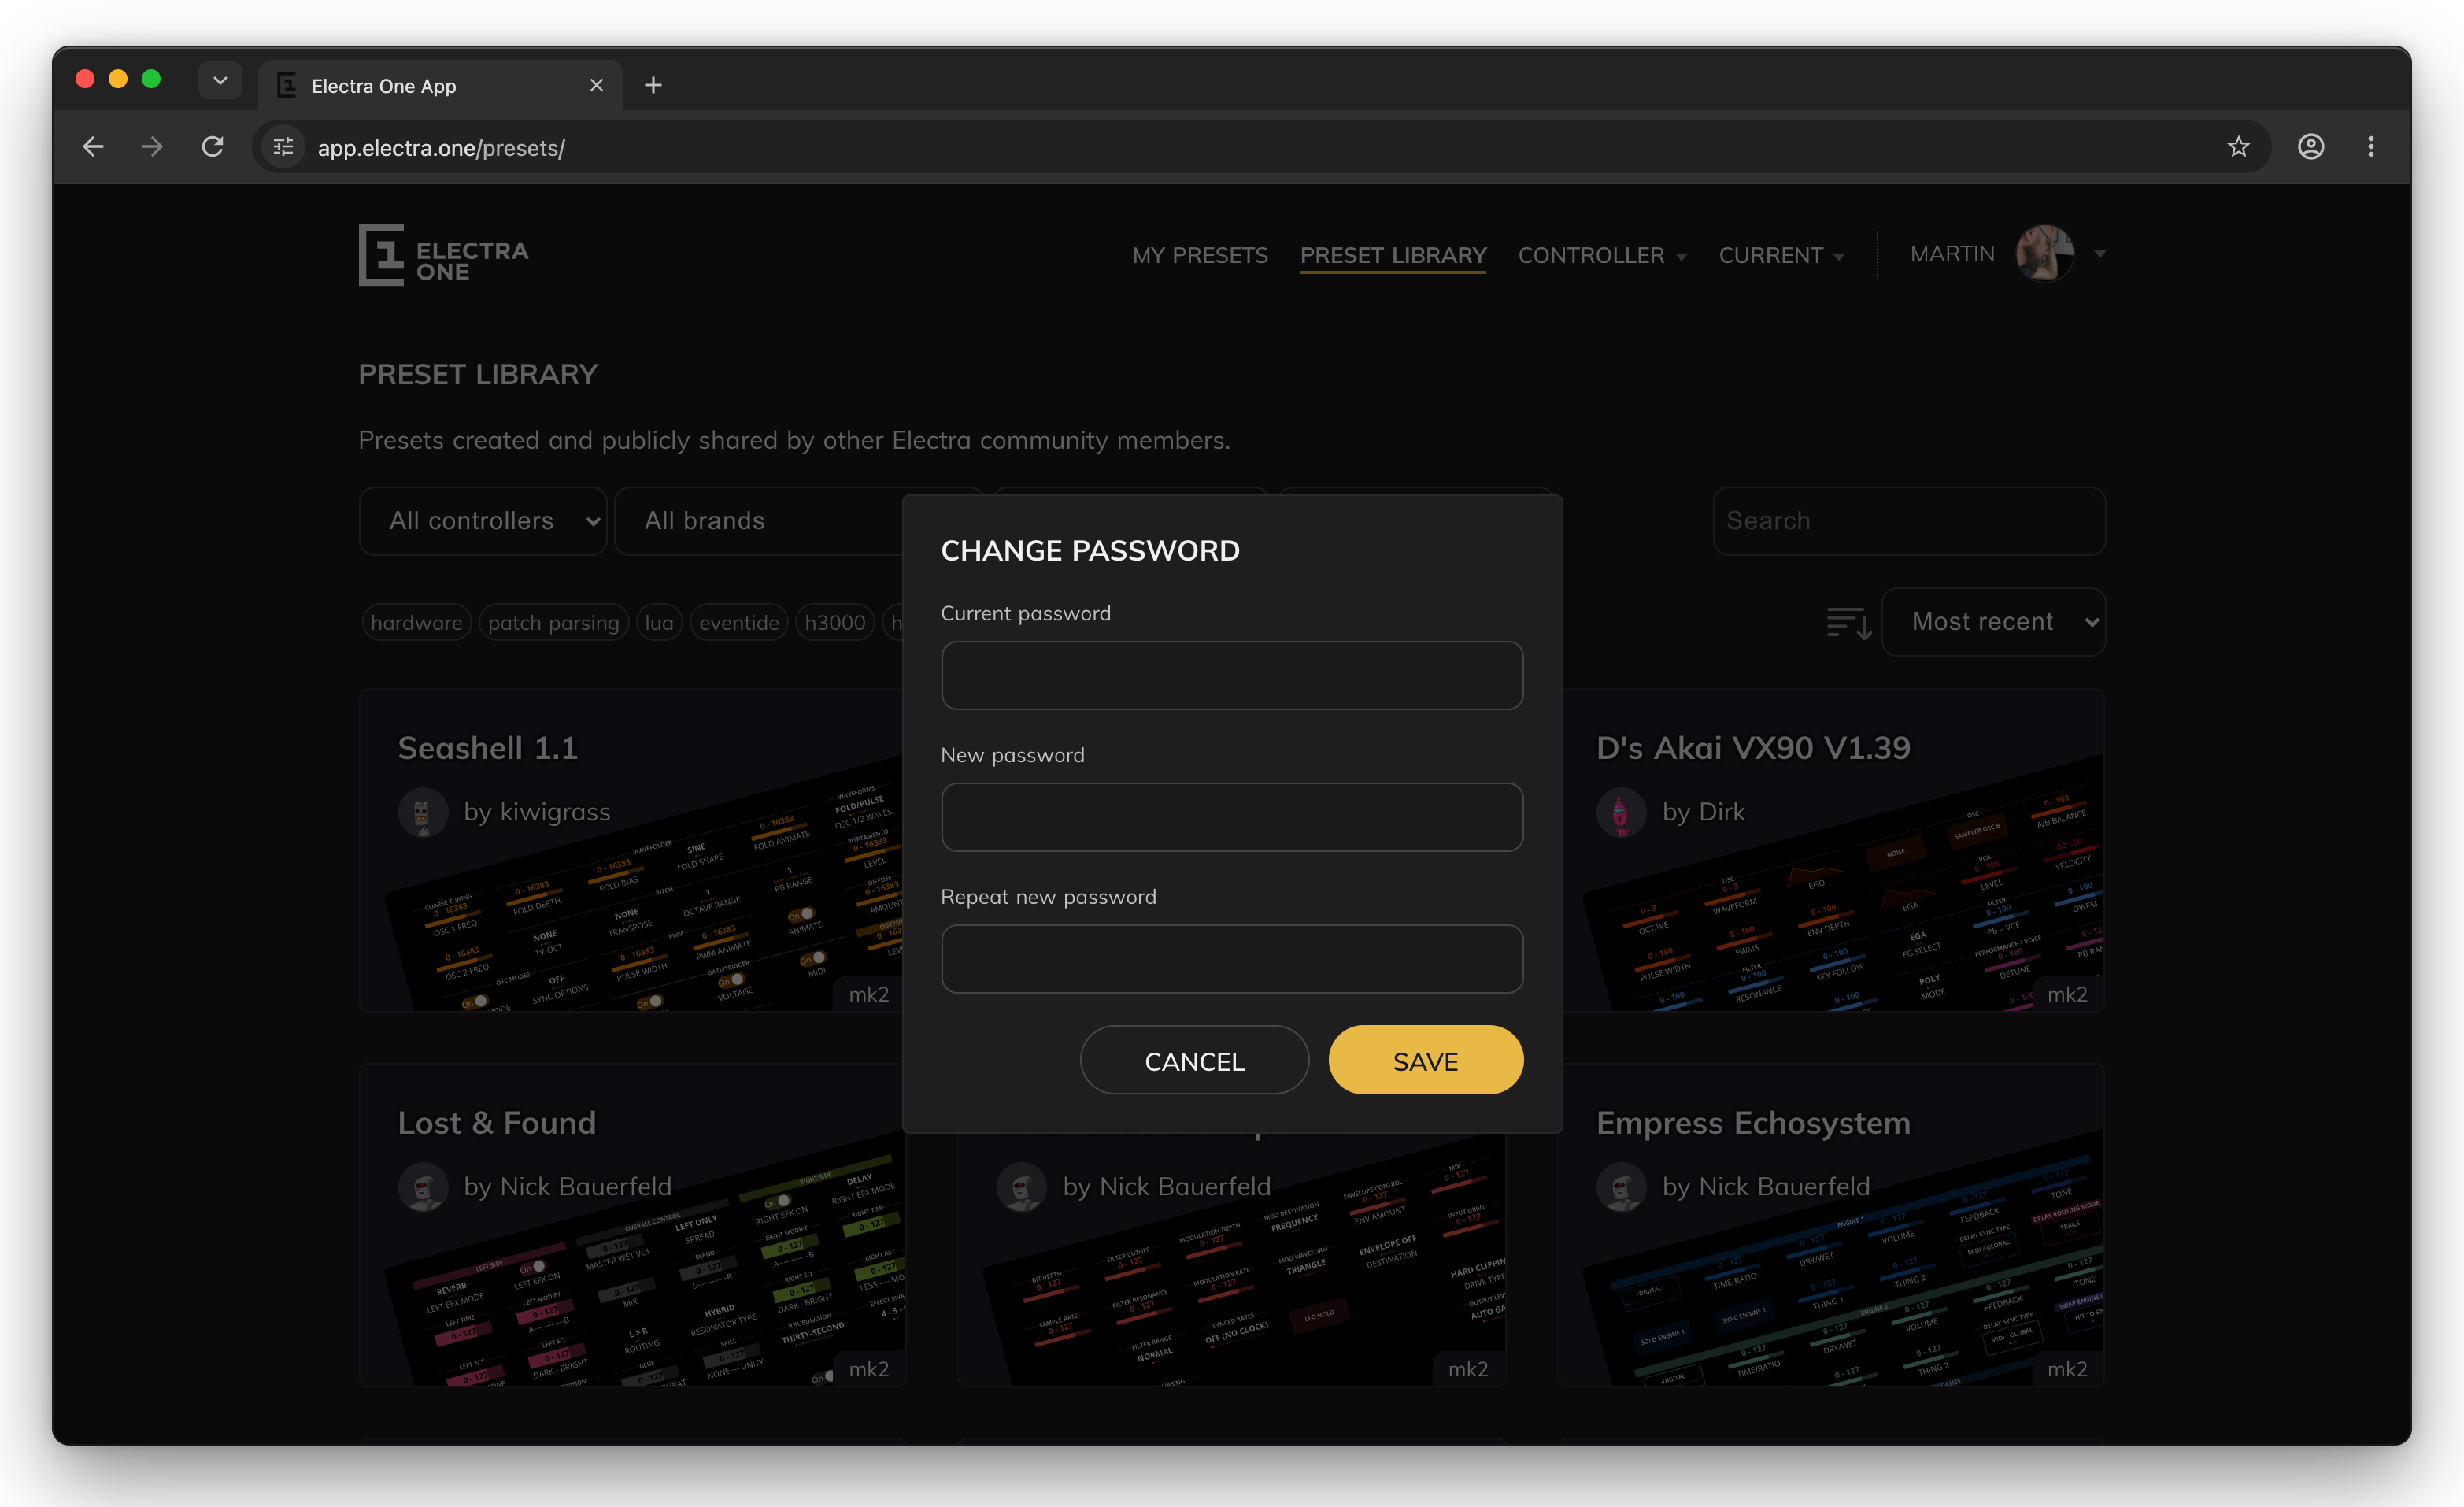
SAVEchanges it, and the author name on all your presets changes with it. - Change password. Enter your current password and the new password twice. The new password needs at least 8 characters, a digit and an upper case letter.
SAVEchanges it. - Documentation. Opens this documentation.
- My licences. Lists your licences for the Electra One app, the desktop version of the editor. For each licence you see the computers it is activated on.
SHOW KEYshows the licence key of a computer, andRELEASEfrees its place so the licence can be used on another computer. - Activate a licence. Activates the Electra One app on a computer with a licence code and the computer's machine code.
- Log out. Signs you out.
The email address of an account cannot be changed in the application. Ask Martin if you reallty want that 😃