

Version5.0.0 beta
Thirty-Two Ways to Wire Six Operators
What you will learn
- What a custom control is: a rectangle on the page that your script draws and your script answers.
- The three callbacks it lives by - paint, pot, and the repaint you have to ask for yourself.
- How to draw with the graphics library, in small functions that each know one shape.
- How to make a drawing follow the instrument, not just the knob.
Introduction
Algorithm has been a dial since Device SysEx Messages, and a dial is the wrong instrument for it. The number it shows means something a number cannot say: which of the DX7's six operators modulate which, and which one feeds back into itself. Thirty-two arrangements, and 17 tells you nothing about any of them.
Every DX7 editor ever written draws them instead, and so can the Electra One. A custom control is a control with no appearance and no behaviour of its own: a rectangle the script fills with whatever it likes, and whose knob does whatever the script says. It is the one place the graphics library may be used, and the only control type that can show something the firmware has no idea how to draw.
This tutorial replaces the Algorithm dial with one. It keeps the same MIDI message underneath, so it still sends what it always sent - and, with one setting changed, it follows the synthesizer as well.
What we will build
The same preset, with the Algorithm dial turned into a diagram.
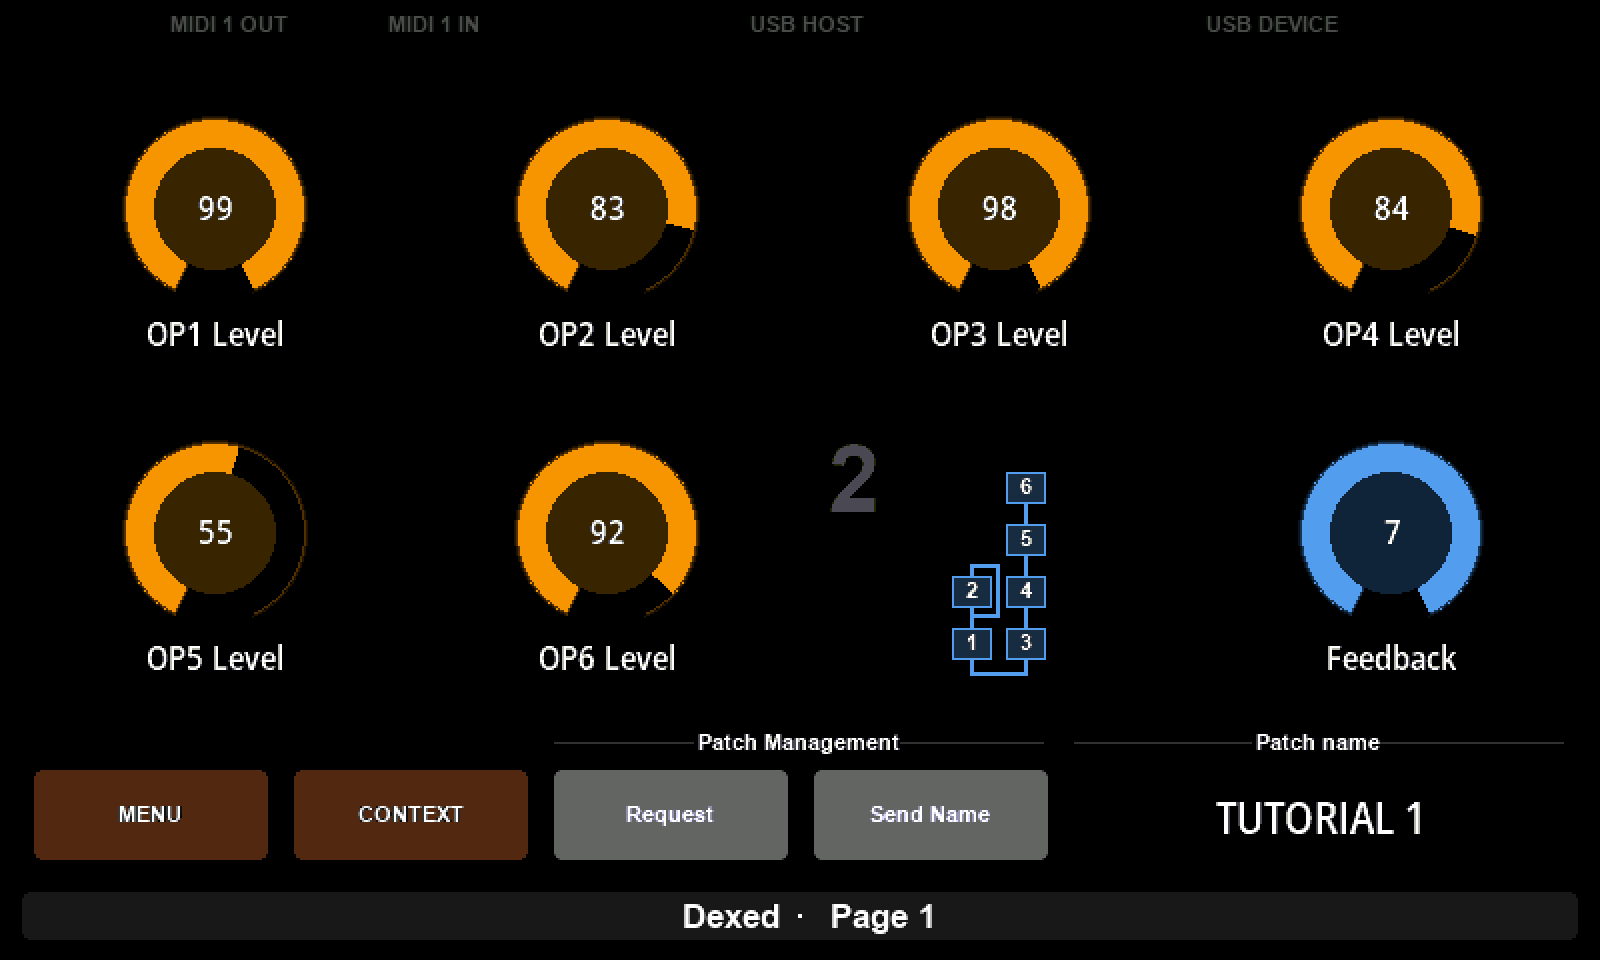
The number stays as a grey watermark in the corner, because it is still worth knowing; the diagram is the point.
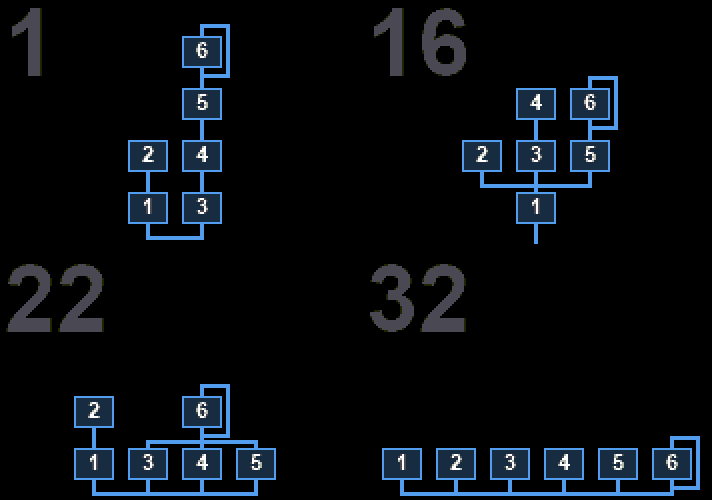
Algorithm 1 is two stacks; 16 is a tree into a single carrier; 22 has one operator modulating three; 32 is six carriers side by side. The one thing they share is the line along the bottom, which is the output.
Gear required
An Electra One controller and the preset editor in Expert mode. The preset from the previous tutorial, and a librarian to send a voice dump with.
- The starting point: the Dexed project
- The finished script: dx7-algorithm.lua
- A voice to send: dx7-tutorial-voice.syx
1. A dial becomes a custom control
Select Algorithm, click Change type at the bottom of the control card, and choose Custom.
Nothing else changes. The control keeps its name, its colour, its slot, its knob and - the part that matters - its value: still parameter 134, still sent through the Voice parameter device message, still 1 to 32 on screen and 0 to 31 on the wire. A custom control is a change of appearance and gestures, not of plumbing.
What you get for that is a blank rectangle. Send to Electra now and the slot is empty, because nothing has told it what to draw yet.
2. The three callbacks
A custom control is driven by functions you hand it, and the concepts behind them are the whole of this tutorial.
The paint callback is called with the control whenever the control is repainted. Inside it, and nowhere else, the graphics library works. Coordinates are the control's own - 0, 0 is its top left corner, wherever it sits on the page - and the rectangle arrives already cleared to black.
It runs on the display thread, not the thread the rest of the script runs on, and while it runs nothing else on the screen is drawn. So it draws, and nothing more: no MIDI, no arithmetic that could have been done earlier.
Coordinates must be whole numbers
Every drawing function except graphics.drawArc refuses a fraction: 10.5 raises an error rather than rounding. Anything computed needs math.floor, or Lua's //, before it is passed in.
The pot callback is called when one of the control's knobs is turned. This is the other half of "no behaviour of its own" - without it the knob does nothing at all. What the turn changes is whatever the callback changes.
And a repaint is something you ask for. Nothing repaints the control when its value changes, because nothing knows what the script drew or what the value has to do with it. control:repaint() is how you say the picture is stale. Half the work in this tutorial is knowing where to call it.
3. The grid the DX7 draws on
The thirty-two algorithms are data, and the data is a layout. Every one of them places six operators on a grid six columns wide and four rows deep, and every operator carries two more facts: what it connects to below it, and whether it has a feedback loop.
That is five numbers per operator, thirty per algorithm:
lua
-- which operator, its column, its row, the link below it, its feedback loop
local ALGORITHMS = {
    { 6,3,0,0,1,  5,3,1,0,0,  4,3,2,0,0,  3,3,3,2,0,  2,2,2,0,0,  1,2,3,1,0 },
    { 6,3,0,0,0,  5,3,1,0,0,  4,3,2,0,0,  3,3,3,2,0,  2,2,2,0,1,  1,2,3,1,0 },
    -- ...thirty more
}
Read the first row as: operator 6 sits in column 3, row 0, draws a line straight down, and has a feedback loop; operator 5 is under it doing the same without the loop; and so on down to operator 1, which joins the output.
The layout is the DX7's own, the one Dexed draws, so a reader who knows the synthesizer recognises it immediately. The whole table is in the script; there is no insight in retyping it.
4. Small functions that each know one shape
The drawing is deliberately broken into pieces that do one thing, because that is what makes it possible to change the size of everything by editing four numbers at the top.
lua
local CELL_W, CELL_H = 27, 26     -- one step of the grid
local BOX_W, BOX_H = 20, 16       -- an operator
local STEM = 10                   -- the middle of a box, across
local LINE = 2                    -- how thick a connection is drawn
Everything else is built from those. Where a box goes:
lua
local function boxLeft(column)
    return originX + column * CELL_W
end

local function boxTop(row)
    return originY + row * CELL_H
end
How a line is drawn - as a filled rectangle rather than drawLine, because a rectangle can be two pixels thick and two of them meet at a corner without leaving a notch:
lua
local function hLine(fromX, toX, y)
    graphics.fillRect(math.min(fromX, toX), y,
                      math.abs(toX - fromX) + LINE, LINE)
end
And an operator, which is the only function that knows what an operator looks like:
lua
local function drawOperator(number, column, row, colour)
    local x, y = boxLeft(column), boxTop(row)

    graphics.setColor(graphics.dim(colour, 0.3))
    graphics.fillRect(x, y, BOX_W, BOX_H)
    graphics.setColor(colour)
    graphics.drawRect(x, y, BOX_W, BOX_H)
    graphics.setColor(WHITE)
    graphics.print(x, y + 2, tostring(number), BOX_W, CENTER, BOLD, SMALL)
end
graphics.dim and graphics.blend are worth knowing: they take the control's own colour and make a family out of it, so a diagram drawn from control:getColor() still looks right when you recolour the control in the editor.
The connections are two more functions of the same shape - drawLink, which knows the seven ways an operator can hand on its output, and drawFeedback, which knows that a loop is a line out of the top, down the side and back in underneath. Both are a if ... elseif over the numbers in the table, and both fit on a screen.
5. Placing it: centred across, sitting on the floor
Most algorithms use three or four of the six columns, so drawing the grid at a fixed position leaves the diagram stranded in a corner. The paint callback works out where to put it instead: it finds which part of the grid this algorithm actually uses, centres that horizontally, and rests the bottom row on the floor of the control.
Bottom, rather than centred, for a reason you can feel: the output line is the one thing every algorithm has in the same place, so pinning it means the diagram does not jump up and down as you turn the knob past algorithms of different heights.
6. The knob
setPotCallback gets the control and an event. Two fields carry the work: event.delta is a step already scaled to the value the knob drives, and event.valueId says which value - which is how a custom control with several knobs tells them apart.
lua
algorithmControl:setPotCallback(function (control, event)
    if event.delta == 0 then
        return                       -- a finger arriving, not a turn
    end

    local value = control:getValue(event.valueId)
    local wanted = value:getValue() + event.delta

    value:setValue(math.max(value:getMin(),
                            math.min(value:getMax(), wanted)))
    control:repaint()
end)
Clamping is yours to do: nothing stops a custom control's value at its own limits, because nothing knows what the limits mean to you.
value:setValue() is the line that sends. It reaches the parameter map as MIDI, exactly as turning a dial would, so the DX7 parameter change goes out through the same Voice parameter message it always did. Turn the knob with the console open and you will see F0 43 10 01 06 xx F7 - the message Device SysEx Messages built.
7. Following the synthesizer
A diagram that only ever shows what you set is half a diagram. Two things make it show what the instrument is playing.
First, the template has to listen. On the Patch tab's Messages sub-tab, set Voice parameter to Send and receive. Now an incoming 43 10 01 06 xx finds the algorithm value and writes it.
Second, something has to ask for the repaint, because a value changing does not repaint a custom control:
lua
function parameterMap.onChange(valueObjects, origin)
    for _, value in ipairs(valueObjects) do
        if value:getControl():getId() == ALGORITHM then
            algorithmControl:repaint()
        end
    end
end
parameterMap.onChange runs whenever anything in the parameter map changes, whatever moved it - a knob, a script, an arriving message, a patch dump - and hands over the values that change touched. Checking the id keeps the repaint to the one control that cares.
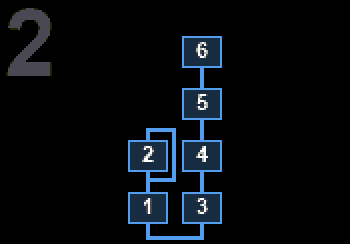
Send a voice dump at the controller and the diagram redraws itself. The picture above is algorithm 2 arriving that way - note the feedback loop on operator 2, where algorithm 1 has it on operator 6. Nothing was turned; the drawing simply followed the sound.
What to remember
- A custom control has no appearance and no behaviour of its own. It is a rectangle your script draws and gestures your script answers.
- The paint callback is the only place
graphicsworks, its coordinates are the control's own, and it runs on the display thread - so it draws and does nothing else. - Coordinates must be whole numbers. A computed one needs
//ormath.floor. - Repaints are asked for, never automatic.
control:repaint()after anything that changes the picture. - The pot callback is what makes the knob do anything, and clamping the value is yours to do.
value:setValue()sends, exactly as a dial would. parameterMap.onChangeis how a drawing follows the instrument, once the template is set to receive.- Changing a control's type keeps its value and its message. The plumbing survives; only the face changes.